
Windows updates have always been a notorious nuisance for many users since the days of Windows XP. Thankfully, the delivery of Windows updates has improved drastically in the past few years and very few feature updates tend to cause major issues nowadays.
You can configure Windows to download and update in the background automatically and even have it restart during your inactive hours. All this is great but what if an update is installed that you did not need? Or what if you get an update that degrades the performance of your machine? Well, in this case, you can uninstall Windows updates in Windows 11. But here are a couple of things that you should keep in mind before uninstalling updates from your Windows 11 PC.
Related: How to Disable Updates on Windows 11
Why uninstall Windows updates?
There could be multiple reasons why you wish to uninstall Windows updates, here are some of the most common ones. If you are troubleshooting errors after a recent Windows update, then you can also go through this list.
In case you are facing any such issues on your system, you can try uninstalling the latest Windows update to try and fix your issue.
- Degraded overall system performance
- Faulty driver updates
- Broken functionality of Windows features
- Mis-managed resources in the background
- High CPU or Disk usage
- Unwanted driver update that you were trying to avoid
- Misbehaving Windows Security or UAC
- Incorrect region settings that can not be changed
- Missing settings or options within Windows 11
and more. There can be tons of issues that you can face when installing a new update for Windows 11 especially if you are subscribed to the beta or insider channel. In such cases, you can try and uninstall the concerned update using the guide in this post.
Related: How to Cancel a Pending Windows Insider Update
Is it safe to uninstall Windows updates?
Yes, as long as you aren’t force-removing Windows updates manually or using an outdated utility, you should be safe uninstalling Windows updates from your system. However, you should keep in mind that Microsoft uses Windows updates to deliver security patches, hotfixes, and more to help protect your system against the latest threats and security vulnerabilities.
Removing Windows updates will also uninstall such patches which in turn will end up making your system vulnerable to online threats. This is especially the case if you are looking to uninstall recent security updates.
Hence, while you are safe to uninstall any update, it is recommended you revert your changes as soon as the error is fixed. If your bug or error is persistent after reinstalling the update then you can hold out until a subsequent update and fix is released by Microsoft.
Related: How to Remove Bing From Windows 11
How to find the updates you want to remove
We can remove updates using various methods but to find which update you wish to remove, you need to identify it on your PC. Each Microsoft update is assigned a KB number which helps determine and identify the update on consumer PCs as well as Microsoft’s servers. We can use this number to our advantage and remove the concerned update from your system using one of the guides below. Here’s how you can identify recent Windows updates installed on your PC.
Method #01: Using Settings
Press Windows + i on your keyboard and select ‘Windows update’ on your left.

Click on ‘Update history’ now.
You will now get a list of recently installed Windows updates on your system.

Simply note down the KB number of the update you wish to remove from your PC.
Method #02: Using CMD
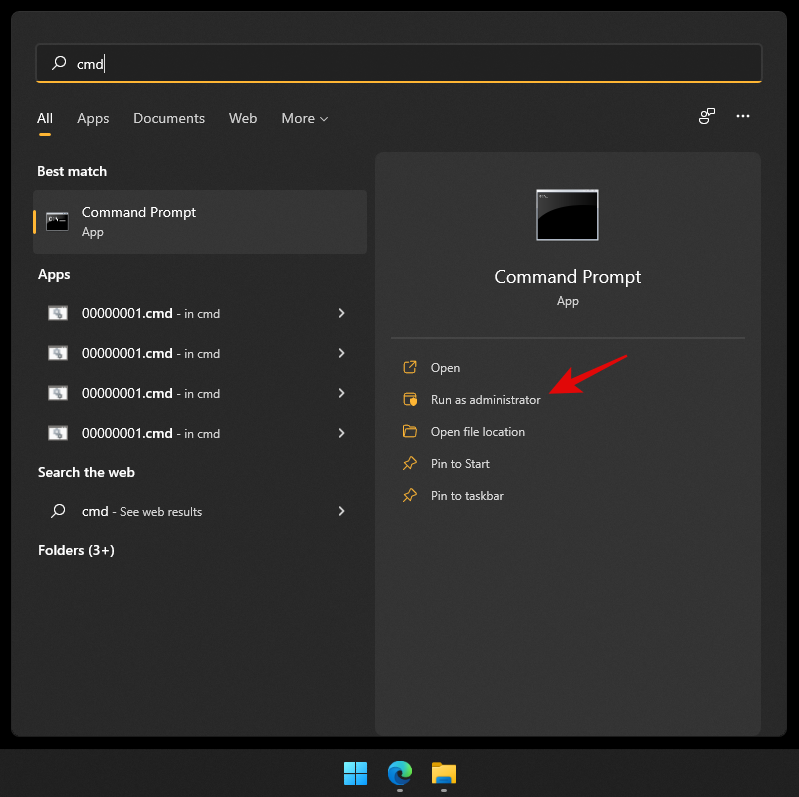
Press Windows + S on your keyboard and search for CMD. Click on ‘Run as administrator’ once the app shows up in your search results.

Type in the following command and press Enter on your keyboard.
wmic qfe list brief /format:table

You will now get a list of all the recent Windows updates installed on your PC. Click and expand the concerned category from the list below.
- Quality updates: Feature updates for Windows 11 that introduce major changes to the OS.
- Driver updates: Generic/OEM driver updates for your peripherals and components delivered through Windows update.
- Definition updates: Security definition updates to help Microsoft Defender identify and quarantine threats on your system.
- Other updates: Updates for Microsoft products, features, and other OEM features specific to your device. Windows features and experience packs will also be updated in this category.

Identify the update you wish to remove and note down its ‘HotFixID’. We will be using this ID to remove the concerned update using the guide below.
How to remove Windows updates from your PC
You can remove Windows updates from your PC using either of the methods below. If you are locked out of Windows or unable to boot to your desktop then we recommend using the Windows RE method or the CMD method. If you can access your desktop then you can use the Settings app to easily remove updates from your system. Use the guides below to get you started depending on your preferences.
Method #01: Using Settings
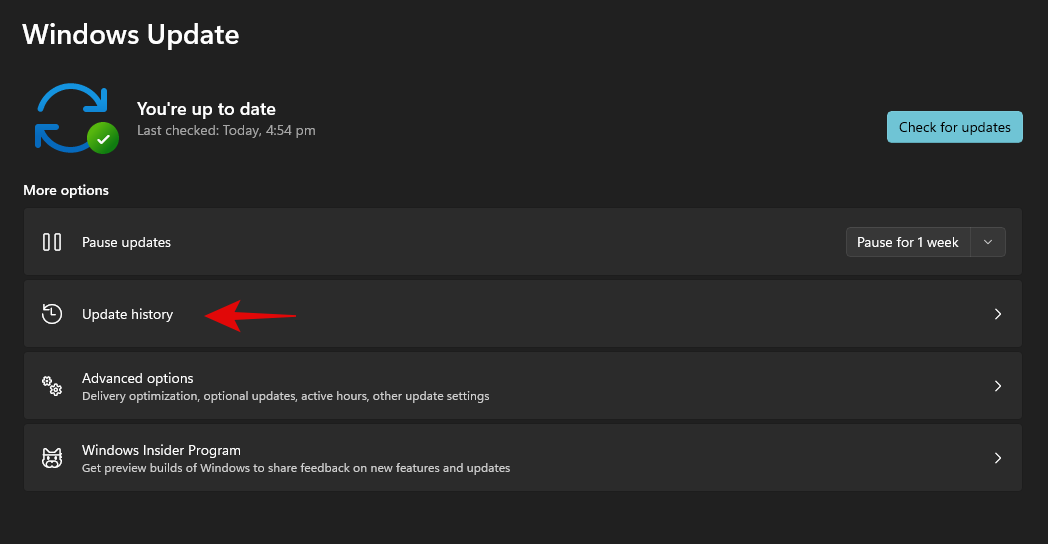
Press Windows + i on your keyboard and click on ‘Windows update’ in the left sidebar.
Click on ‘Update history’.
Scroll to the bottom and click on ‘Uninstall updates’.
You will now be redirected to the Control Panel where you will find a list of recent updates that can be removed from your system.
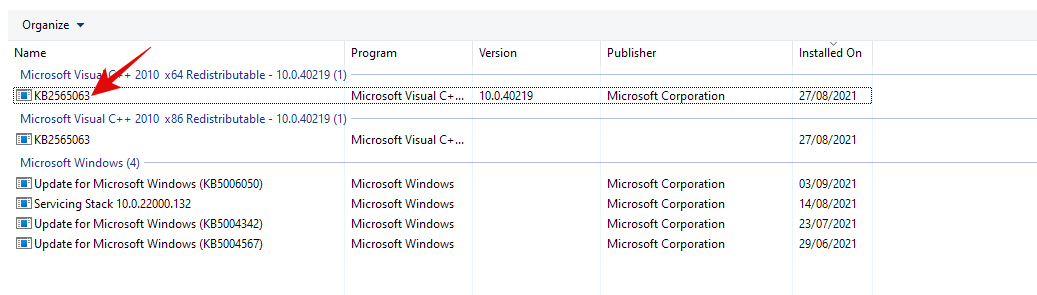
Select the update you wish to remove and click on ‘Uninstall’ at the top.
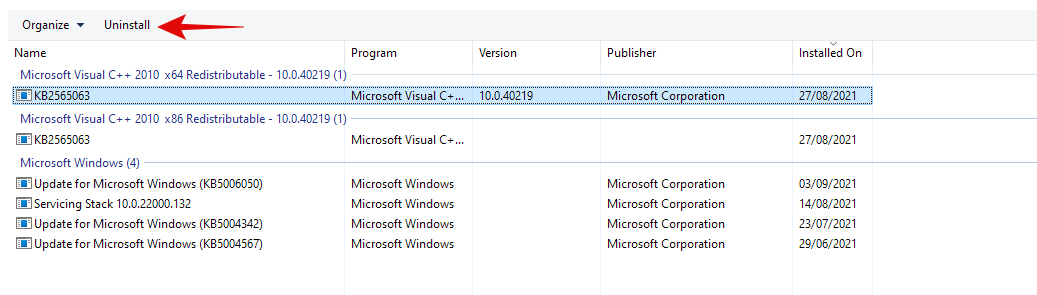
Follow the on-screen instructions to uninstall the concerned update from your PC.

You can now restart your PC and any issues that you were facing due to the update should now be fixed.
Method #02: Using Windows update troubleshooter
Press Windows + i on your keyboard and click on ‘Troubleshoot’.

Click on ‘Other troubleshooters’.
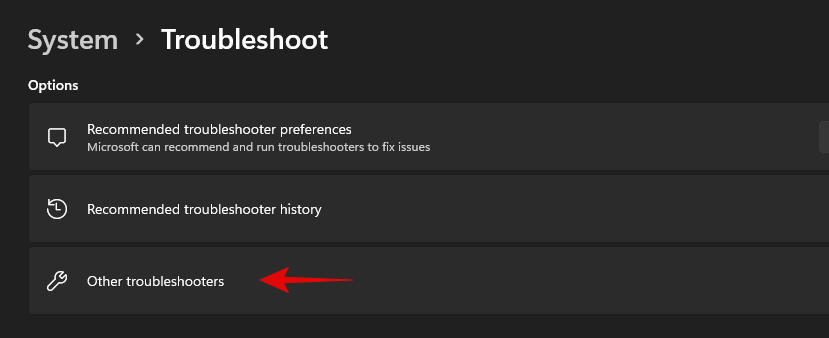
Click on ‘Run’ beside Windows Update.

Windows troubleshooter will now look for issues with and caused by, Windows Updates on your PC. If any are found, the troubleshooter will automatically resolve the problem. If a recent update is found to be the culprit then the troubleshooter will give you the option to select and uninstall the necessary Windows Update. Follow the subsequent on-screen instructions to completely remove the update.

Once done, click on ‘Close’.

Restart your PC for good measure and the problem should now be fixed at this point. If not, you can use the PowerShell method below to manually uninstall the desired Windows Update from your system.
Method #03: Using PowerShell or CMD
Press Windows + S on your keyboard and search for PowerShell. Click on ‘Run as administrator’ once the app shows up in your search results.

Type in the following command and press Enter on your keyboard to execute it.
wmic qfe list brief /format:table

You will now get a list of all the recently installed Windows Updates on your system in a table format. Note down the KB number for the selected Windows Update.
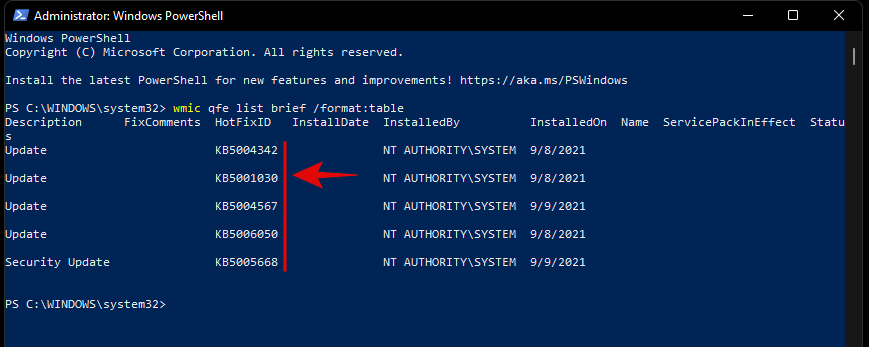
Note: You only need the number and not the letters before it.
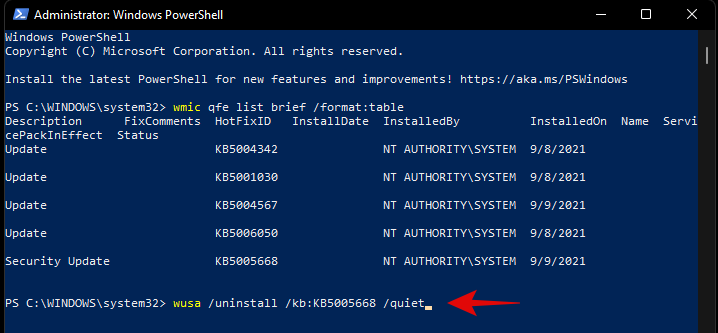
Once done, type in the command below and execute it. Replace ‘NUMBER’ with the KB number you noted down earlier.
wusa /uninstall /kb:NUMBER

Once prompted, confirm your choice.
If prompted for a restart, we recommend you restart your system at the earliest while saving your work in the background.
If however, you do not wish to receive confirmations before uninstallation and a restart, then you can use the command below.
wusa /uninstall /kb:NUMBER /quiet
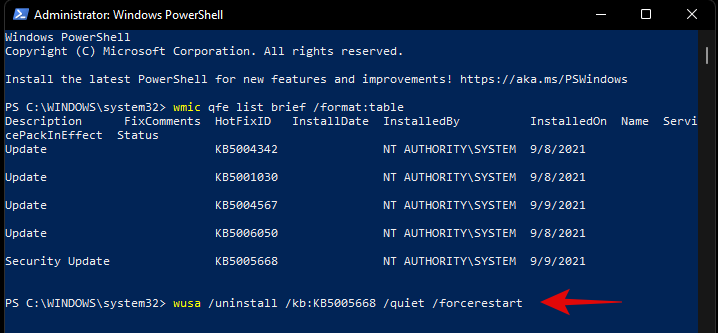
While the command above won’t prompt for confirmations, it will wait for your apps to shut down normally in the background. If you are looking to force close your apps and restart your system immediately, then you can use the command given below.
wusa /uninstall /kb:NUMBER /quiet /forcerestart
Subsequently, if you only wish to confirm a restart, then you can use the command below.
wusa /uninstall /kb:NUMBER /quiet /promptrestart

And that’s it! The problematic Windows Update should now be uninstalled from your PC.
Method #04: From Windows RE
Windows Recovery Environment also allows you to uninstall conflicting updates. Use the guide below to get you started. If you are facing a BSOD and are already in the Recovery Environment, then you can skip the first few steps of this guide.
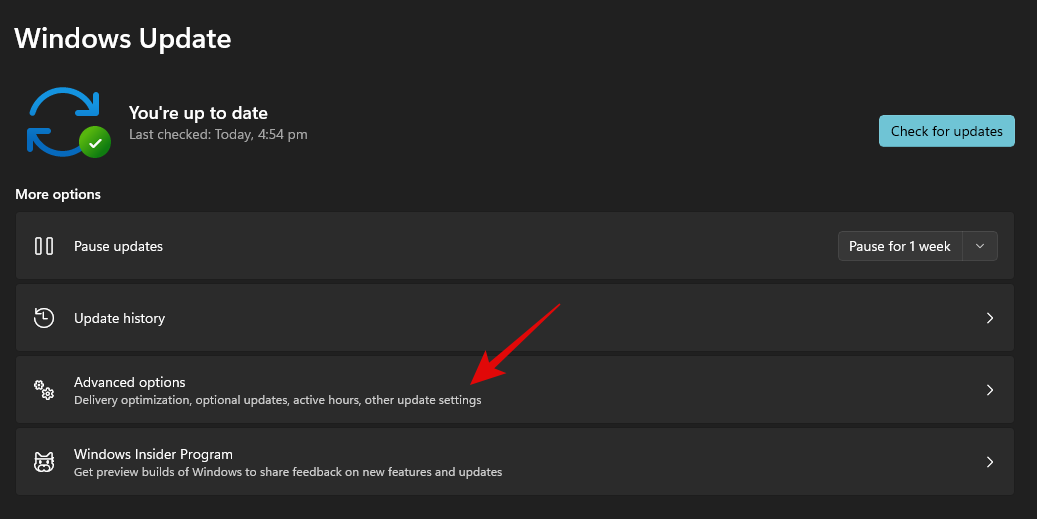
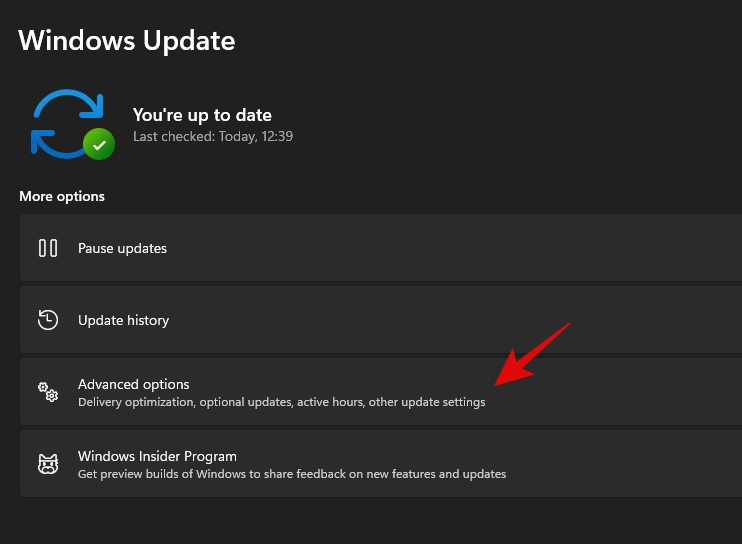
Press Windows + i on your keyboard and select Windows Update from your left.

Click on ‘Advanced options’ now.
Select ‘Recovery’.

Click on ‘Restart now’ beside Advanced Startup.

You will now boot into the recovery environment. Click on ‘Troubleshoot’.
Now click on ‘Advanced Options’.
Select ‘Uninstall updates’.
Click and select the type of update you wish to install from the options on your screen.
- Uninstall latest quality update
- Uninstall latest feature update
Note: In case you are confused, feature updates refer to major updates to your Windows system that include new features, updated integrations, and sometimes new UI. Quality updates on the other hand encompass everything else including Security updates, Driver updates, Intelligence updates, Telemetry updates, and more.
Click on your administrator account and log in with your password.
Click on ‘Uninstall quality/feature’ update to confirm your choice.
Click on ‘Done’ once the process finishes.
Restart your PC and boot into Windows normally. You shouldn’t face any more issues caused by a problematic Windows update.
Method #05: Using DISM
DISM or Deployment Image Servicing and Management tool is an administrative tool within Windows that helps repair your Windows image and even mount images if needed. DISM supports image formats like .wim, .vhd, and more.
The tool can help you fix issues with your Windows installation and even remove problematic Windows updates. If you are looking to remove windows updates using DISM, then you can follow the steps below to get you started.
Note: DISM can be accessed via CMD and thus, you can use this guide from a recovery environment or an installation media as well. Follow the guide above to get CMD working on your lock screen or within Windows Recovery Environment.
Launch CMD and type in the following command. Press Enter on your keyboard once you are done.
dism /online /get-packages /format:table

Unlike the WUSA commands we used earlier with PowerShell and CMD, you will need to note down the entire name of the Windows Update package we need to remove. Unfortunately, this includes special characters, spaces, and everything else included in the name. Thankfully you can easily copy the entire name to your clipboard by selecting it with your mouse and then using the keyboard shortcut. Once done, type in the command below and replace NAME with the package name you noted down earlier.
Note: This includes the term ‘Package_for_’ prefixed before some updates.
dism /online /Remove-Package /PackageName:NAME

The selected Windows Update will now be uninstalled from your system. In some cases, you will be prompted to restart your system, type in ‘Y’, and hit Enter on your keyboard to restart your system immediately.
How to stop receiving an update
While removing an update can help you, this does not mean that the broken Windows Update will stop showing up in your Updates section. This can be annoying and if you have automatic updates then you run the risk of automatically installing the problematic update in the background. In all such cases, you can try blocking Windows Updates on your system using the guides below depending on your preferences.
Method #01: Stop OEM driver updates through Windows update
OEM driver updates are delivered through Windows updates as well depending on their importance. Security vulnerabilities and bugs that have been recently found in components like CPU, GPU, or your wireless card, are instantly patched through such updates.
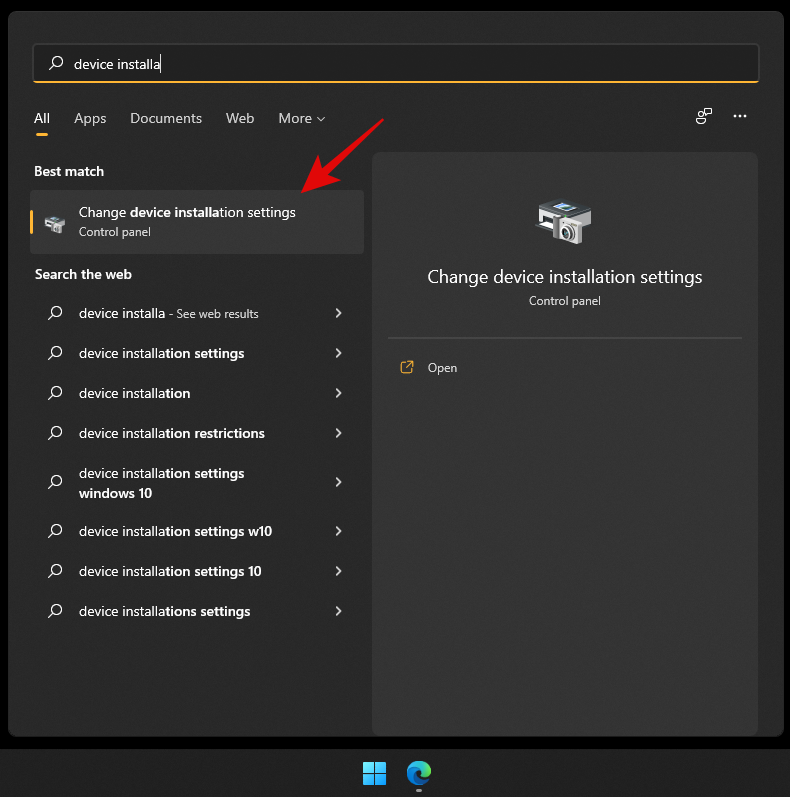
However, if you do not wish to install an OEM driver update provided by Windows update, then you can follow the guide below to block your OEM driver updates.
Press Windows + S on your keyboard and search for ‘Change device installation settings’. Click and launch the app from your search results.
Select ‘No’.
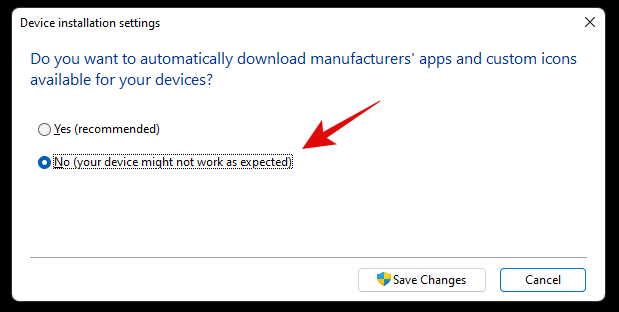
Click on ‘Save changes’.

The changes will now be saved and you will no longer receive OEM driver updates through Windows Update.
Related: 6 Ways to Update Drivers on Windows 11
Method #02: Stop updates for Microsoft products
If you have been receiving constant updates for new Microsoft features and old products that keep messing up your system, then you can use the guide below to disable updates for Microsoft products via Windows Update.
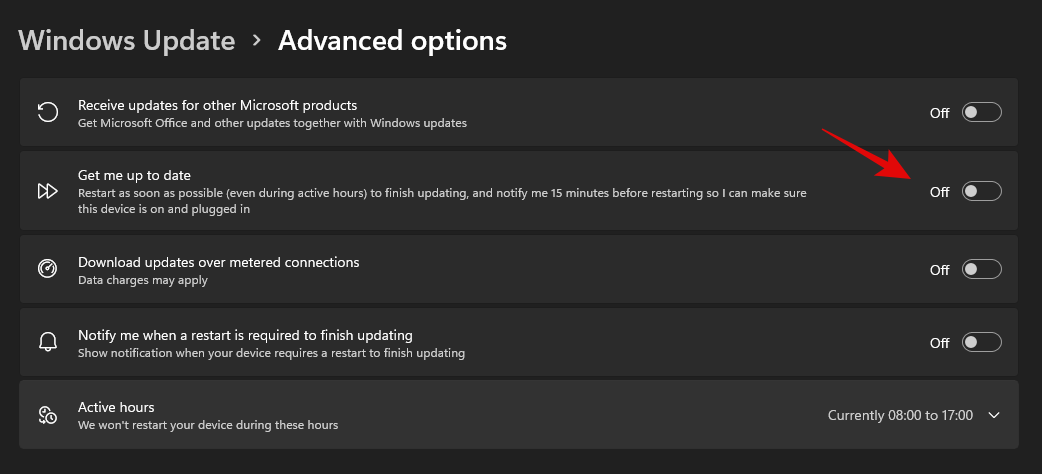
Press Windows + i on your keyboard to open the Settings app and select ‘Windows Update’ from the left sidebar.
Click on ‘Advanced options’.
Now turn off the toggle for ‘Receive updates for other Microsoft products’ at the top.

You will no longer receive updates for Microsoft products installed on your system via Windows update.
Method #03: Change active hours for background download and installation for updates
If you’re just looking to dismiss updates so that they don’t interfere with your work hours, then this is the perfect option for you. You can decide when Windows can download and update your PC in the background which will prevent Windows from interfering with your work hours. Follow the guide below to get you started.
Press Windows + i on your keyboard and click on ‘Windows Update’ on your left.
Click on ‘Advanced options’.
Now turn off the toggle for ‘Get me up to date’.
Click on ‘Active hours’.

Click on the drop-down menu and select ‘Manually’.

Define your desired start and end time. Windows won’t download updates and restart your PC during these hours.
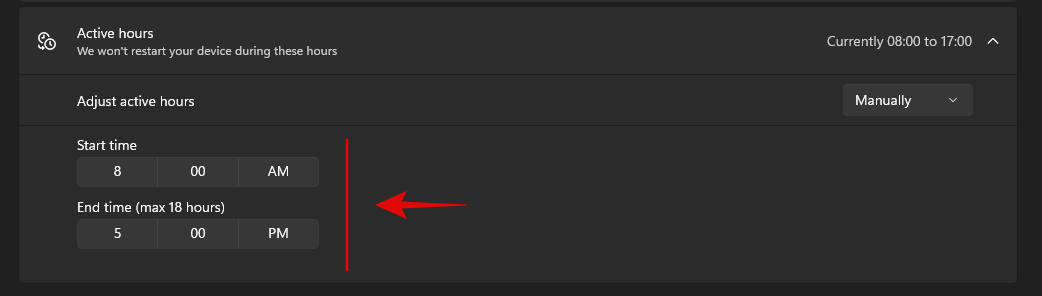
And that’s it! Active hours should now be enabled for your system.
Method #04: Block Windows updates that you never wish to install
If you are receiving forced Windows updates that you don’t ever wish to install on your system then you can use a dedicated Windows troubleshooter to solve your issue.
This can be helpful in case you are trying to stop an update that disables a certain feature on your system that you don’t want disabled. This could be access to voltage controls, clock speed controls, turbo controls, fan controls, RGB control, and more. Follow the guide below to get you started.
- Wushowhide | Download Link
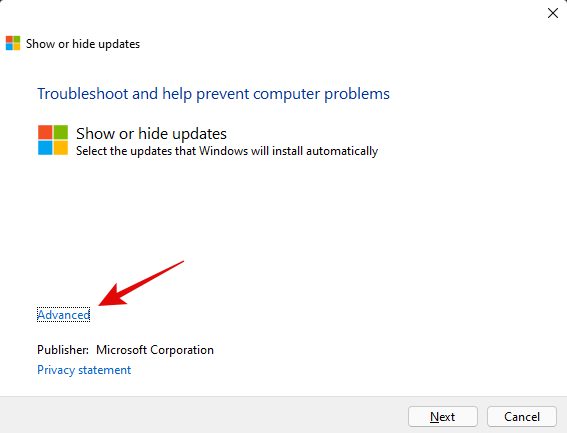
Download the Windows Update Show Hide troubleshooter using the link above and launch it on your PC. Click on ‘Advanced’.
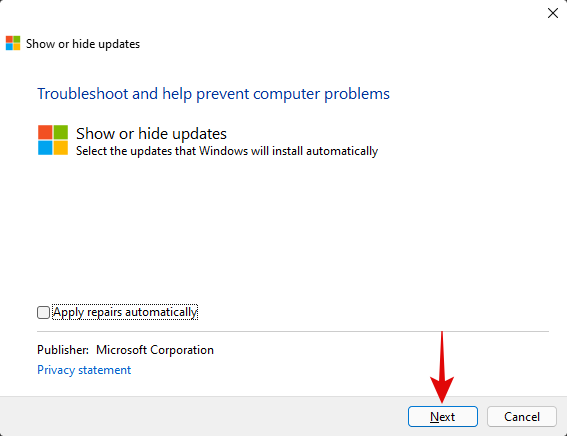
Uncheck the option for ‘Apply repairs automatically’.

Click on ‘Next’.
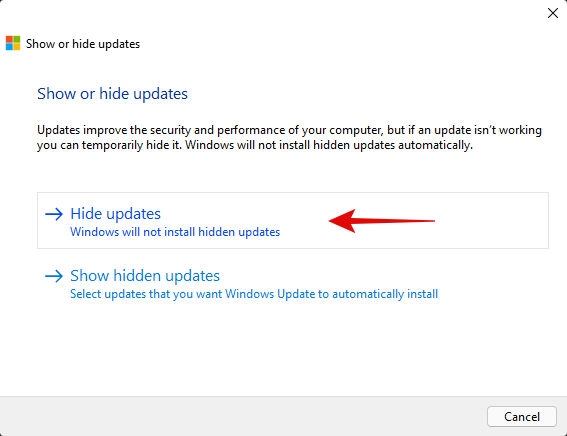
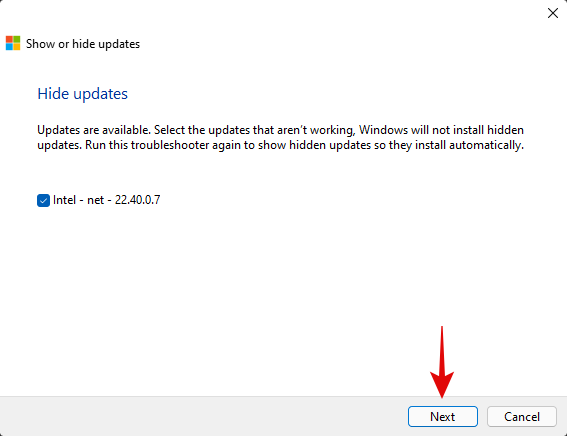
The troubleshooter will now look for pending updates and display them on your screen. Click on ‘Hide updates’.
Check the boxes for all the updates you don’t wish to receive on your PC.

Click on ‘Next’.
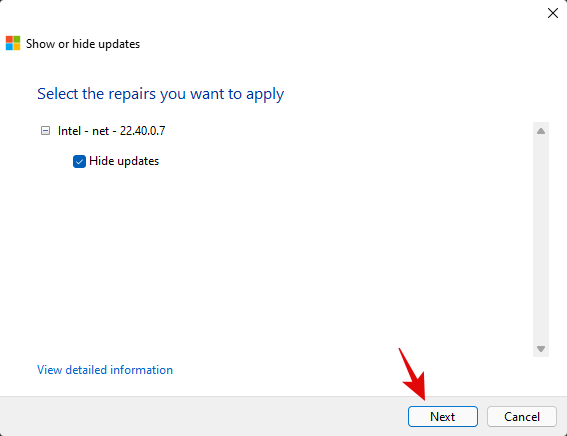
Ensure that ‘Hide updates’ is selected and click on ‘Next’.
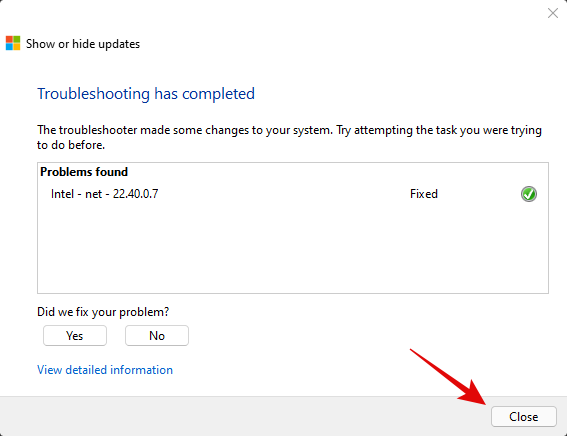
The troubleshooter will now hide the necessary Windows updates from your PC which in turn will prevent them from ever being downloaded on your PC. Click on ‘Close’.
And that’s it! You will now have blocked the necessary updates on Windows 11.
Can you turn off Windows updates?
Yes, you can use certain workarounds and tricks to disable Windows updates on your PC. However, this isn’t recommended as you will lose out on important security patches which would leave you vulnerable to online threats including hackers, malware, adware, and more.
Hence we recommend you keep your PC updated or at least opt to install the latest security updates on your PC. Even if you are losing out on features it’s usually because of a hardware security vulnerability that would compromise your system.
However, if you still wish to disable Windows Updates on your PC, you can use this dedicated guide from us. If you face any issues, feel free to drop a comment.
Can’t uninstall Windows updates? Try these fixes!
If you are unable to install updates on your PC, then you can try the following fixes. However, if you are still unable to uninstall updates then this might indicate an issue with your Windows installation in which case resetting your PC might be the best option.
Follow the guides below to get you started.
Method #01: Reset Windows components and try again
If you have been unable to uninstall updates then you can try resetting your windows components. This will help fix corrupted system files in the background that might be preventing you from uninstalling updates on your system. We will be using a modified script from Mircosoft to help reset all components of Windows 11. The script was originally developed for Windows 10 or higher and hence will need some edits to work properly on Windows 11. This script will perform the following tasks on your system when executed;
- Remove older Windows updates folder
- Re-register Windows update files
- Reset your network connection
Follow the steps below to run the script on your system and reset Windows update components on your PC.
- Reset Script | Download Link
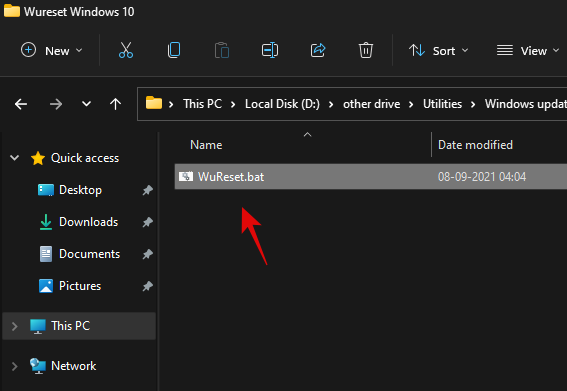
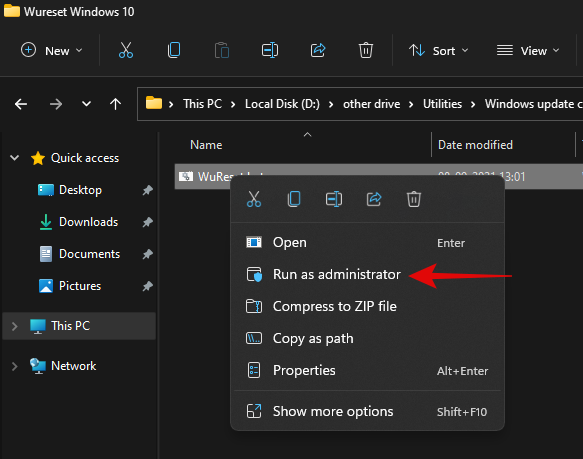
Download the script using the link above to your local storage and extract it to a convenient location. Once extracted right click on the script.
Click on ‘Show more options’.

Select ‘Rename’.
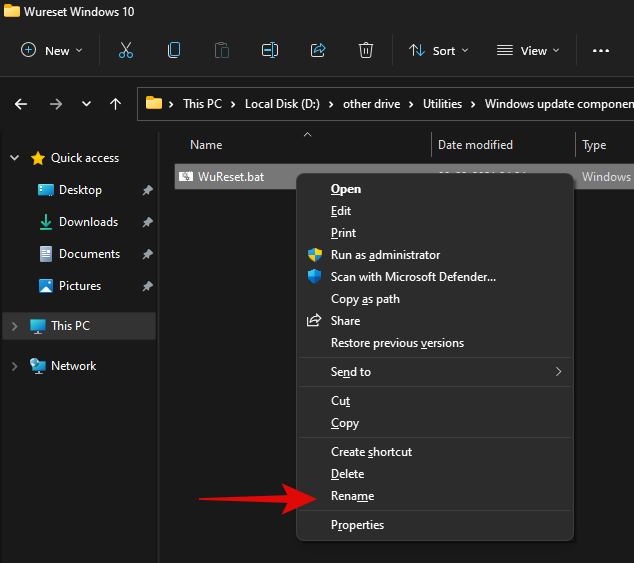
Replace ‘.bat’ with ‘.txt’.

Click on ‘Yes’ to confirm your choice.

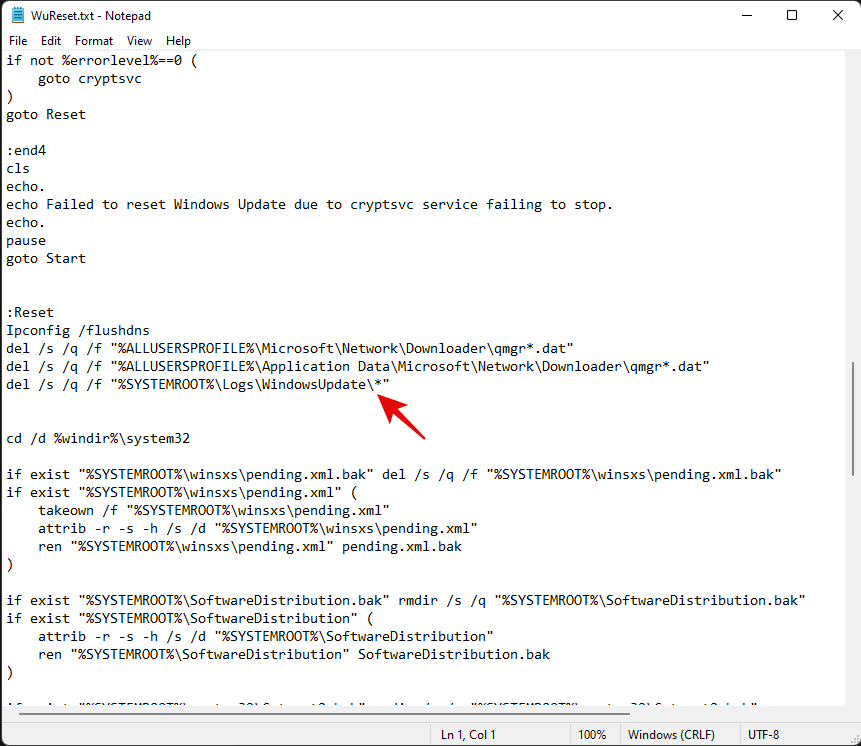
Now double click and open the file and it should open in your notepad. Once opened, scroll to the ‘:Reset’ section for resetting network commands and add the following line after the first delete command as shown below.
del /s /q /f "%SYSTEMROOT%\Logs\WindowsUpdate\*"
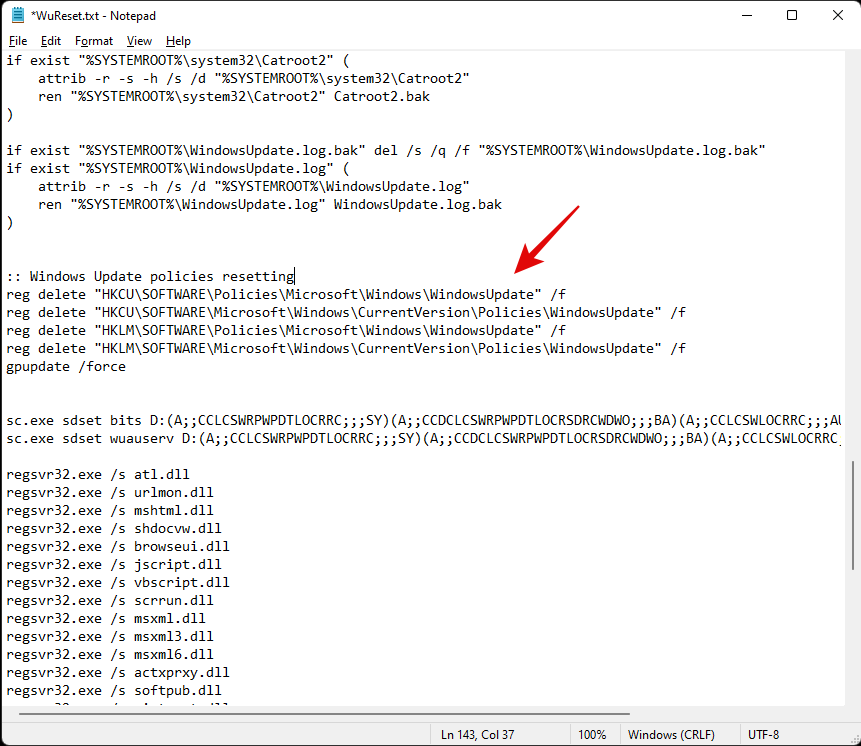
Once added, hit Ctrl + S on your keyboard. Ensure that there are no formatting changes or spaces before or after the line. The file will now be saved on your system along with its recent changes. We will now add some code to Reset Windows’s update policies on your system. Copy the lines below and paste them after your system commands. Ensure that two empty lines are available at either end of the code as shown below.
:: Windows Update policies resetting
reg delete "HKCU\SOFTWARE\Policies\Microsoft\Windows\WindowsUpdate" /f
reg delete "HKCU\SOFTWARE\Microsoft\Windows\CurrentVersion\Policies\WindowsUpdate" /f
reg delete "HKLM\SOFTWARE\Policies\Microsoft\Windows\WindowsUpdate" /f
reg delete "HKLM\SOFTWARE\Microsoft\Windows\CurrentVersion\Policies\WindowsUpdate" /f
gpupdate /force
Lastly, let’s add some lines to ensure that the startup type for this service is set to ‘Automatic’. Copy the code below and add the lines after your winsock reset commands but before your service starting commands as shown below. Copy and paste the code in its respective location.
:: Set the startup type as automatic
sc config wuauserv start= auto
sc config bits start= auto
sc config DcomLaunch start= auto

Once you are done, hit Ctrl + S on your keyboard to save your changes. Close the file and right-click on it again and select ‘Show more options’.

Click on ‘Rename’.

Replace ‘.txt’ with ‘.bat’.
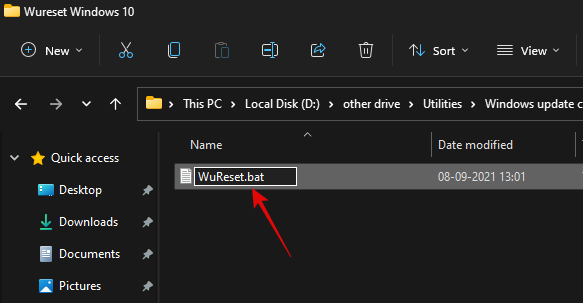
Once done, right-click on the file and select ‘Run as administrator’.
The batch script will now run on your PC and do its thing. Once the process completes, you will be asked to restart your PC. We highly recommend that you restart your PC at the earliest after running this script. Upon a restart, your Windows update should be reset and a fresh start should help you easily install pending Windows updates on your PC.
Method #02: Use DISM to uninstall the concerned packages
If you are still unable to uninstall specific Windows Update packages then simply use the DISM method to remove the concerned updates from your PC. This method force removes any available Windows updates from your PC without any issue. You will get a list of all the available updates in a table format which should make it much easier for you to find the culprit on your PC. Simply follow the guide at the top to get you started.
Method #03: Run SFC & DISM commands
At this point, if Windows still fails to update your system then you are facing a more serious issue than we anticipated earlier. This could indicate system-level corruption of files or missing system files from your system. In such cases, you can run SFC and DISM checks to fix corrupted files as well as restore missing system files. Follow the guide below to get you started.
Press Windows + S on your keyboard and search for CMD. Click on ‘Run as administrator’ once it shows up in your search results.
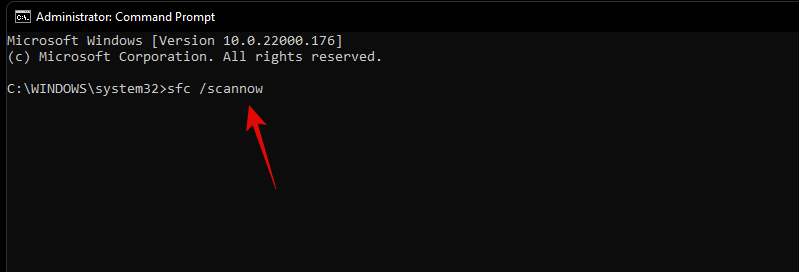
Type in the following command and press Enter on your PC.
sfc /scannow
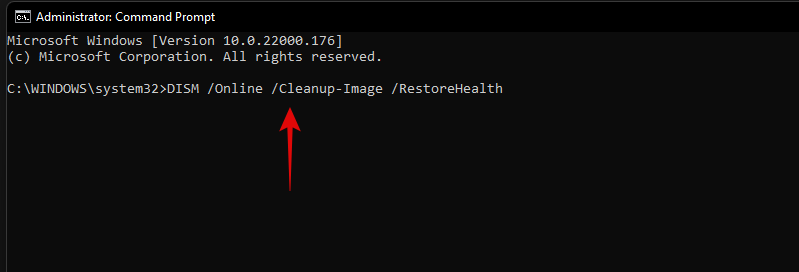
Once the SFC scan completes, type in the following command and execute it.
DISM /Online /Cleanup-Image /RestoreHealth
We recommend you restart your PC once the process completes.
Method #04: Last resort: Reset your PC
If nothing seems to be working for you then it might be time for a fresh installation of Windows 11 on your system. You can try getting in touch with your support team as well but if nothing works then a reset of your PC is the best option. In most cases, a reset while keeping your local files should help get Windows update working on your system.
Windows 11 connects to the update servers and updates your security definitions and drivers during OOBE. Windows will fix all update issues and reinstall necessary services on your system to get Windows update back up and running on your system during this process.
► You can use this dedicated guide from us to reset your Windows 11 PC.
We hope you were able to easily uninstall updates from your Windows 11 PC using the guide above. If you face any issues, feel free to drop a comment below.
Related:
- How to Clean Registry on Windows 11 [4 Ways]
- How to Check Windows 11 Version
- Should You Install Windows 11 Dev Channel Build Under Insider Preview?
- What Happens When Stable Windows 11 Arrives if You Install Dev Channel Insider Build Now
- How Often Do Windows Dev Builds Come Out?
- How to Download and Install Official Windows 11 ISO
- How to Download Windows 11 ISO for Insider Dev Channel Build Yourself
- How to Remove the Evalutation Copy Watermark on Windows 11


