Windows registry is the memory bank of your PC where it records just about everything you do on your system. It is exactly what the name suggests – a registry. Be it information about the dozen or so video files that you moved a few weeks back, or the latest program that you installed – everything is documented in this database, including all the settings and preferences that are specific to your machine. It’s natural prudence, then, that guides people to stay away from tinkering with it.
Windows, however, isn’t as adept at cleaning the registry as it is in filling it up. Over time, it invariably gets bloated and slows down the computer, and nobody appreciates that. So, if you’re looking to clean the registry and speed up your computer a bit, you have to know what you’re doing and how to go about it.
What causes Registry junk?
A bloated registry can be the cause of a number of registry errors. For instance, it’s not uncommon for entries of uninstalled programs and software to linger in the registry. If you reinstall programs or upgrade them, the registry will get duplicated keys. Over time, you get hundreds of entries that are just sitting around orphaned and for no good reason other than Windows’ ineptitude at cleaning up after itself.
A registry record is also maintained for system shutdowns. And if the system crashes or is turned off abruptly, it can potentially disrupt these records and cause an issue (remember BSOD?). Furthermore, registry entries also come under attack by malware infestation that can modify the keys and cause dire issues. If these things go unattended, you could be looking at a system that’s on the brink of giving up.
Related: What Windows 11 Services to Disable Safely and How?
Should you clean your registry?
Given the vulnerabilities that the registry is open to, it would make sense to clean the registry from time to time. But a number of complications can arise if one is not careful with the process, especially if one is doing it manually. Accidentally deleting entries essential to the proper functioning of the system can be detrimental to it, leaving it unresponsive and dead. Even if you use third-party applications dedicated to this purpose, it’s not recommended to let the applications auto-clean the registry.
Can you clean your registry easily by yourself?
It is important to know exactly what you’re doing when you’re cleaning the registry yourself. Certain precautions are warranted before you take up the task of cleaning the registry all by yourself. Backing up the registry should be the first thing to do so that you can revert back the changes in case you make any erroneous deletions.
The other thing to ensure is that you don’t delete registry entries that you have no clue about. Though the names of the key folders themselves can tell you what they’re about, if you’re unclear at any stage about where they came from, it’s better to leave them alone.
With all this in mind, let’s see how you can clean the registry on Windows 11.
Related: How To Cast Phone to PC: 5 Ways Explained
How to back up registry
Before going into the various methods for cleaning the registry, whether you’re doing it manually or using a tool for it, backing up the registry is a must. Here’s how to do so.
The simplest way to back up the registry is by exporting its records via the Registry Editor itself. Here’s how to go about it:
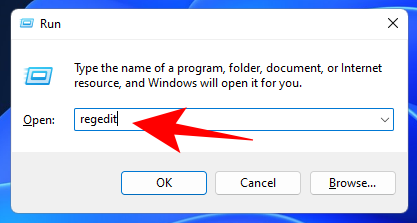
Press Win + R to open the RUN dialog box, type regedit, and hit Enter.
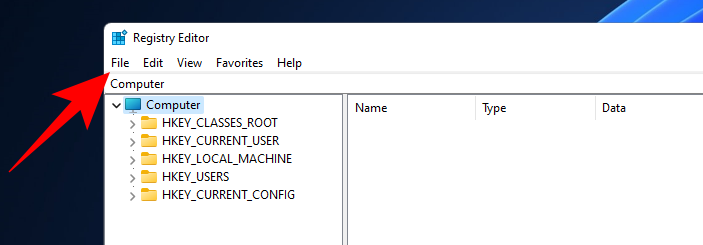
Click on File.
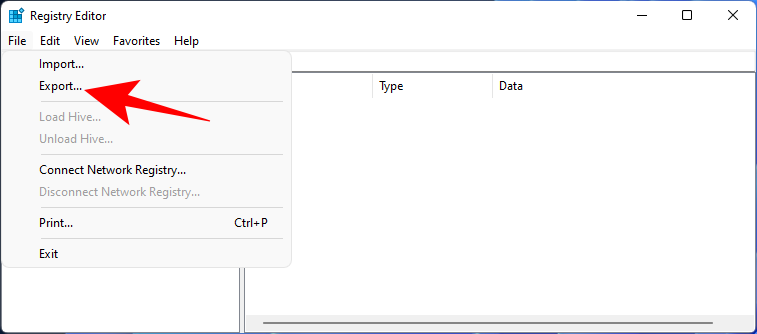
Select Export.
Give this registry backup file a name and click on Save to do so.
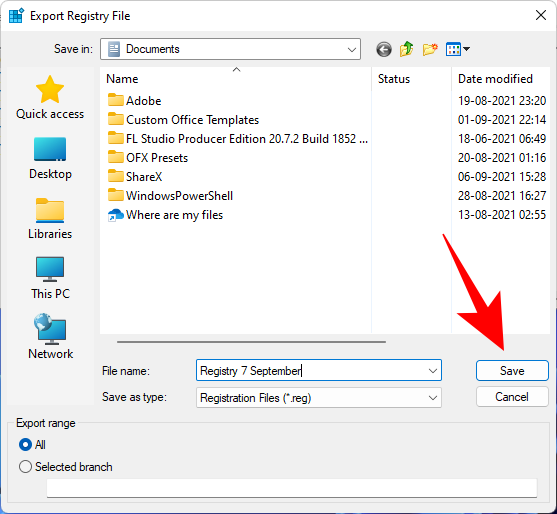
Depending on the number of entries in the registry, this can take some time. Once it’s done, you can start using the following methods to clean up the registry.
How to clean your registry on Windows 11
Make sure you have backed up your registry first as given above. Once done, use any of the methods below to clean the registry of your Windows 11 PC.
Method #01: Using Disk Cleanup
Though this method isn’t for the registry, strictly speaking, it does clean up the disk where the registry files are stored and removes a whole lot of temporary and system error dump files – all of which are unnecessary files linked to the registry that slows the computer down.
Press Start, type Disk Cleanup, and select the first available option.
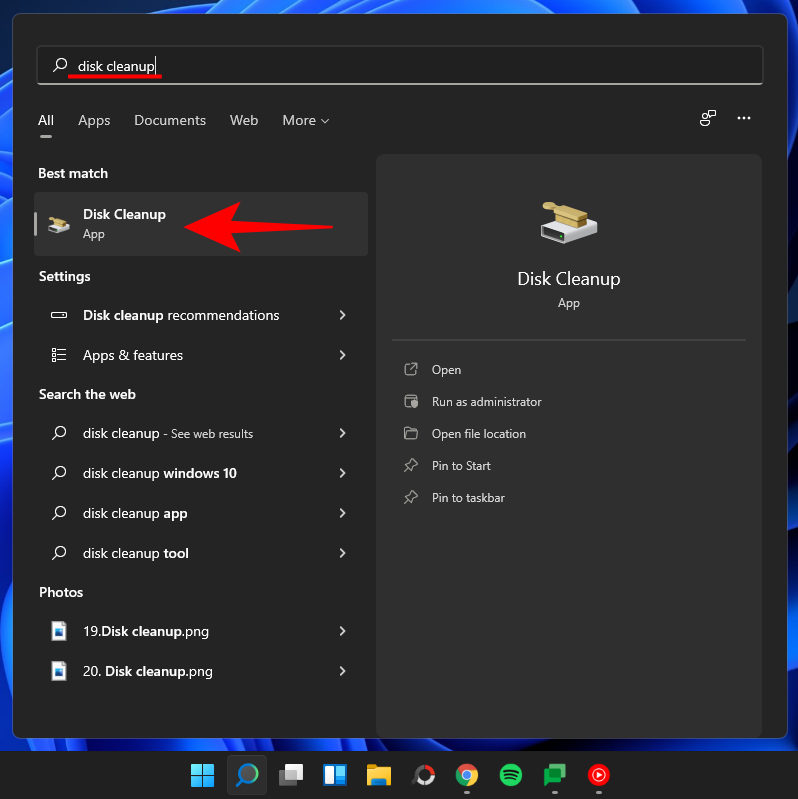
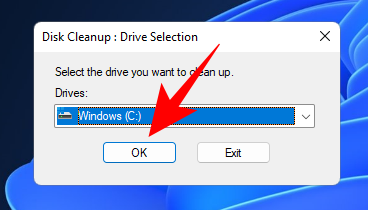
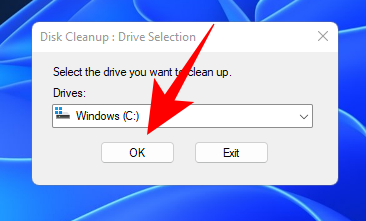
Once the tool opens up, select the C: drive (default) and click OK.
Once the tool finishes scanning, click on Clean up system files.
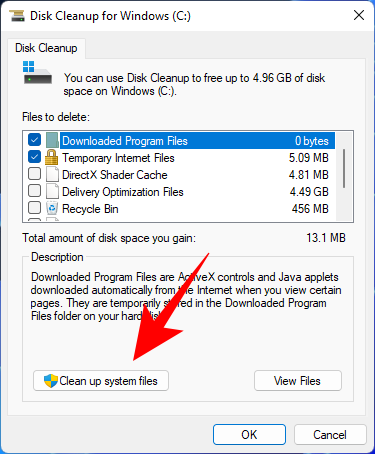
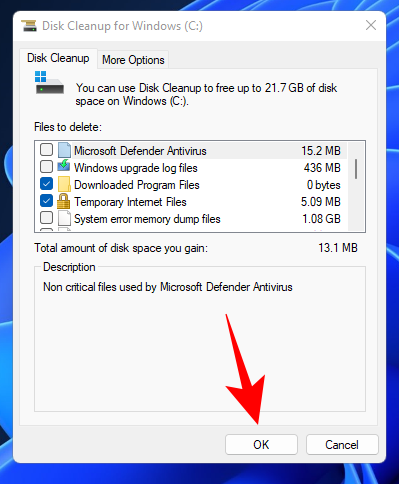
Click OK again. This will make the tool scan a second time and give you some more options.
When the scanning is complete, check for all the additional files that you can delete, and click OK.
Method #02: Using Command Prompt (with the DISM command)
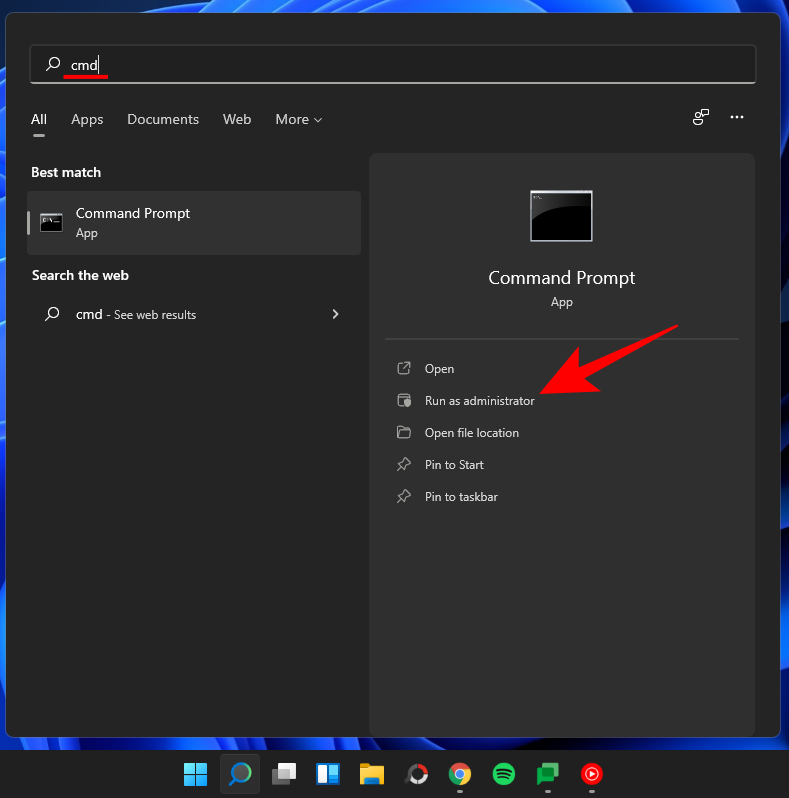
To run the Deployment Image Servicing and Management command, we’re using the Command Prompt. To open it up, press Start, type cmd, and click on Run as administrator.
Now type the following command:
DISM /Online /Cleanup-Image /ScanHealth

Press Enter. The scan will automatically search for and fix any errors found.
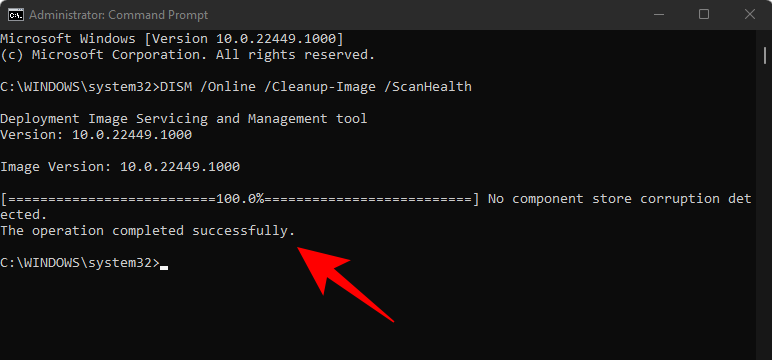
Even though this isn’t only related to the registry, your computer will benefit greatly from this checkup.
Method #03: Using Registry Editor itself (in Safe Mode)
Now, onwards to the actual registry cleanup. Since this method requires you to manually delete registry files yourself, and because of the high chance that you may end up deleting something you shouldn’t, it’s better to be safe and do so from the Safe Mode.
To boot your PC into safe mode, press Start, click on the Power button, and then, while pressing the “Shift” key, click Restart.

Now, while the computer is restarting, you will be taken to the Advanced Restart options. Select Troubleshoot.

Click on Advanced options.
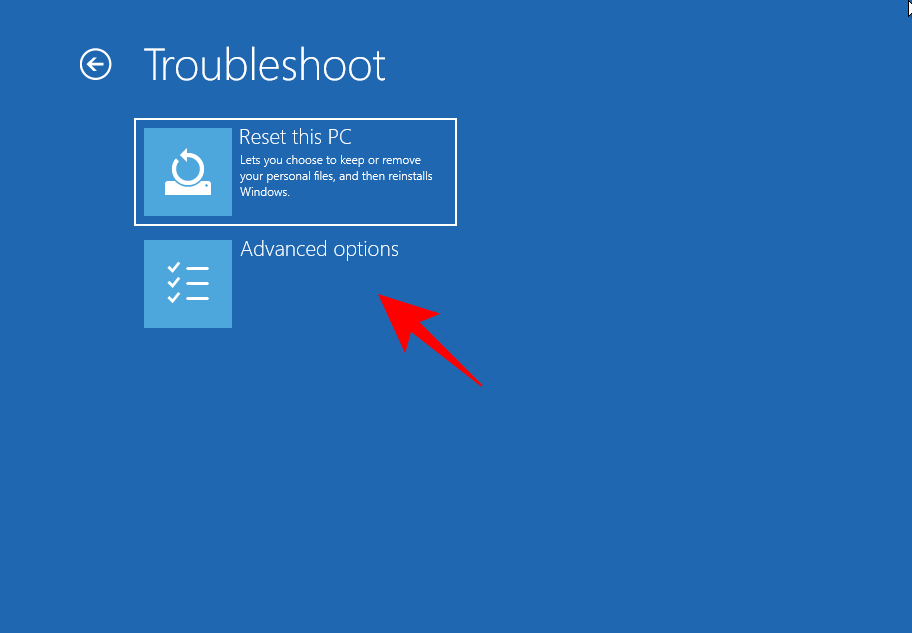
Click on Startup Settings.

Click Restart.
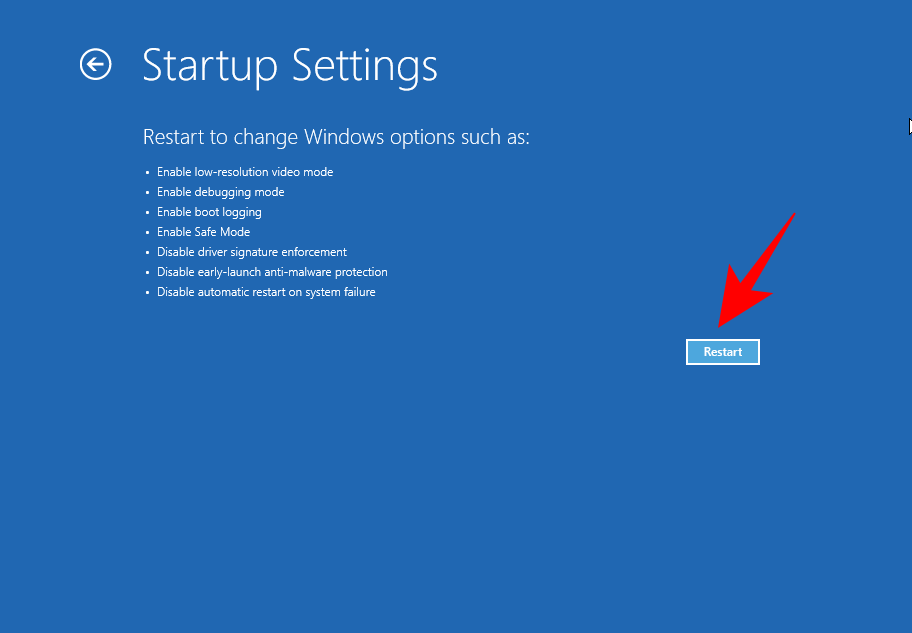
Now press the number that corresponds to Enable Safe Mode with Networking.

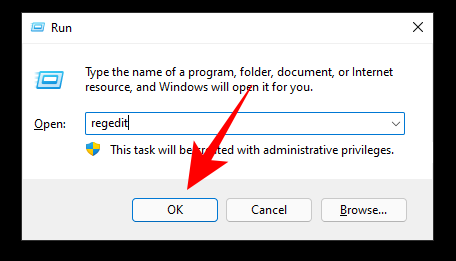
Once you’re booted up in Safe Mode, press Win + R to open the RUN dialog box. Then type regedit and hit Enter.
Now, it’s time to start removing unnecessary registry entries and exercising extreme caution while doing so. The safest registry cleaning option is to look for residual entries of programs and applications that have already been uninstalled. To do so, expand the HKEY_CURRENT USER folder and then Software.
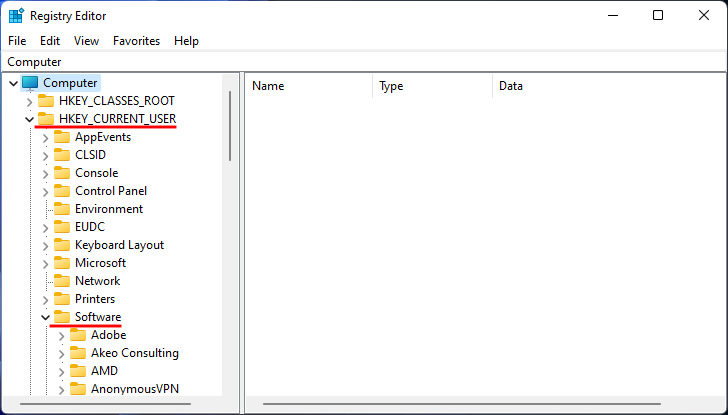
Now look for keys that represent applications already uninstalled, then right-click them and select Delete.
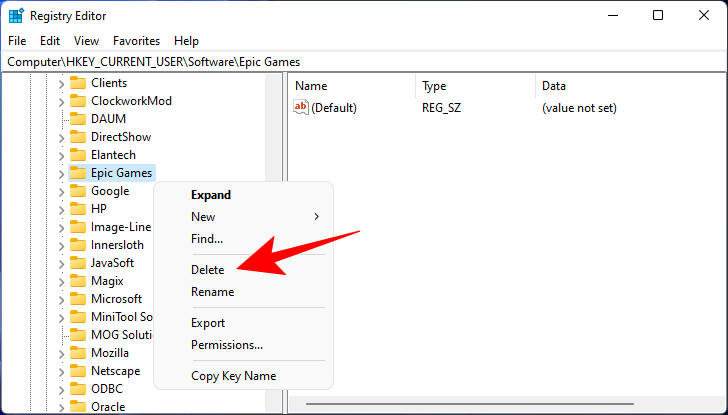
Make sure that you delete keys and folders only if you’re completely sure what they are. For instance, we remember uninstalling Epic Games a few weeks back, which is why we’re removing it from the registry also. You will also be prompted once before you delete the registry entries for good. Click on Yes to confirm.
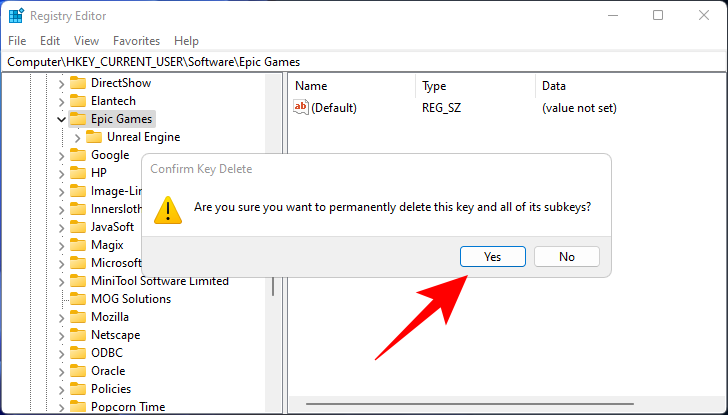
Do so for all keys that you know for sure are just remnants of uninstalled programs. Once you’re finished, close the Registry Editor and restart the computer normally.
Method #04: Using 3rd-party applications
There are tons of third-party applications whose sole purpose is to clean the registry. However, even with all these sophisticated programs, you need to maintain caution while giving them the authority to clean at will.
Many of these applications will give you the option to deep clean the registry. We recommend that you don’t go with this option, and always review the deletions before they’re made.
With that in mind, let’s look at a few popular registry ‘cleaners’.
1. CCleaner
CCleaner is a useful tool when it comes to scanning issues related to the PC, especially the registry. The good thing about this program is that it gives you the opportunity to review each entry before ‘fixing’ it (read delete).
Download: CCleaner
After downloading, install CCleaner and open the application. Then click on Registry in the left panel.

Click on Scan for Issues.
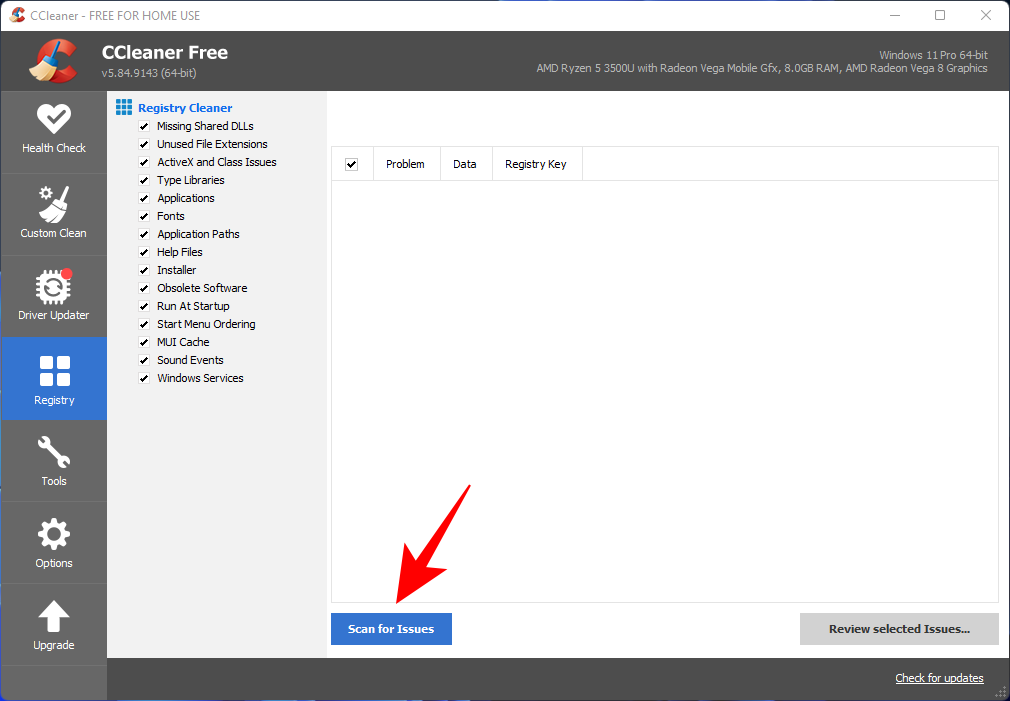
Once the issues are found, click on Review selected Issues.
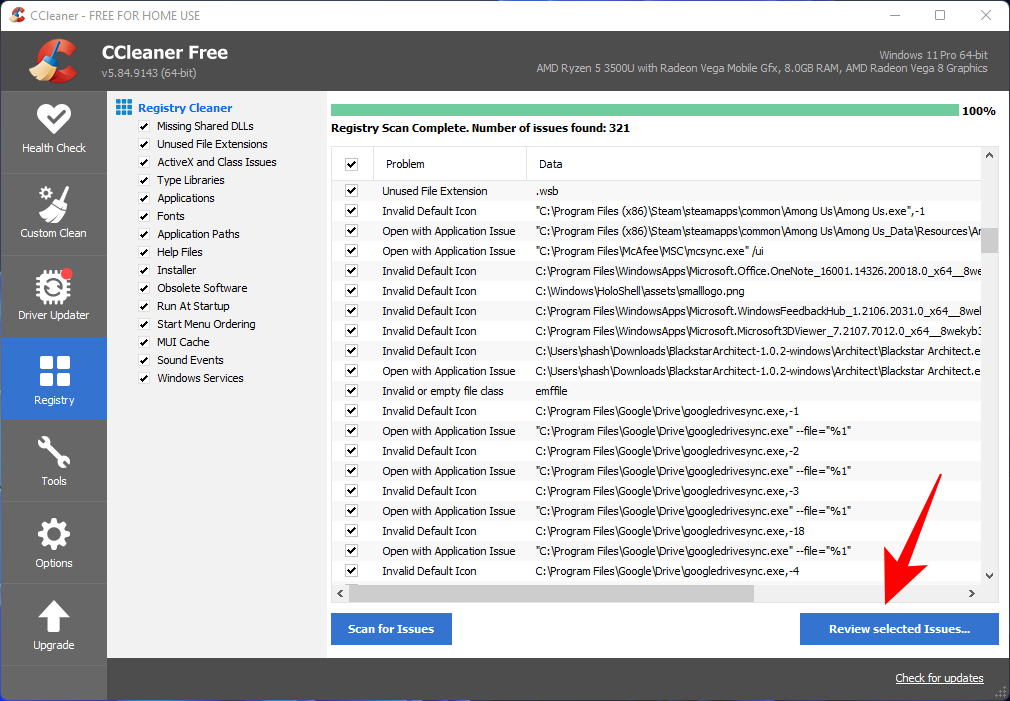
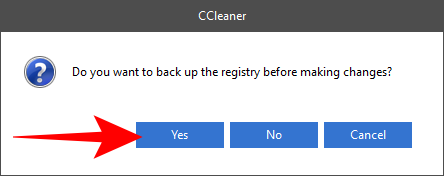
CCleaner will ask if you want to back up the registry. Click Yes if you haven’t done so yet.
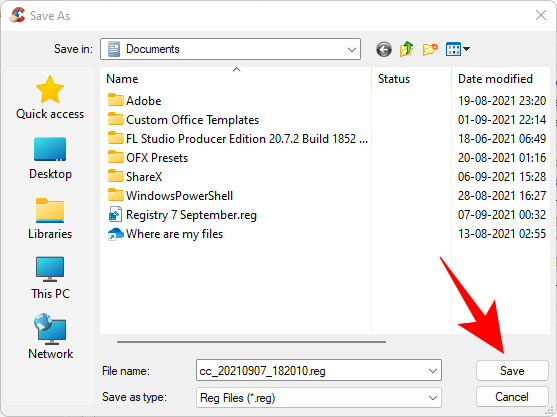
Then save a copy of the registry and click on Save.
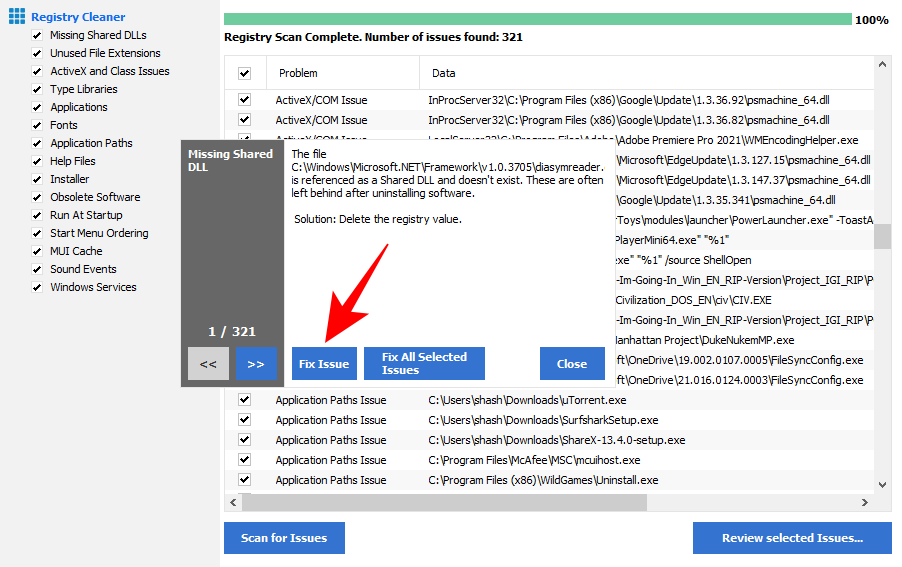
Now review the issues one by one. If there is an issue that you’d like to fix, click on Fix Issue.
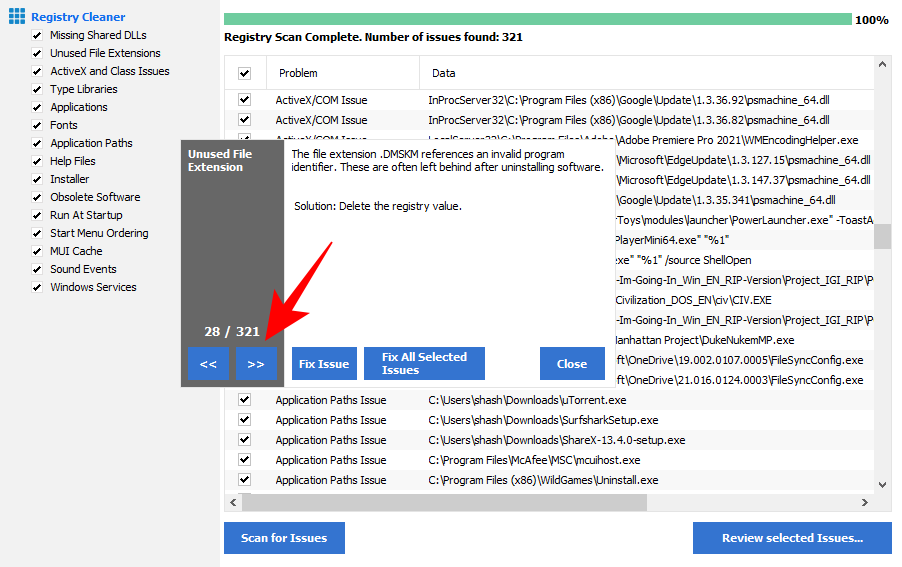
Do so for all issues. If you don’t know if an issue is pertinent or safe to fix, move on to the next one.
Close CCleaner once you’re done.
2. Wise Registry Cleaner
Wise Registry Cleaner is another tool that cleans and defrags the registry.
Download: Wise Registry Cleaner
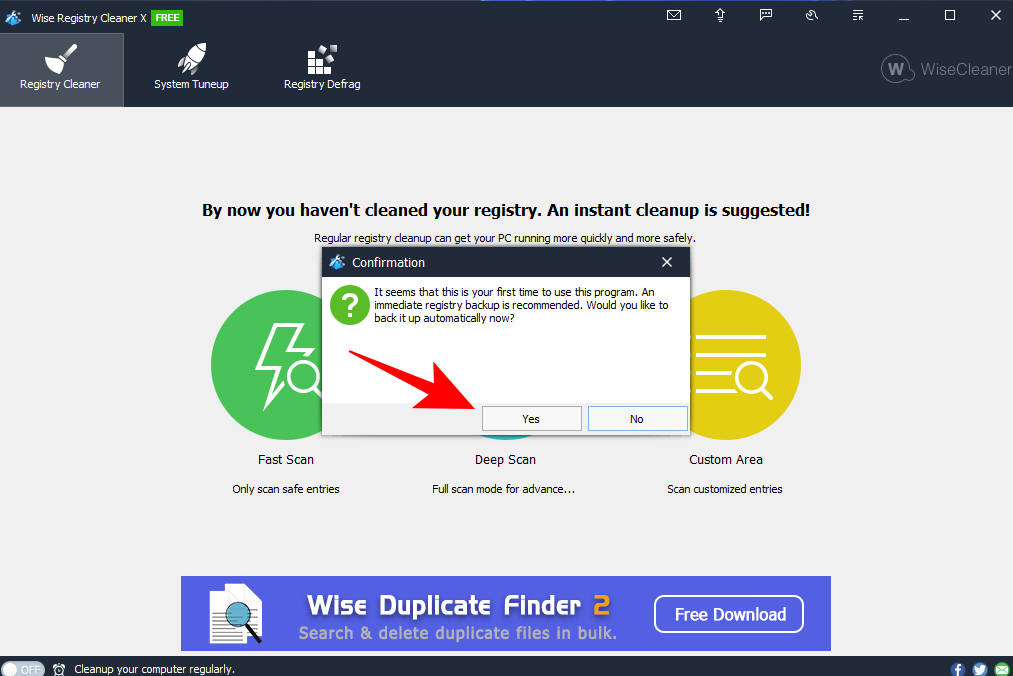
When you run the program for the first time, you’ll be asked to create a backup first. Click on Yes to do so.
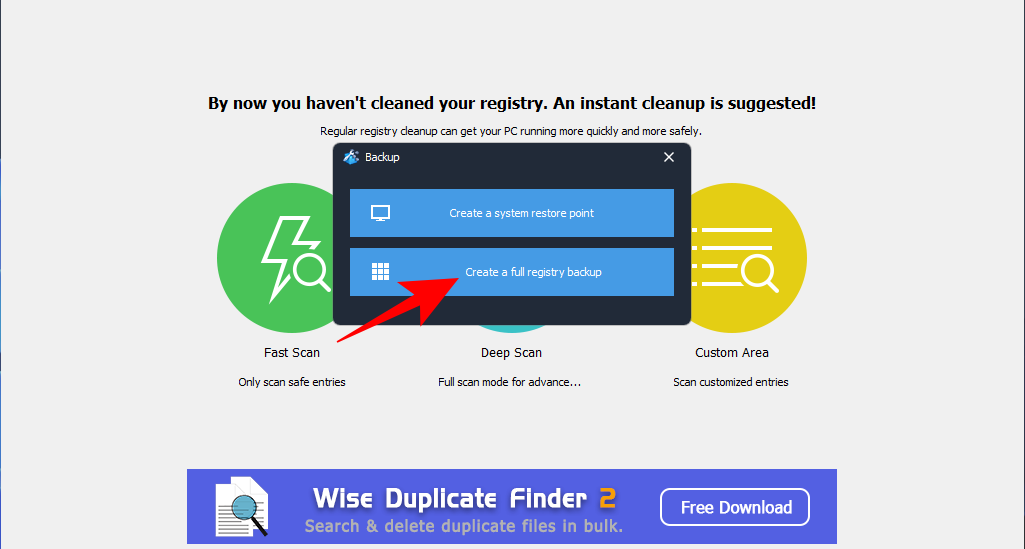
Click on Create a full registry backup.
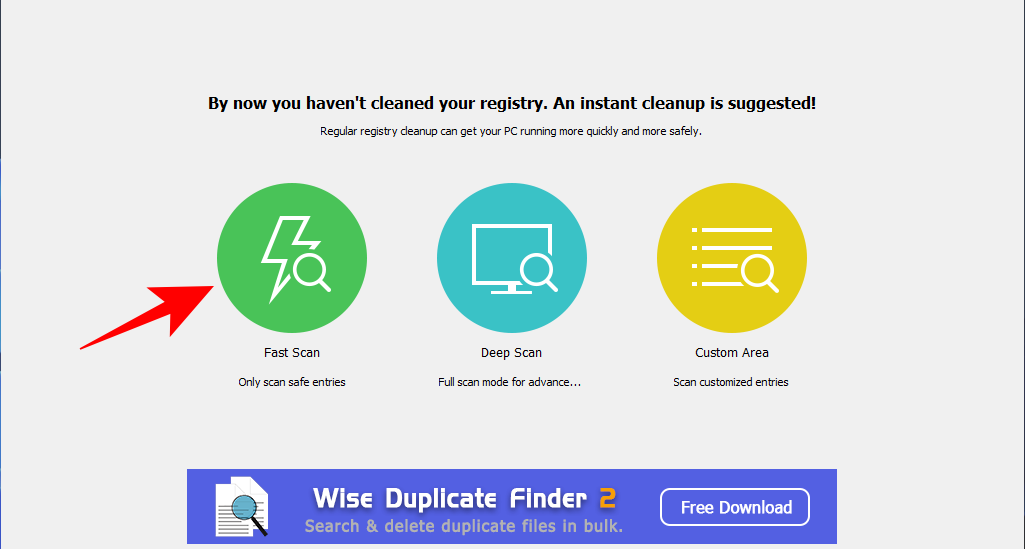
Once the backup is created, scan the registry with the tool. We recommend going for the Fast Scan option as this will only scan safe entries (safe to delete, that is).
Once the scan is completed, you will get a list of issues found with the registry.
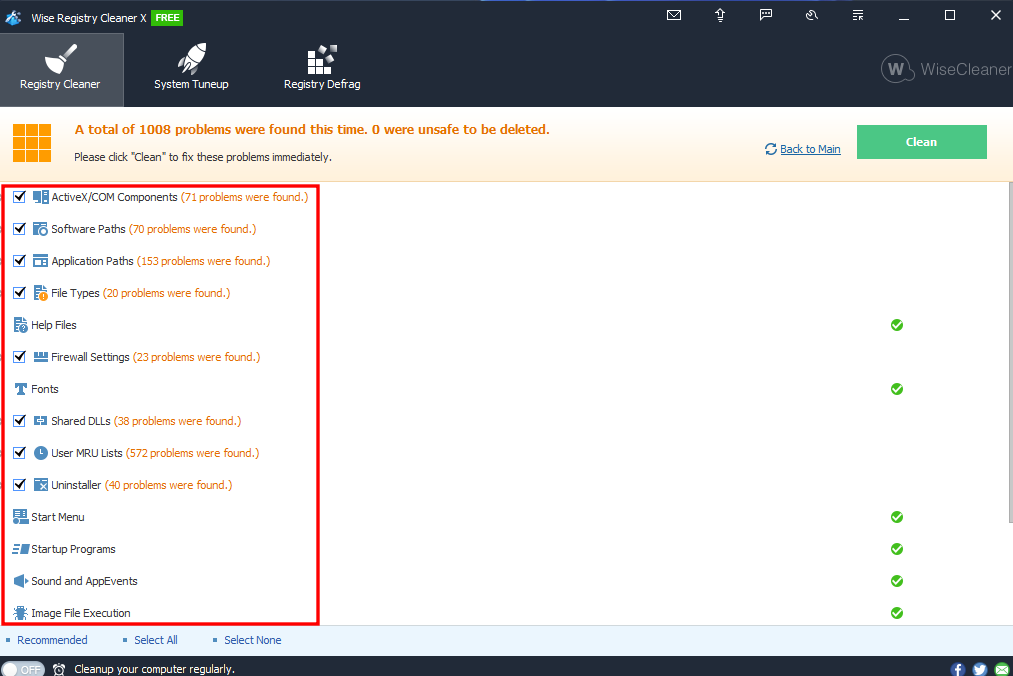
Click on each category to review the issues contained in it. Unselect issues that you are not sure about deleting. Then click on Clean.

3. Auslogics Registry Cleaner
The last registry cleaner that we’re looking at today is an application that is a little on the heavier side, mainly because of the numerous features that it has.
Download: Auslogics Registry Cleaner
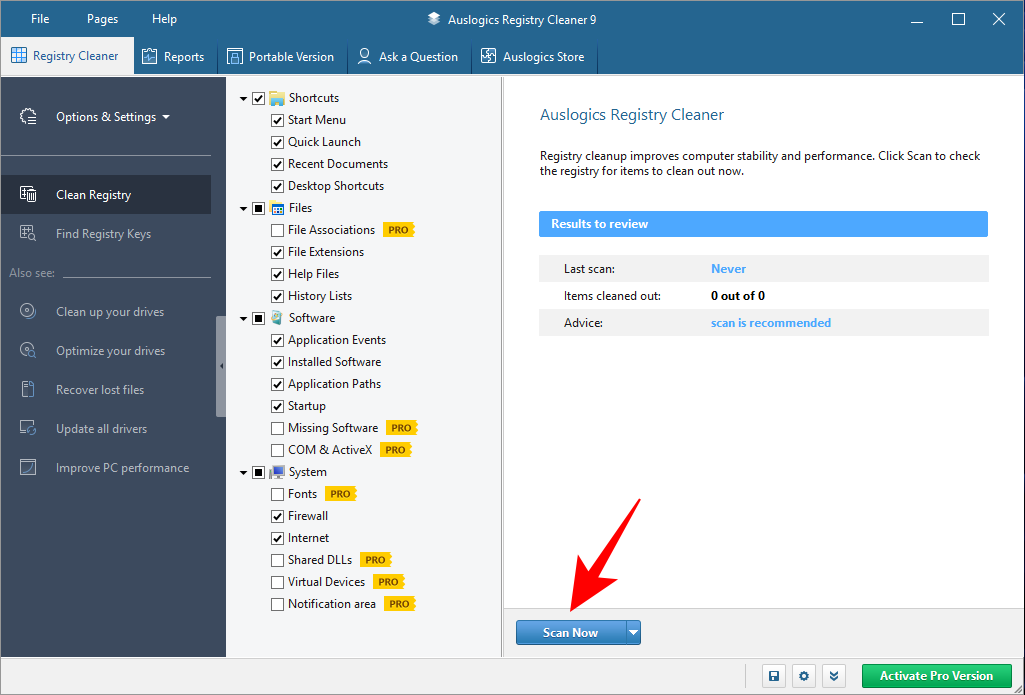
Once you open the application, ‘Clean Registry’ will be the default option. Click on Scan for Auslogics Registry Cleaner to start looking for registry issues.
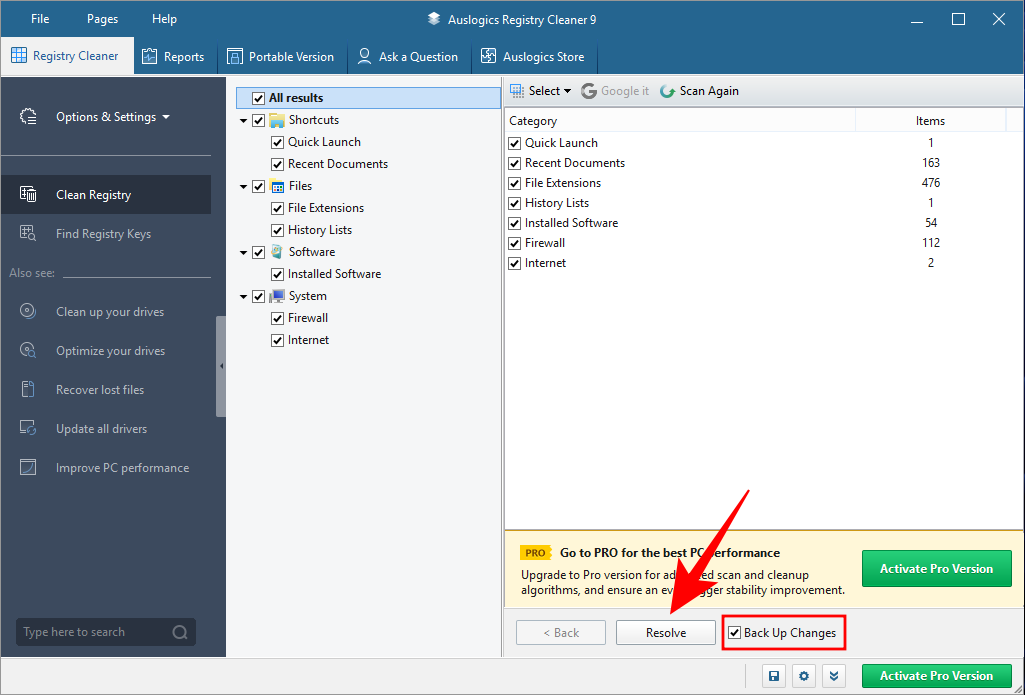
Once the scanning finishes, go through each category and unselect the issues that you’re not sure about fixing. Once you’re satisfied with the issues that you’re resolving, click on Resolve at the bottom (make sure the Back Up Changes option is selected).
How to restore a Registry backup
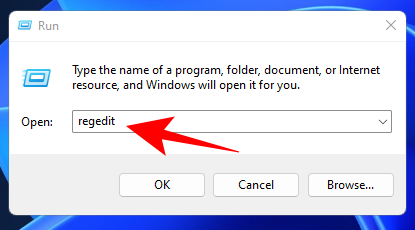
If you made a mistake by deleting a few entries that you shouldn’t have, you may want to restore the registry as it was when a backup was made. To do so, first press Win + R to open the RUN dialog box. Then type regedit and hit Enter to open the Registry Editor.
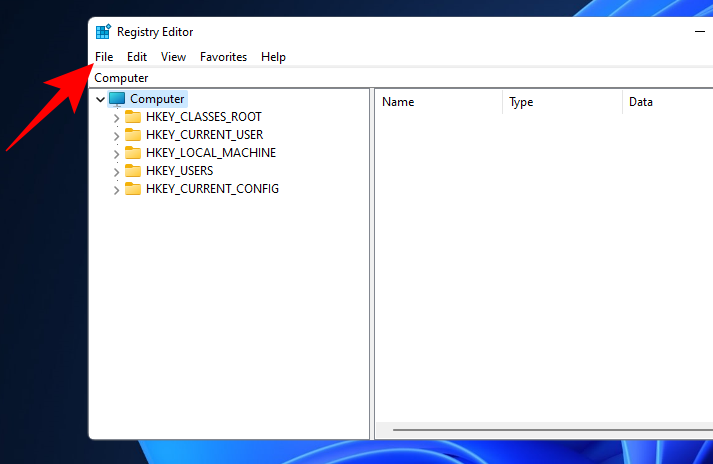
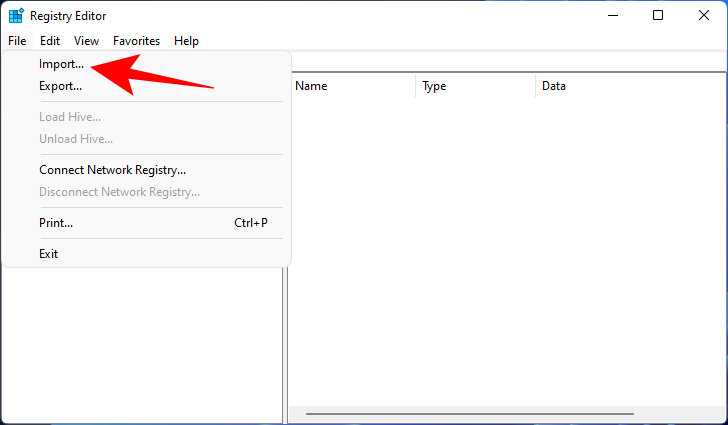
Click on File.
Select Import.
Look for the backup that you created earlier, select it, and click on Open.
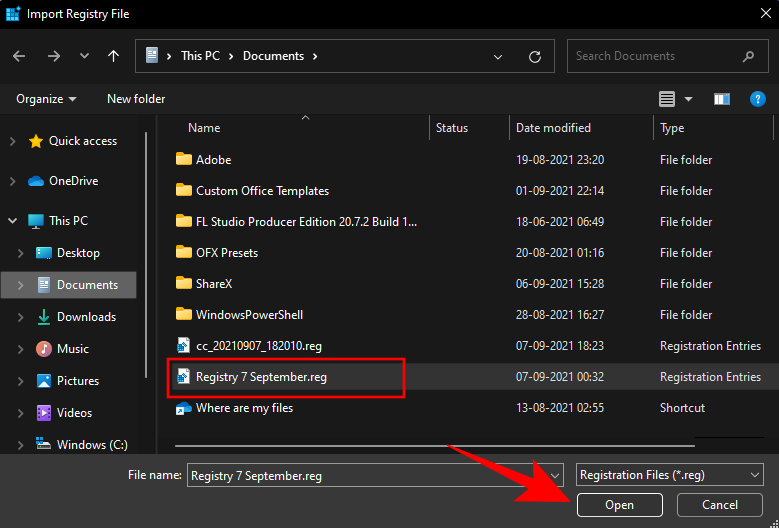
And that’s it! You have restored the registry as it was before you started the cleaning process.
Frequently Asked Questions (FAQs)
Cleaning the registry can be a tricky task, to say the least. Users tend to have a lot of questions about the risks involved in the process and whether the benefits really outweigh those risks. Here we answer a few commonly asked questions to allay some of the fears.
What risks are involved when cleaning the registry?
The biggest risk involved when cleaning the registry, whether you’re doing it manually or delegating the task to a Registry cleaning application, is that you may end up deleting registry entries that are crucial to the proper functioning of your system.
This is why throughout our guide we have placed special emphasis on reviewing the entries before going about deleting them. If you want to negate those risks, always back up the registry and clean the registry from Safe Mode, just to be on the safer side.
When is it recommended to clean the registry?
Cleaning the registry isn’t something that most people tend to do, or even need to. But if your computer is being bogged down and appears a little more sluggish than usual, cleaning the registry can be one way of speeding up Windows 11.
It’s a good practice to keep your system free of unnecessary applications so you don’t need to use a registry cleaner. But if you really need to, we hope you were able to clean the registry responsibly with this guide without running into any trouble.
RELATED
- How to Login as Administrator on Windows 11 or Windows 10
- How to Disable Updates on Windows 11
- How to Repair Windows 11 [15 Ways]
- How to Type Accents on Windows 11 [6 Ways]
- How to Unzip Files on Windows 11 Natively or Using a Software


