
What to know
- Right-click on a ZIP file and select Extract All. Alternatively, click on the ZIP file and select Extract All from the File Explorer toolbar.
- Third-party apps like WinRAR also let you extract zip files, among other archive formats.
- You can also unzip individual files from a .zip archive. Simply double-click on the zip to access its files, then copy and paste it outside the zip folder.
Archives have been a long-standing way of sharing compressed data since the early ages of Windows. They were the go-to way to save data, storage space, and bandwidth in the early days and have now become an integral way to share multiple files in one go. If you have share a lot of data, then chances are that you have already encountered the most common archive type – ZIP. But what exactly is it? And how can you extract it to get your original files? Let’s find out!
What are ZIP archives?
Archives are compressed and modified single files created from folders, directories, or multiple files. Depending on your files and archive extension, the files can be extremely compressed to save on storage space and bandwidth usage.
ZIP (extension .zip) is an archive format that is the most common and widely used one due to its support for multiple operating systems including Windows, macOS, and Unix. It’s quite easy to extract .zip files and even create your own archives with the .zip extension. Let’s take a quick look at the procedure.
Related: What Windows 11 Services to Disable Safely and How?
How to unzip archives on Windows 11
Windows 11 comes with multiple ways to unzip archives and the revamped File Explorer now gives you the ability to extract all your files with a single click. Follow one of the methods below to extract your files depending on your current requirements.
Natively
Since the days of Windows 7, Microsoft has bundled its own unarchiving and compression utility in Windows that allows you to unzip files natively in Windows 11 as well. You do not need any additional apps or services for this method and you can unzip your files in the following ways, natively on Windows 11.
- Navigate to the .zip file you wish to extract to your local storage and right-click on it. Select ‘Extract all’.

- Now click on ‘Browse’ and select a location where you wish to extract your files.

Note: In case you wish to extract your files to the same location in a folder named the same as your archive, then you can continue with the default path. - Check the box for ‘Show extracted files when completed’ if you want Windows to automatically open the folder with the extracted files.

- Now click on ‘Extract’.

And that’s it! The files will now be automatically extracted to the selected location on your local storage.
Method 2: Using File Explorer
You can also extract your files using the revamped File Explorer in Windows 11. Follow the guide below to get you started.
- Open the file explorer on your PC and navigate to the archive you wish to extract to your local storage. Click and select the archive. Now click on ‘Extract all’ at the top of your screen.

- Click on ‘Browse’ and select a location where you wish to extract your files.
Note: If you wish to extract your files in the same location then you can continue with the default path. - Check the box for ‘Show extracted files when complete’ to view your archive results once it is uncompressed.
- Click on ‘Extract’.
The selected archive will now be automatically extracted to the selected location on your local storage.
Use a third-party app
There are also third-party apps to help you compress files and extract archives. We recommend WinRAR in case you are looking into a third-party utility. Use the link below to download and install WinRAR on your PC. Once, installed, you can use the guide below to extract all kinds of archives from your local storage.
- WinRAR | Download Link
Method 3: Extract files via WinRAR
You can extract files in multiple ways once WinRAR has been installed on your system. Follow one of the guides below that best suits your current needs.
- Navigate to the desired archive on your local storage and right-click on it. Click and select ‘More options’.

- Now click on one of the following options

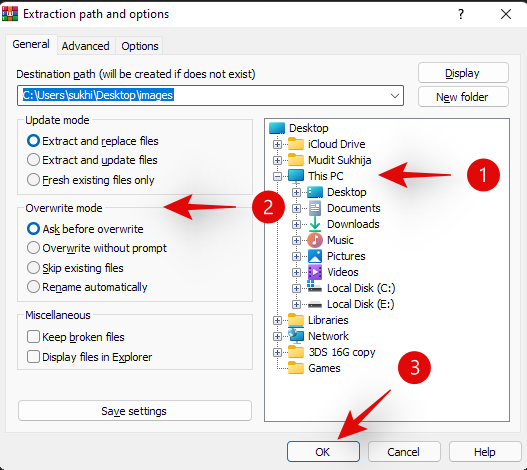
- Extract Files: Selecting this option will open the Winrar extraction window. You can now select your extraction path, what happens with duplicate files, and the overwrite mode for Extract files. Once you’ve made your choices, simply click on ‘Ok’ at the bottom to extract your files.
- Extract Here: This option will automatically extract all the files in your archive to the current folder where your archive is stored. The files will be extracted directly to your archive’s path and won’t be added to a folder of the same name.

- Extract to ‘/Path/Archive name’: This option will extract all your archived files in the current location of your archive, however, all files will be extracted in a folder with the same name as your .zip archive.
And that’s it! The selected archive will now be extracted to your local storage depending on your preferences and requirements.
2. Using WinRAR app
You can also use the native WinRAR app on Windows 11 to uncompress .zip files on your local storage. Follow the guide below to get you started.
- Press Windows + S on your keyboard and search for ‘WinRAR’. Click and launch the app once it shows up in your search results.

- Press Ctrl + O on your keyboard. Now navigate to the desired location where your .zip archive is stored and click and select it. Once selected, hit ‘Enter’ on your keyboard or click on ‘Open’.

- Ensure that the native folder listing is selected at the top.

- Now click on ‘Extract to’.

- Click on the GUI for your local system on your right and select the location where you wish to extract your files. Click on ‘Ok’ once you are done.

Tip: If you want your files extracted to a single folder in that particular location, add the following to your destination path selected above. Ensure that you replace ‘FolderName’ with the folder name of your choice/FolderName
And that’s it! The selected archive will now be uncompressed and extracted to the desired location chosen by you.
Can you extract a file or some files from an archive?
Yes, you can easily extract single files from an archive as well. This saves you the hassle of extracting all your files and then having to delete the ones that you did not need. You can extract particular files from an archive by either using a third-party utility or the native unarchiver bundled with Windows. Follow one of the methods below that best suits your current needs and requirements.
How to unzip a file from a zip file
Here’s how you can selectively unzip particular files from an archive on Windows 11.
Method 1: Natively
- Navigate to the concerned .zip archive on your local storage and double click on it.
- In case you have a third-party unarchiving utility installed on your system, then right-click on the file instead, select ‘Open With’ and click on ‘File Explorer’.

- The archive will open like any other folder in your File Explorer now. Simply copy the file you wish to unarchive and paste it in a convenient location. You can also drag and drop the file to achieve the same effect.

- Once pasted, your file should be automatically extracted and you should be able to use it like any other normal file stored on your local storage.

Method 2: Use a third-party app
We recommend you use WinRAR in case opting for a third-party utility. Use the link below to download and install Winrar to your system. Once installed, follow the guide below to extract particular files from an archive.
- WinrRAR | Download Link
- Navigate to the concerned .zip archive on your local storage and double click on it to open it in WinRAR by default.
- In case WinRAR is not your default unarchiving utility, right-click on the file, select ‘Open With’ and then click on ‘WinRAR’ instead.

- Now click and select the file you wish to extract from the archive. You can hold down Ctrl and click and select multiple files from the archive as well.

- Once selected, click on ‘Extract to’ at the top.

- Choose a location on your local storage using the GUI on your right. You can also enter a path manually using the ‘Destination Path’ field at the top. Click on ‘Ok’ once you are done.

And that’s it! The selected files will now be automatically extracted to the location on your local storage selected by you.
We hope you were able to easily unzip files on Windows 11 using the methods above. In case you face any issues, feel free to drop a comment in the comments section below.
RELATED


