
What to know
- Windows lets you uninstall apps from a variety of locations, including the Settings app, the Start menu, or simply the .exe uninstallation file.
- Other, lesser-known uninstallation ways include the Control Panel, terminal apps, and dedicated third-party uninstallers.
- A few system apps can also be removed using PowerShell and third-party scripts.
Windows comes with a lot of pre-installed stuff that is irrelevant to almost every user. If you bought a pre-built system or a laptop, then chances are that there is additional advertisement software installed on your system which you might wish to remove. You can easily remove and uninstall most apps on Windows with a simple click, however, things get a bit complicated when you get to programs, Windows Store apps, Windows Updates, and system apps. Fear not, you can follow our guides below to remove all kinds of apps from your Windows system no matter your current settings. Let’s get started.
How to uninstall apps on Windows 11 [8 Ways]
Here are all the ways in which you can uninstall an app from your Windows 11 PC. For uninstalling system apps, see its dedicated sections and special methods below after this section.
Method 1: Using Settings
Follow the guide below to uninstall an app via Settings from your system:
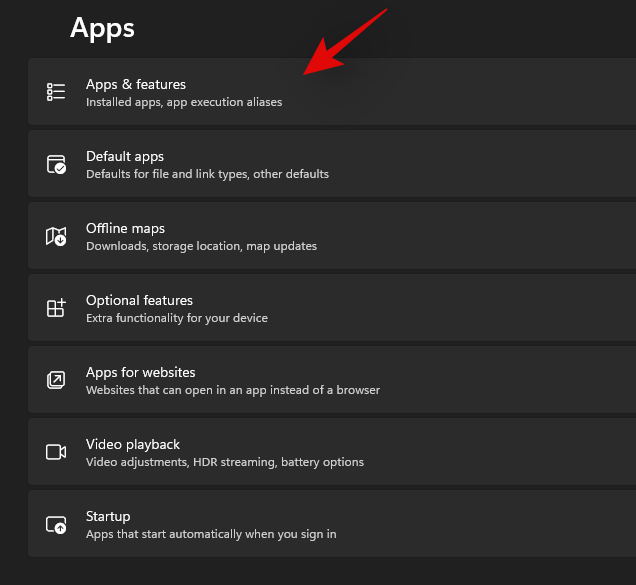
- Press
Windows + ion your keyboard and select ‘Apps’ from your left.

- Now click on ‘Apps & features’ on your right.
- Scroll the list and find the app you wish to uninstall. Once found, click on the ‘3-dot’ menu icon on your right.
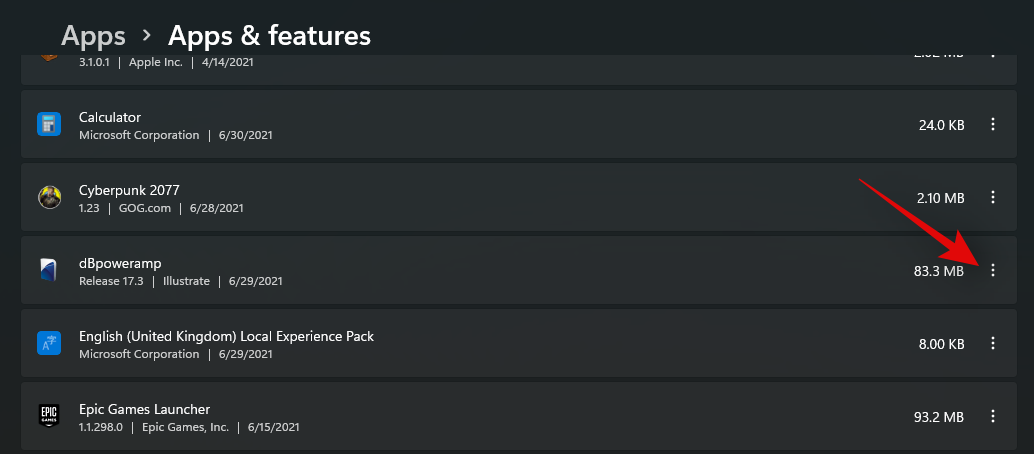
- Click and select ‘Uninstall’.

- Now follow the on-screen instructions to uninstall the app. If you are uninstalling a pre-installed or Windows Store app then it will be automatically uninstalled in the background. However, if it is a third-party program detected by Windows, then Windows will either try to uninstall it in the background or launch the ‘uninstall.exe’ or ‘setup.msi’ so that you can uninstall it on your own with the desired settings.
And that’s it! The selected app should now be uninstalled from your system.
Method 2: Using ‘Start’ menu
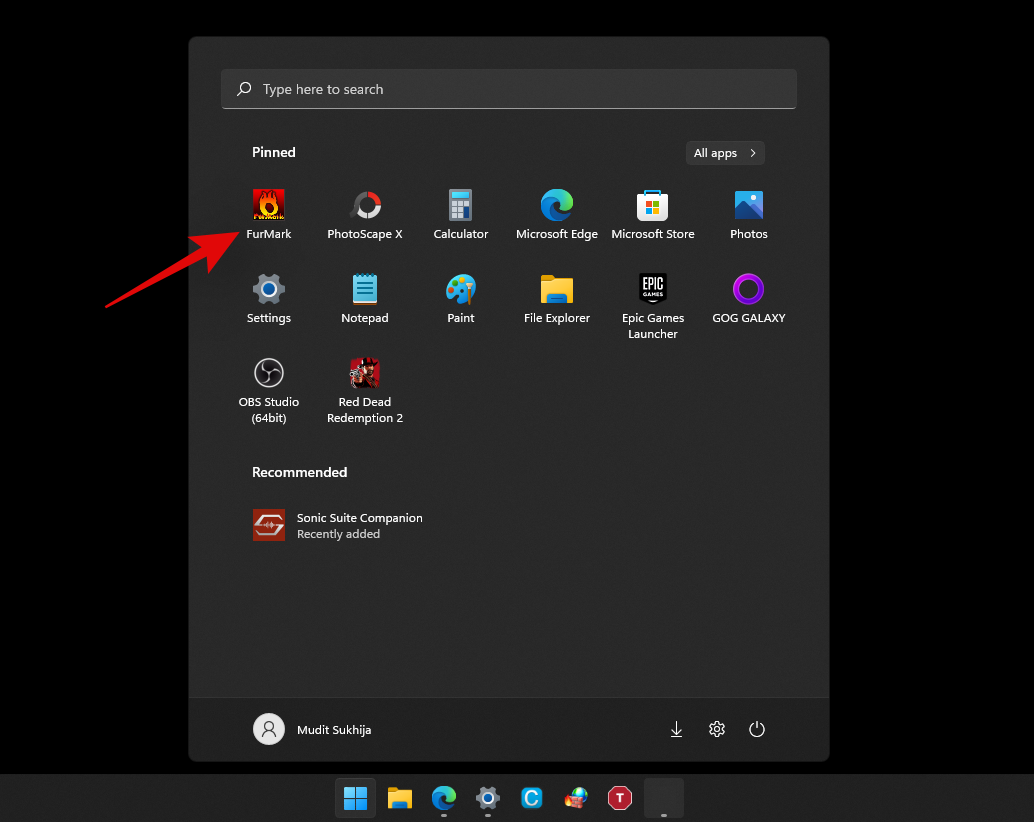
- Press the ‘Windows’ button on your keyboard to bring up the ‘Start’ menu. Alternatively, you can also click on the icon in your ‘Taskbar’.

- Find the app you wish to uninstall and right-click on it.
- Now click on ‘Uninstall’. Follow the on-screen instructions, if needed, to complete the uninstallation process.
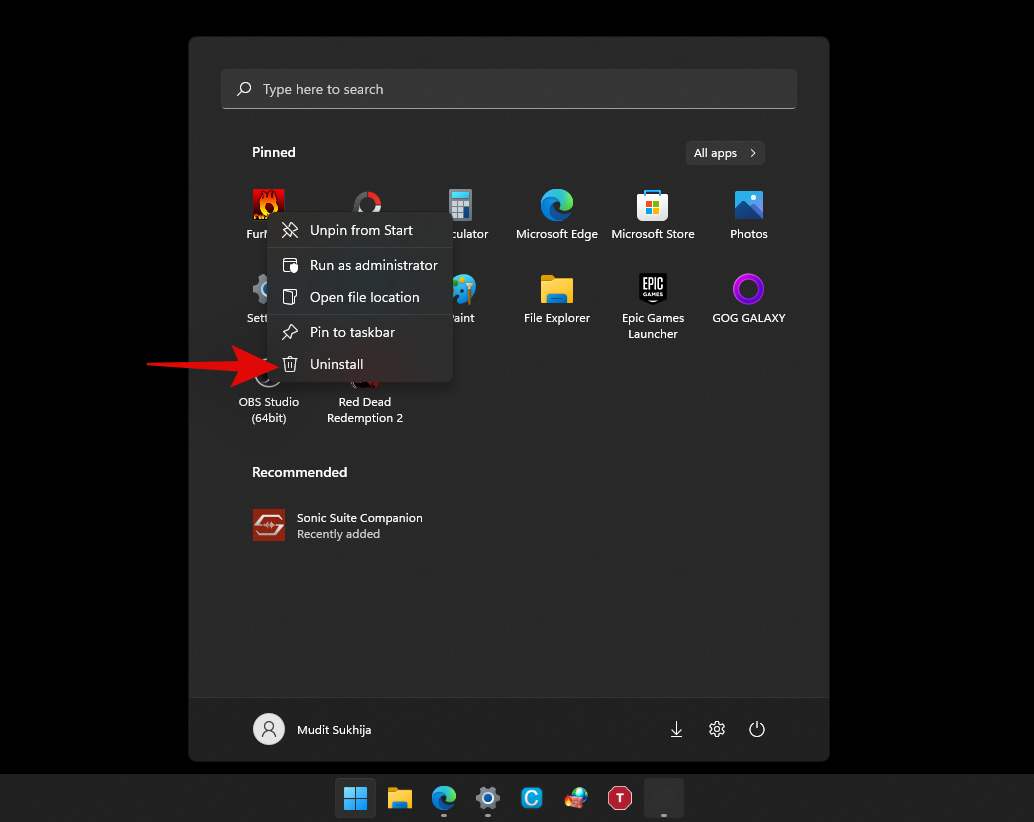
And that’s it! You will now have uninstalled an app from your system via the Start menu.
Method 3: Using the uninstallation ‘.exe’ file
Ideally, you shouldn’t need to manually launch the uninstallation executable file for a program, but in some cases, like older programs, you might have a program installed on your system, whose uninstall option shows nowhere in your Settings. In such cases, you can launch the uninstallation file on your own using the guide below.
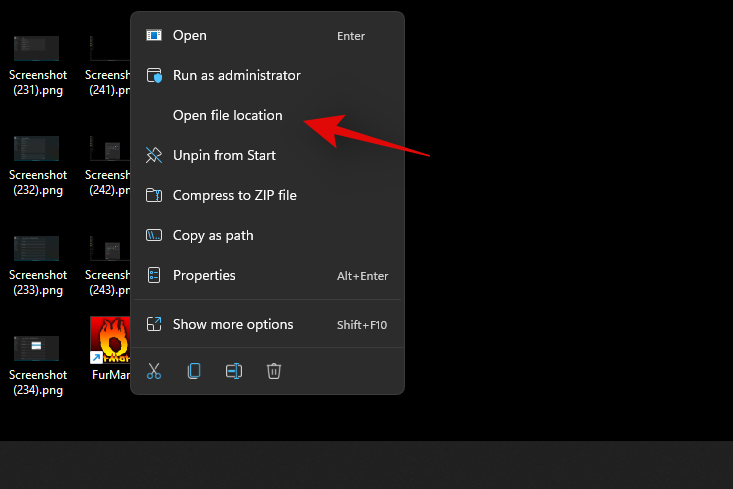
- Locate the program’s .exe file or the shortcut that you usually use to launch the program and right-click on it.
- Select ‘Open File Location’. If you do not see this option, select properties. You will now find the ‘Open File Location’ option in the ‘General’ tab as shown below.
- You will now be taken to the program’s installation directory. Look for a .exe file with either of the following names or a similar name.
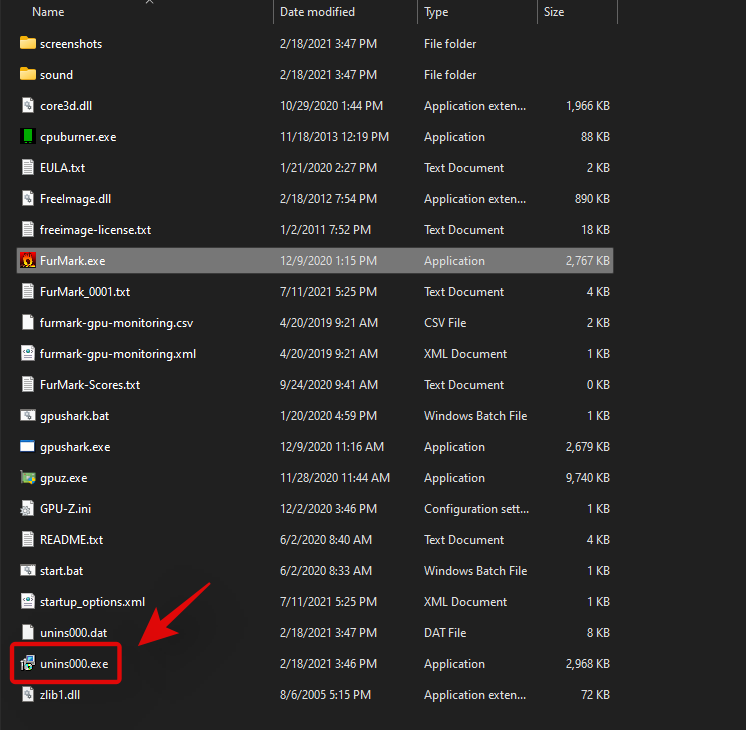
- uninst.exe
- uninstall.exe
- setup.exe
- setup.msi
- (programname)setup.exe/.msi
- (programname)uninstall.exe/uninst.exe
and more. The uninstall program/setup will be named similarly. Once you launch it, you can follow the onscreen instructions to uninstall it from your system. In some cases, you might also get the option to repair, reinstall or modify the program along with uninstallation. You can select the desired option and proceed with the setup as you intend.
Method 4: Using Control Panel
You can also easily remove programs and apps from the Control Panel. Ideally, it is recommended that you only uninstall legacy and modern programs using the Control Panel as not all your installed apps will show up here. Follow the guide below to uninstall programs via the control panel.
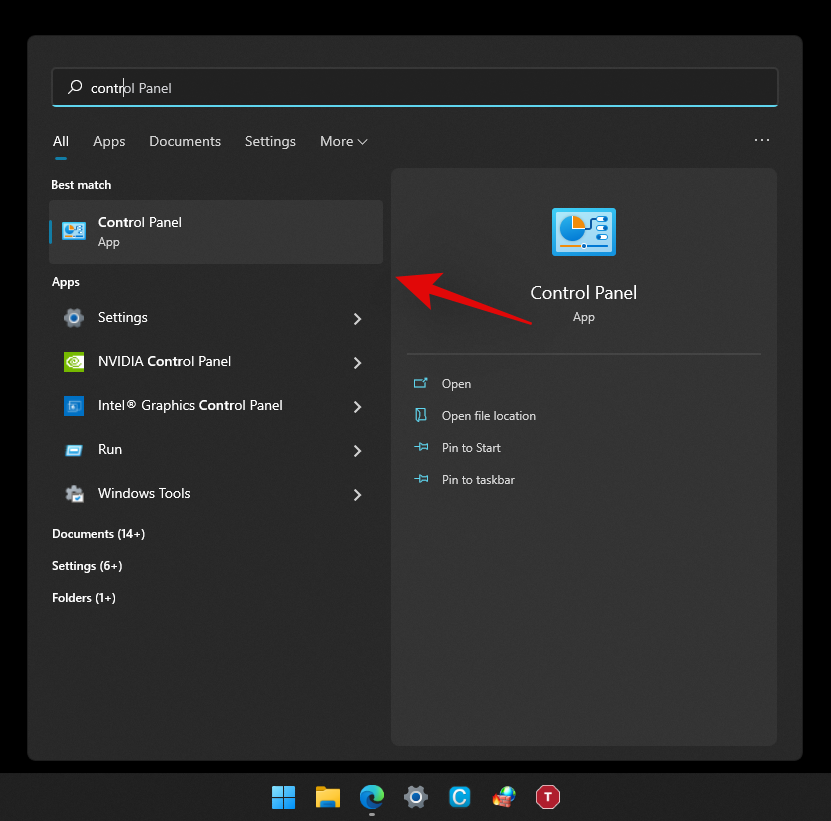
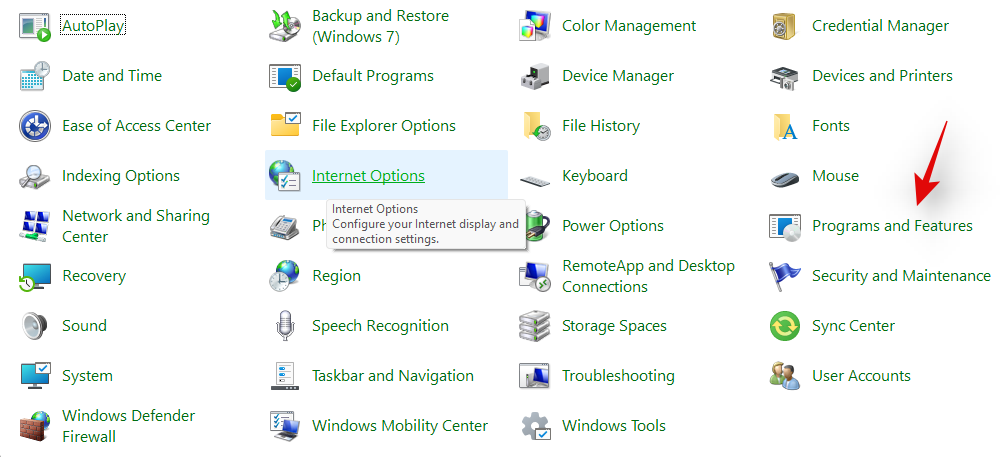
- Press
Windows + son your keyboard and type in ‘Control Panel’. Click and launch the app once it shows up in your search results.
- Now click on ‘Programs and Features’.
- You will now get a list of all the programs installed on your system currently. Find the program you wish to uninstall and click on it.
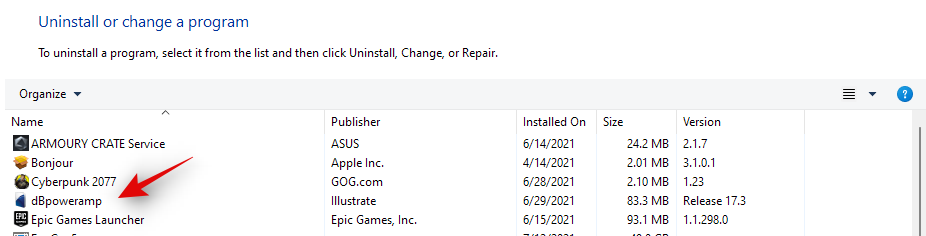
- Now select ‘Uninstall’ at the top.

- Follow the on-screen instructions to complete the installation process. In some cases, this will be an automated process while in others, you might get the option to repair the existing installation or choose which data you wish to retain and which data you wish to delete.
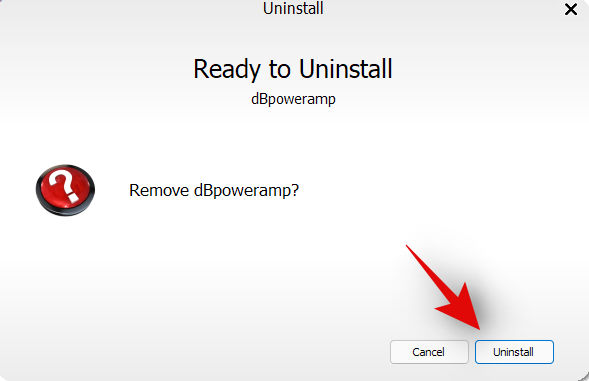
Once you’ve made your choices, the uninstallation process will take place and the program should be removed from your system once the process is complete.
Method 5: Using PowerShell
You can also uninstall apps via an elevated PowerShell in Windows 11. While the uninstallation command is quite simple, getting the package name for the concerned app or program is not. Hence, in the guide below you will find how to uninstall apps via PowerShell if you have the package name.
However, if you do not know how to source your full package name then we recommend you follow the system apps guide below which covers the same method in much more detail. Let’s get started.
- Press
Windows + son your keyboard and type in ‘PowerShell’. Now click on ‘Run as administrator’ once it shows up in your search results.

- Once you get the PowerShell window on your desktop, type in the following command and press ‘Enter’ on your keyboard. Ensure that you replace ‘[Name]’ with the full package name of the concerned app:
Remove-AppxPackage [Name]

And that’s it! Powershell will now do its magic and uninstall the concerned app from your system.
Method 6: Using CMD
You can also use the command prompt in Windows 11 to uninstall apps from your system. Follow the guide below to get you started.
- Press
Windows + son your keyboard and search for ‘CMD’. Click on ‘Run as administrator’ once it shows up in your search results.

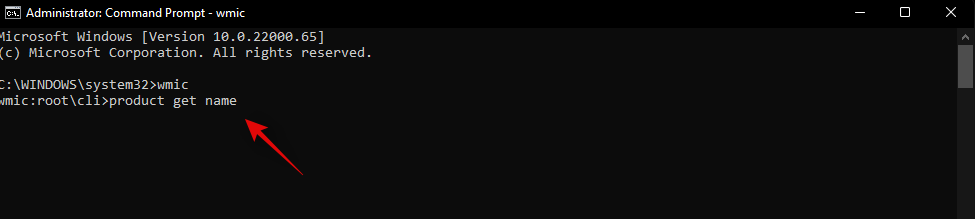
- Once CMD launches, type in the following command and press ‘Enter’ on your keyboard:
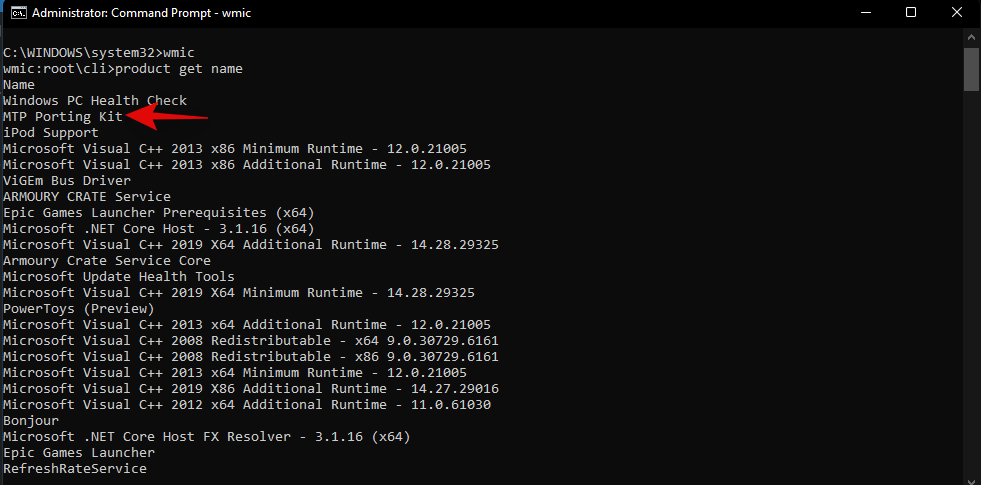
wmic

- Now type in the following command to get a list of all apps and programs installed on your system:
product get name
- Once you get a list of all the programs, find the one that you wish to uninstall in this list. Once found, make a note of its entire name in a convenient location.
- Now type in the following command, and replace AppName with the name of the app you noted down earlier:
product where name="AppName" call uninstall/nointeractive

Note: Do not remove the quotes from the command as they are necessary for this syntax. - Press ‘Enter’ on your keyboard to execute the command. Command Prompt will now carry out the necessary processes in the background and you should get a confirmation as shown below once the process is complete.
And that’s it! You will now have uninstalled an app from your system via the Command Prompt.
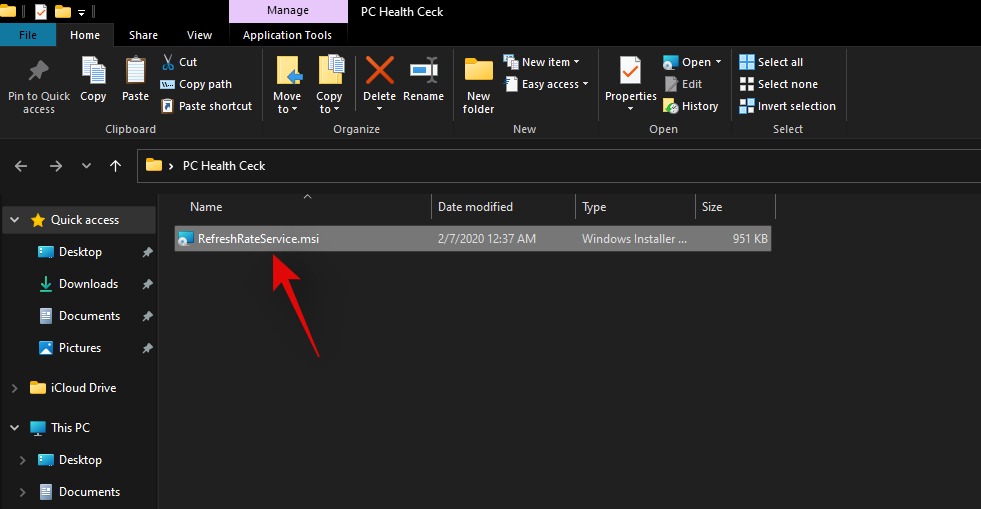
Method 7: Using setup.msi
In case your program came with a setup file that had a .msi extension instead of .exe, then you can use the same file to uninstall your program as well.
- Locate the .msi setup file on your local storage and double click and launch the app.
- Follow the on-screen instructions until you are prompted to select one of the courses of action.
- Repair
- Modify
- Uninstall
- Install Updates
- Remove Updates
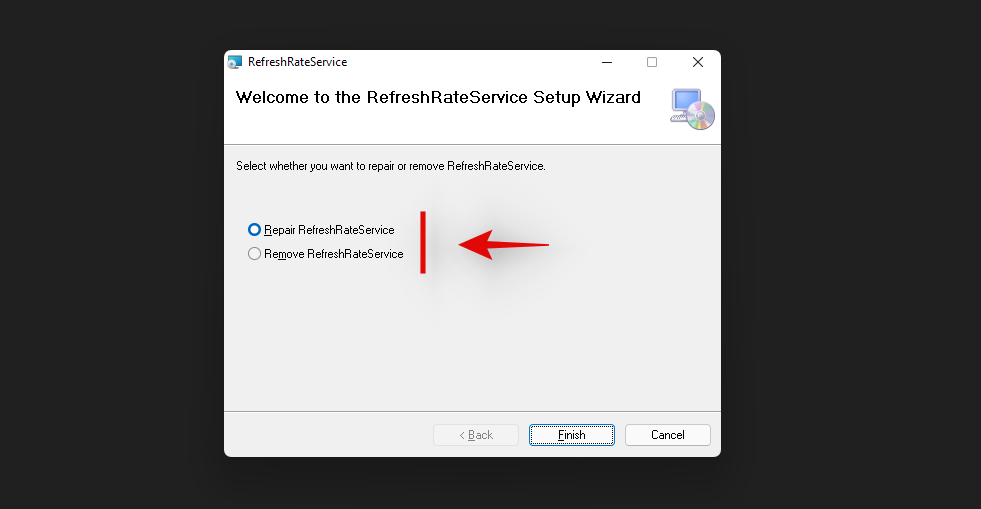
Select the desired option and continue with the on-screen instructions to complete the uninstallation process.
And that’s it! The selected program should now be removed from your system via its .msi setup file.
Method 8: Use a third-party uninstaller
There are various third-party uninstallers available on the market as well. These apps help identify all the system and third-party apps on your system which can then be uninstalled from your PC with a simple click. Most of these programs allow you to remove system apps after opting for the premium model of the software.
In case you decide to use the free version, you will be limited to a certain number of uninstalls in most cases. While this might sound redundant, these utilities are extremely useful for professionals and technicians who need to uninstall multiple programs with a single click. Most of these uninstallers support bulk uninstallations which is quite useful when setting up multiple systems for an office environment. We have linked the two most popular third-party uninstallers below. We hope you find them useful in your quest to uninstall programs from Windows 11.
- Revo Uninstaller | Download Link
- IObit Uninstaller | Download Link
How to uninstall system apps on Windows 11 [2 Ways]
You can uninstall system apps on Windows 11 either via an elevated PowerShell or by using a third-party PowerShell script. I would recommend that you use the PowerShell method, although it might seem more complicated, you won’t have to run third-party scripts with elevated privileges on your system.
However, if you still decide to use an automated script, ensure that you change your execution policy back to normal once the script has been executed. This will be paramount to your system’s security as leaving the execution policy unchanged might allow malicious users to run PowerShell scripts on your system easily. Use one of the methods below that best suits your current needs and requirements to get started.
Method 1: Using Powershell
The PowerShell uninstallation process for any program has two processes. First, sourcing the full package name of the concerned app and then using PowerShell to uninstall the concerned app. If your app does not show up in the PowerShell list, then you might have to use the third-party script below to remove the concerned app from your system. Let’s get started.
Step 1: Source full package name
- Press
Windows + son your keyboard and search for ‘PowerShell’. Click on ‘Run as administrator’ once it shows up in your search results.
- Once PowerShell launches, type in the command below and press ‘Enter’ on your screen:
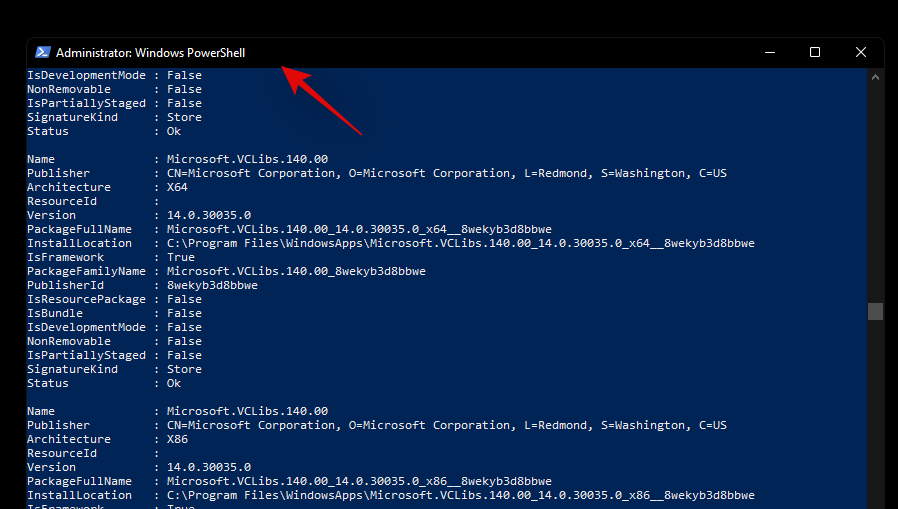
get-appxpackage
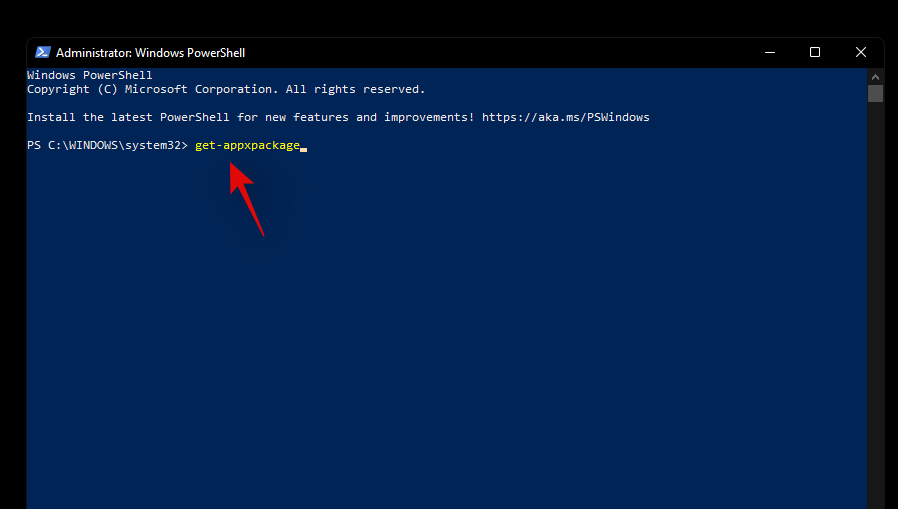
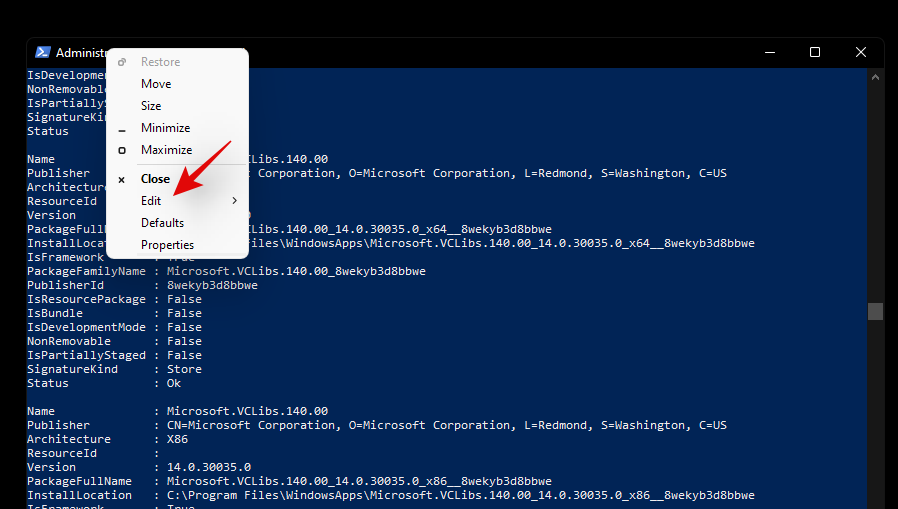
- PowerShell will now generate and show a list of all the apps installed on your system including built-in OEM apps and Windows apps. Scroll the list to find your app, however, if this seems too tedious, start by right-clicking on the title bar at the top.
- Now select ‘Edit’.
- Click on ‘Find’.
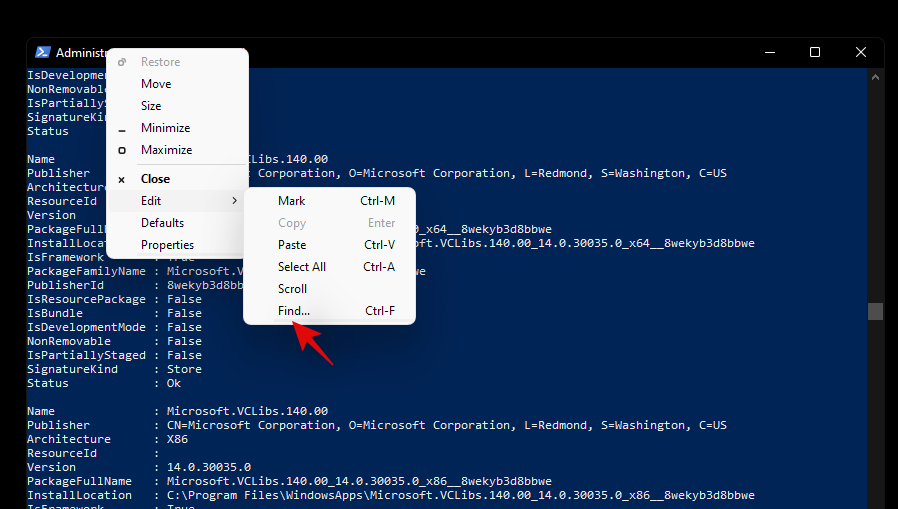
- Now search for the general name of the app and the ‘Find’ feature should automatically take you to the app in the list.
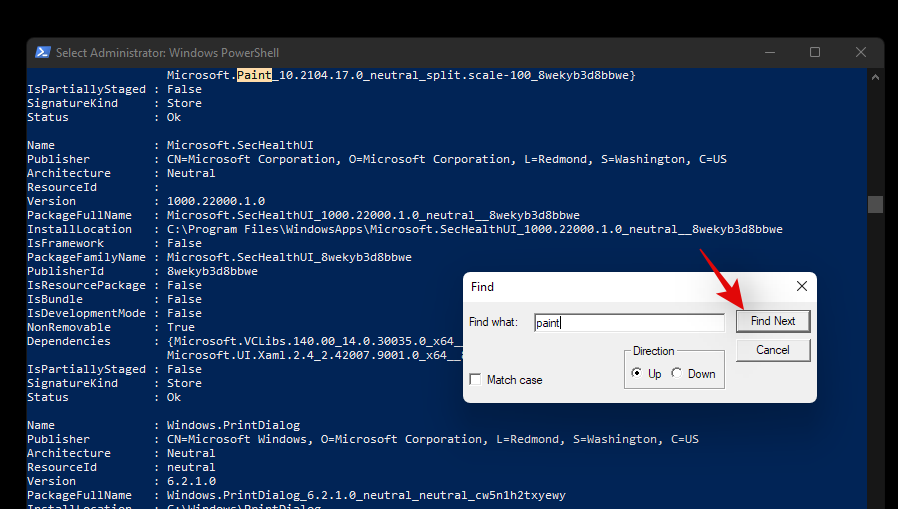
- Note down the ‘FullPackageName’ of the concerned app as shown below.

And that’s it! You will now have sourced the full package name for the concerned app on your system. You can now use the guide below to uninstall it from your system.
Step 2: Uninstall apps via PowerShell
Open an elevated PowerShell using the guide above. If you already have one open on your screen, then start by typing in the following command. Ensure that you replace ‘[PackageName]’ with the full package name of the app we sourced above.
Remove-Appxpackage [PackageName]
Hit ‘Enter’ on your keyboard once you are done. PowerShell will now do its thing and the app should be installed from your system in no time.
Can’t remove an app using PowerShell? How to fix
If you are unable to remove the app via PowerShell then we recommend you do the following checks to solve the issue.
- Ensure that you are using an elevated PowerShell window.
- Ensure that the Full Package Name has been sourced correctly.
- Verify your ‘uninstall’ codes and try to keep everything lowercase.
- Repeat the same guide in Safe mode.
- Verify if the app hasn’t been already removed from your system and only leftover registry files are showing up in PowerShell.
You should be able to solve your issue by crosschecking the above-stated checks. However, if you are still unable to uninstall the concerned app, then you can use the third-party script below.
Method 2: Using a third party script
You can also use a third-party script to remove system apps from your Windows 11 system. These scripts have been quite popular lately and have been the go-to choice for many users when setting up fresh installations of Windows. Use the guide below to get started.
- Windows10debloater by Sycnex | Download Link
Note: While this is a Windows 10 script, it has been verified to remove system apps on Windows 11 as well. However, we recommend you keep checking the download page for updates that should be better compatible with Windows 11. We recommend using the script to only remove system apps and nothing else offered by the script. Other features could potentially break Windows 11 until a compatible script for the same is released in the future.
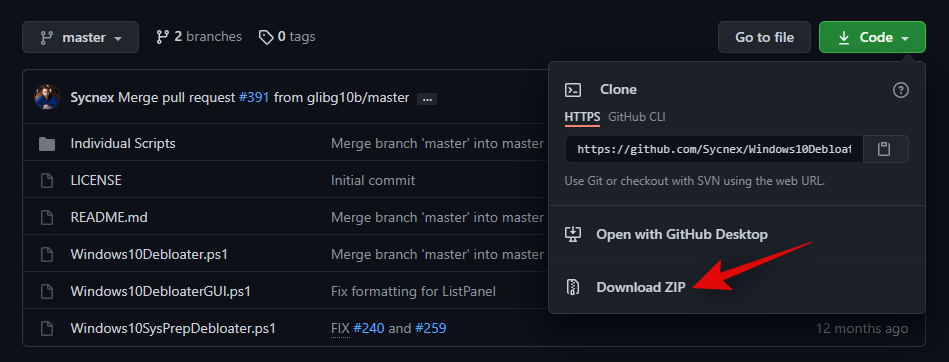
- Visit the link above and you will be taken to the GitHub page for the script. Click on ‘Code’ in the top right corner.

- Now click and select ‘Download ZIP’.
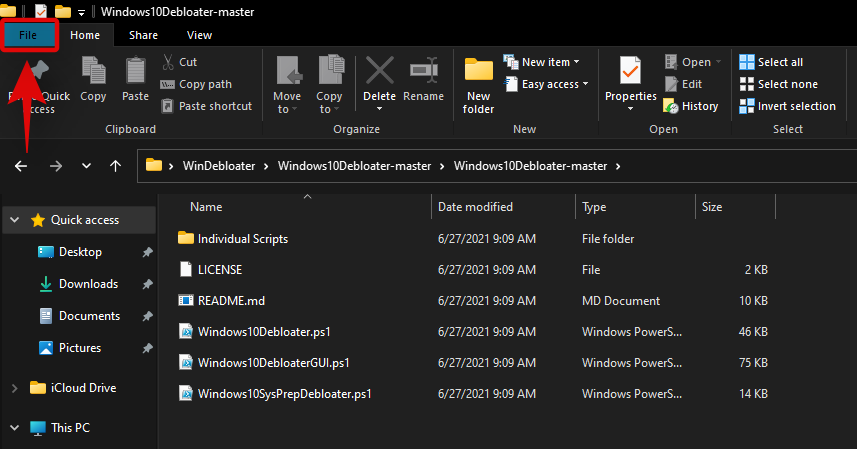
- A Zip file will now be downloaded to your local storage. Extract the files to a convenient location.

- Once extracted, open the folder and click on ”File’ in the top left corner.
- Hover over ‘Open Windows PowerShell’ and select ‘Open Windows PowerShell as administrator’.

- An elevated PowerShell window will now launch on your system. Start by executing the following command given below:
Set-ExecutionPolicy Unrestricted -Force

- This will set your script execution policy as unrestricted which will allow us to use the script on your system. Once executed, enter the following command in the window and press ‘Enter’ on your keyboard once you are done:
.\Windows10DebloaterGUI.ps1

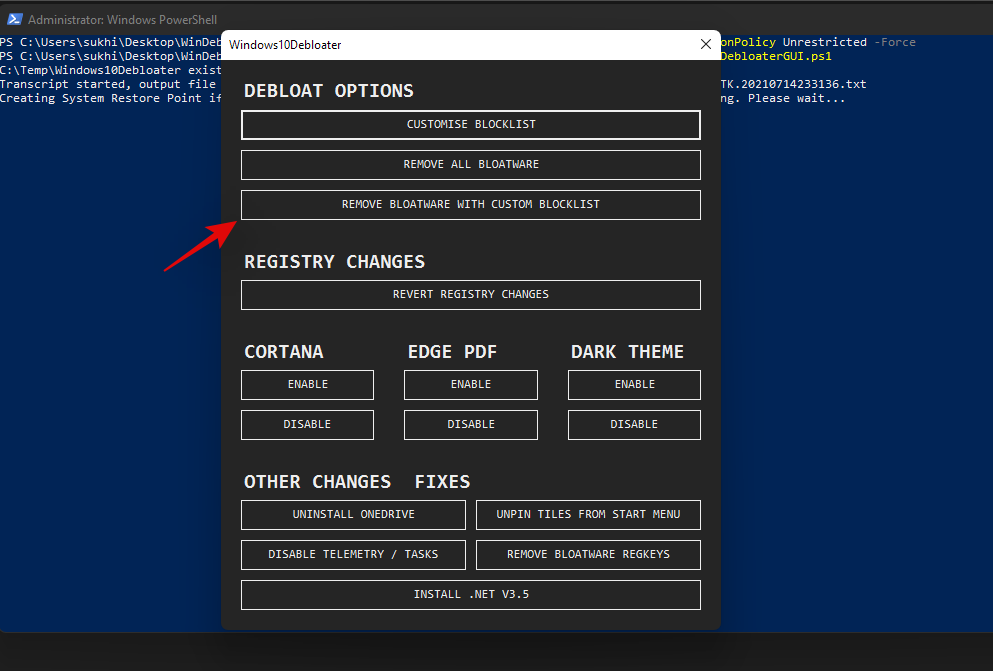
- This will execute the debloat script and you should now get a graphical interface for it on your screen. Click on ‘Customize Blacklist’ at the top.
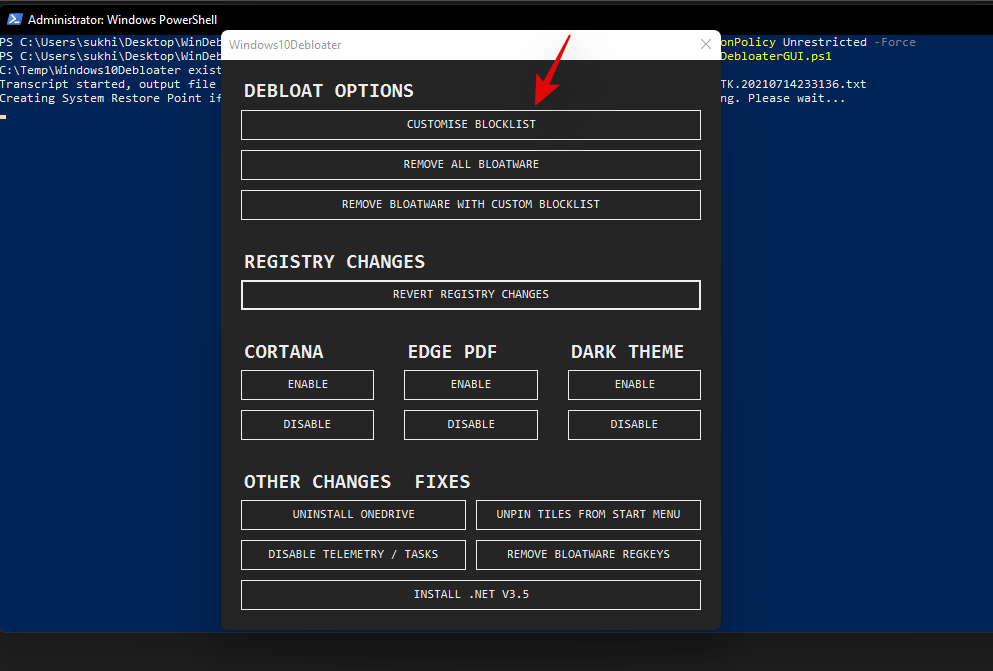
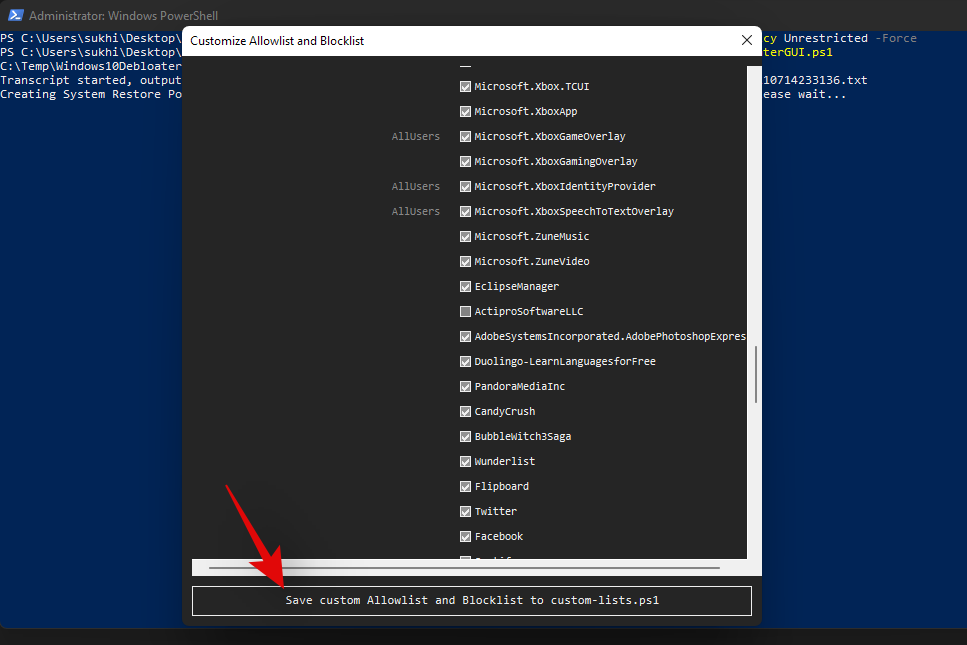
- You will now get a list of all the apps installed on your system. Check the box for the apps you wish to uninstall and uncheck the box for the apps you wish to keep on your device. Ensure that you go through the entire list to remove any default selections made by the script for the programs that you wish to keep on your device.

- Once you have edited your list, simply click on ‘Save custom Whitelist and Blacklist to custom-lists.ps1’ at the top. You can now close this app selection window.
- Now click on ‘Remove Bloatware with Customized Blacklist’. Keep an eye on the PowerShell window on the background once the command executes.
- Once all programs have been removed, you will get a confirmation for the same in the PowerShell window in the background. Close the graphical interface by clicking on the ‘X’ in the top right corner.
- Now go back to your PowerShell window and execute the following command:
Set-ExecutionPolicy Restricted -Force
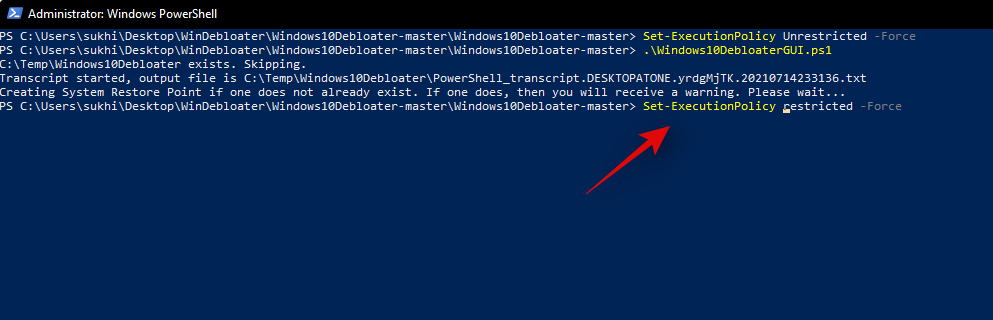
This will revert changes to your execution policy and revert the changes we made earlier. Doing this is quite important to maintain proper security on your Windows system.
And that’s it! You will now have uninstalled system apps from your system via a third-party PowerShell script.
Can’t uninstall apps on Windows 11? How to fix
There could be a few reasons why you are unable to uninstall apps on your system. Here are a few workarounds that should help you uninstall persistent apps from your system easily.
Method 1: Close the instance in the task manager and try again
Chances are that the app has an instance or a process open in the background which is preventing it from being uninstalled. In such cases, you can try finding processes related to the app and kill them on your own. Once the processes have been killed, you can then try to uninstall the app again. Follow the guide below to find and kill the process.
- Press
Ctrl + Shift + Escon your keyboard to open the ‘Task Manager’. Switch to the ‘Details’ tab by clicking on it.

- Now look for a process in the list for the concerned app. In our case, we are looking to uninstall ‘AsusOptimization’, hence we will look for a PowerToys process. Once found, click and select the process.

- Hit delete on your keyboard or click on ‘End Task’.
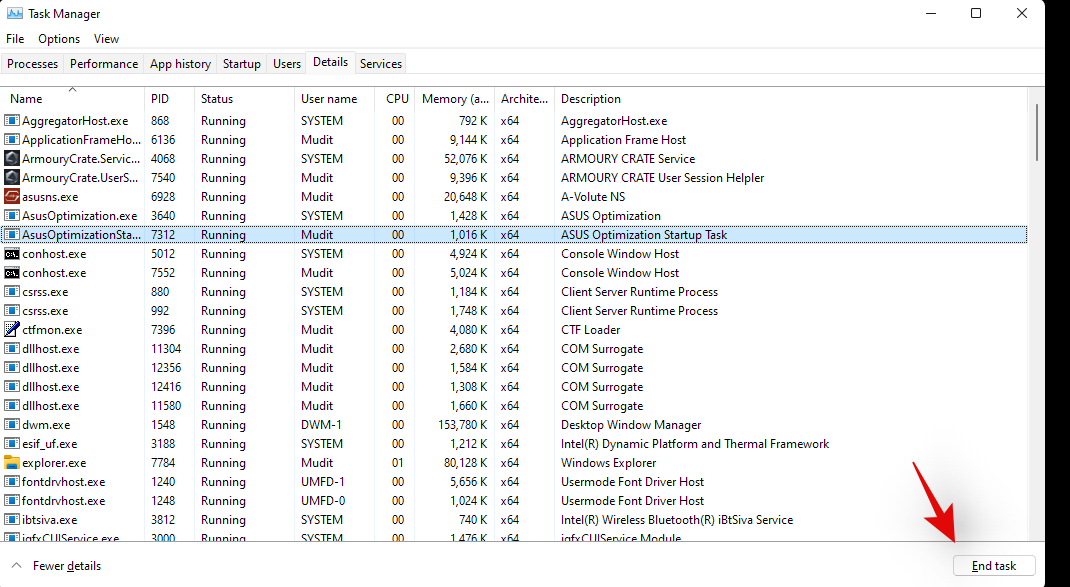
- Confirm your choice by selecting ‘End Process’.

And that’s it! the process should now be killed and you can now try uninstalling the concerned app again.
Method 2: Uninstall in Safe mode
Another way to ensure that no third-party apps are launched or used in the background is to launch your system in safe mode and then try to uninstall your concerned app. You can use this guide to enter safe mode on Windows 11.
Once in safe mode, follow the guide below to get the installer service back up and running on your system. Once the service is running in the background, you can use either of the methods above to uninstall the concerned app from your system.
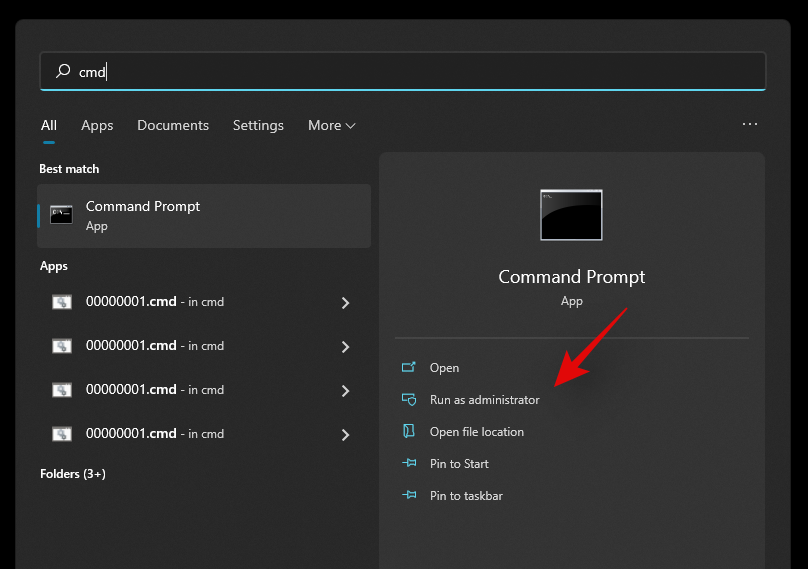
- Press Windows key + S key to open Windows Search and type in ‘cmd’. Click on ‘Run as administrator’ when the command prompt shows in your search results.
- Enter the following commands in the command prompt one by one and hit Enter on your keyboard to execute each one of them.
REG ADD "HKLM\SYSTEM\CurrentControlSet\Control\SafeBoot\Minimal\MSIServer" /VE /T REG_SZ /F /D "Service"
REG ADD "HKLM\SYSTEM\CurrentControlSet\Control\SafeBoot\Network\MSIServer" /VE /T REG_SZ /F /D "Service"
net start msiserver

And that’s it! The installer service should now be running on your system and you should now be able to uninstall the concerned app using either one of the methods above.
Method 3: Run the Microsoft Uninstaller troubleshooter
You can also run a Microsoft Troubleshooter to try and fix uninstaller issues. Use the guide below to launch an uninstaller troubleshooter on your Windows 11 system.
Required
- Microsoft Install and Uninstall Troubleshooter | Download Link
Guide
- Download the troubleshooter using the link above to your PC. Once downloaded, extract the .zip file to a convenient location, right-click, and select ‘Extract All’.
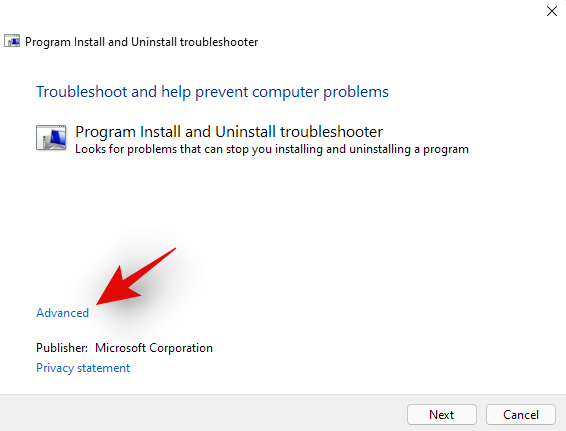
- Navigate to the extracted files on your local storage. Cut the file named ‘MicrosoftProgram_Install_and_Uninstall.meta.diagcab’ and paste it on your desktop. Double-click and run the file from your desktop. Click on ‘Advanced’ at the bottom once the troubleshooter is launched.
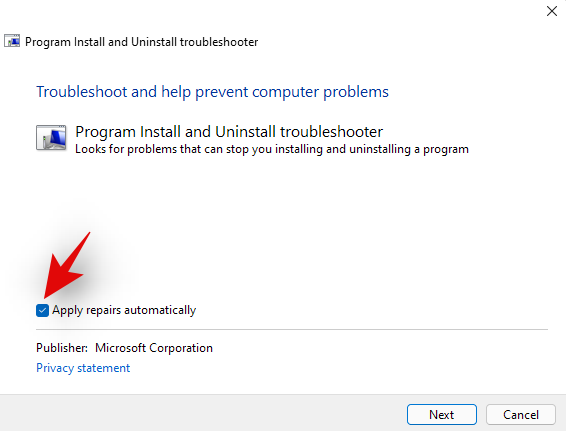
- Check the box for ‘Apply repairs automatically’. Click on ‘Next’ once you are done.
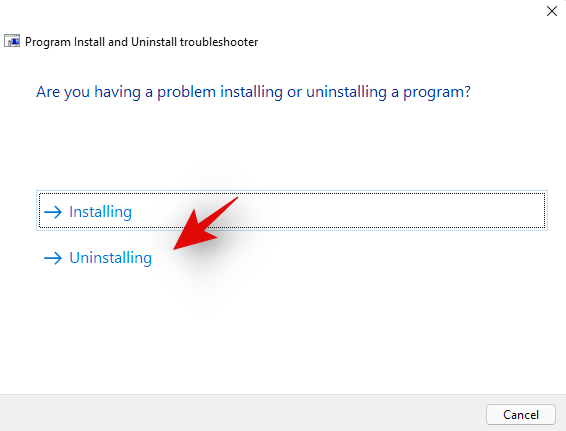
- Select ‘Uninstallting’ on the next step.
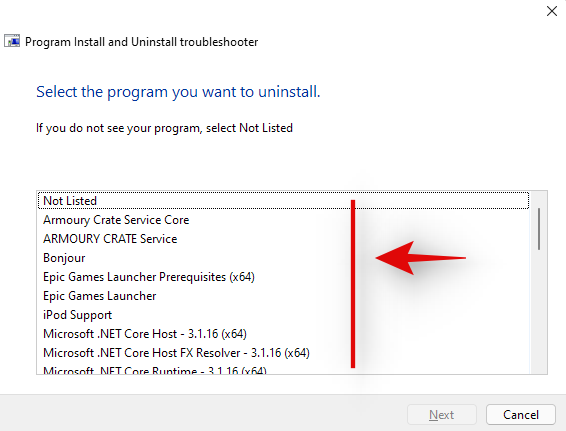
- Select the concerned program from the list provided on your screen. If your program does not appear in the list, click on ‘Not Listed’.
- Now follow the on-screen instructions depending on your choice to complete the troubleshooting process.
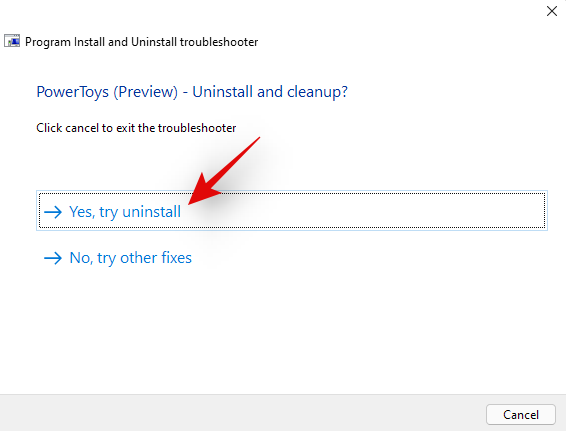
And that’s it! In most cases, the troubleshooter will detect your issue and solve it automatically. A report for the same will be presented to you at the end of the process with all the details.
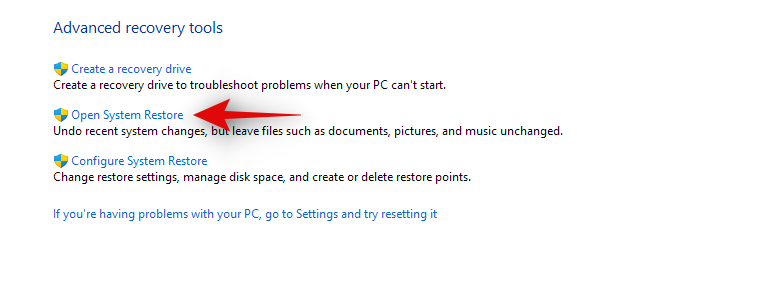
Method 4: Use a restore point
If you are still having issues uninstalling the software from your system then it is time for some drastic steps as this could be malicious in nature. Let’s restore your PC to a restore point before the concerned app or program was installed on your system.
- Press Windows + S on your keyboard and search for ‘Recovery’. Click and launch the app link once it shows up in your search results.

- Click on ‘Open System Restore’.
- You will now be suggested a recent system restore point if you have one. Select that if needed, or click on ‘Choose a different restore point’ if you wish to choose an older one.
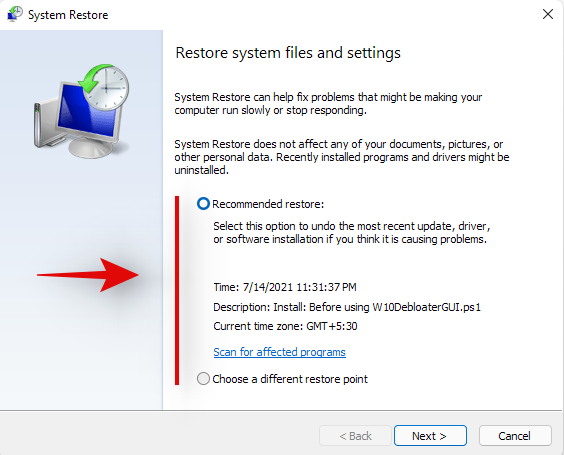
- Select ‘Next’ or hit ‘Enter’ on your keyboard.
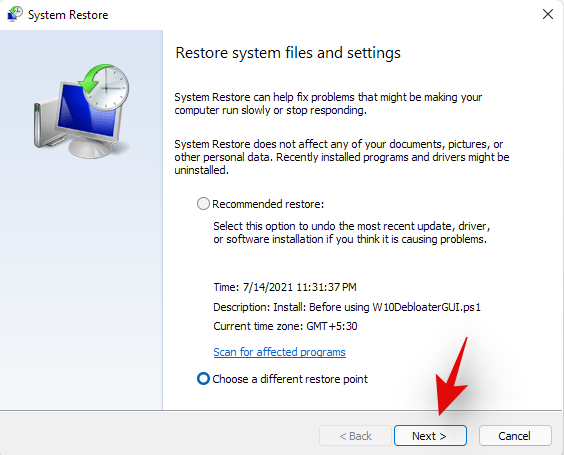
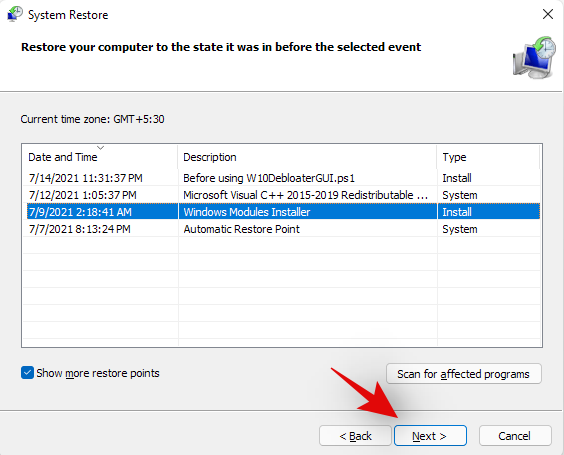
- You can now select the desired Restore Point from the list at the top. You can check the box for ‘Show more restore points’ if you wish to look at more restore points.
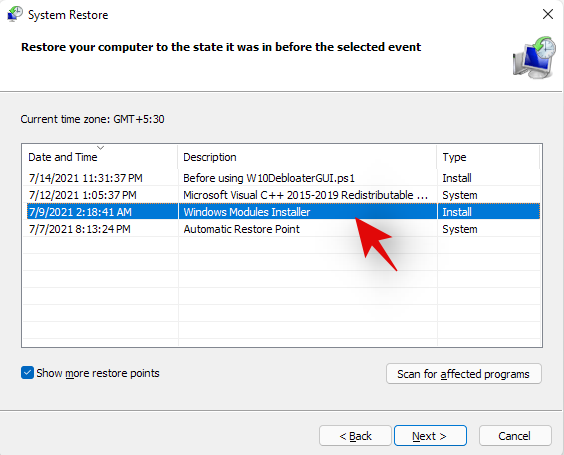
- Once selected, click on ‘Next’.
- Finally, click on ‘Finish’.
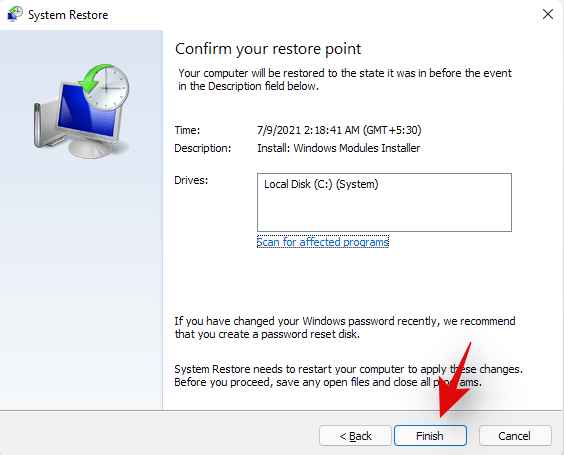
Windows 11 will now restore your system to the selected restore point and the concerned app should no longer be on your system once the process is completed.
Method 5: Contact Windows Support
If you are still unable to get the app uninstalled from your system then it might be time to contact Microsoft Support. Microsoft Support executives are trained to solve such issues with more expertise and can even remotely takeover your system if needed. It might be time to get in touch with the support team to solve your issue. Additionally, if you purchased a pre-built system, you can use your OEM support for some help as well. Use the link below to get in touch with Microsoft Support.
Uninstall programs on Windows 11: FAQs
Let’s consider a few commonly asked questions about uninstalled apps and programs on Windows 11.
Can you uninstall pre-installed apps?
Well, officially, you can not and it is not recommended by Microsoft. But still, if you wish to remove preinstalled apps, you can easily do so depending on the type of the app. If you wish to remove a system app then the process is a bit complicated. Else, if you wish to remove third-party pre-installed apps then you can simply do so by uninstalling them like any other app from your Windows 11 Pc using the guide below.
Can you uninstall system apps?
Yes, you can uninstall system apps but not officially. Officially Windows 11 or any Windows for that matter, doesn’t allow you to remove system apps from the OS. However, there are many workarounds to circumvent this restriction and uninstall preinstalled system apps from your system.
This includes using command prompt/PowerShell or a third-party software. Using these methods you should be able to easily uninstall system apps from your system. Follow our guides below for each of the methods depending on your current needs and requirements.
Can you uninstall apps downloaded from the Microsoft Store?
Yes, apps downloaded from the Microsoft Store can be uninstalled easily using either of the methods listed below. This includes Android apps that you may have downloaded on your system but did not find appealing enough. We recommend uninstalling Windows Store apps either via Settings or Start.
Chances are that the Store app will now show up in the Control Panel and if uninstalled via CMD or PowerShell, you could end up with leftover files including empty Start menu folders. Hence, use Powershell or CMD for Windows Store apps only if you are facing an issue uninstalling them via the Settings or the Start menu.
What happens when you uninstall a program?
Uninstallation is the process of removing a program or an app from your system. While apps are installed singularly with all dependencies available to them in a sandbox, programs operate differently. Programs usually have scheduled tasks, customized registry values to execute them, and dependencies for various Windows features and extensions that they need for their own installation process to create and place every file and task correctly.
Hence the removal process for all these things created by a program when it is first installed on your system is called uninstallation. All scheduled tasks, registered services, registry keys, executables, temporary files, log files, and more are removed once you uninstall a program from your system. In some cases, you will be leftover with settings and save files so that you don’t have to set up the program entirely when installing it in the future.
These files can be cleared by clearing your Windows Cache and temporary files in most cases. However, if you still suspect leftover files from a program on your system, then we recommend checking the following places for any leftover files. If found, you can simply delete them like any other file on your system.
- /Documents
- C:\Program Files (x86)\Common Files
- C:\Program Files\Common Files
- C:\ProgramData
- C:\Users\USER\AppData\Local
- C:\Users\USER\AppData\LocalLow
- C:\Users\USER\AppData\Roaming
- C:\Users\USER
How to remove data of uninstalled programs
If you still see the remaining files and folders or context menu options for a removed program or app, then you can try the fixes below to solve your issue.
Method #01: Clear cache and temporary files from Windows
You should first try clearing cache and temporary files from your Windows 11 system. In most cases, this will help the overall File Explorer UI to refresh itself which should automatically remove leftover files and context menu items for removed programs from your system.
You can use this comprehensive guide by us to easily clear your Windows 11 cache and storage. You can also use the same guide to free up storage space on your system as well by deleting other large files and installations that show up in the list.
Method #02: Check for leftover files manually
You can also check and delete all leftover files manually for the removed program or app. You should start by using Windows Search to look for any files or folders associated with the uninstalled program. You can then delete these manually from your local storage.
Once you have deleted all the files and folders that show up in the search, you can proceed to manually check the locations listed below. If they contain any leftover files or folders from the removed program, then you can simply select them and delete them from your system.
- /Documents
- C:\Program Files (x86)\Common Files
- C:\Program Files\Common Files
- C:\ProgramData
- C:\Users\USER\AppData\Local
- C:\Users\USER\AppData\LocalLow
- C:\Users\USER\AppData\Roaming
- C:\Users\USER
Method #03: Run a third-party uninstaller/cleaner
If you are still left with the remaining files and context menus for the program then it is time to use a third-party uninstaller or cleaner. These programs are specifically designed to identify and remove leftover files from previously uninstalled programs on your system. We recommend you give Revo uninstaller a try as even the free model for the app will help you identify the location of leftover files which can then be deleted by you manually. You can also use something like CCleaner that is designed to remove leftover files and free up storage and processing space on your system.
Method #04: Try to remove the app via PowerShell
If nothing works, then chances are that the concerned app was installed on your system using elevated privileges which prevents some files and folders from being removed from your system.
In such cases, we recommend you try to remove the app via PowerShell. You can use our guide above to remove system apps from Windows 11 via PowerShell. You will first need to source the full package name for your app or program, which can then be used to force uninstall it from your system.
Can you uninstall Windows Updates?
Yes you can easily uninstall Windows Update from your system. New updates can often introduce compatibility issues on older hardware and having the option to uninstall updates can always help. You can use the guide below to uninstall recently installed updates from your system.
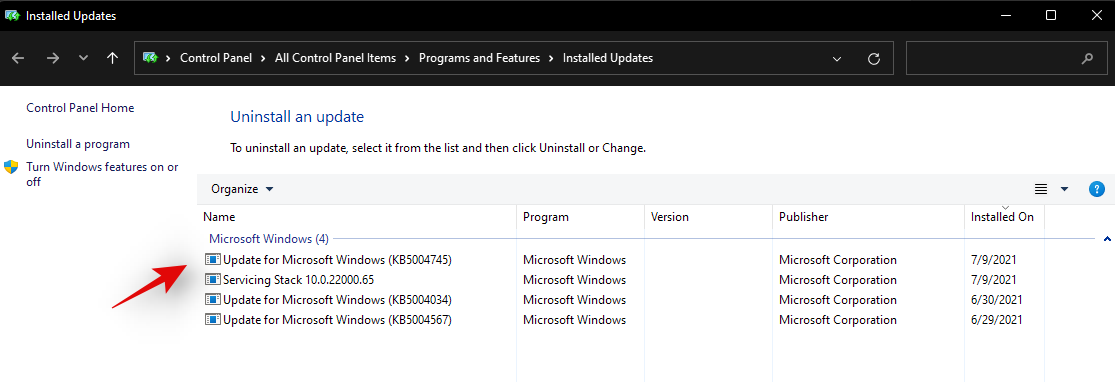
How to uninstall Windows Updates
Follow the guide below to uninstall recently installed Windows Updates from your Windows 11 system.
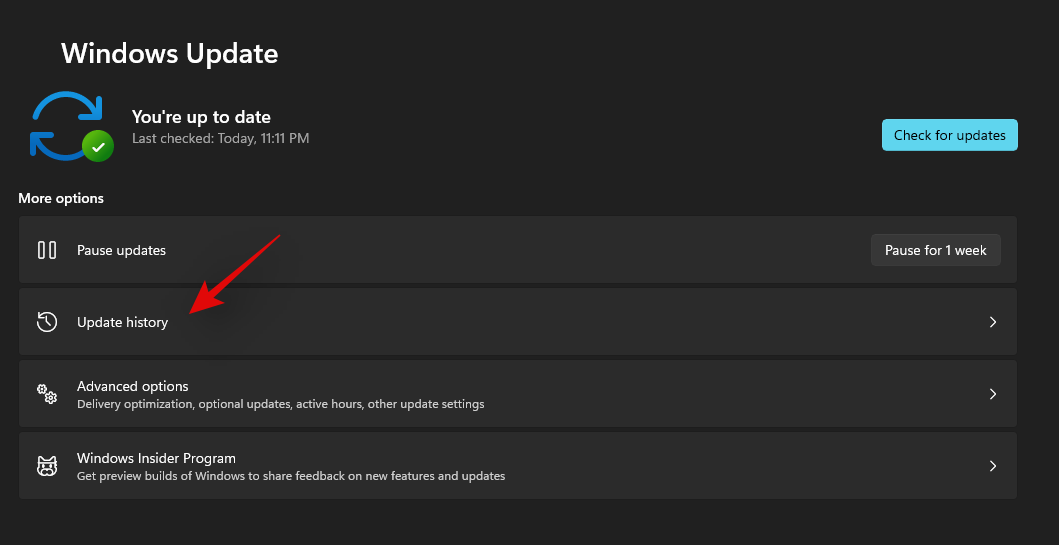
Press Windows + i on your keyboard to open the Settings app. Click on ‘Windows Update’ on your left.

Now click on ‘Update history’.
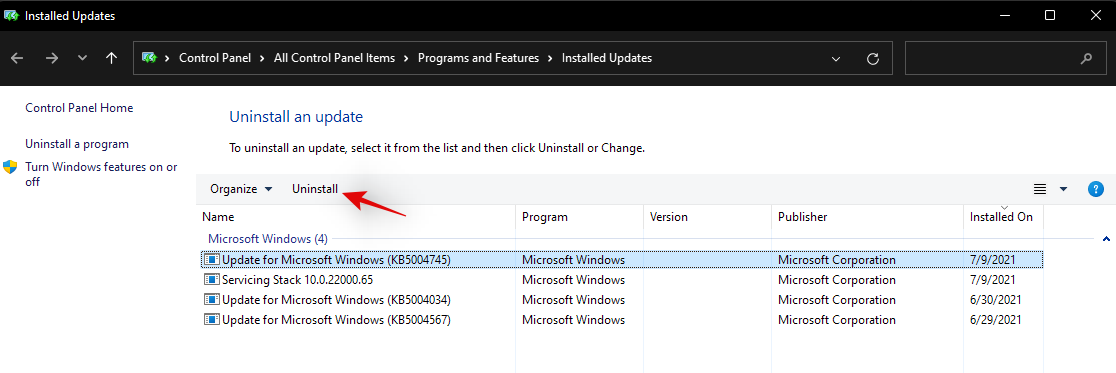
Scroll to the bottom on your right and click on ‘Uninstall Updates’.

You will now get a list of all the recent updates installed on your system. Click and select the update you wish to uninstall.
Click on ‘Uninstall’ at the top now.
Follow the on-screen instructions to complete the process.
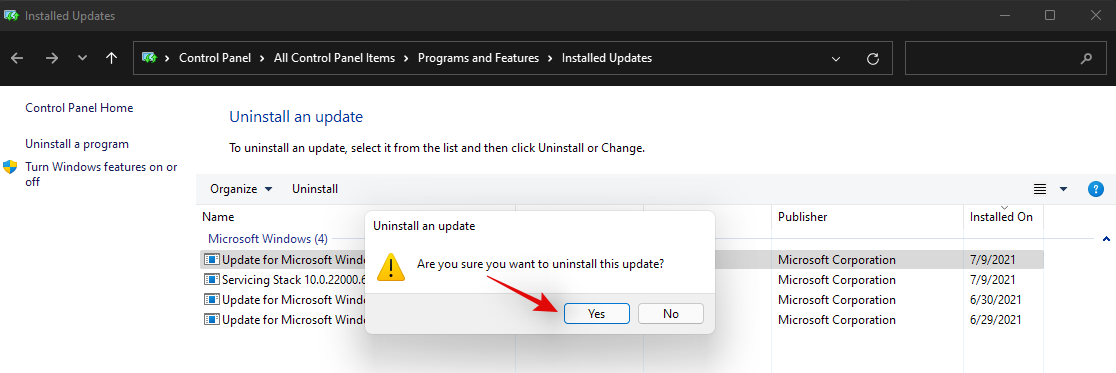
And that’s it! Your selected Windows update should now be uninstalled from your system.
We hope this guide helped you uninstall the concerned apps or programs from your system. If you still face issues, feel free to reach out to us using the comments section below.


