
- What to know
- Method 1: Using the Windows Character Map
- Method 2: Using the Alt key Codes
- Method 3: Using the English International keyboard
- Method 4: Using Keyboard shortcuts for accented international characters in Microsoft Word
- Method 5: Using Sticky Keys to type accented characters
- Method 6: Using Windows Virtual Keyboard
What to know
- There are several ways to type accents on Windows 11. The simplest way is to copy the accented character from the system app called ‘Character Map’.
- If you know the Alt code of a character, also shown on the character map, you can simply type that in as well.
- International English keyboards also let you type accented characters using keyboard sequences. The same are also available in MS Word.
- Sticky Keys and Virtual Keyboard (Taskbar settings > Touch keyboard) are some other ways to quickly type accented characters on Windows.
English is a Germanic language, while languages such as Spanish, French, Portuguese, Italian, and Romanian are called ‘Romance’ languages (as in those derived from Vulgar Latin spoken in the expansive Roman Empire). But English does borrow heavily from them and, as a result, you will find a lot of accented phrases making up its vocabulary, such as café, naïve, cortège, dèjà vu, etc., necessitating you to type them out in your professional writing.
But how does one type accents on Windows? In the absence of the general know-how, most of us tend to copy and paste accents and symbols when we must. But if you have to use them frequently, such as when you’re learning to type in a different language, or using the correct accents and diacritics in your documentation, there’s no workaround for knowing how to type accents.
So, to help you learn and make things easy for you in the long run, here are all the ways that you can use to start typing accents on Windows and flexing your pedantic spelling skills.
Related: Windows 11 Shortcuts: Our Complete List
Method 1: Using the Windows Character Map
Instead of browsing the web every time you want to copy a symbol, you can make use of the Windows Character Map to get a truckload of symbols and characters from a number of languages, both dead and alive. Here’s how you can access the Windows Character Map:
- Press the Start button, type character map, and click on the Character Map app.

- Alternatively, you can also press
Win + Rto open the RUN box, type charmap, and press Enter.

- This will open up the “Character Map” app. Here, look through the accented characters and find the one that you need. Clicking on one will zoom into it for a better look.

- Click on Select to choose a character and it will appear in the “Characters to copy” field.

- Click on Copy to have it copied to your clipboard.

- Now you can paste the copied character wherever you need to. If you want to know the ASCII code for a character, it is displayed towards the bottom right.

Method 2: Using the Alt key Codes
All the accented characters that are supported by Windows have their own unique ASCII codes, also known as Alt codes. These can be used to type in any document processor or field capable of processing and displaying accented characters. Of course, you would need to know the Alt codes for the same. Here are the Alt codes for common accented characters that you would generally need:
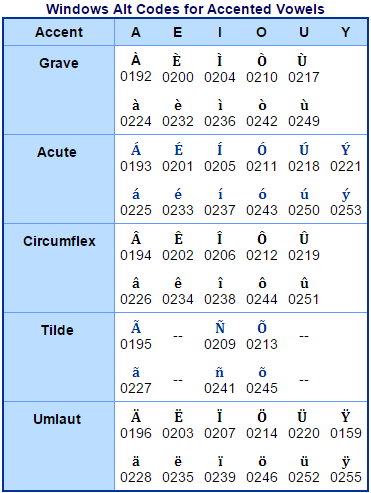
Once you know the Alt codes, here is how you can enter them:
- Move the cursor to the field where you want to type the accented character.
- Ensure that
Num Lockis turned ‘On’ as Alt codes work only when typed on the num pad. However, if you’re working on a laptop that doesn’t have a num pad, you can go ahead and use the number keys above the qwerty keyboard. - Now, while holding the Alt key, type the Alt code for the accented character that you want to enter.
- The accented character will appear only when you let go of the Alt key.
As mentioned earlier, the ASCII or Alt codes are also available in Windows Character Map. Click on the character and the Alt code will be shown in the bottom right corner.
Method 3: Using the English International keyboard
Another, simpler way to add accented characters in your text is to do so using the English International keyboard. But first, you will have to install and switch to it if you haven’t done so. Here’s how to go about it:
Install United States-International Keyboard
- Press Start, type language, and select Language settings.

- In Language settings, next to “Preferred languages”, click on Add a language.

- Then search for English (United States), select it, and click Next.

- Click Install.

- This will install the English (United States) keyboard. Now, click on the ellipsis next to English (United States).

- Select Language options.

- Under “Keyboards”, click on Add a keyboard.

- Scroll down the list and select United States-International.

- You will now see the “United States-International” keyboard listed under “Keyboards”.

Switch to United States-International keyboard
Now, to start using the International keyboard, you will have to first switch to it. There are a couple of ways of doing so:
The first way is to use the keyboard shortcut key to switch between keyboards.
- To do so, press
Win + Spacebarand flip through the installed keyboards. While holding the Windows key, press the spacebar until you get to the United States-International keyboard.

- The keyboard that you’ve selected will be displayed towards the right of the taskbar, just before the action center.

- The other way to switch between keyboards is to simply click on the language bar…

- and choosing the keyboard that you want.

Using the United States-International keyboard for accented characters
Once you have switched to the International keyboard, there are a couple of ways you can start typing accented characters.
1. Keyboard sequencing: The first way is to learn the keyboard sequence that uses the combination of punctuation marks and the letter keys to enter accented characters.
For example, to get an ï, first press the “ (quotation key) and then press i. Here’s a table to quickly know the keys that you need to press to get a specific accented character:
| Press this punctuation key first | Then press this letter key | Get this accented character |
| ‘ (apostrophe) | c, e, y, u, i, o, a | ç, é, ý, ú, í, ó, á |
| ” (quotation) | e, y, u, i, o, a | ë, ÿ, ü, ï, ö, ä |
| ` (accented grave) | e, u, i, o, a | è, ù, ì, ò, à |
| ~ (tilde) | o, n, a | õ, ñ, ã |
| ^ (caret) | e, u, i, o, a | ê, û, î, ô, â |
Note: With the United States-International keyboard, pressing the punctuation won’t lead to anything until you press the appropriate letter key. You will only see the accented character once you’ve pressed the punctuation key and the corresponding letter. Also, when you’re trying to press the ~ or the ^ character, you will have to press Shift as well.
If, for example, you only want the punctuation mark and not the accented character, you will have to press space after entering the punctuation. You may have also noted that not all letters correspond to particular punctuation marks. This is because there are only a few letters that go along with certain punctuations. So, if you press the apostrophe and then the letter z, you won’t get an accented z. You’ll only end up with ‘z.
2. Use the right-Alt key: The second way of entering accented characters is to hold down the right-Alt key while typing the corresponding letters. The diagram below shows the characters that you will get upon pressing the right-alt key and a specific letter.

There are different sets of characters that you can get by pressing the appropriate keys.
- The ones in Blue are activated when pressing
right-Alt + corresponding letter. - The ones in Orange are activated when pressing
right-Alt + Shift + corresponding letter.
So, as an example, if you want to get the © character, press right-Alt + c. On the other hand, if you want to get ¢, press right-Alt + Shift + c.
Method 4: Using Keyboard shortcuts for accented international characters in Microsoft Word
If you’re using Microsoft Word, you don’t really have to switch to the English International keyboard. You can simply use the following sheet to know which keys to press to get which accented character in Word:
| Desired Character | Press these keys simultaneously |
| à, è, ì, ò, ù, À, È, Ì, Ò, Ù |
CTRL + ‘ (Accent grave) + letter |
| á, é, í, ó, ú, ý Á, É, Í, Ó, Ú, Ý |
CTRL + ‘ (Apostrophe) + letter |
| â, ê, î, ô, û Â. Ê, Î, Ô, Û |
CTRL + SHIFT + ^ (Caret) + letter |
| ã, ñ, õ Ã, Ñ, Õ |
CTRL + SHIFT + ~ (Tilde) + letter |
| ä, ë, ï, ö, ü, ÿ Ä, Ë, Ï, Ö, Ü, Ÿ |
CTRL + SHIFT + : (Colon) + letter |
The aforementioned are some of the most common accented characters that you would need to enter in your Word document. However, if you need to add special characters, you will have to enter its character code, then press Alt + X.
For instance, if you want to add the pound currency symbol (£) in Word, enter its character code (which is 00A3), then hold down the Alt key and press X.
How do you find the character code, you ask? Check out the Character Map app (as shown before). The character code will be at the bottom left corner.

Method 5: Using Sticky Keys to type accented characters
If you’re having a hard time using multiple key combinations to enter a single accented character, such as when using the right-Alt key method, you can turn on Sticky keys to do the same.
Sticky keys allow you to press keyboard shortcuts that use multiple keys (such as right-Alt + Shift + c) one key at a time. But Sticky Keys isn’t turned on by default on Windows. To do this, follow the steps given below:
- Press
Win + ito open Settings, then click on Accessibility in the left panel.

- On the right, scroll down and select Keyboard.

- Here, toggle on Sticky keys.

Now, whenever you need to press a multiple-key combination to activate a particular shortcut, instead of pressing the keys simultaneously, press the keys one by one.
Method 6: Using Windows Virtual Keyboard
Windows has an in-built virtual keyboard that users can utilize to enter accented characters, even if they don’t have a two-in-one touch screen. But this needs to be enabled as well. To do so, follow the steps given below:
- Right-click on the taskbar and select Taskbar settings.

- Now, under “Taskbar corner icons”, toggle on Touch keyboard.

- You should find the virtual keyboard towards the right of the taskbar. Click on it to bring it up.

- Now, whenever you need to add accented characters, click and hold on to a letter to get the available options. Then move over the accented letter that you want and let go.

This is not unlike typing on a smartphone so it shouldn’t be too much trouble.
So these were the ways that you can type accents on Windows. Granted that learning which key combinations correspond to which accented character can be a little confusing at first and may require a bit of memorization. But if you choose a method and stick to it, you will find yourself typing accented characters in no time.
RELATED


One response to “How to Type Accents on Windows 11 [6 Ways]”
Thank you! You have saved me SO much frustration! I would kiss you on both cheeks if I could!