What to know
- Format a drive by right-clicking on it and selecting Format > Quick format. You can also use the ‘Disk Management’ utility to format a drive using the right-click context menu.
- The diskpart utility in CMD lends another way to format a drive. Use the following commands in order:
diskpart>list disk>select disk #>clean. Windows Recovery screen also lets you use CMD to format a drive. - Resetting a PC also leads to formatting the system drive. Do so from Settings > System > Reset this PC > Remove everything.
- Third party utilities like Gnome Partition Manager can be used to format drives.
If you’re upgrading to a new PC, chances are, you may be trying to reuse the hard drive from your old PC. If not, you may be planning to give it to a family member or a friend. But before you proceed with any of these options, you should completely wipe your old hard drive, so that the next person starts fresh with the hard drive.
In this post, we’ll cover multiple ways to wipe a hard drive in Windows 11.
Why should you wipe a hard drive?
Before we jump to the methods, let’s take a minute to understand why you should wipe your hard drives.
The more obvious reason behind wiping a hard drive is to flush all of your personal files and applications from the drive, making sure they can’t be recovered by data recovery tools — after a factory reset or not. Another reason for wiping the drive could be to simply gain more storage space for your new files. Or maybe you just want to set up your PC from scratch with a clean installation of Windows and fresh partitions for your hard drive.
Whatever the reason, let’s take a look at the prerequisites to wiping your hard drive.
What to do before wiping a hard drive?
Before you wipe your drive, there are a couple of things that you need to take care of.
- Make sure you’ve copied all the contents of the drive to another location, preventing any data loss.
- If you’re using a laptop to wipe the drive, we recommend connecting your laptop to power as some methods may take a long time to complete.
- Close any applications or files that may be running from the hard drive that you’re trying to wipe.
Let’s take a look at the methods to wipe a hard drive in Windows 11.
Related: How to Map a Drive in Windows 11
How to format a drive on Windows 11 or 10
You can format a drive in multiple ways depending on the type of access you have to your system. Use one of the guides below that best suits your current situation and requirements.
Method 1: Using the right-click context menu
This is undoubtedly one of the simplest and quickest ways to wipe a hard drive. The process merely takes a couple of seconds and is perfect for when you want to make room for new files on your hard drive.
Note: This method will only work for secondary drives on your system and not your boot drive.
- Press
Win key + rto open the Run box. Type in ‘explorer’ and hit enter. - You’ll see a window titled ‘File Explorer’ open up. Click on ‘This PC’.

- You should now see all the drives connected to your PC. Ours has three drives, out of which, we’ll be using the ‘Data’ drive for this guide.

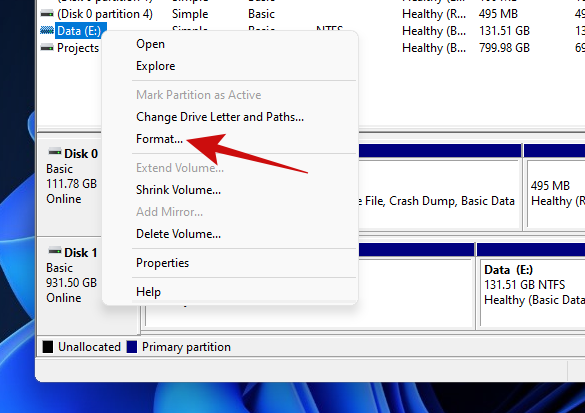
- All you need to do is right-click the drive that you want to wipe and click on ‘Format’.
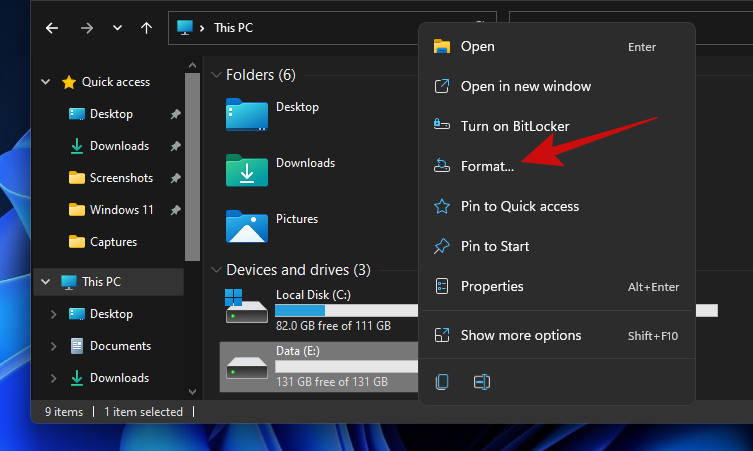
- You should see a small ‘Format’ popup open with a bunch of options. If you want to do a quick data wipe, without messing with other options, click on the ‘Start’ button.
Tip: For a more secure data wipe, untick the ‘Quick Format’ option and then click on ‘Start’. Keep in mind, a thorough wipe will take a lot longer than a quick format.

Once the wipe is complete, you should see a message confirming the same. Click ‘OK’ to dismiss the alert.
Your drive is now fully clean and ready to be used again.
Method 2: Using Disk Management
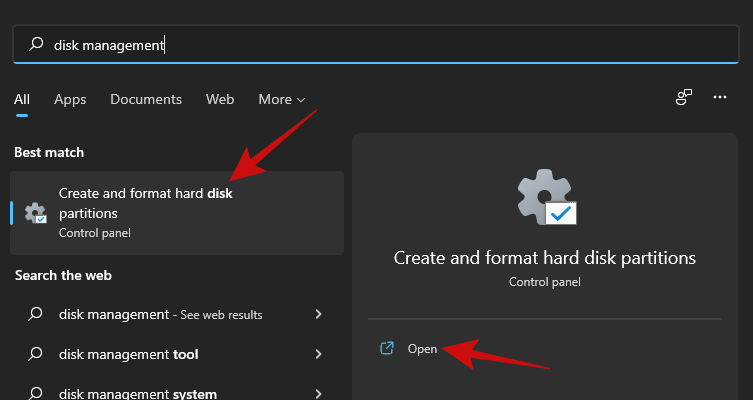
- Open the Start menu and type in ‘Disk Management’. Click on the search result or the open button.
- Here’s how the Disk Management tool looks like.
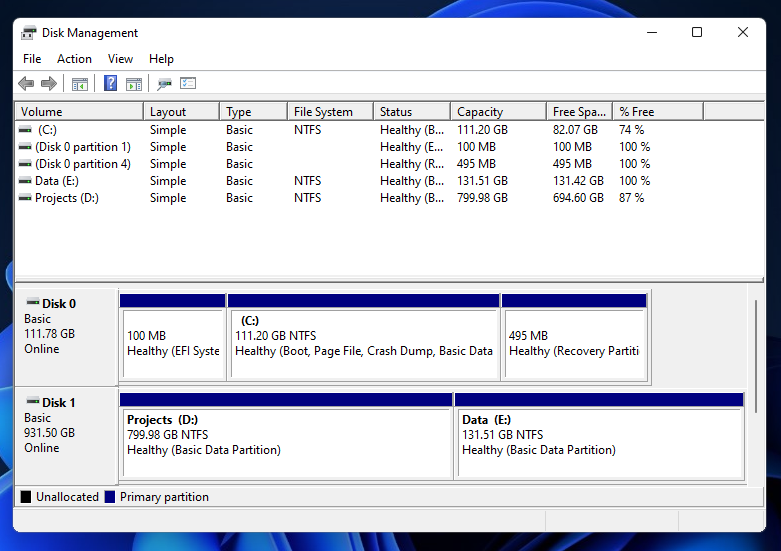
- Right-click on the volume you want to wipe, and click on Format.
- On the next popup, you should have a handful of options like changing the name of the volume, the file systems, and more.
Again, just like the previous method, you should keep the ‘Perform a quick format’ option ticked if you don’t want to wait for a long time to wipe your drive.
Tip: For a thorough wipe that should remove all traces of your data from your drive, untick the ‘Perform a quick format’ option. - Click on the ‘OK’ button to start wiping your drive.
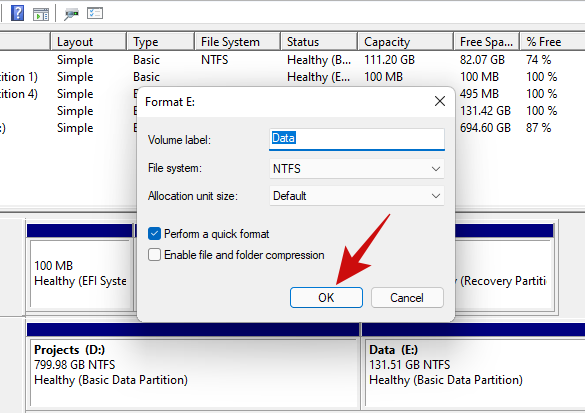
- Click on the ‘OK’ button to confirm the data wipe and your drive should be clean within minutes.
Method 3: Using Diskpart in CMD (command prompt)
Diskpart is a command-line utility that can be used to manage all the drives connected to your PC. You can do everything from listing the disks, creating and deleting partitions, and so much more with diskpart.
Let’s take a look at how you can wipe your hard drive with diskpart.
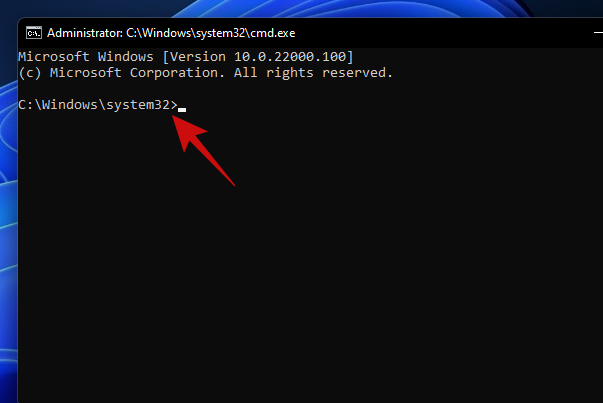
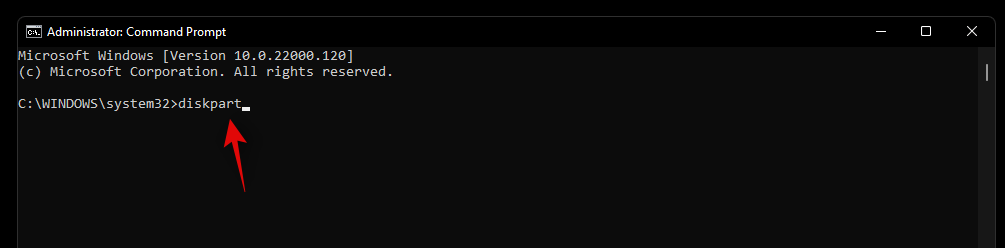
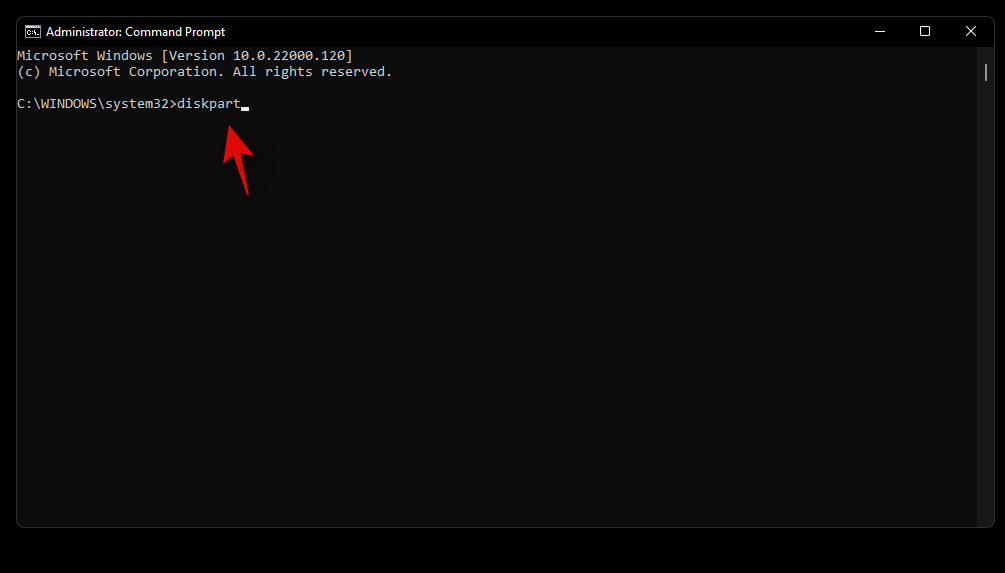
- Press
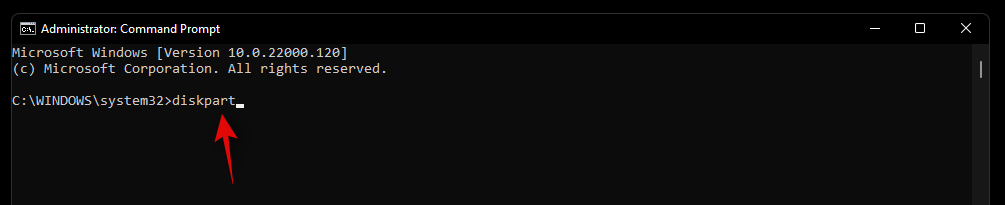
Win key + rto open the Run box. Type in ‘cmd’ and press theCtrl + Shift + Enterkeys instead of just the enter key. This will open an elevated Command Prompt. - The default path from an elevated Command Prompt should look like this.
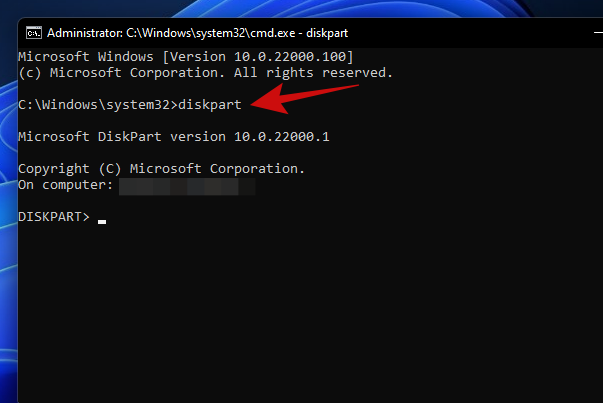
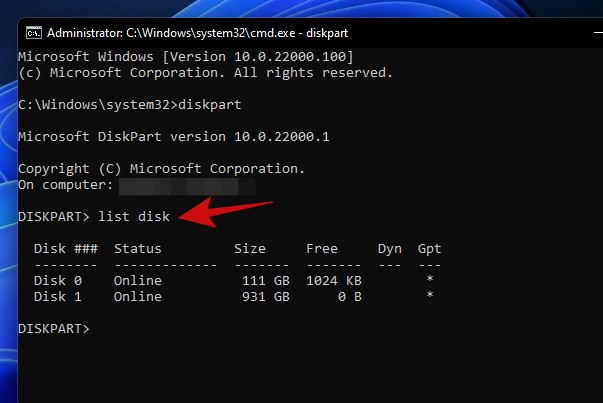
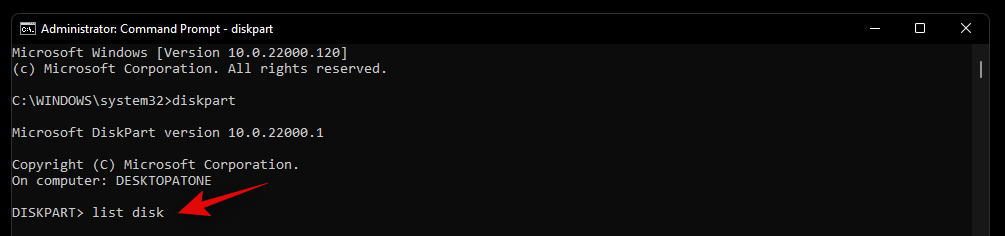
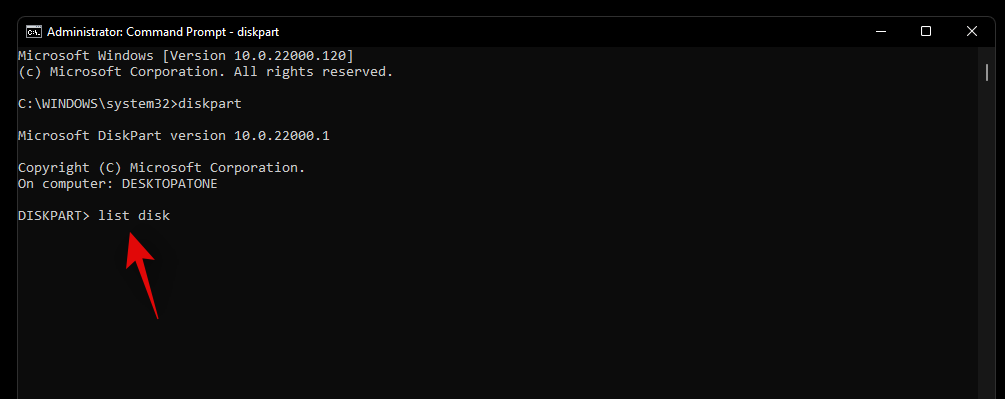
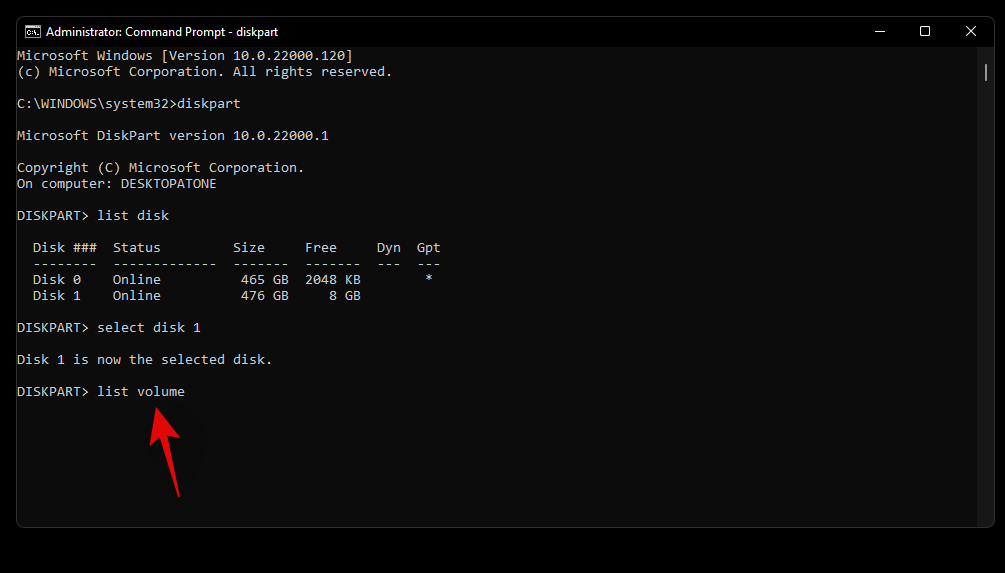
- Type in ‘diskpart’ and press enter. You should now be in the diskpart utility.
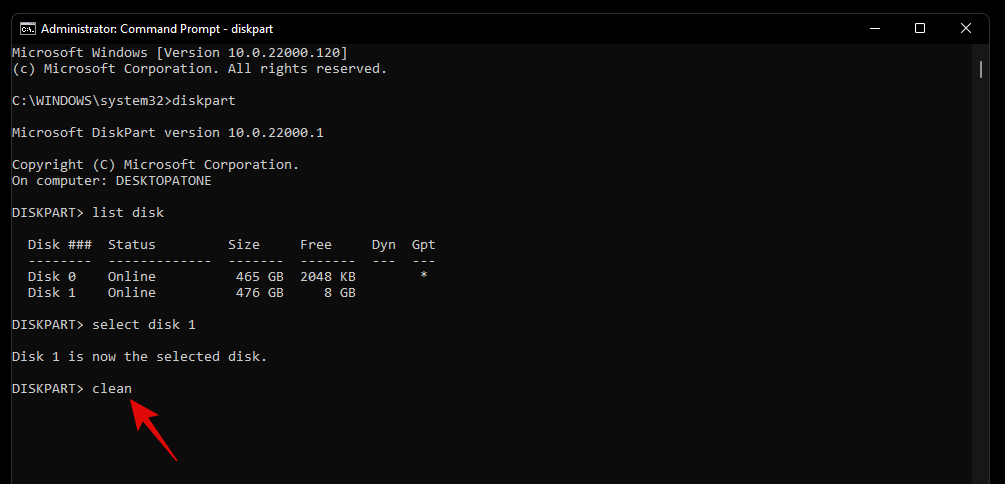
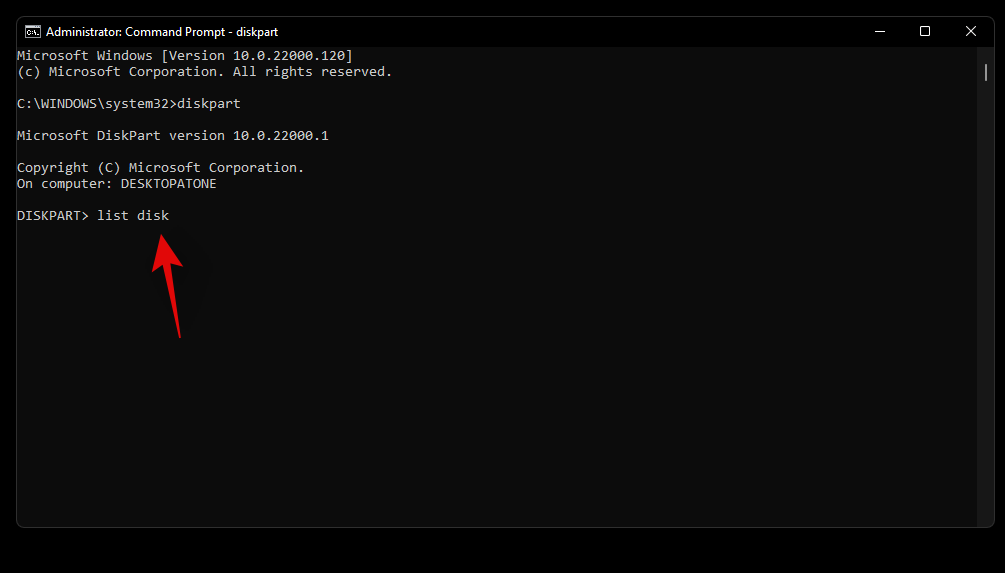
- Type ‘list disk’ and press enter. This should list all the disks connected to your PC.
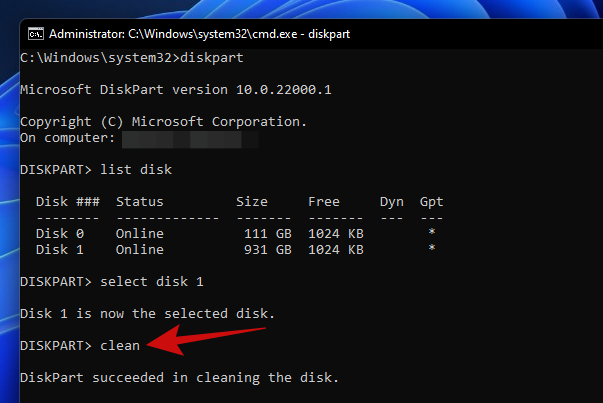
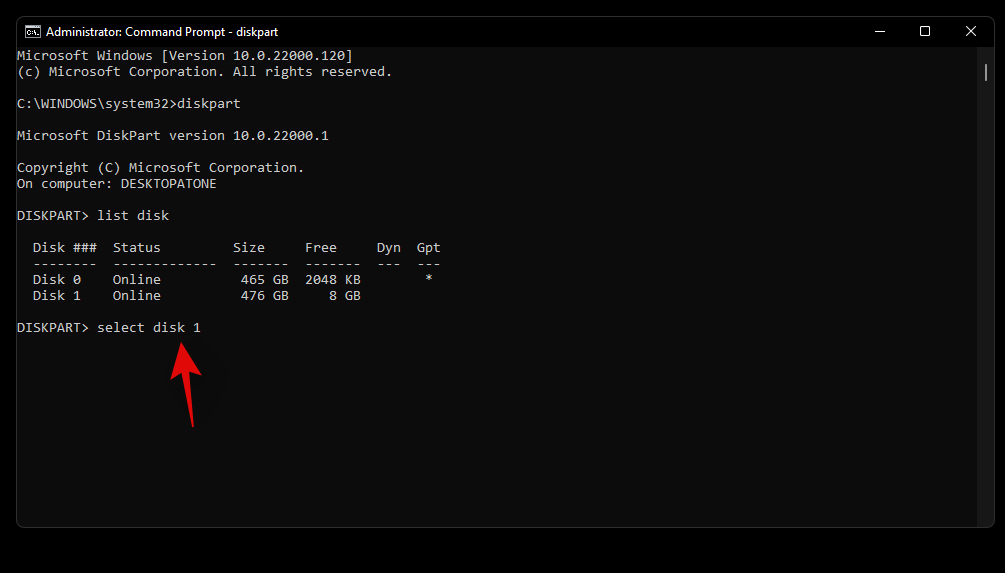
- To proceed with the disk wipe, type in ‘select disk <disk#>’. Our laptop has two hard drives, and for this guide, we’ll be proceeding with Disk 1, so we entered ‘select disk 1’ and hit enter.

- Type in ‘clean’ and press enter.
Your disk should now be completely empty and turned into unallocated space. Your next task should be to create partitions using the Disk Management tool we used earlier. Simply run the tool and initialize the disk. After that, you should be able to create partitions of any size that suits you best.
Method 4: Using the Reset Option
Windows 11 comes with an option called ‘Reset this PC’ which resets Windows to its factory settings. And the best part about Reset this PC is that it offers users the option to either keep all their files and reset Windows or remove everything while resetting Windows.
If you’re wiping your drive just to reinstall Windows, we recommend you give this method a try before proceeding with a clean install.
Here’s how you can do it.
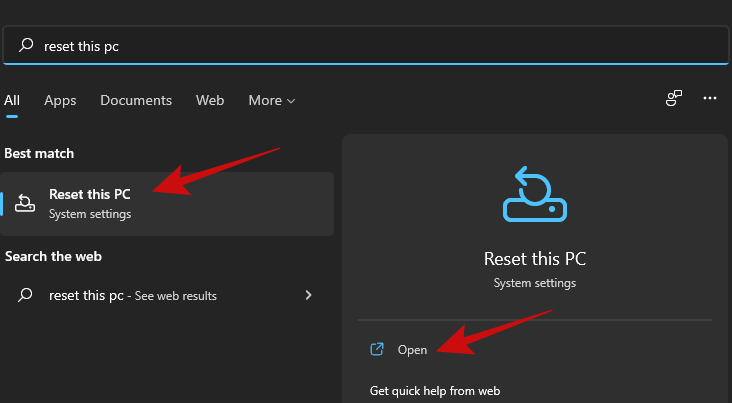
- Open the Start menu and type in ‘Reset this PC’. Click on the search result that pops up or click on the open button.
- Click on the ‘Reset PC’ button to trigger the Windows Reset process.

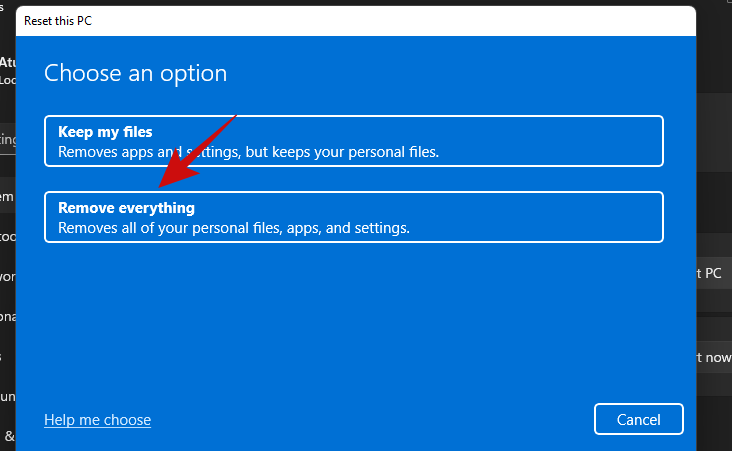
- You should see a blue screen with two options. Click on ‘Remove everything’ to reinstall Windows while removing all your files, apps, and settings.
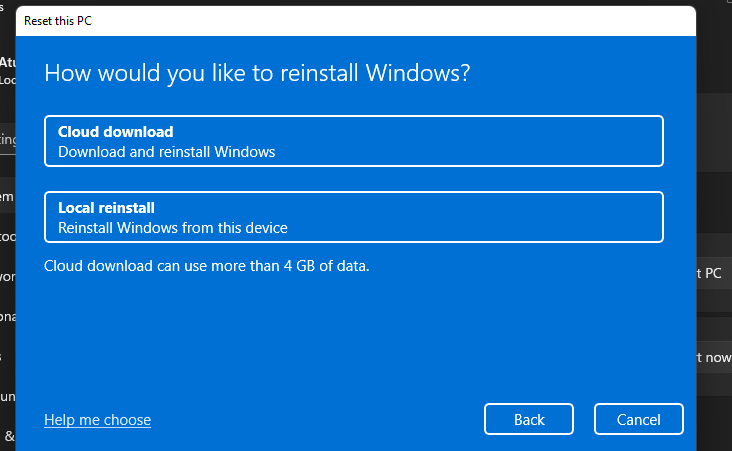
- The next screen should ask you how you would like to reinstall Windows. If your PC has an internet connection, you can proceed with the ‘Cloud download’ option, else proceed with ‘Local reinstall’.
- Follow the rest of the on-screen instructions and in no time, you’ll have your PC ready with a fresh installation of Windows 11 and no trace of your old files and apps on your hard drive.
Method 5: Using PowerShell
You can also format drives using PowerShell. Follow the steps below to format a drive using PowerShell on Windows 11.
- Press
Windows + Son your keyboard and search for PowerShell. Click on ‘Run as administrator’ once it shows up in your search results.

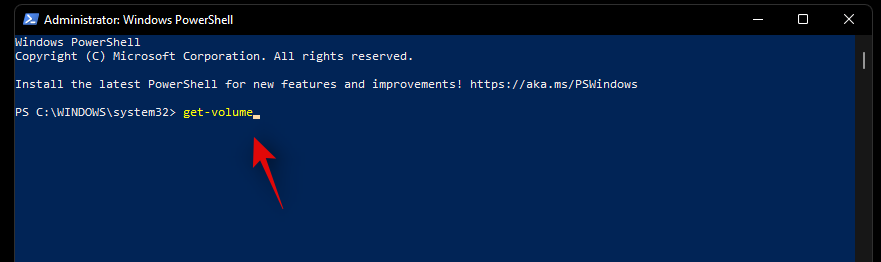
- Type in the following command to get a list of all the volumes from disks installed on your system. This will help you identify and find the disk you wish to format:
get-volume
- Choose the volume you wish to format and then use the command below to select it. Replace X with the letter assigned to the concerned volume:
select X

- Now use the command below to format the selected volume. Replace NAME with a name of your choice that will be assigned to the volume once it has been formatted:
format-volume -filesystem NTFS -newfilesystemlabel NAME

And that’s it! The selected volume on the concerned drive will now be formatted. Wait for the process to complete and close the PowerShell to use the disk as usual.
Method 6: Using a third-party utility
There are tons of partition managers out there that can help you manage and format all disks installed on your system easily. Follow the guide below to get you started. We will be using Gnome Partition Manager for this guide which is a long-trusted industry tool that is completely free. Use the link below to download it to your local storage.
- Gnome Partition Manager | Download Link
Once GParted is downloaded to your system, you can simply mount it like any other ISO and get started. If you wish to clean and wipe your boot drive, then we recommend you mount the ISO to a removable media which should allow you to format the drive outside of your current Windows 11 installation. Once mounted, restart your system and access the Gnome Partition Manager from your boot menu. We will be using Rufus to mount the disk image to removable media and then reboot our current system.
Note: Make sure secure boot is disabled on your system so that you can boot from your USB. Additionally, switch your storage configuration to AHCI instead of Intel Optane memory in case available. GParted won’t be able to recognize your drives if the storage configuration is not set to AHCI.
- Once you boot into your USB drive, you will have the option to launch GParted with various settings. We recommend you opt for the first option and select ‘Launch GParted with default settings’.
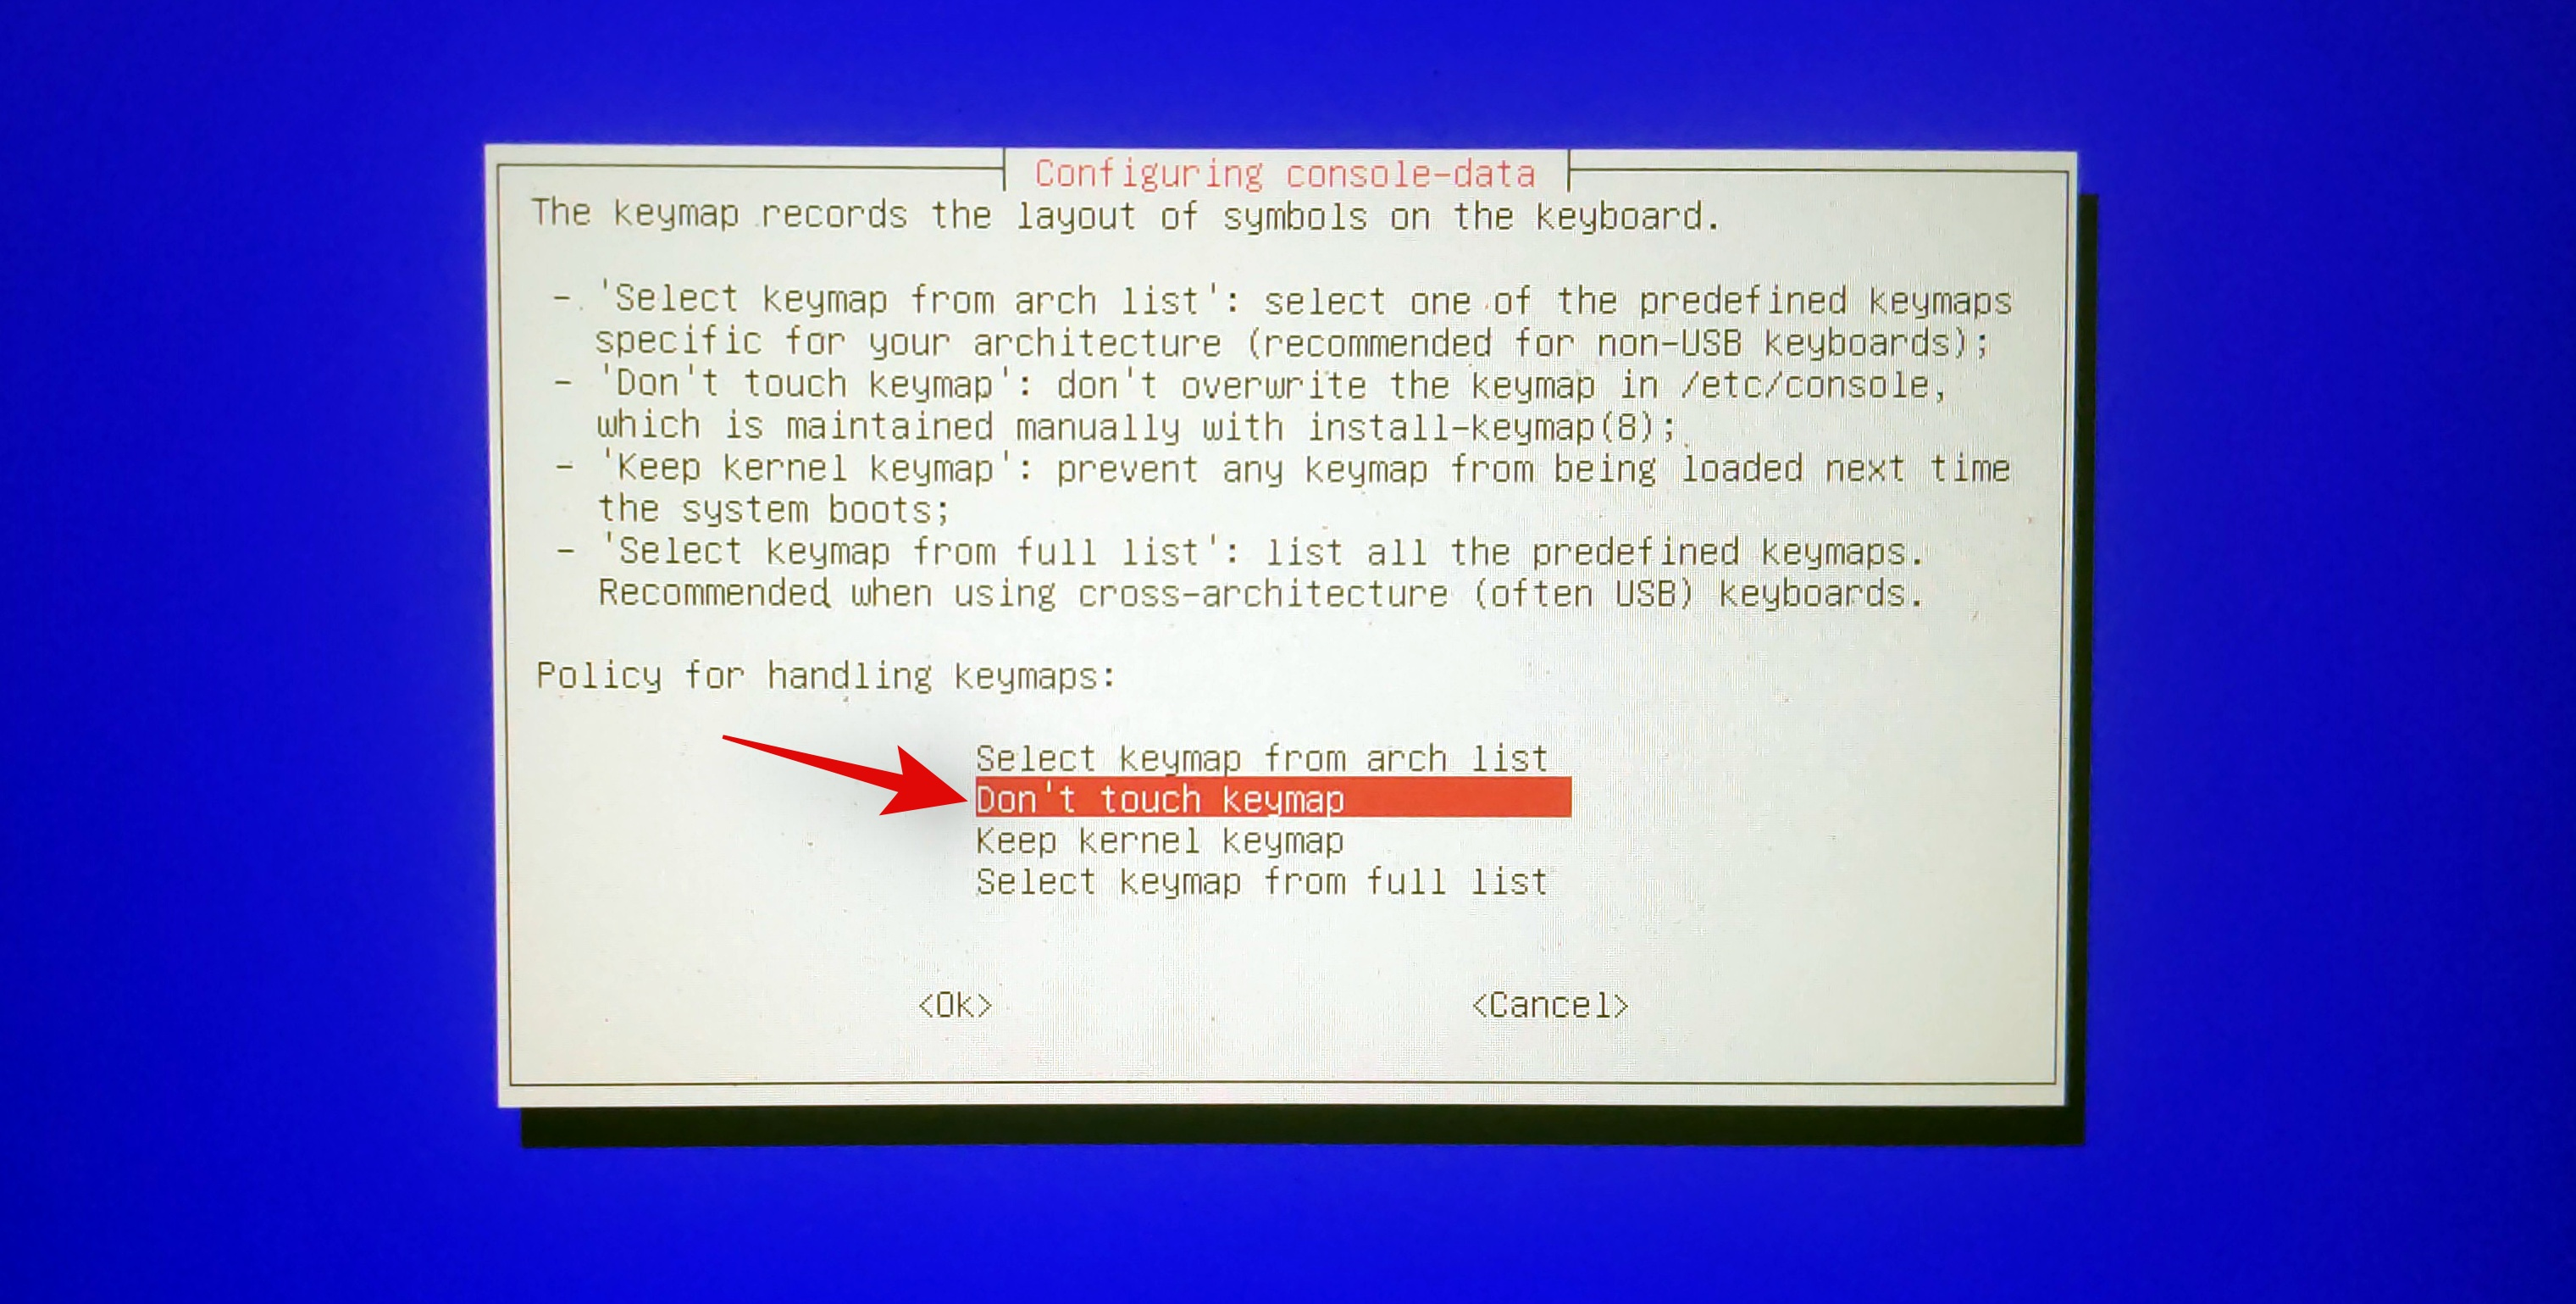
- You will now be prompted to select a keymap. This page comes in handy in case your keyboard is incorrectly recognized by Gnome. If your keyboard seems to be responsive then select ‘Don’t touch keymap’ to proceed with the process.
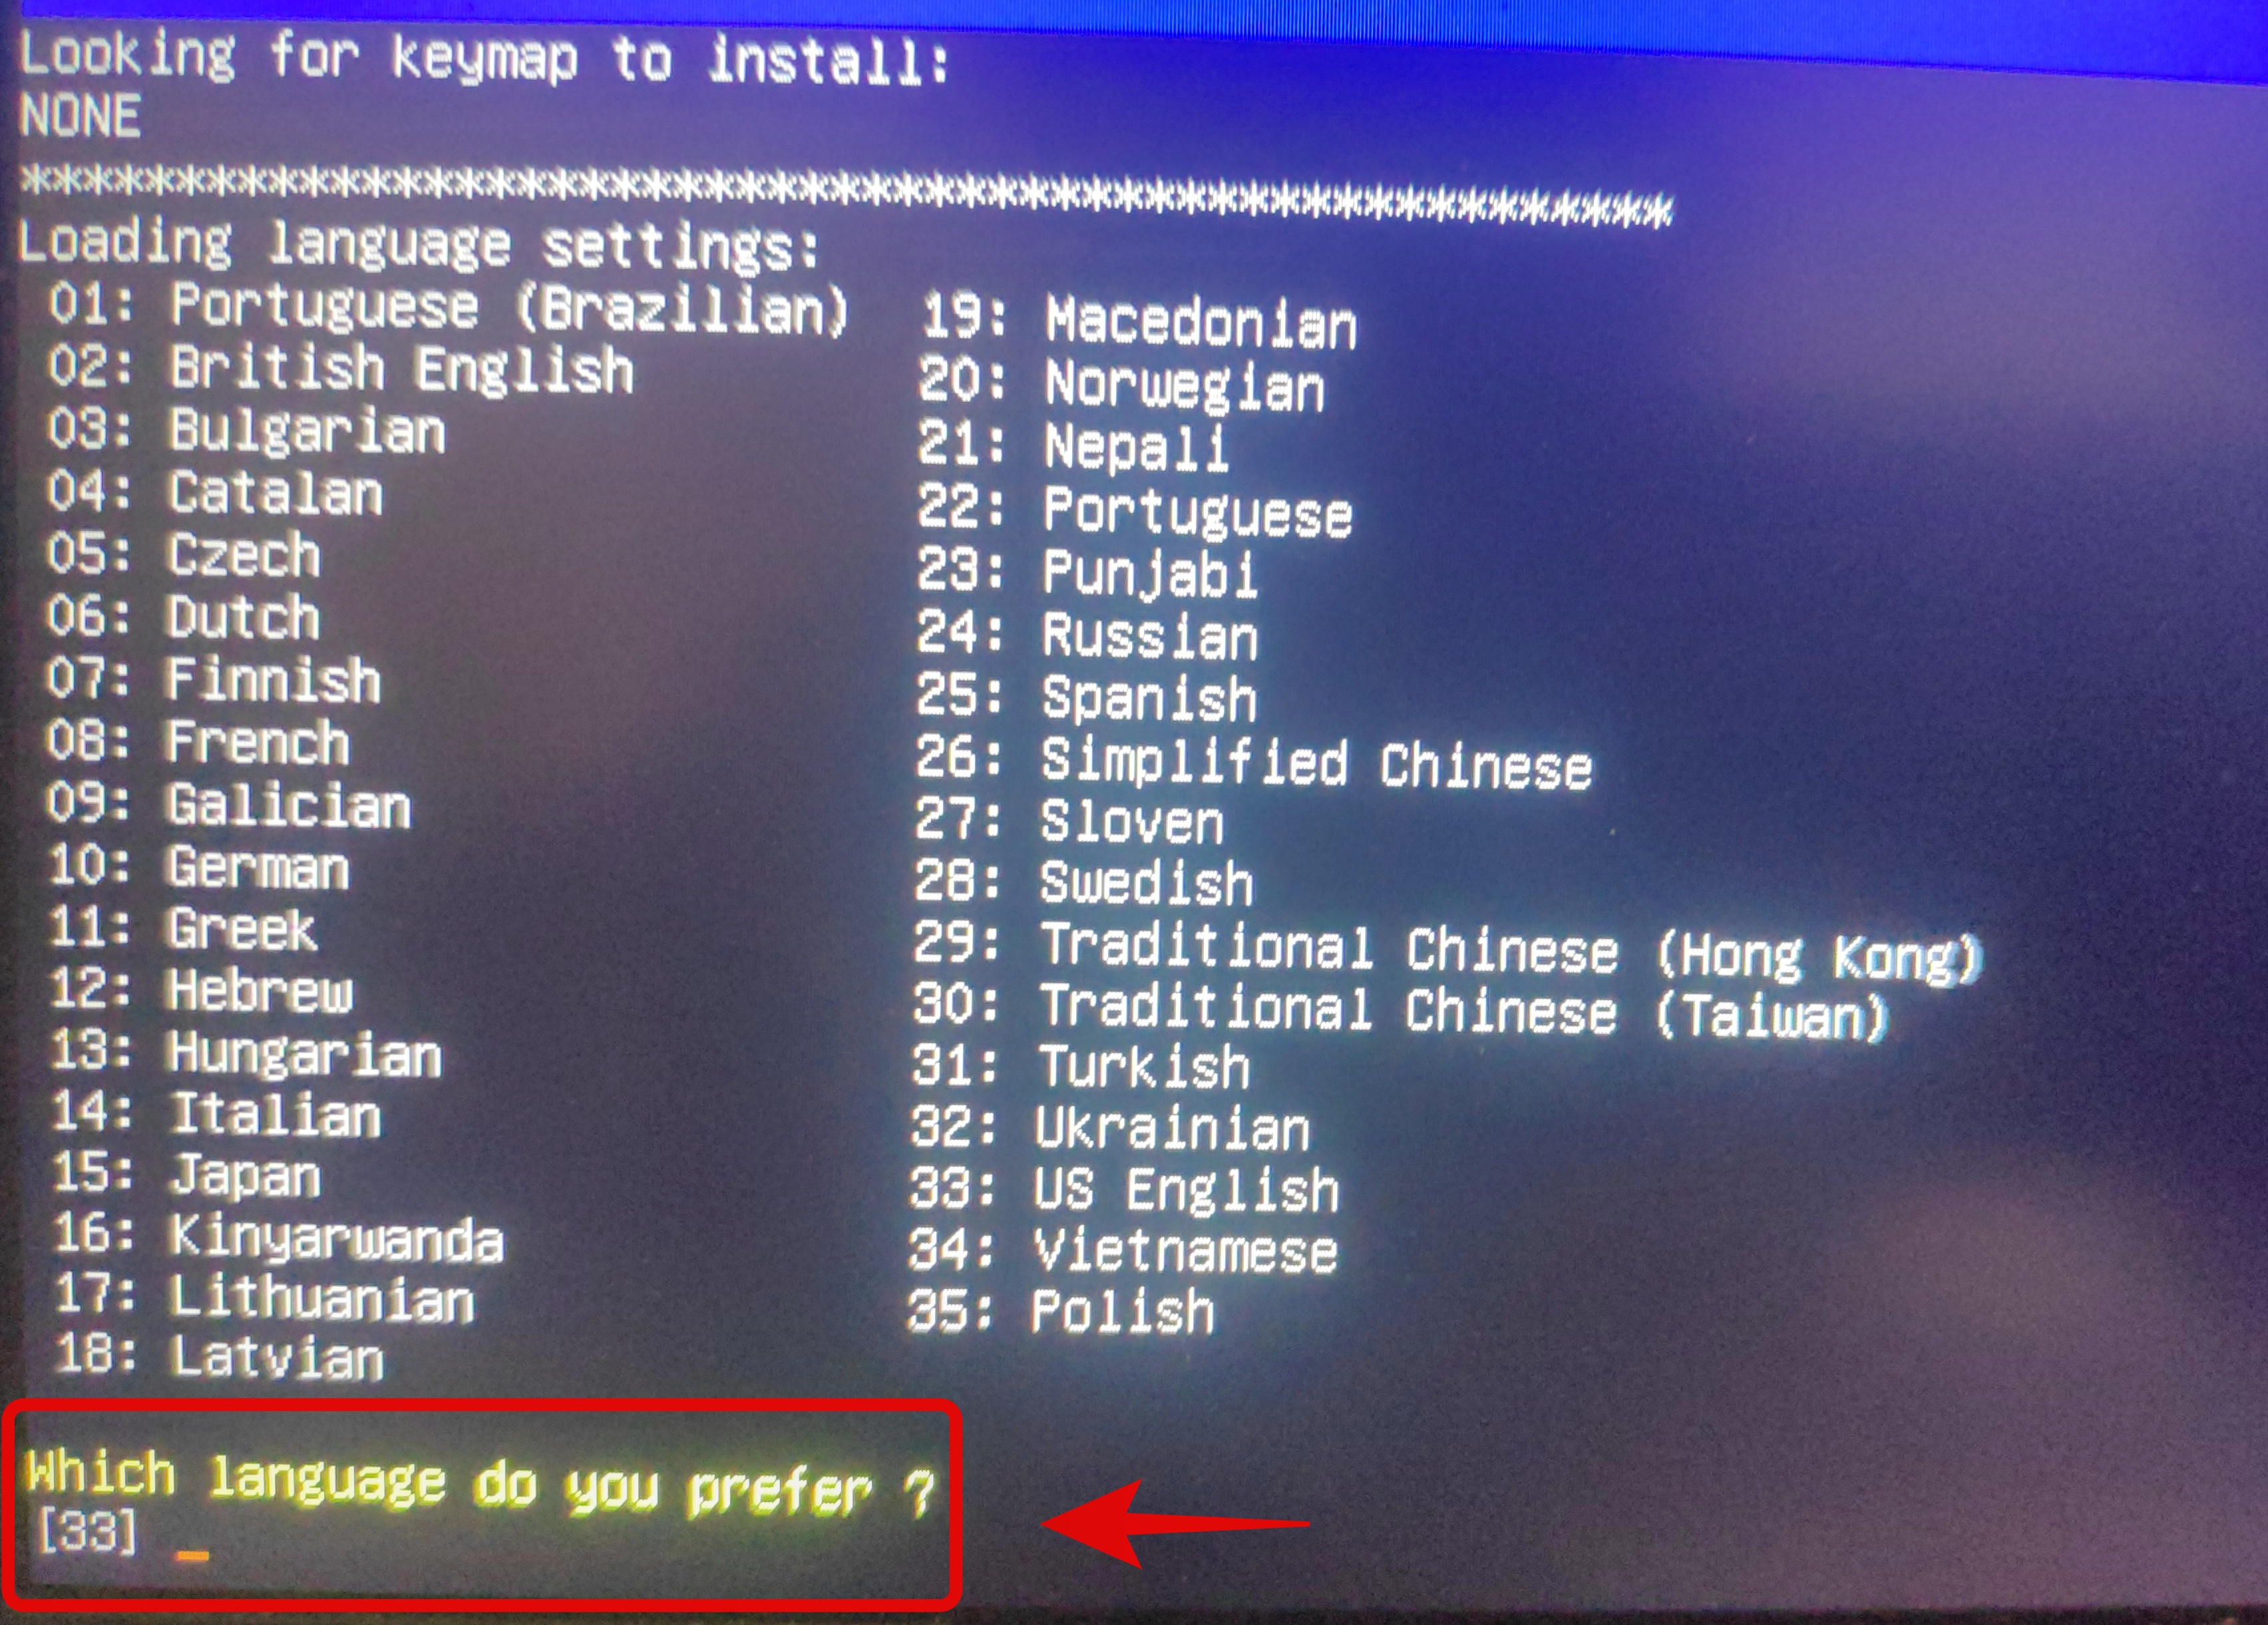
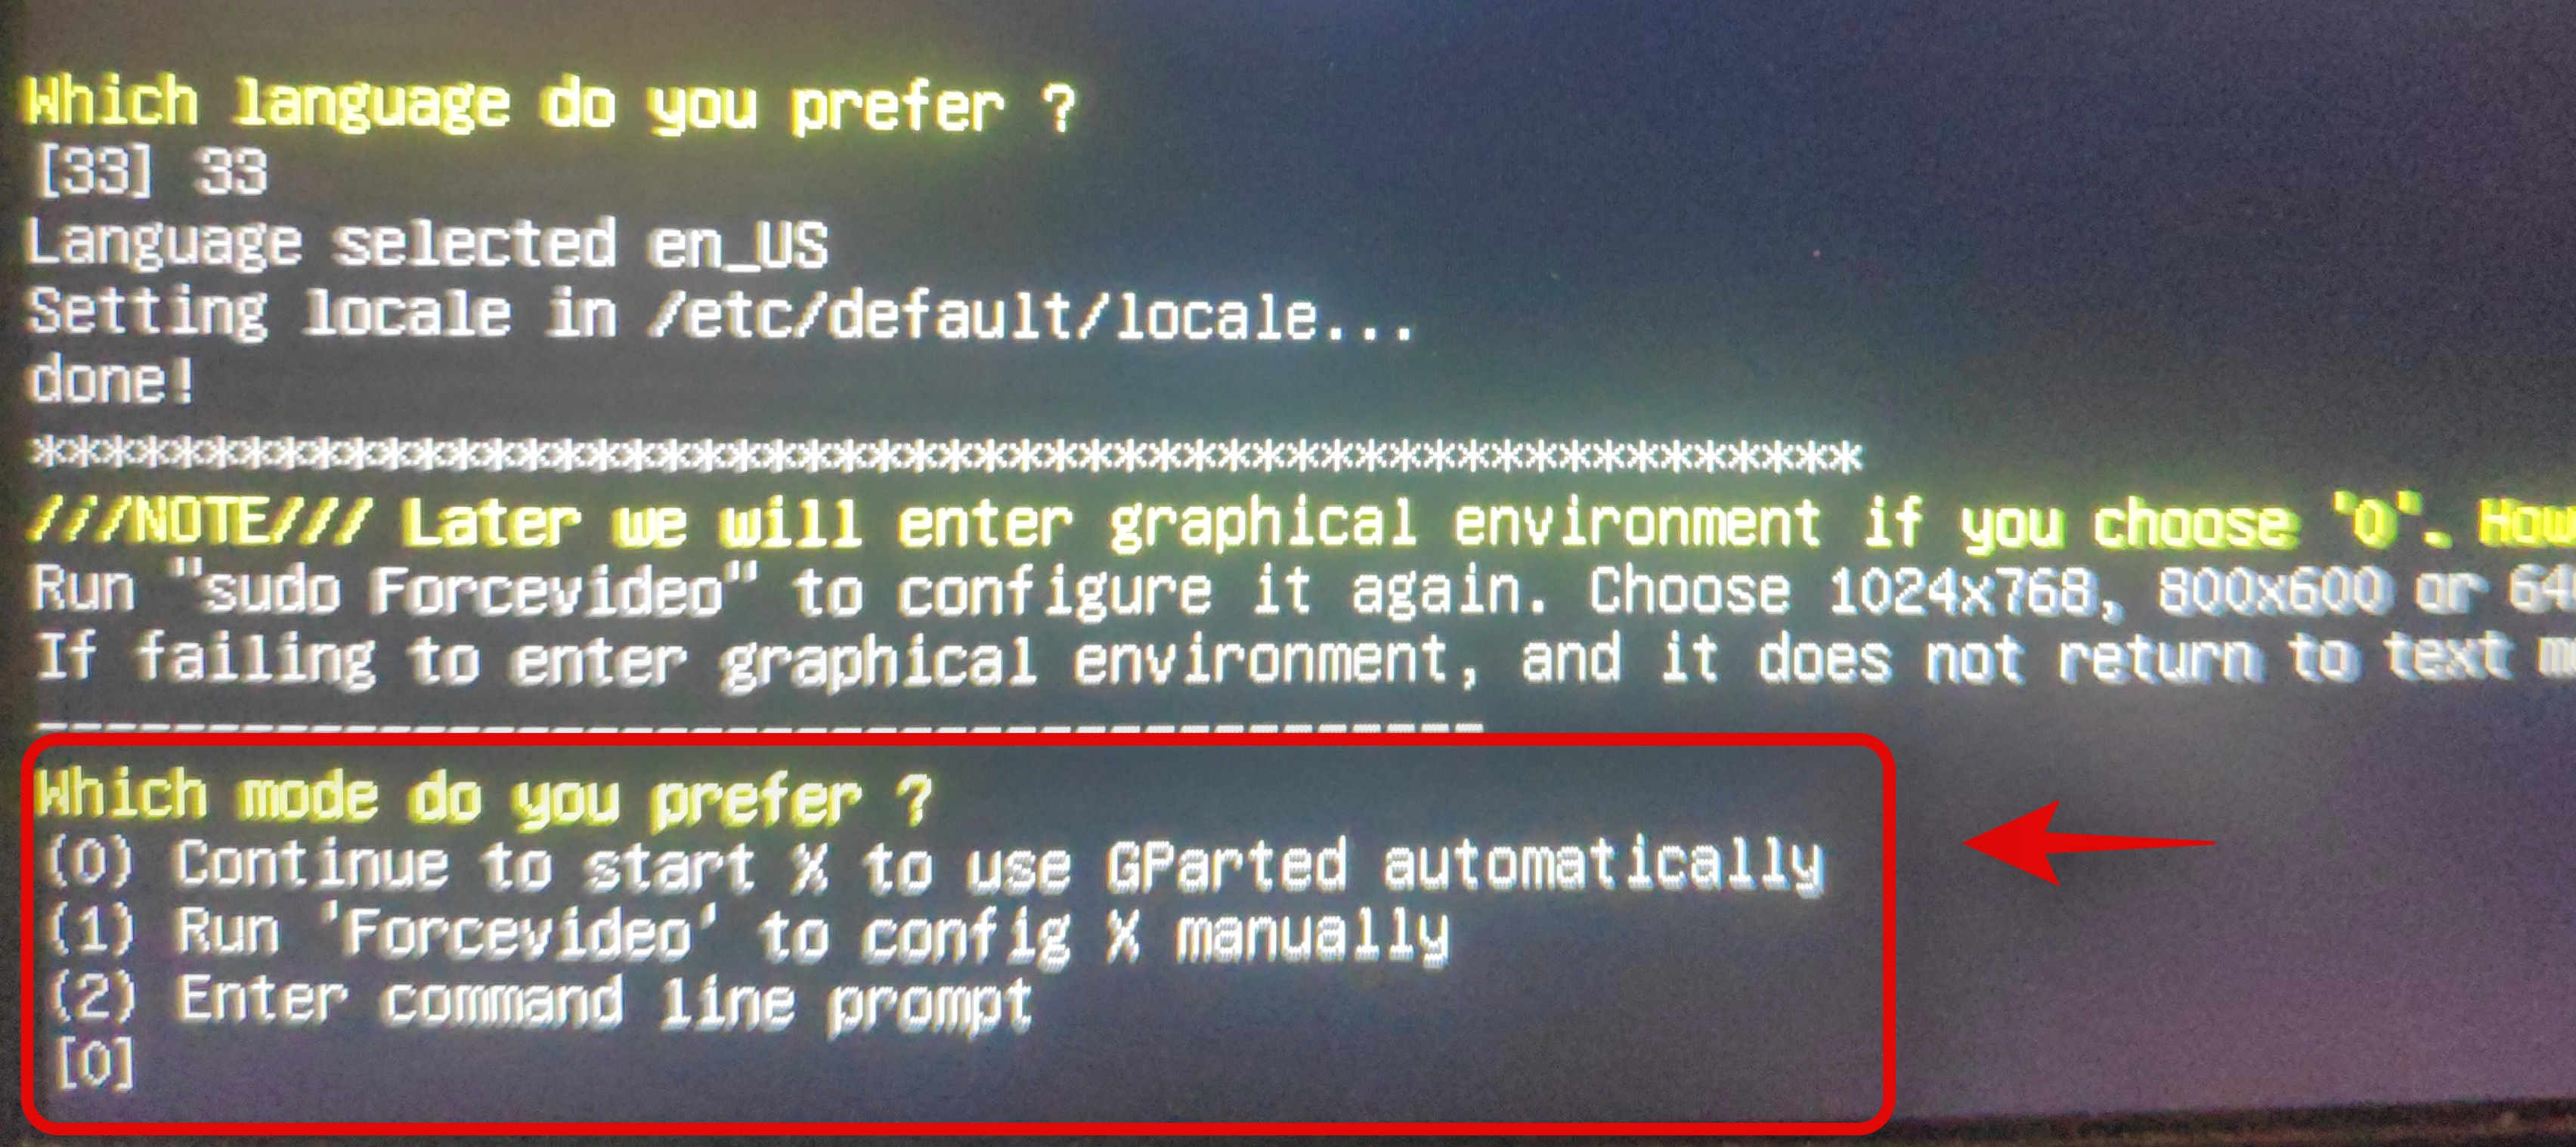
- Now go ahead and select your language by entering its corresponding number. Enter ’33’ if you wish to select US English.
- You will now be asked if you wish to load GParted with forced video drivers or the default settings. Force video driver option comes in handy in case GParted is unable to recognize your display or if you are having resolution problems on your system. We recommend you select the first option. Enter ‘0’ to select the option.
- GParted will now be booted and you will be taken to its temporary desktop. The partition manager should automatically launch on your system now. Click on the drop-down menu in the top left and select the desired disk that you wish to format.
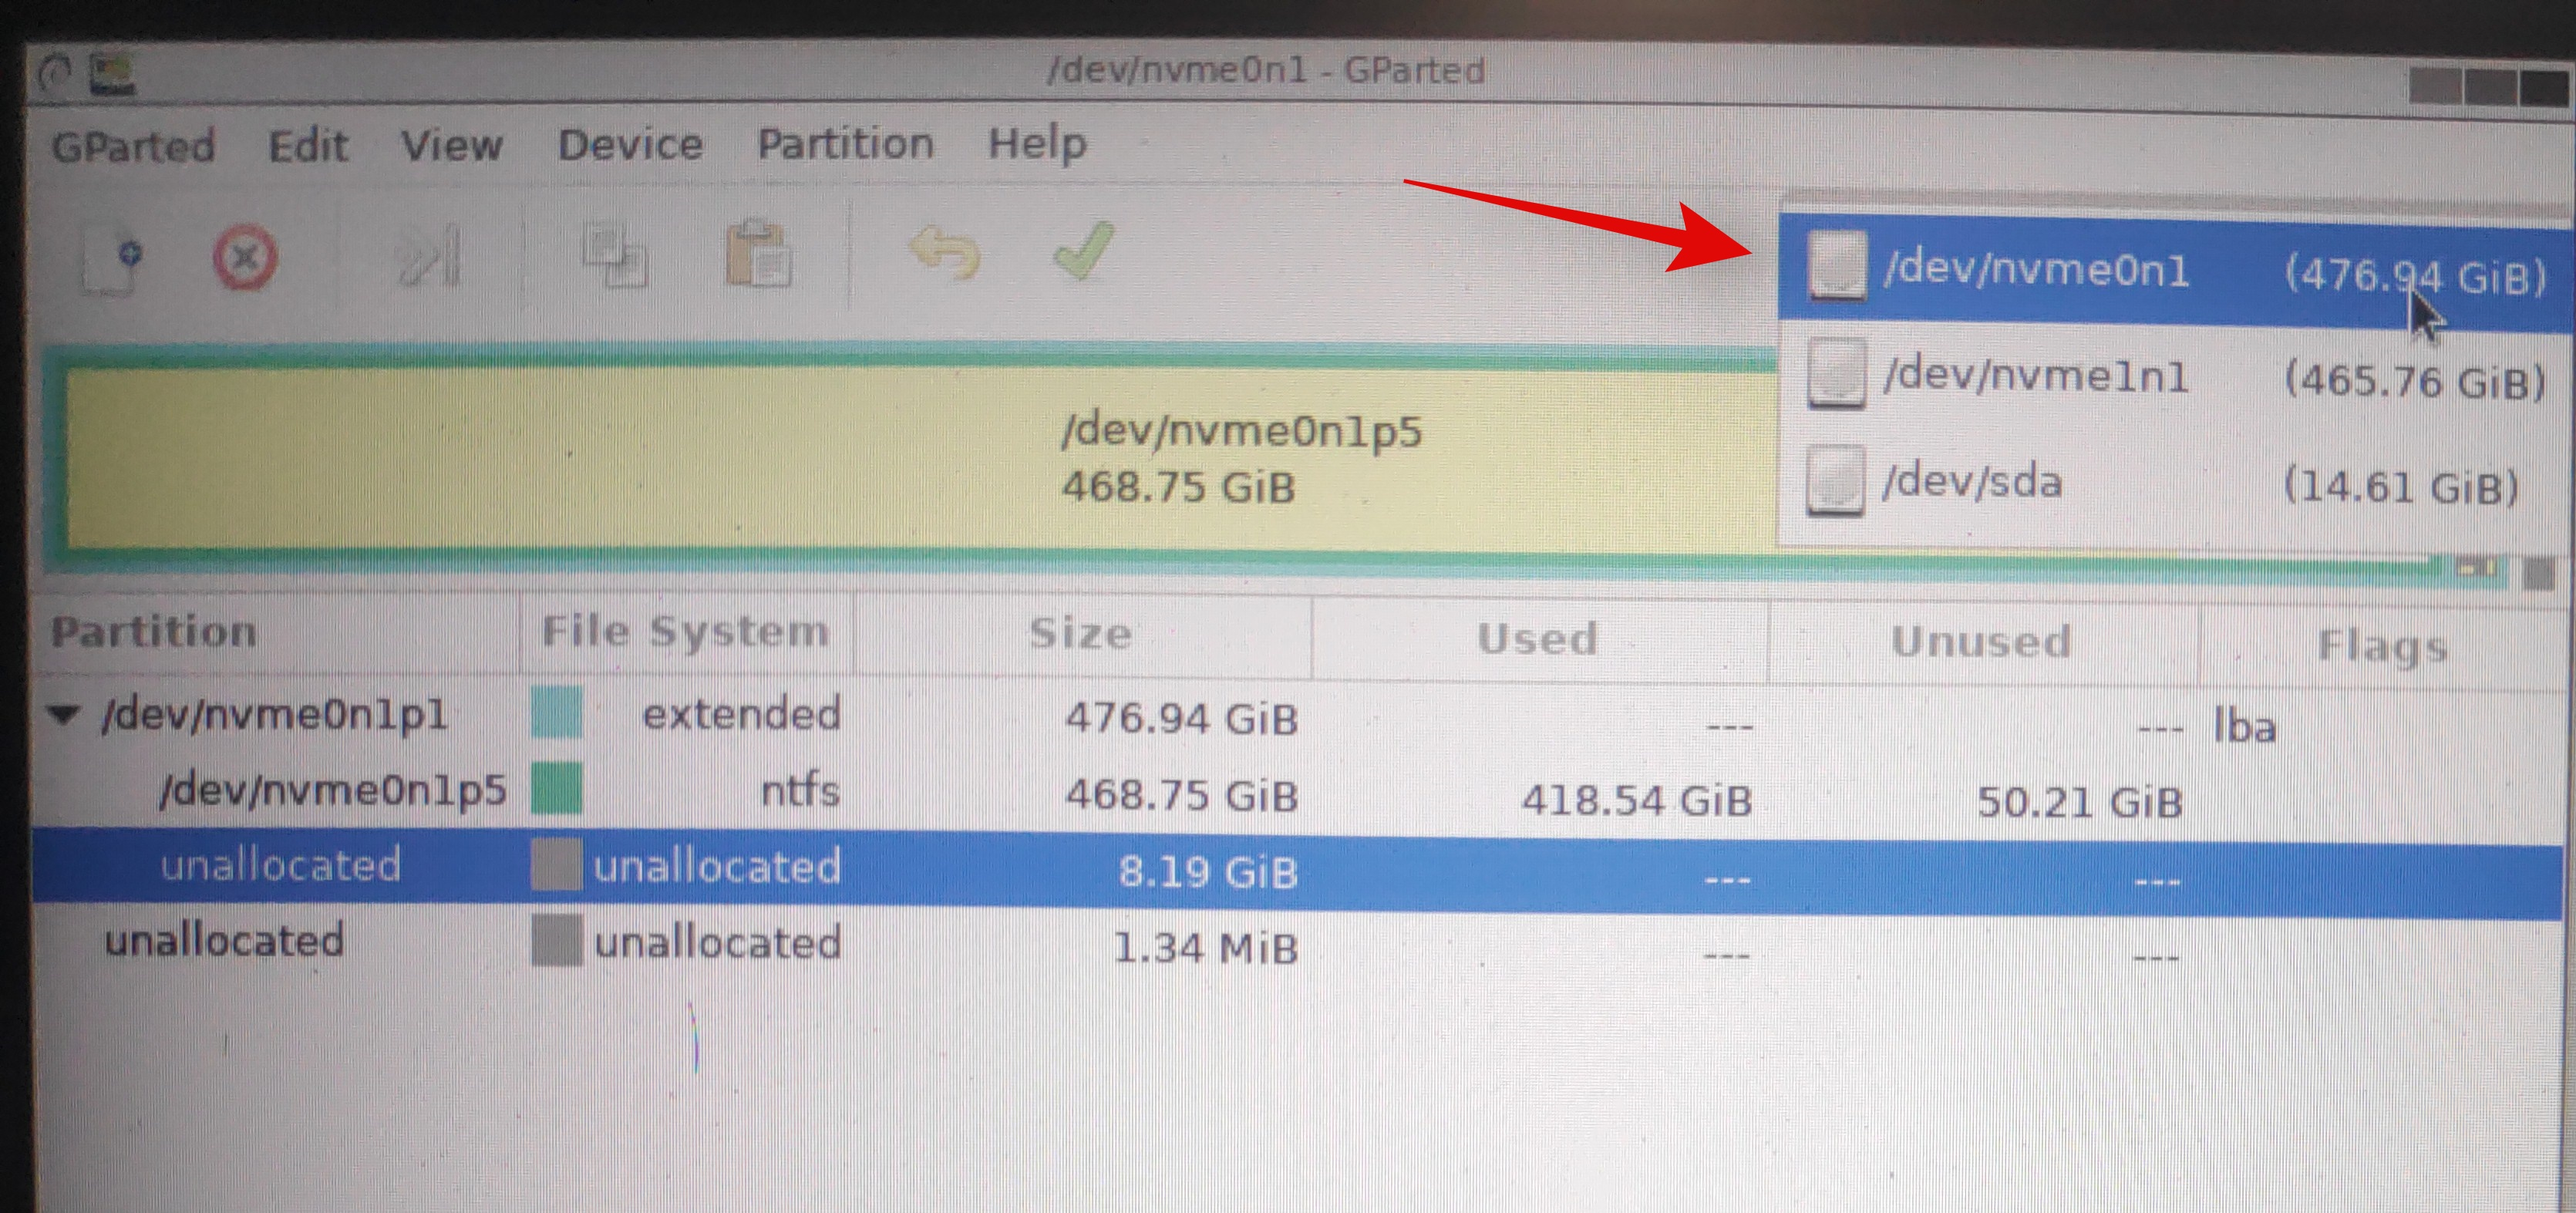
- You will now get a list of existing volumes on the selected disk. Click and select the desired volume that you wish to format.
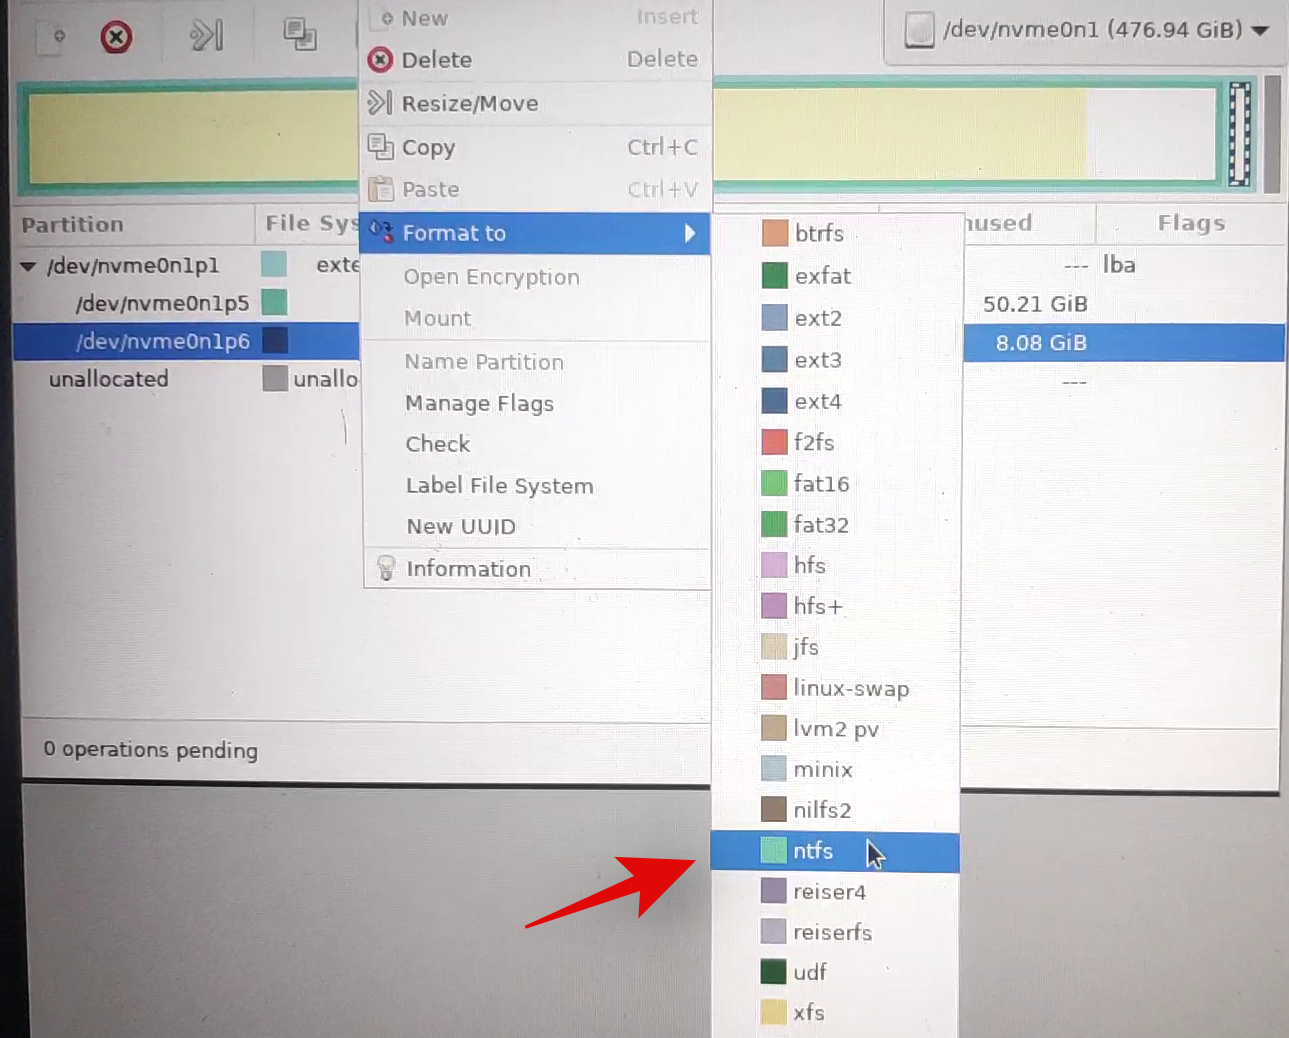
- Now click on ‘Partition’ at the top and hover over ‘Format to’.
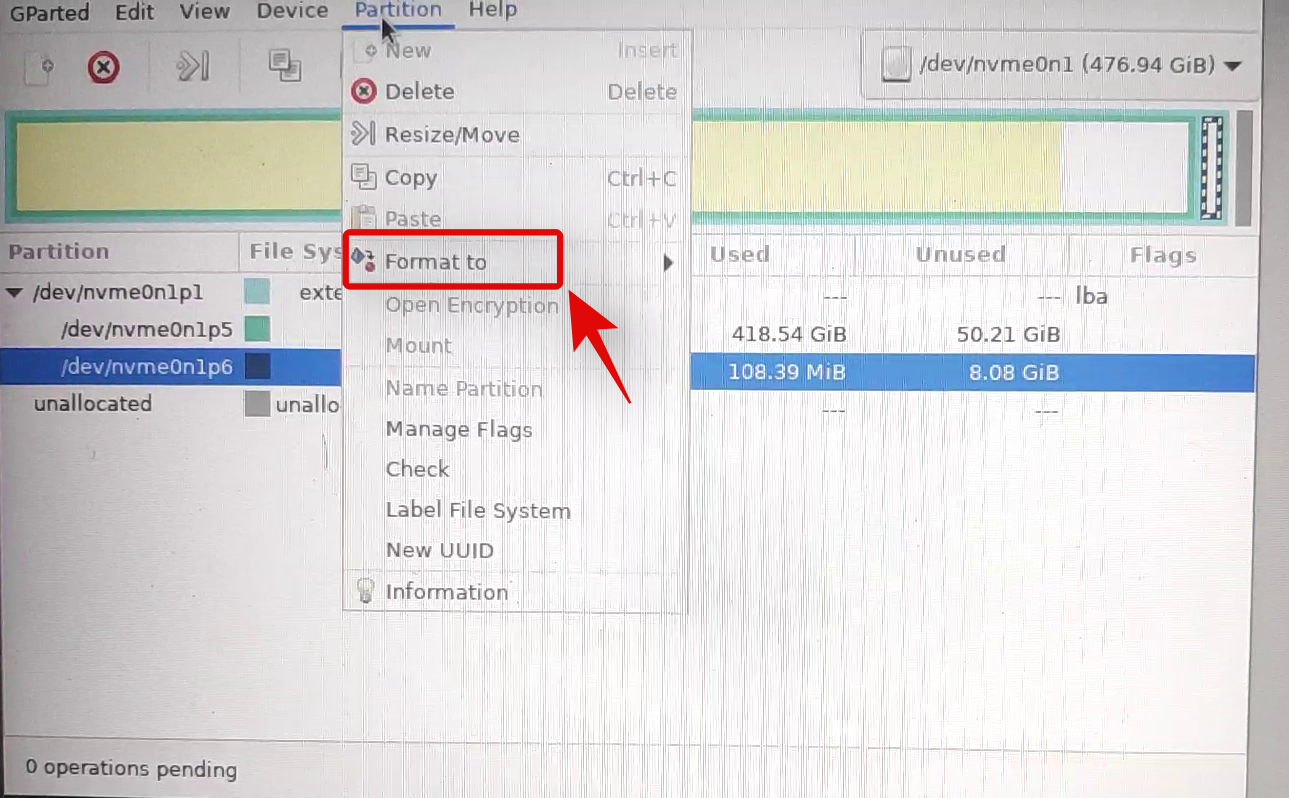
- Select your desired drive format but it is recommended that you format your drive in NTFS for all modern systems.
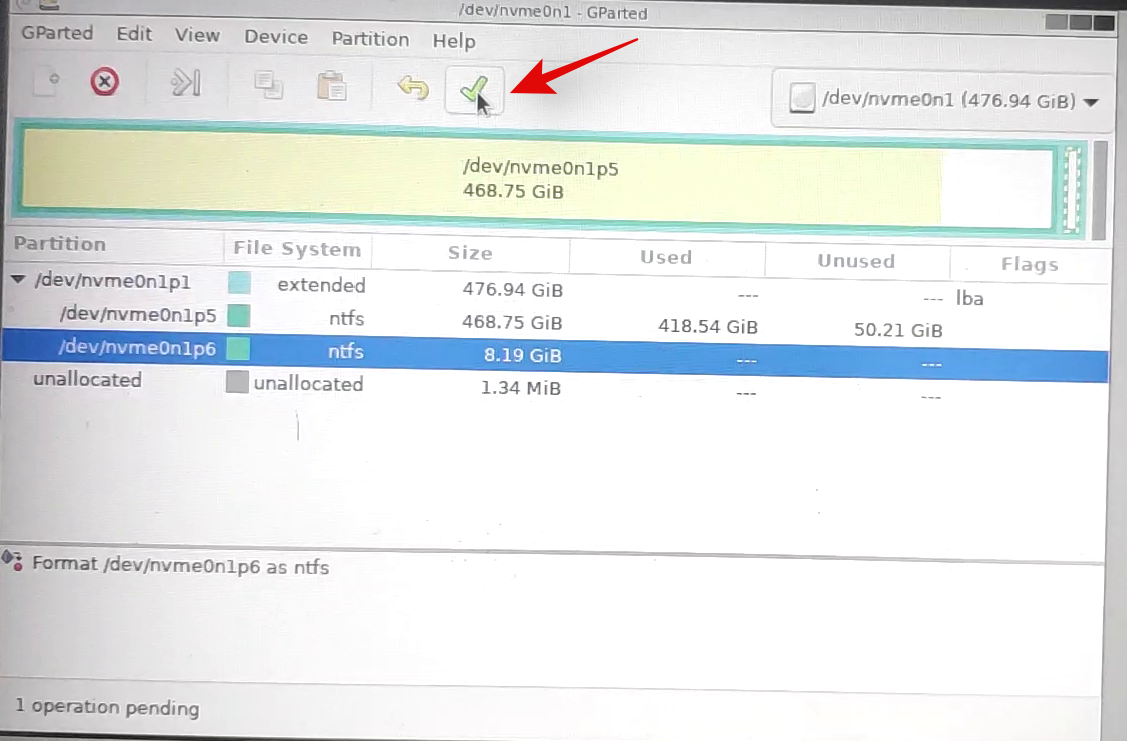
- Once you select the desired disk format, GParted will cue the current operation in its task list. Click on the checkmark in the toolbar at the task to execute cued tasks.
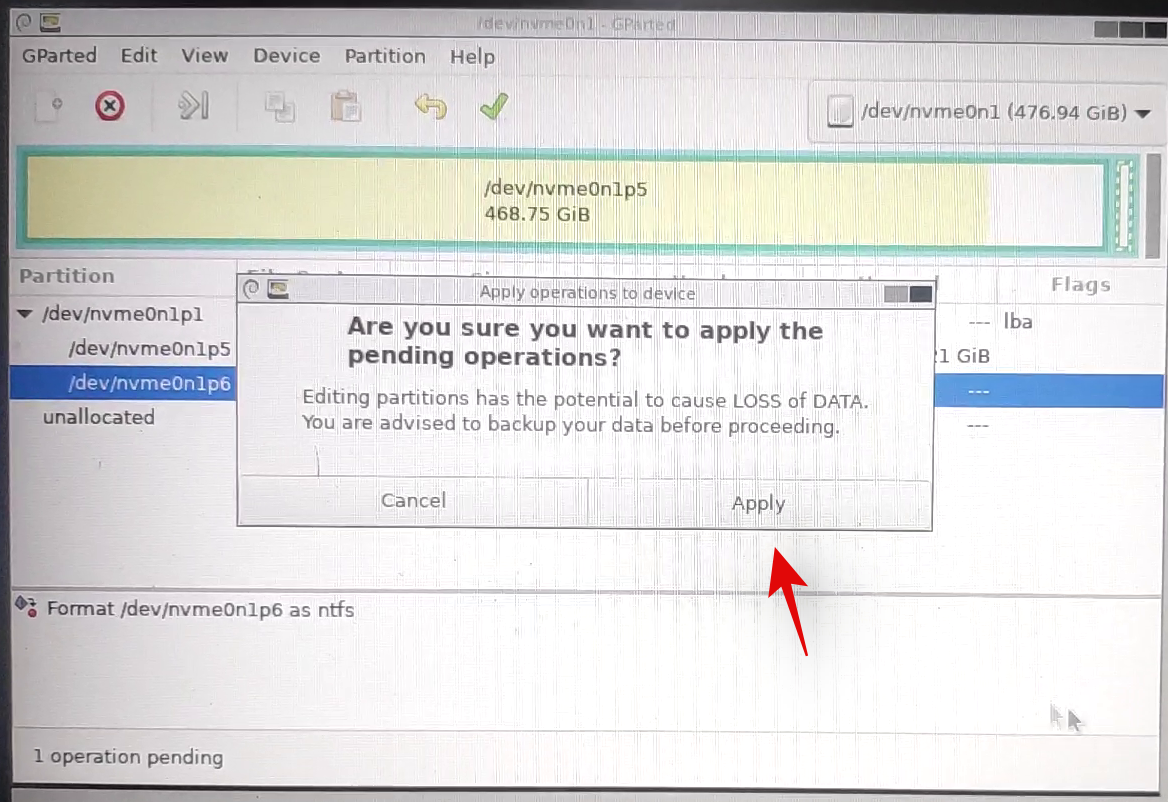
- Click on ‘Apply’ to confirm your choice.
- GParted will now perform the necessary operations and the selected volume should be automatically formatted at the end of this process. Close the GParted utility and click on the Power icon on the desktop. Click and select ‘Restart’ and then click on ‘Ok’.
- Boot into the BIOS on your system and revert the changes you made earlier. This includes enabling secure boot, changing your storage configuration back to its default settings, and changing your boot device order.
- Once you have reverted the changes, unplug your USB and exit the BIOS while saving the changes you made.
You will now be booted into Windows normally and the selected volume should now be formatted and wiped on your system.
Method 7 From Recovery
If you are in Windows Recovery Environment and unable to boot into Windows, then you can use the guide below to format a drive on your system.
Please keep in mind that it is not recommended to format your boot drive using the guide below from your recovery environment as this could cause issues with your boot drive and make it unrecognizable. You will then have to completely format the drive and set it up again and install a new version of Windows on it.
Hence, use the guide below only to format secondary drives from the Recovery environment or ensure that you have a Windows 11 installation media handy to reinstall the OS that you will remove from your boot drive.
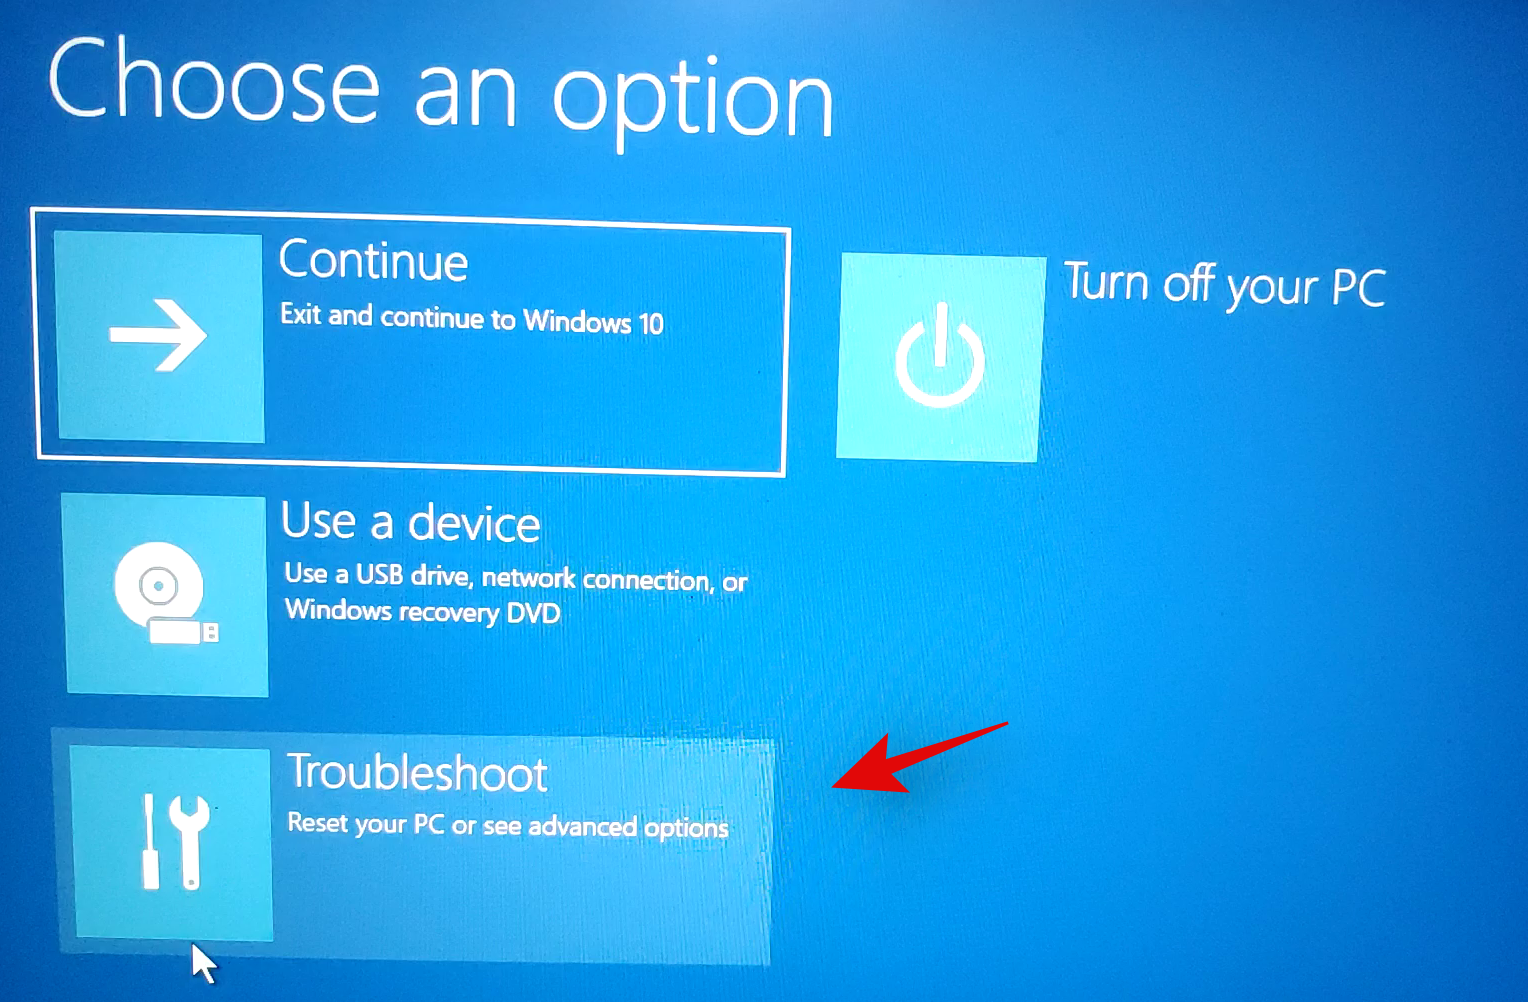
- Once you are on the Windows Recovery or troubleshooting screen, click and select ‘Advanced Options’.
- Click on ‘Troubleshoot’.
- Select ‘Advanced Options’ again.

- Now click on ‘Command Prompt’ to launch the command prompt.
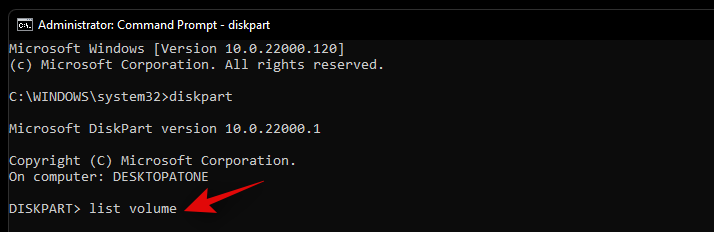
- Type in the following command to launch the diskpart utility.
diskpart
- Now execute the following command.
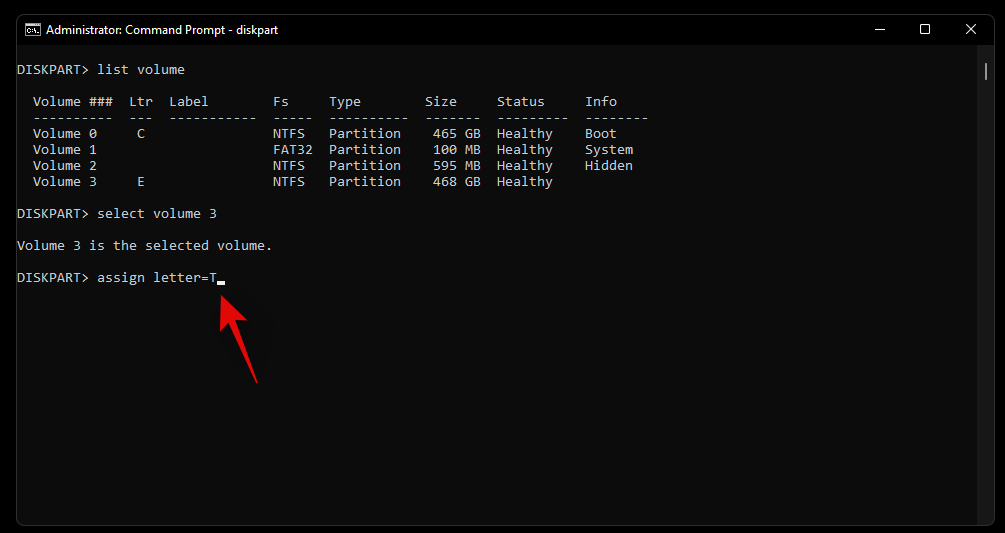
list volume
- Find the volume you wish to format and use the command below to select it. Replace X with the dedicated number of the volume you selected:
select volume x

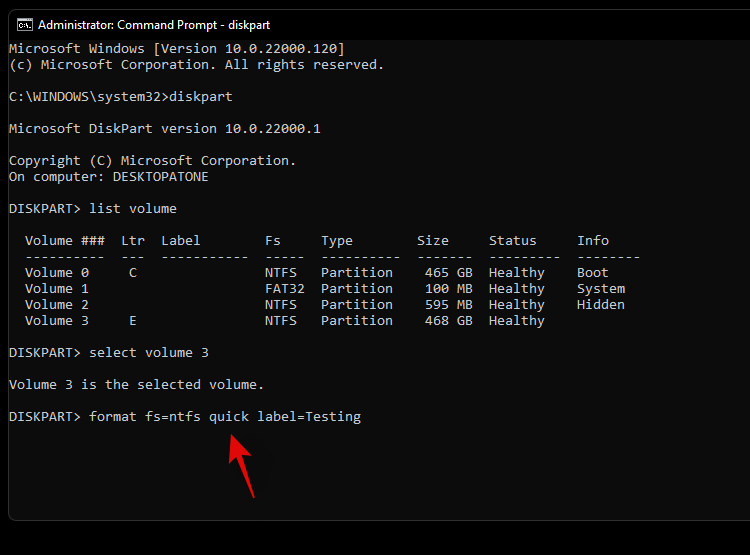
- Now use the following command to format the selected volume with NTFS as its format. Replace NAME with the name you wish to give your newly formatted volume:
format fs=ntfs quick label=NAME
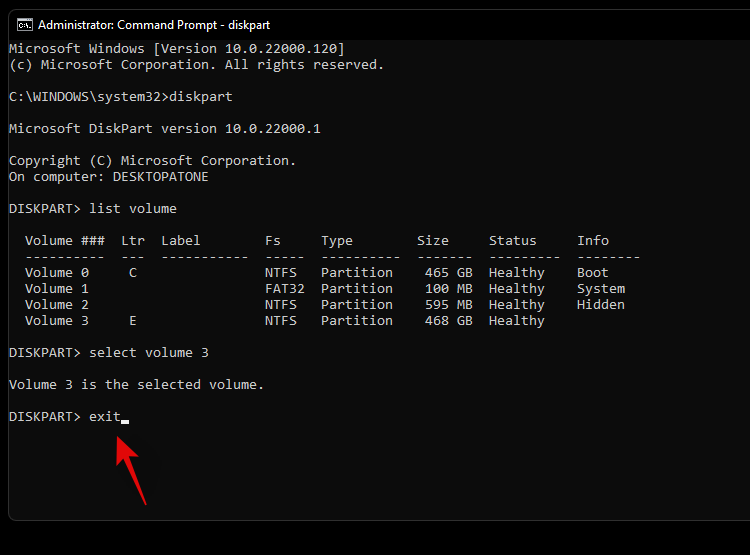
- Let diskpart do its thing and the volume should be formatted within a few seconds. Once formatted, type in the following command to exit CMD.
exit
Now restart your PC and the selected volume should be formatted on your system.
Method 8: Using the Windows Setup
You can also format a drive-by directly using the Windows setup as well. Depending on your requirements, you can then exit the setup or continue installing Windows on the freshly formatted drive.
- Launch the Windows setup from the installation media when prompted at the time of boot. Once the setup is launched, select your language and click on ‘Next’.
- Click on ‘Install Windows’.
- Windows Setup will now detect the drives installed on your system. Click and select the drive you wish to format and click on ‘Format drive’ at the bottom.
- Confirm your choice and Windows will now proceed to format the selected drive.
And that’s it! Once the drive is formatted, you can continue formatting other drives on your system using the setup or continue with the Windows installation depending on your requirements.
How to completely format a drive on Windows 11 or 10
Completely formatting a drive is a little different from the traditional format methods listed above. While the above-listed methods will delete all your data from the drive, the existing partitions will remain. Additionally, if it is the boot drive that we are talking about then you will also have recovery and EFI partitions on the drive. While this shouldn’t be an issue on your system, they can cause problems when switching systems as the boot order or the recovery media can be recognized incorrectly by the new system.
In such cases, you can wipe all partitions from a drive and completely format it. You can then create new partitions and volumes on the drive depending on the need of the new system that you are switching to. Follow one of the guides below to completely format a drive and remove all partitions and volumes.
Method 1: From a third-party utility
If you wish to completely format your drive using a third-party utility then we recommend using the Gnome Partition Manager. This is an open-source and completely free utility hosted on Sourceforge. You can even compile the binaries on your own in case the privacy is a concern. Follow the guide below to get you started. The Gnome Partition Manager is available in ISO format which allows you to mount it to a removable media and use it individually as well, in case you are looking to completely format your boot drive. Use Rufus to create a USB installation media using the Gnome Partition Manager ISO.
Required
- Gnome Partition Manager | Gnome Partition Manager
- AHCI Storage mode enabled in BIOS
- Secure boot disabled in BIOS
- Boot device order changed (if needed to boot from USB on your system)
Guide
- Make the necessary BIOS changes on your system and plug in the GParted USB into your system. Once plugged in, reboot your device and boot from the USB by pressing a key if prompted.
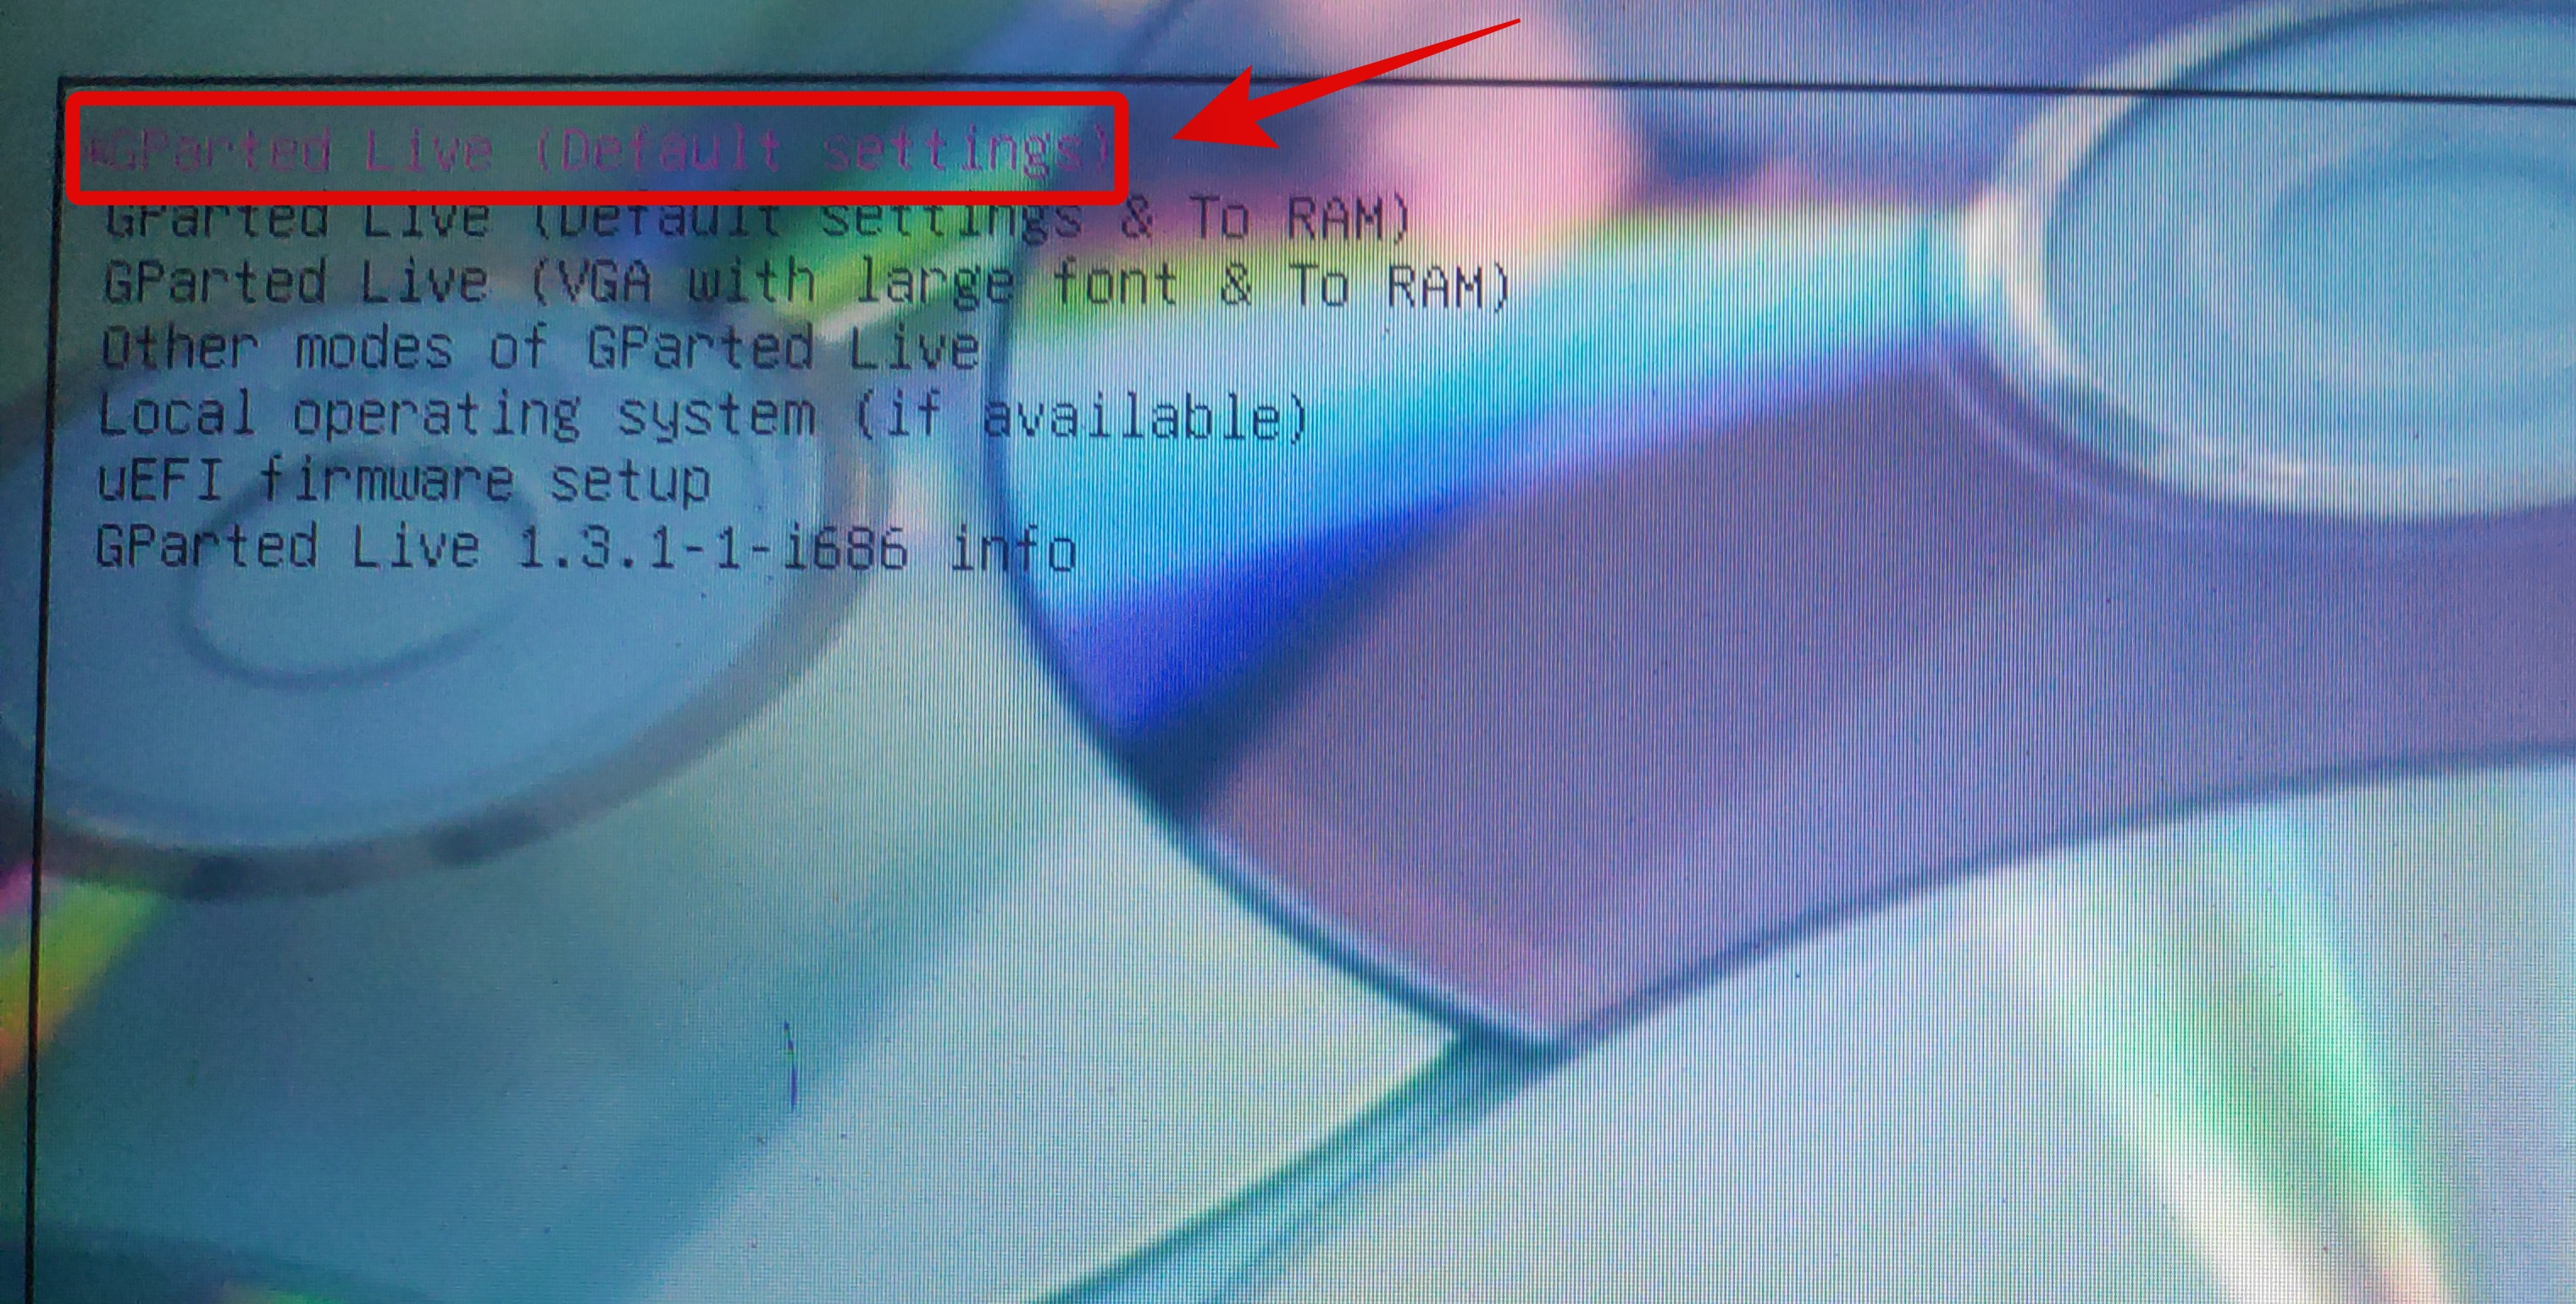
- You will now be at the GParted Splash Screen where you will be requested to select the relevant version of GParted that you wish to use. We recommend you select the first one which is GParted Live with default settings.
- Once booted, you will be prompted to change your keymap if needed. If your keyboard seems to be working as intended, select ‘Don’t touch keymap’ or use one of the other options to get keyboard working within Gnome.
- Select your preferred language by entering its relevant number. Use number 33 for US English.
- Now if you wish to manually install or configure your video output then enter 1 on the next screen. Else if the resolution and video response times seem to be fine for now then enter ‘0’.
- GParted will now boot with the dictated settings. Once launched, you will be taken to the temporary desktop where the GParted utility will be launched automatically.
- Click on the drop-down menu in the top right corner and select the desired disk that you wish to completely format.
- Now select a volume on the selected disk and click on ‘Partition’ at the top. Select ‘Format to’ and then select ‘NTFS’.
- Repeat the steps above for all the partitions on the disk. Once each partition is cued for formatting, click on the checkmark in your toolbar to execute these tasks.
- Confirm your choice by clicking on ‘Apply’.
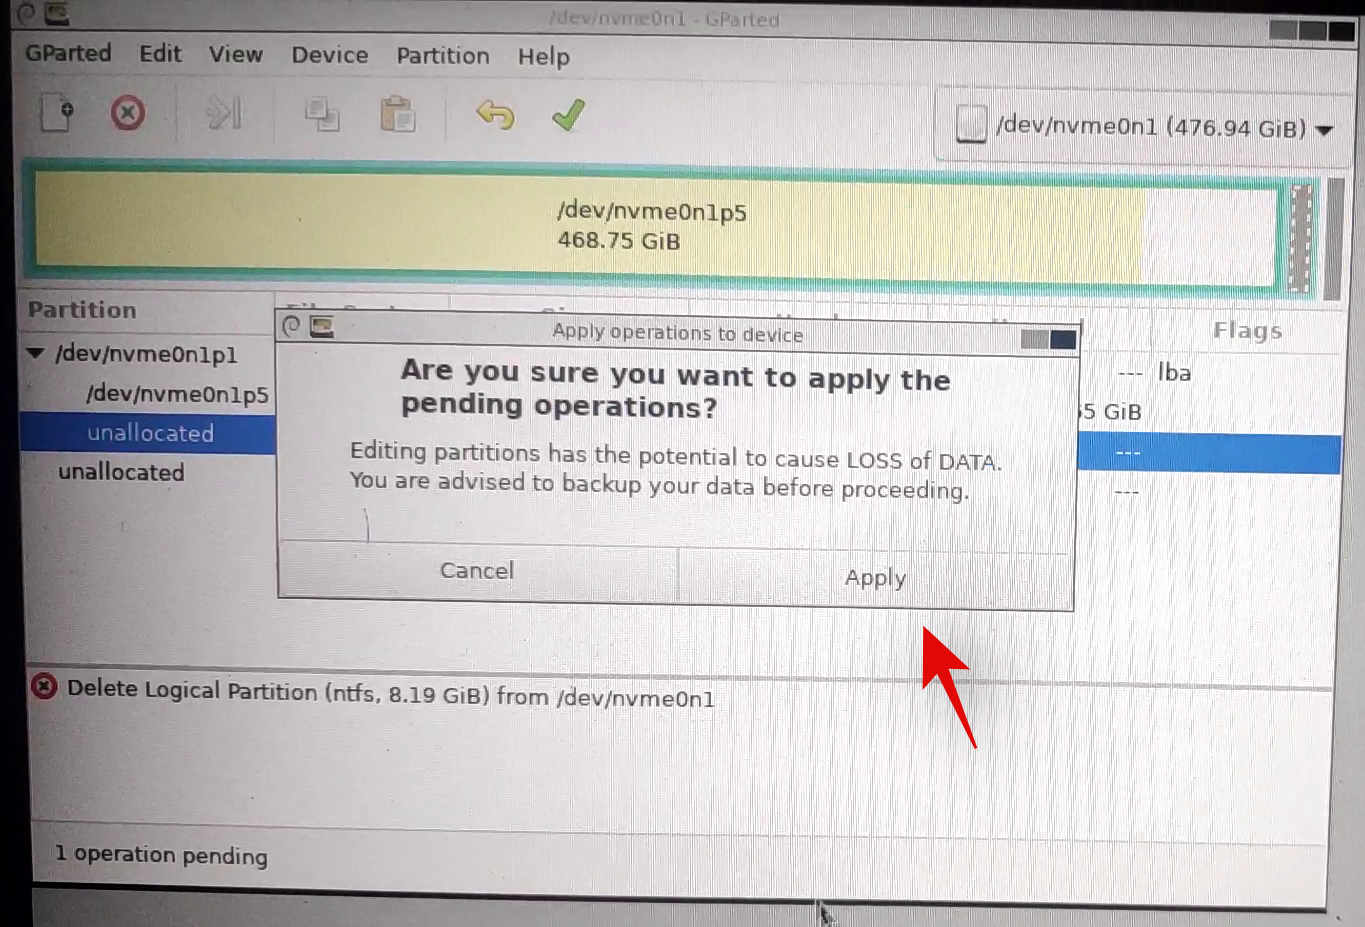
- All the selected partitions will now be formatted. We can now delete these partitions. Click and select each partition one by one and then click on the X in your toolbar. This will cue each partition for deletion.
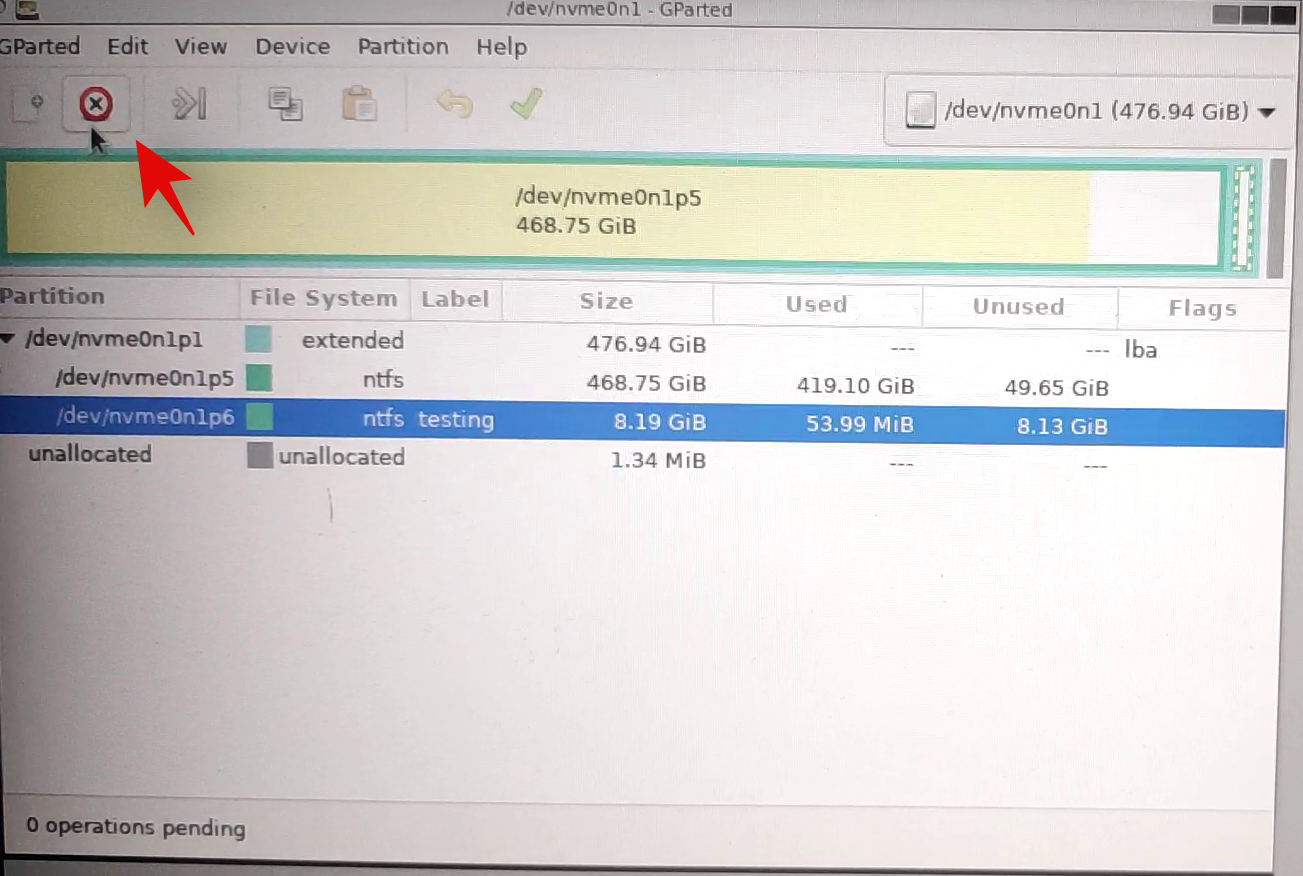
- Click on the checkmark again to delete all the selected partitions.
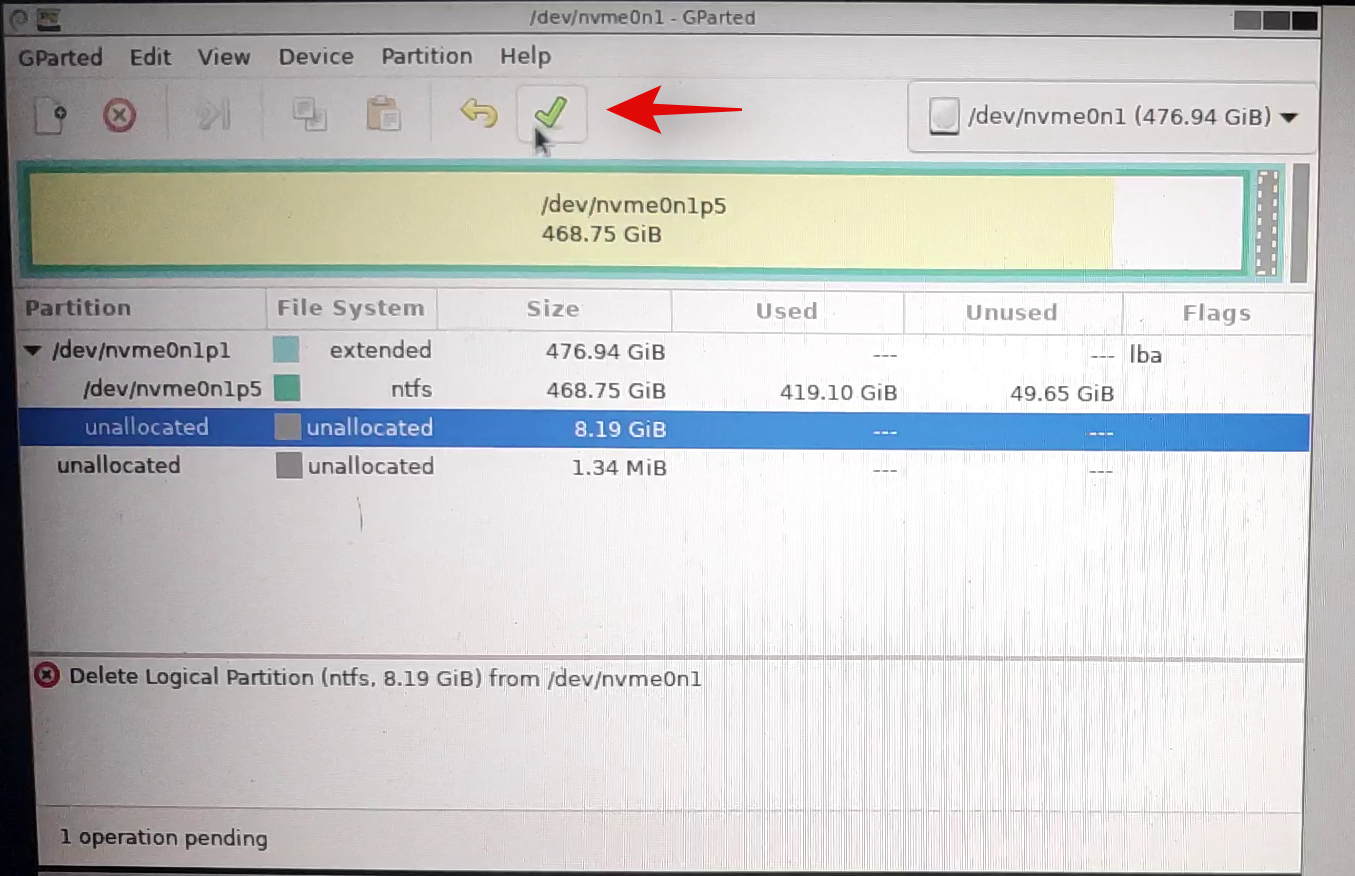
- Confirm your choice by clicking on ‘Apply’.
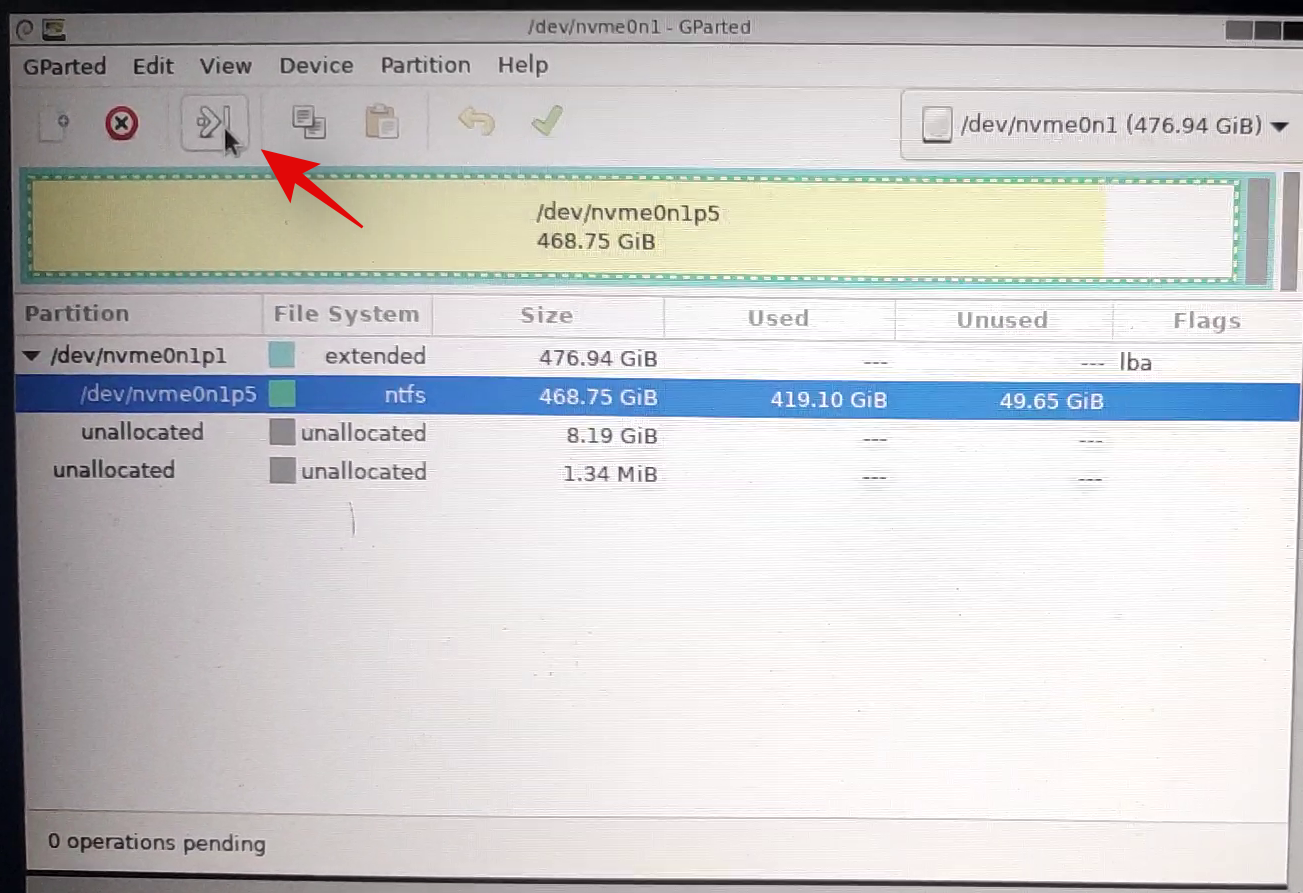
- Once all partitions are deleted from the disk, click and select the unallocated volume on the disk and then click on ‘New’ at the top. If you have an existing primary partition on the disk then select that partition and click on the ‘Resize’ icon instead.
- Select the entire size of your disk and enter a name for your disk beside the label text field. If resizing an existing partition, use the slider at the top to drag it to the maximum size.
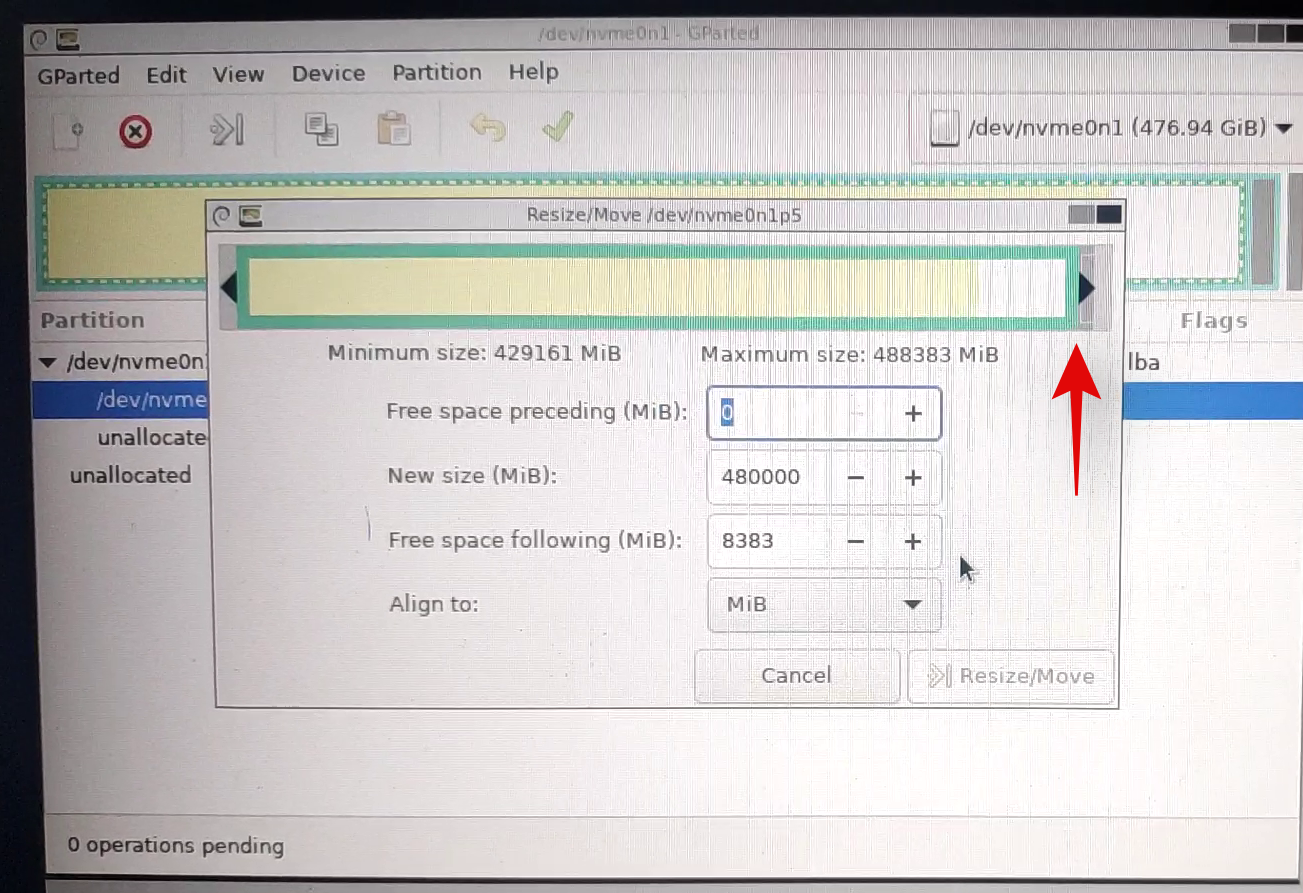
- Click on ‘Ok’ or ‘Resize/Move’ depending on your choice.
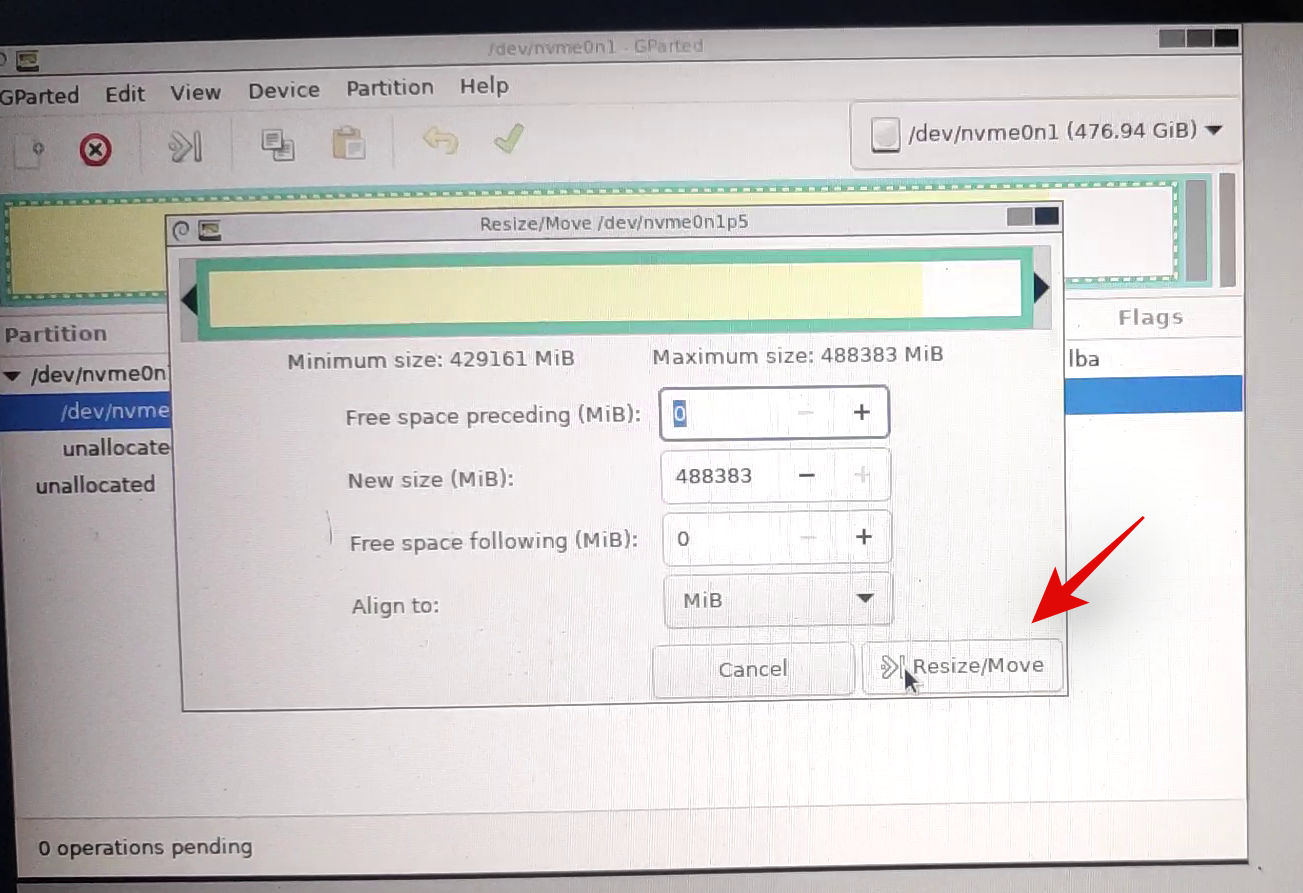
And that’s it! Your entire drive should now be formatted and a single partition equal to the entire size of your drive should now be created which will allow you to use the drive, however, you wish. You can now exit GParted by clicking on the power icon on the desktop. Once rebooting, boot into your BIOS and revert the changes you made earlier. Once reverted, unplug the USB and boot into Windows normally.
Method 2: From CMD
Diskpart is a hugely versatile utility that can be used to completely format a drive as well. Once completely formatted via diskpart, you will need to set your disk as GPT or MBR depending on your platform needs for the drive to be recognized properly.
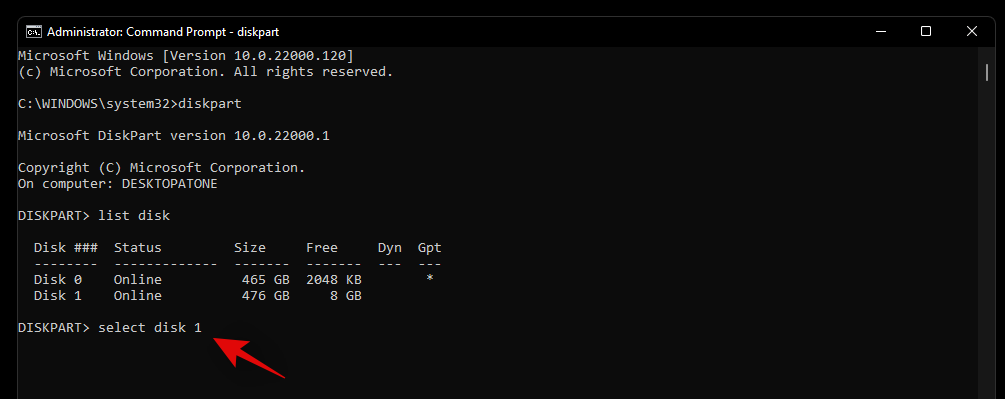
- Launch CMD using one of the guides above depending on the current state of your system. Once CMD is launched, enter the command below to launch diskpart:
diskpart
- Now enter the following command and find the disk you wish to completely format:
list disk
- Note down the concerned disk’s number and use the command below to select it. Replace N with the disk number you noted down earlier:
select disk N

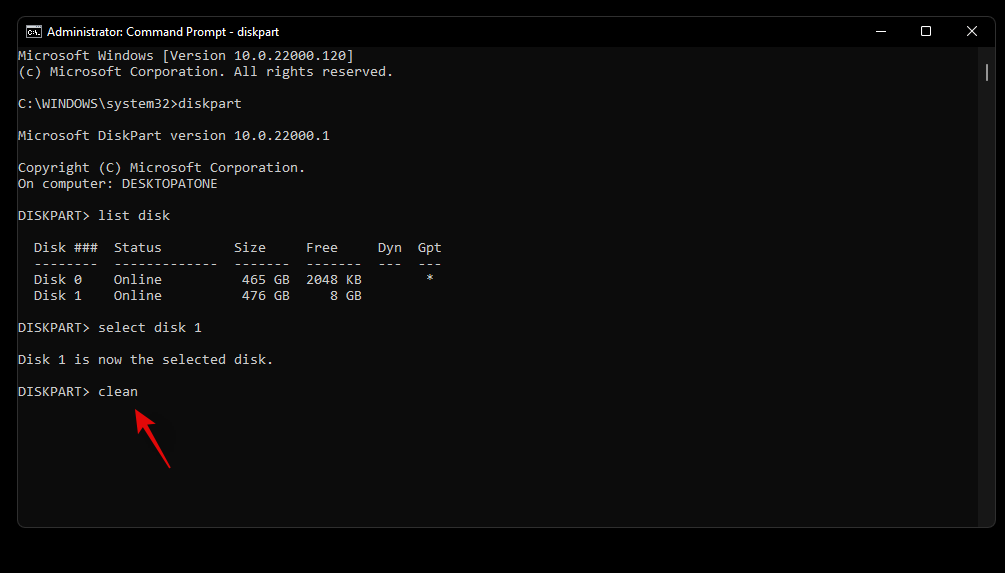
- Now enter the command below to clean your disk:
clean
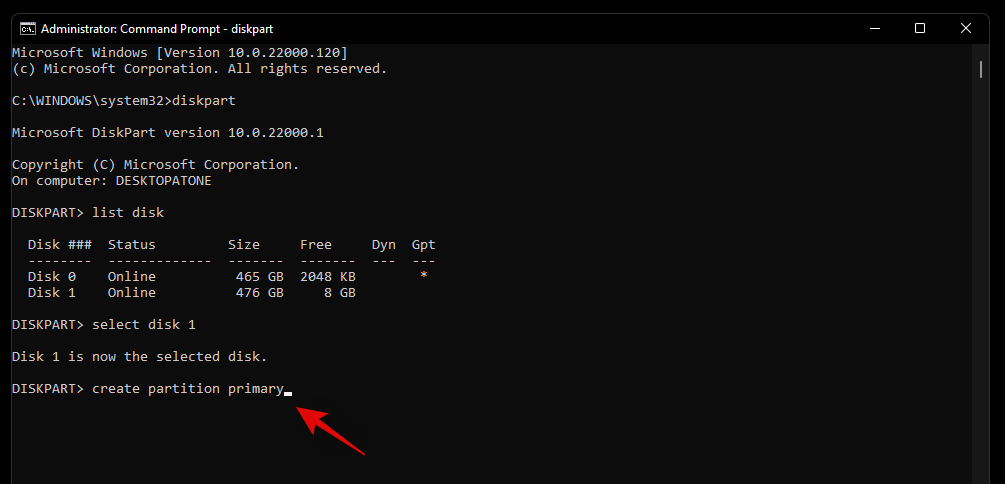
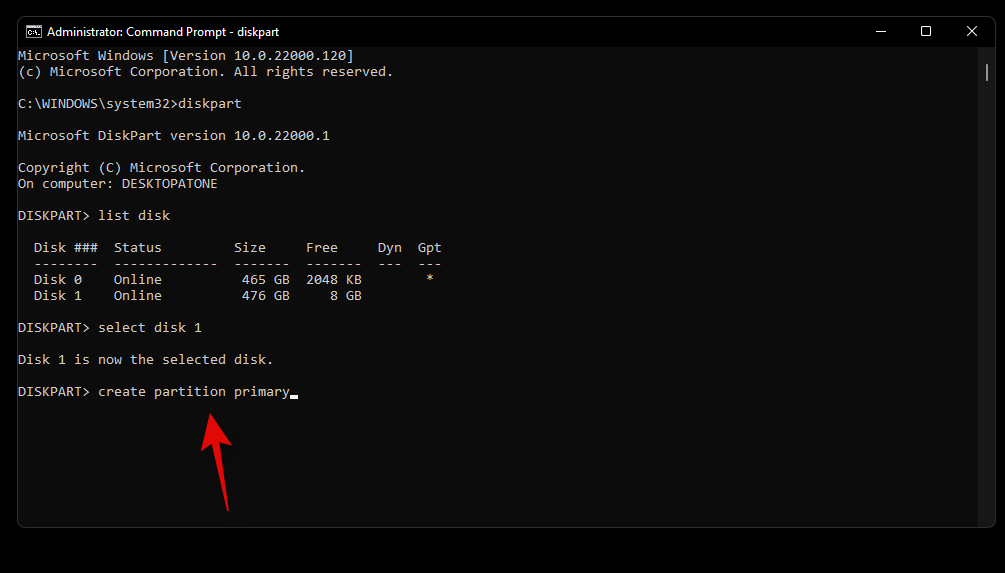
- We will now need to create a partition on the selected disk so that it is usable. Enter the command below to get started:
create partition primary
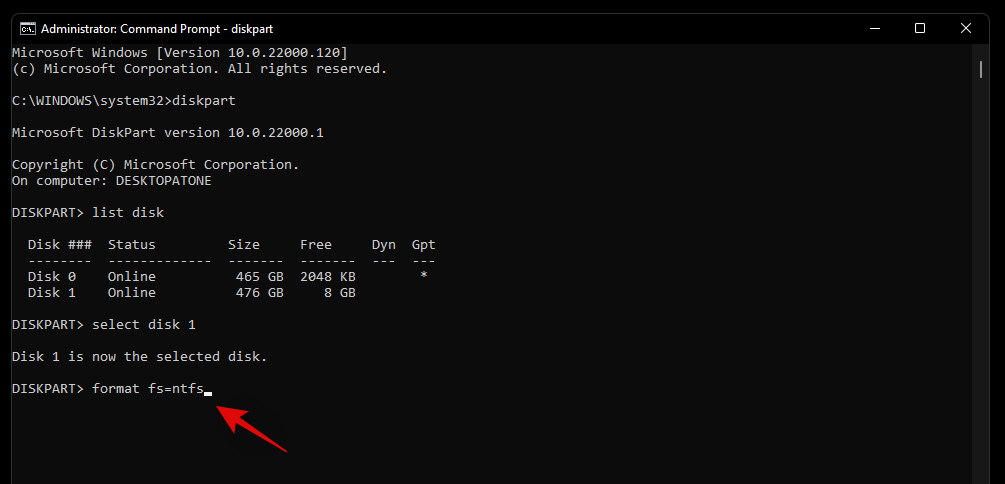
- Use the command below to format the newly created volume now.
format fs=ntfs
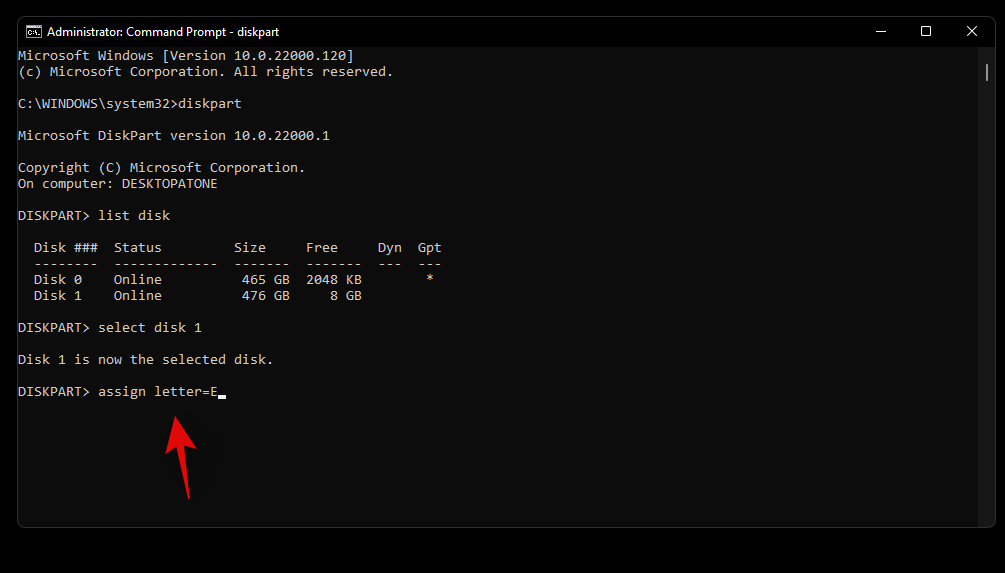
- Enter the following command to assign a letter to the drive. Replace X with the letter of your choice.
assign letter=X

And that’s it! The selected drive should now be completely formatted. Any recovery or EFI partitions on the drive should also now be deleted.
How to switch between MBR and GPT
MBR and GPT are types of disk setups that are used to install new OS on a drive. These types are essential in case you are trying to switch between platforms or use Linux on yoru system. While GPT is a new disk setup with various advantages, MBR is still the most compatible setup format out there. If you are trying to switch your disk setup from MBR to GPT or vice versa then you can use the guide below to change the disk type.
Note: When converting, your disk will be cleaned and all the data will be removed from it. You will need to create new partitions on the drive as well so ensure that you have backed up your data before proceeding with the guide below.
- Launch CMD on your system either from the recovery environment or from within Windows depending on the current state of your system. Once launched enter the command below to launch the diskpart utility.
diskpart
- Now enter the following command to get a list of all the disks on your system. Note down the number for the concerned list so that you can access it later on.
list disk
- Enter the following command and replace N with the disk number you noted down earlier.
select disk N
- Use the command below to clean the drive.
clean
- Now let’s convert the drive to your desired disk type. Replace TYPE with MBR or GPT depending on your current requirements.
convert TYPE

- Once the disk has been converted, use the command below to create a primary partition.
create partition primary
- Now use the command below to assign a letter to the drive. Replace X with the drive letter of your choice.
assign letter=X
And that’s it! You will now have converted the selected drive to GPT or MBR depending on your current requirements.
How to create new volumes and partitions
Once you have formatted your drives you will find that it is not that easy to use them within Windows. Formatted drives need dedicated partitions which can then be used as storage spaces to store your data or install an OS. Use the guide below to create custom partitions for a selected drive in Windows 11.
Method 1: From CMD
- Launch CMD and use the command below to enter diskpart.
diskpart
- Enter the following command to get a list of all the disks installed on your system. Note down the disk number of the concerned disk.
list disk
- Now enter the command below and replace N with the disk number you noted down earlier.
select disk N
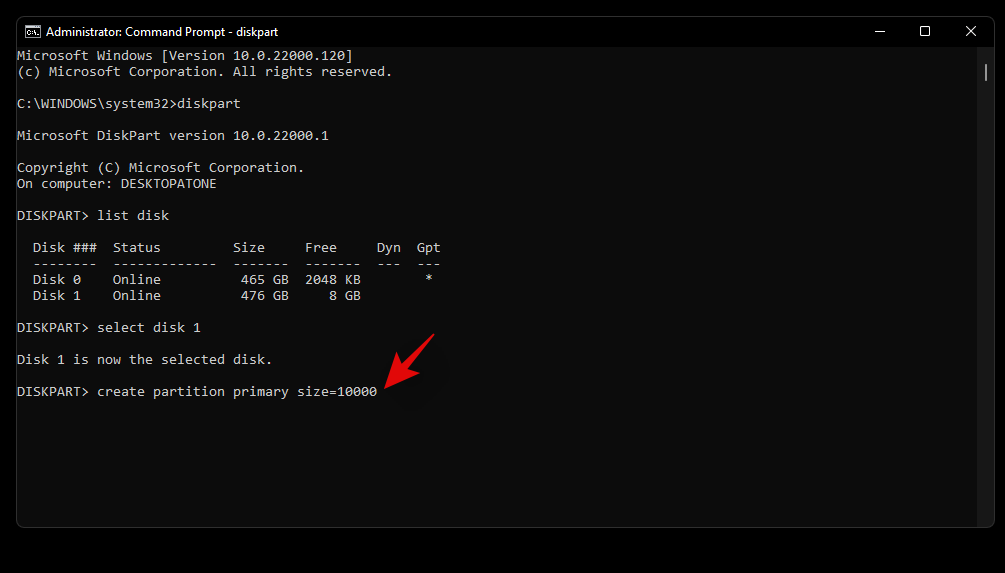
- Use the command below to create a custom partition on the selected disk drive. If a partition already exists on the drive then replace ‘primary’ with ‘extended’. Additionally, replace XXXX with the size of your choice for the partition. The size is measured in megabytes where 1000MB = 1GB.
create partition primary size=SIZE
- Now enter the following command. Your newly created partition will now show up in this list. Note down its volume number:
list volume
- Enter the following command and replace N with the volume number you noted down earlier.
select volume N

- Now use the following command to assign a letter to the selected volume. Replace X with the letter of your choice.
assign letter=X
And that’s it! You will now have created a new partition on the selected drive depending on your current needs and requirements.
Method 2: From Disk Management
You can also create a new partition son your system using the Disk Management utility provided within Windows. Use the guide below to get you started.
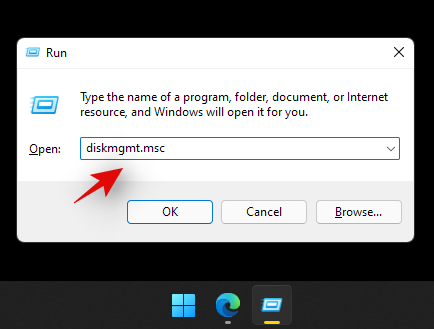
- Press
Windows + Ron your keyboard and type in the following. Press Enter on your keyboard to launch the disk management utility.diskmgmt.msc
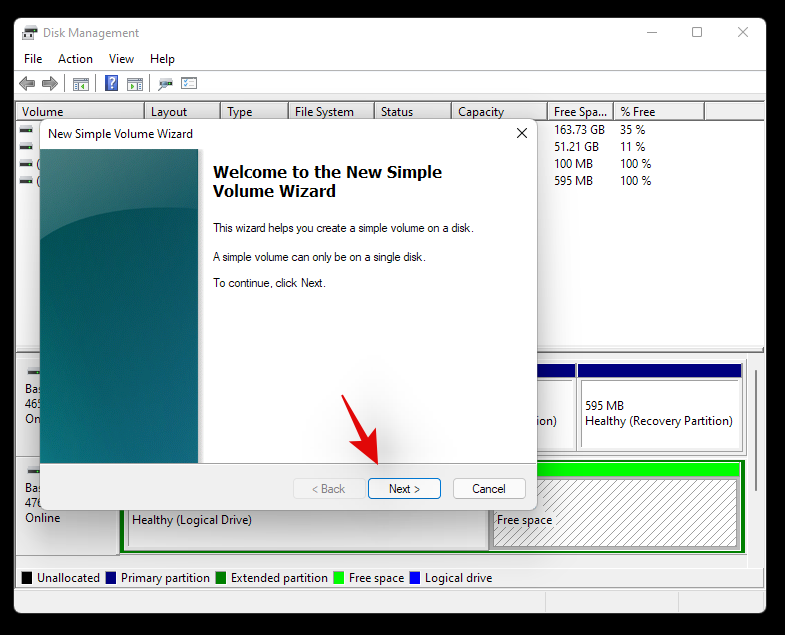
- Once the disk management utility is launched, you will get a graphical representation for all your drives. Right-click on the unallocated space at the bottom of your screen and click on ‘New Simple Volume’.
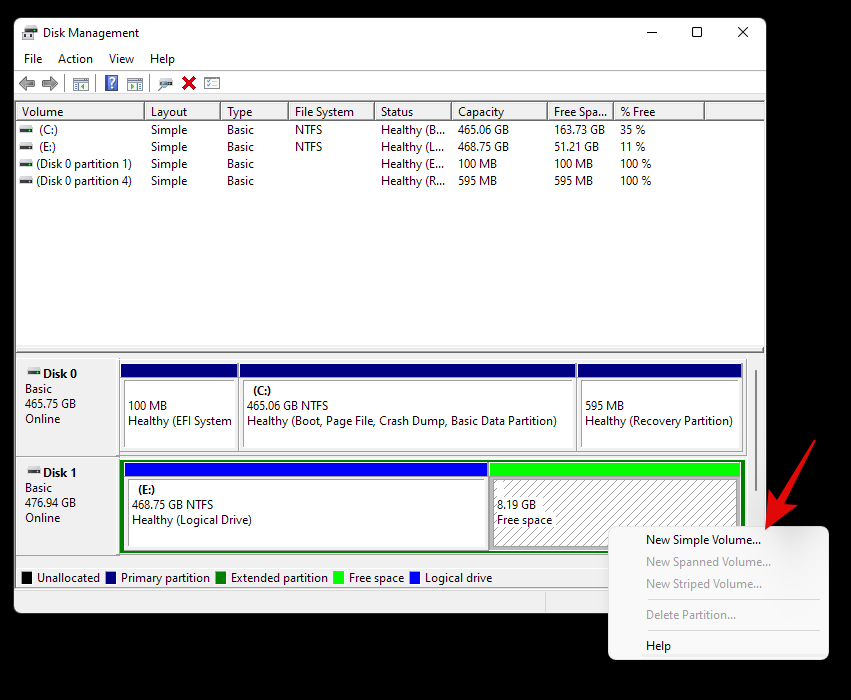
- The volume creation wizard will now be launched. Click on ‘Next’ to get started.
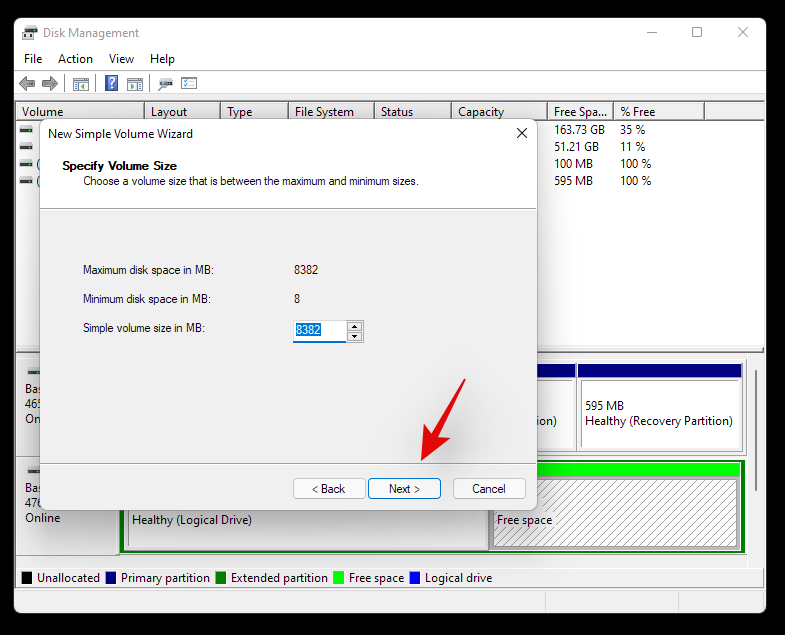
- Select a custom size if needed. By default, Windows will use the entire unallocated space to create a new simple volume on your drive. Click on ‘Next’ once you have set the desired size.
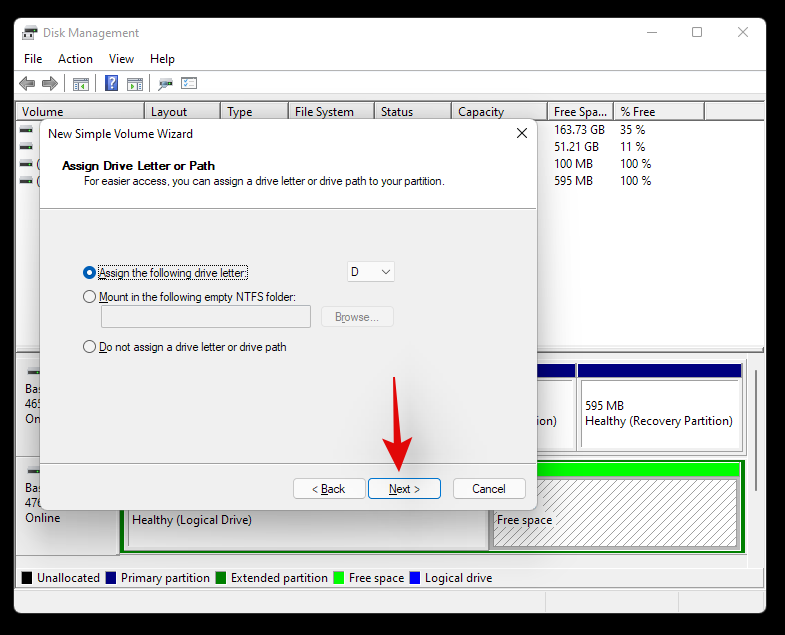
- Choose a drive letter for your new volume now. Click on ‘Next’ once you are done.
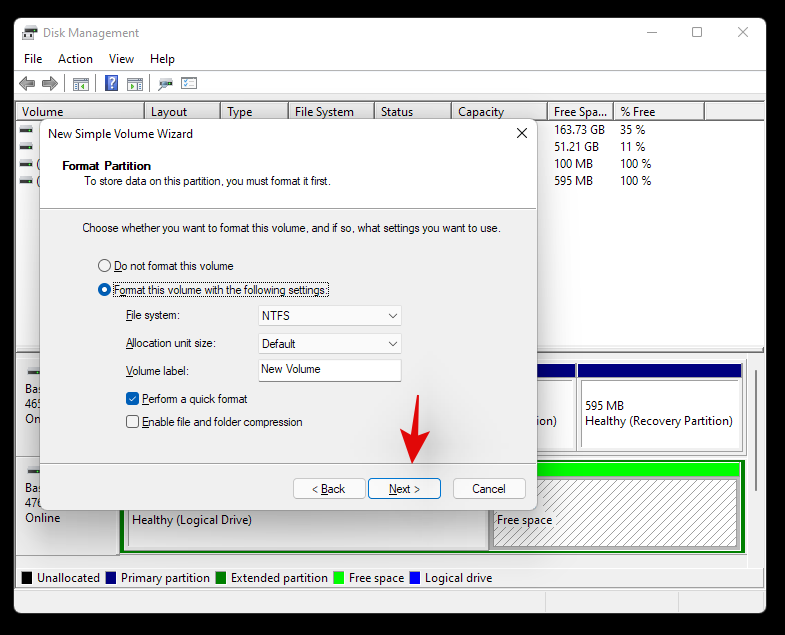
- You will now be given the option to format the unallocated space before the volume is created. Choose your disk format by clicking on the drop-down menu and set a name for the new volume beside Volume Label. If you do not wish to format the unallocated space, then click and select ‘Do not format this volume’. Click on ‘Next once you are done.
- Finally, click on ‘Finish’ and the new volume will now start being created.
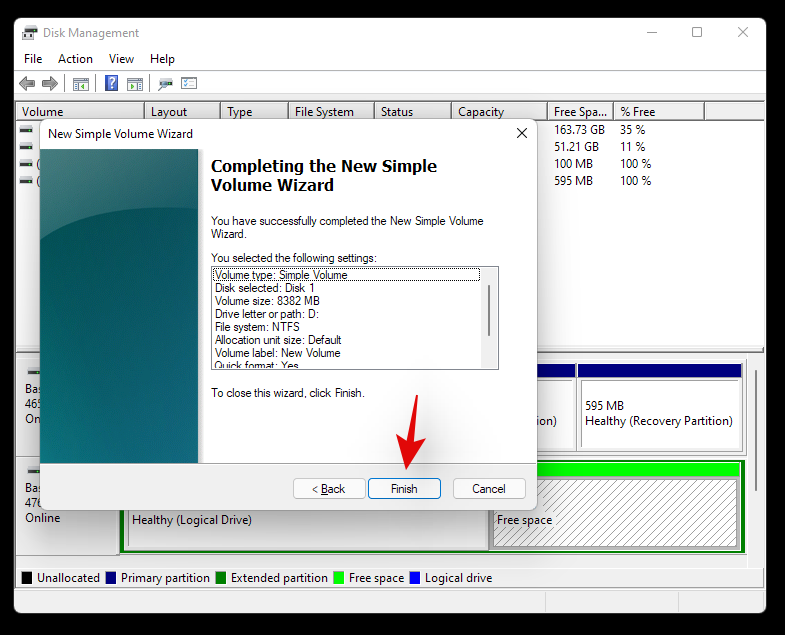
And that’s it! A new volume should now be created on the selected drive.
We hope this guide helped you easily format or wipe your drive in Windows 11 depending on your current needs and requirements. If you face any issues or have any questions for us, feel free to reach out to us using the comments section below.
Related:
- Windows 11 Shortcuts: Our Complete List
- How to Remove Microsoft Teams Chat From Taskbar on Windows 11
- How to Use Chat on Windows 11 Taskbar
- How to Repair Windows 11 [15 Ways]
- How to Fix 100% Disk Usage issue on Windows 10 or 11 [18 Ways]
- How to delete temporary files in Windows 11
- How to Unzip Files on Windows 11 Natively or Using a Software
- How to Uninstall Apps on Windows 11: Everything You Need to Know
- How to Create a Restore Point in Windows 11


2 responses to “How to Wipe a Hard Drive on Windows 11”
Thanks for you amazing and very much significant post. your useful tips to make my pc running smoothly. My pc is running out smoothly when I getting Windows 11. It is best system ever, So thanks for the tips.
Thanks for you amazing and very much significant post. thanks for this.