Like us, if you also use your PC daily to browse the internet, watch videos on YouTube, or simply work online, we’re sure your PC may have created an enormous amount of internet cache on your system drive by now. Also known as temp files, these files can reduce the total free space available to the user and can also lead to additional wear and tear to the system drive if not cleaned regularly.
Fortunately, there are a couple of ways to tackle this problem. Read on below.
- What are temporary files?
- Method #1: Clearing the temp folder
- Method #2: Using the Disk Cleanup utility
- Method #3: From the Settings app
- Method #4: Using Storage Sense
- Method #5: Using Command Prompt
- Method #5: Use Third-Party Cleaners
- Method #6: Manually delete leftover files
- Method #7: Delete Windows Store Cache
- Method #8: Delete your browser cache and local files
- Method #9: Clear Prefetch
- Method #10: Clear your File Explorer History
- F.A.Qs
What are temporary files?
Before we dive into the methods to get rid of them, let’s first find out what they actually are.
When you browse the internet, your browser essentially downloads heaps of data from the internet to render webpages and their images. The same thing happens while watching YouTube videos, your browser cleverly downloads the entire video in chunks and plays it. Once you’ve closed the browser, some portion of all these downloaded files remain on your PC as cache to give your instant access to your favorite websites and videos.
They’re also created when you try to extract an archive, as the archive first gets extracted to a safe temporary location and then gets copied to where you originally extracted it.
These are what’s called temporary files. You may or may not need them later on but they do take up space on your system drive.
Method #1: Clearing the temp folder
This method goes way back to the Windows XP days when PCs used to ship with those puny little 80GB or 120GB spinning hard drives and we’re certain it’s still a go-to method of clearing temp files for a lot of users even today.
Let’s take a look at how you can clear the temporary files using this method.
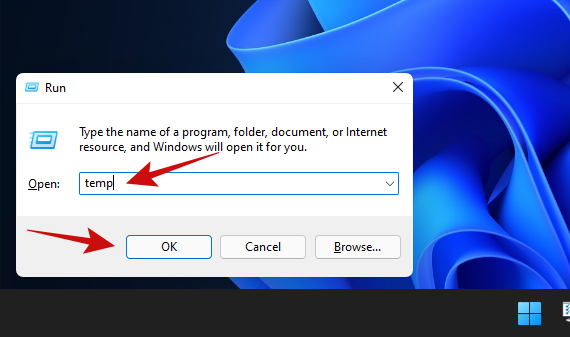
Press the Win key + r button combo to open the Run dialog box. Then type in ‘temp’, followed by an enter.
If you get a prompt saying ‘You don’t have access to the folder’, click on ‘Yes’ and accept any further prompts until the temp folder contents are visible. Here’s how our temp folder looks like.
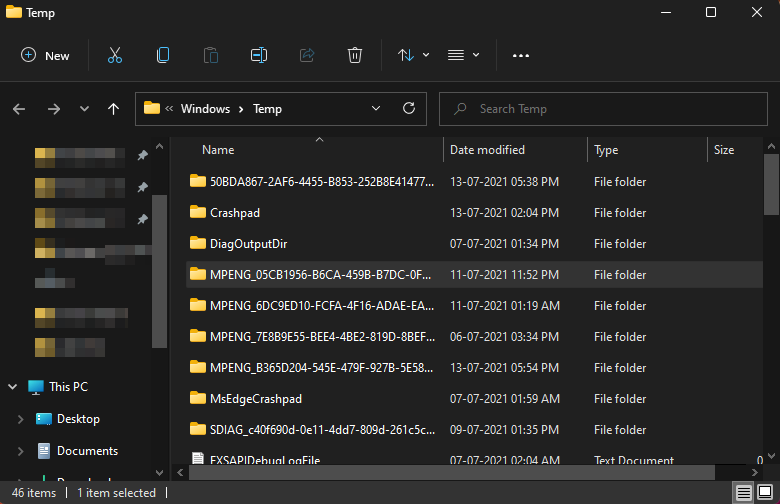
Simply select all these files and folders and delete them. Oh, and don’t forget to clean your Recycle Bin after that and you should be good to go.
Takes you back to the Windows XP times, doesn’t it?
Tip: Sometimes, you may see an alert saying that the file is in use and can’t be deleted. The fix for this is simple. Try deleting these files when you’re done working on your PC and have closed all the files and apps.
Method #2: Using the Disk Cleanup utility
Disk Cleanup has been shipping with Windows for a long time to serve a single purpose, cleaning drives/partitions of all the junk files, deleted files, unused Windows updates, and similar stuff that it can find. The utility is pretty lightweight and comes with a simple UI but it does the job well.
Here’s how you can use it.
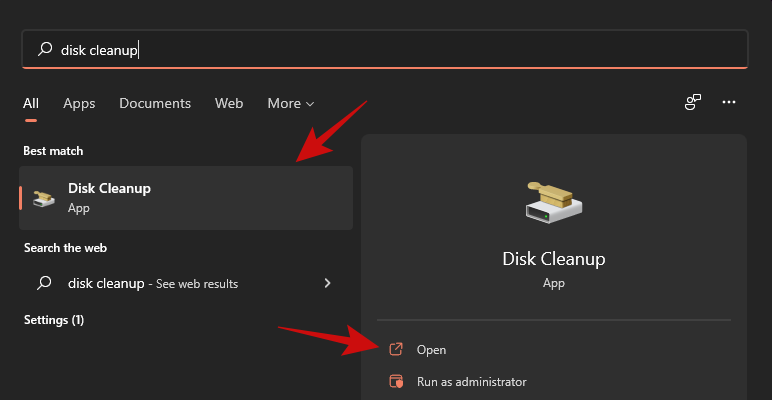
Open the Start menu and type in ‘Disk Cleanup’. Click on any one of the highlighted options.
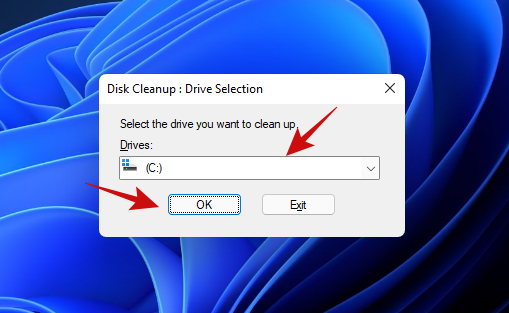
The utility should now be in front of you. Just click on the dropdown, select the drive you want to run the cleanup on, and click ‘OK’.
The utility will scan the selected drive and present a dialog box to you as shown below. Scroll the list and select everything that you’d like to delete and click ‘OK’.
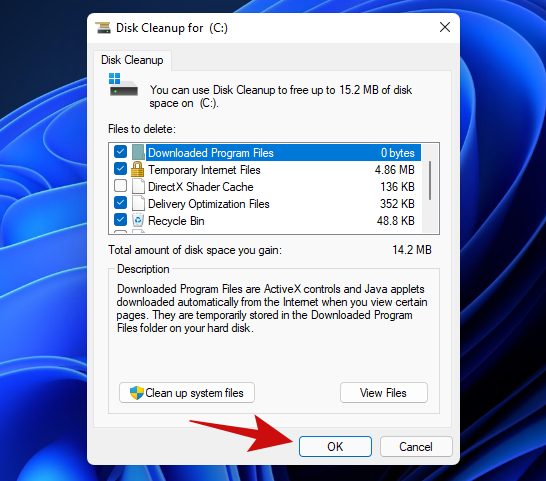
Tip: The ‘Clean up system files’ button on the screen above lets you get rid of old system restore points and other unnecessary system files to free up even more space. We recommend giving it a try.
Once you’ve clicked ‘OK’, the Disk Cleanup utility will start removing all of the useless items from your disk. After cleanup, you should gain a few GBs worth of free space back on your drive.
Method #3: From the Settings app
Windows has become a lot smarter and Windows 11 is no exception. The built-in Settings app comes with all the tools to manage all your PC’s disk drives. Let’s take a look at the steps to clear temporary files on your PC using Windows 11’s Settings app.
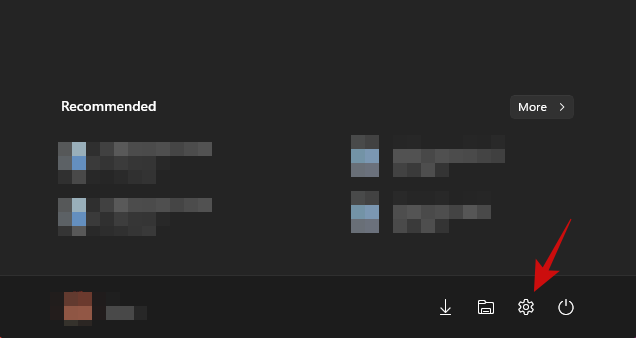
Open the ‘Start’ menu and click on the little gear icon as highlighted. Alternatively, you can also use Win key + icombo to open Settings.
Click on System and then click on ‘Storage’ as shown below.
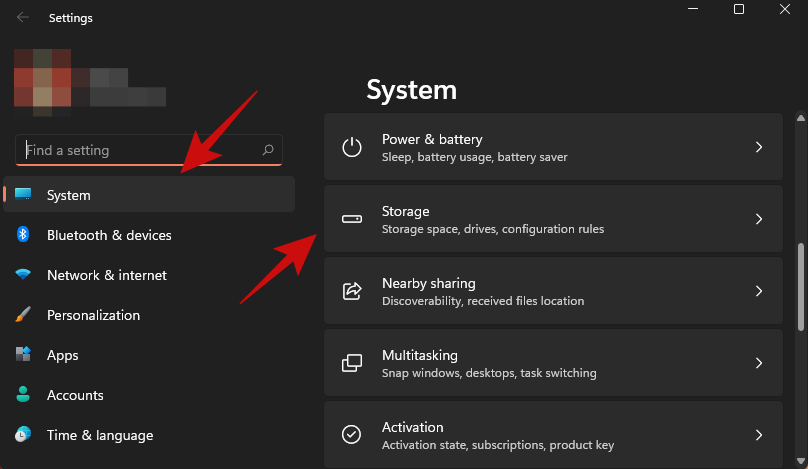
You should now be able to see a rough estimate of the space occupied by temporary files on your system drive (the one with Windows 11). Our PC shows close to 95MB of space held hostage by the temporary files.
Click on the Temporary Files option to go a level deeper and find out which parts of Windows have created how much temporary files.
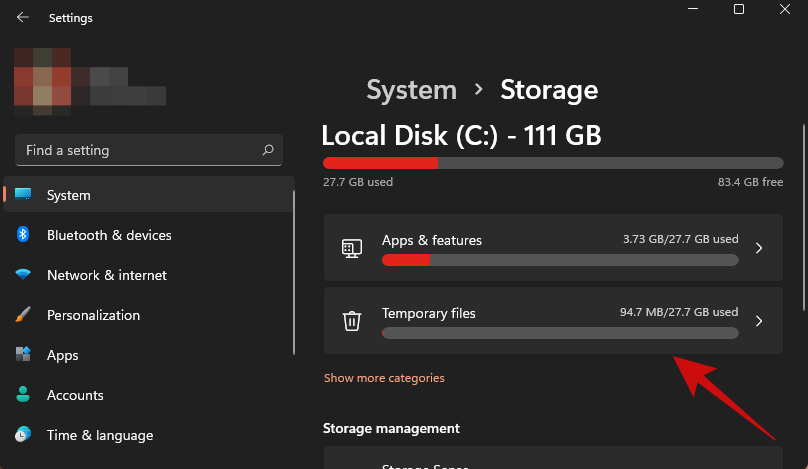
Here’s how the screen looks like.
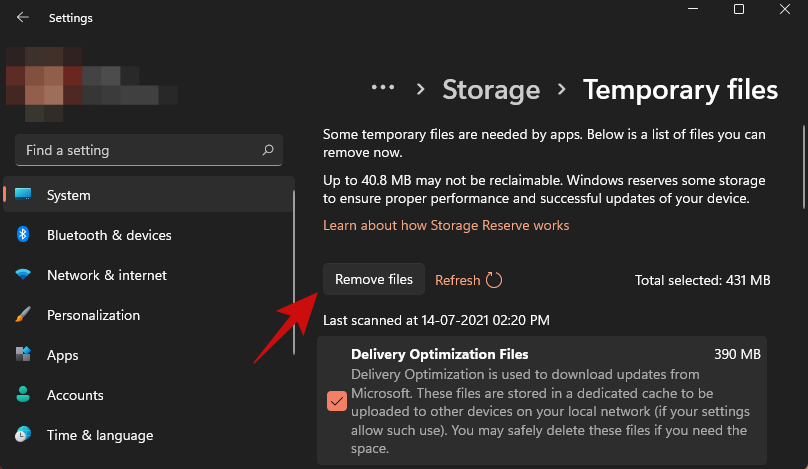
Turns out our PC had close to 500MB of cache. You can simply go through the list and tick the items that you want to remove. Once done, click the ‘Remove Files’ button to start the cleanup.
Method #4: Using Storage Sense
Windows also offers an additional tool called ‘Storage Sense’, which smartly does all the cleaning on its own or as per the period defined by you. You also have the option to run the tool on demand.
The idea behind such a tool is to keep Windows running smoothly by automatically managing the storage and the temporary files created by apps.
Here’s how you can start cleaning temporary files with Storage Sense.
Open the Start menu and type in ‘Storage Sense’, then click on either of the options highlighted below.
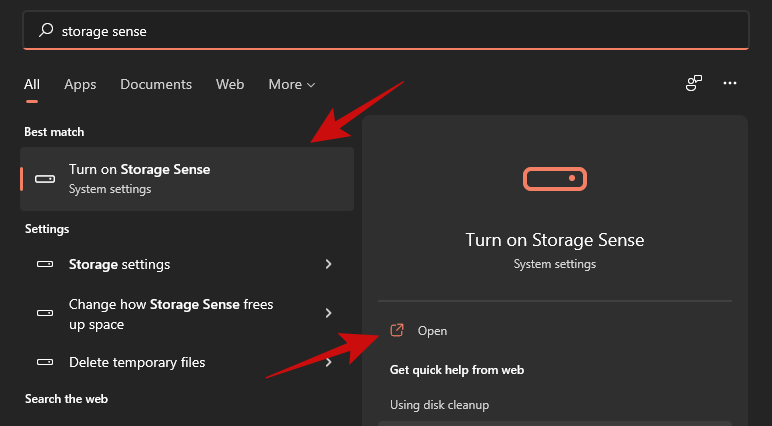
You should now be inside the Storage options under System Settings. Scroll down a bit to find the option called ‘Storage Sense’ and click on it. Here’s how it looks like.
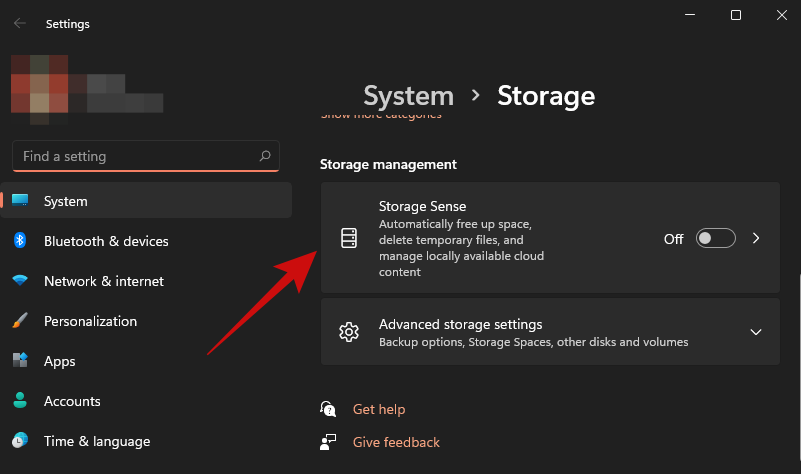
Inside, you should be able to find a toggle for Storage Sense along with a few more options to define when Storage Sense should run for folders like Downloads, Recycle Bin, and when should Storage Sense run.
After enabling ‘Automatic User content cleanup’, we highly recommend going through these options and selecting what works best for you before closing the app.
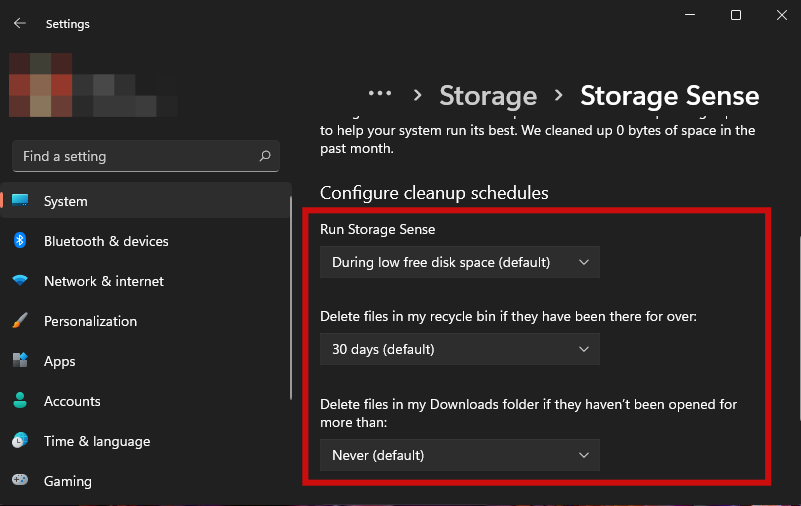
Once enabled, you can run Storage Sense whenever you want by scrolling down and clicking on the button shown below.
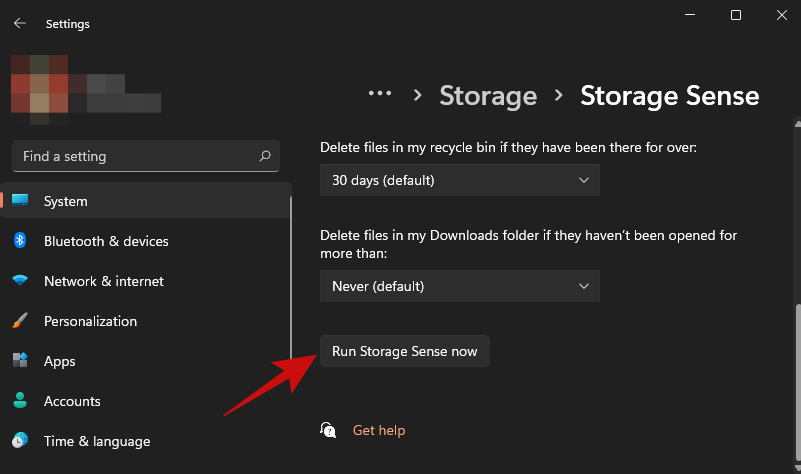
Tip: As you may have already noticed, Storage Sense can automatically delete files from the Downloads folder. If you don’t want that to happen, set the ‘Delete files in Downloads folder’ option to ‘Never’.
Method #5: Using Command Prompt
This is another one of those power methods that only a handful of people know. Command Prompt on Windows can be used to perform a whole lot of activities, one such activity is deleting files and folders.
Remember we shared how you can open the temp folder and clean the files in Windows in Method #1? This method gives you the same results but with fewer steps. Here’s how.
Open the Start menu and type in ‘Command Prompt’. Make sure to run the app as an administrator, as shown below.
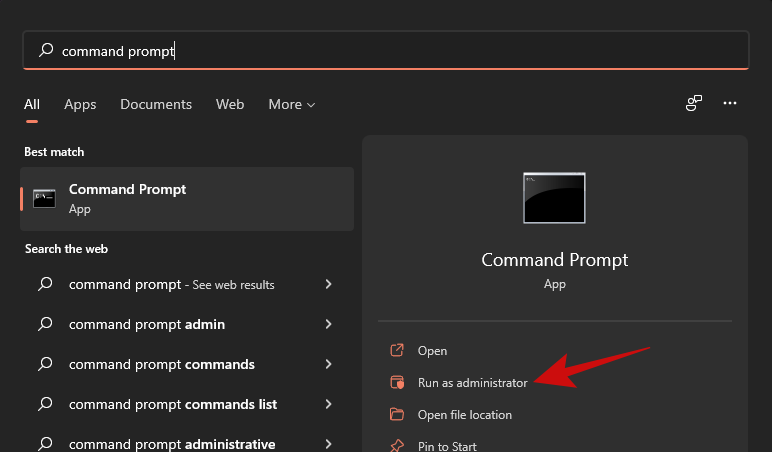
Once opened, paste the below command and hit enter.
del /q/f/s %TEMP%\*
You should see a lot of text scroll by in an instant. Don’t worry, it’s just the command doing its thing. Once it stops, you should see something like this.
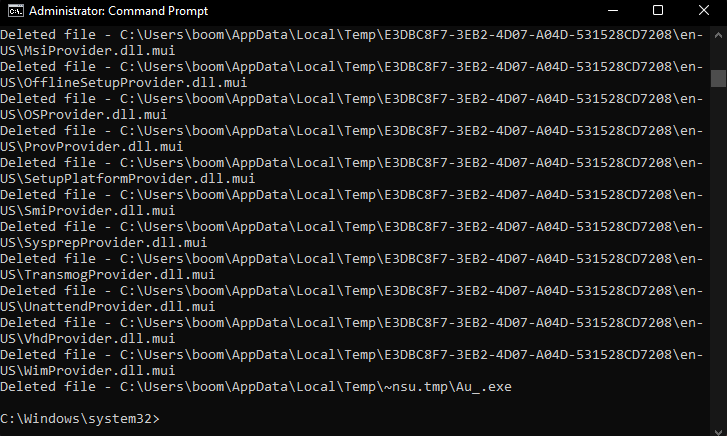
And that’s about it! All your temporary files should be gone by now.
Method #5: Use Third-Party Cleaners
You can also use third-party cleaners to get rid of temporary files on Windows 11. These cleaners are designed to check for leftover and temporary files so that they can be deleted from your system. Moreover, these cleaners also help identify files of uninstalled programs that are no longer needed on your system.
You can then remove these files at your discretion. We recommend opting for CCleaner as it is a long-standing utility for Windows that receives regular updates and has been trusted by users for the past few years. Use the link below to download and install CCleaner on your system.
Once installed, run the app and follow the onscreen instructions to remove all unnecessary files from your PC. Please note that we do not recommend running the registry cleaner for now until Windows 11 is out of the beta channel and until a stable version is released to the public. Additionally, we recommend waiting for a CCleaner update compatible with Windows 11 to avoid removing registry keys that will break important background tasks for Windows 11.
- CCleaner | Download Link
Method #6: Manually delete leftover files
It’s now time to manually delete leftover files from previously uninstalled programs from your Windows 11 system. Some programs tend to leave behind user data files, save files, settings, downloadables, and temporary data on your system so that it is easier to install and run the program in the future. However, these leftover files can sometimes cause conflicts with existing programs or simply end up taking extra space on your system. You can use the guide below to delete leftover files from common locations in Windows 11.
Press Windows + E on your keyboard to open the File Explorer. Now navigate to the following path given below. You can also copy-paste the given bath in the address bar at the top to directly visit the desired directory.
C:\Users\USERNAME\AppData\Local

Note: If you are copy-pasting the path above, then ensure that you replace ‘USERNAME’ with the current username of the profile that you are signed in with on Windows 11.
Look for temporary leftover files from previously uninstalled programs and select each desired folder. Press delete on your keyboard and confirm your choice by clicking on ‘Yes’. In case UAC is enabled on your system, provide the necessary information to delete the files.

Similarly, navigate to the following paths given below and manually delete all leftover files from previous programs that you find in the given directories.
C:\Users\USERNAME\AppData\Roaming
C:\ProgramData
C:\Program Files (x86)
C:\Program Files (x86)\Common Files
C:\Program Files
C:\Program Files\Common Files
In case you installed removed programs on a different drive, we recommend checking their install locations as well. In case you find any leftover data, you can delete it as well.
You will now have manually cleared leftover files from Windows 11 that weren’t removed at the time of uninstallation of certain programs.
Method #7: Delete Windows Store Cache
Windows Store has come a long way with the introduction of Windows 11. You now get accessed to a revamped UI, new titles, and the ability to install Android apps on your system. However, for optimum performance, Windows Store tends to download and store certain data on your local storage. This data can over time accumulate and take up significant storage on your system. The size of this cache could exponential if Windows Store fails to regularly clear the cache in the background. If you find Windows Store to be sluggish and a lot of unidentified temporary data on your local storage, then it is likely the Windows Store cache. Use the guide below to clear Windows Store Cache on your system.
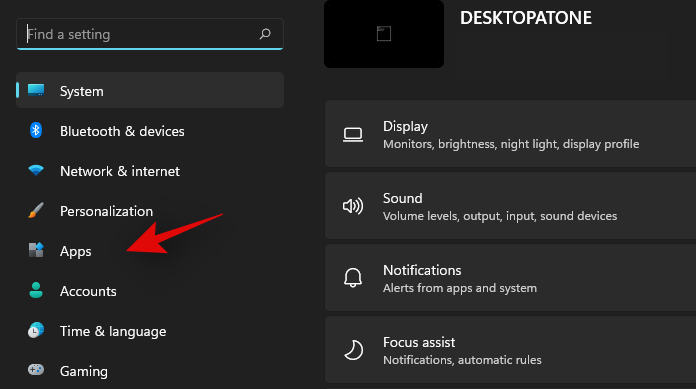
Press Windows + I on your keyboard to open the Settings app on your system. Now click and ‘Apps’ on your left.
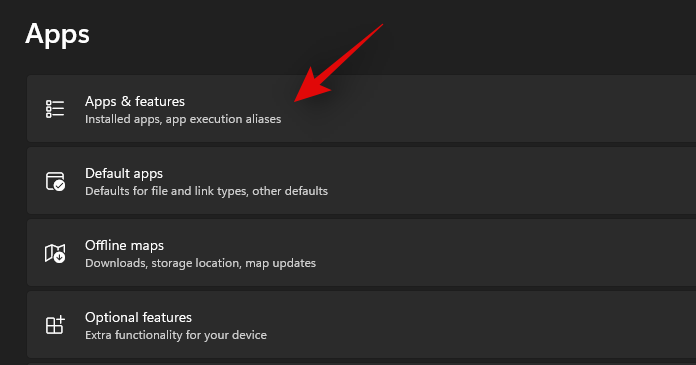
Click and select ‘Apps & features’.
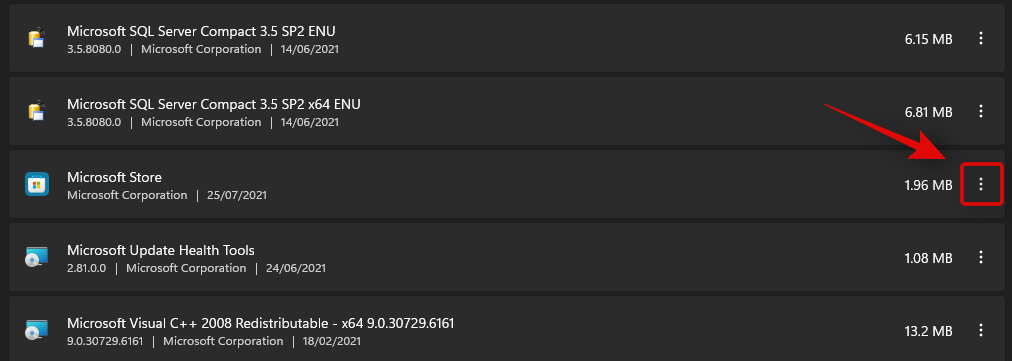
Find ‘Microsoft Store’ in this list and click on the ‘3-dot’ icon beside it.
Now click and select ‘Advanced Options’.
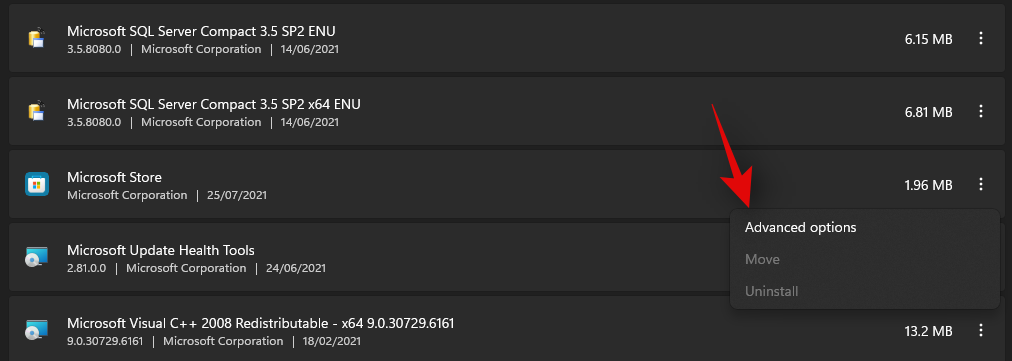
Scroll to the bottom and click on ‘Terminate’ first.
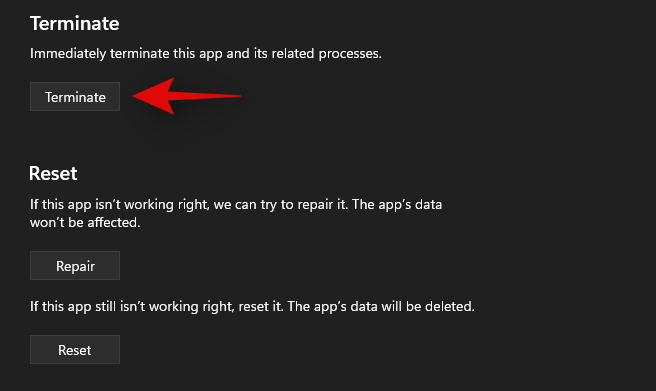
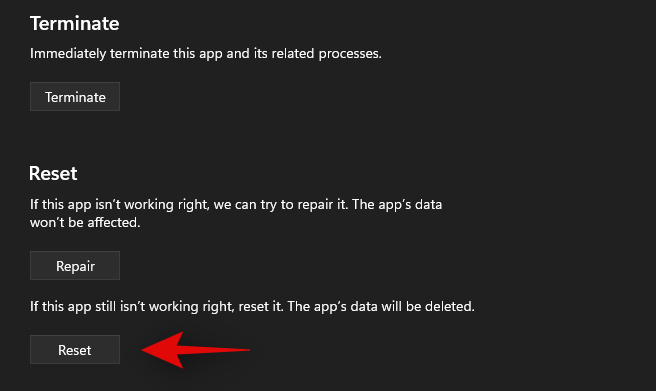
Now click on ‘Reset’.
Confirm your choice by clicking on ‘Reset’ again.
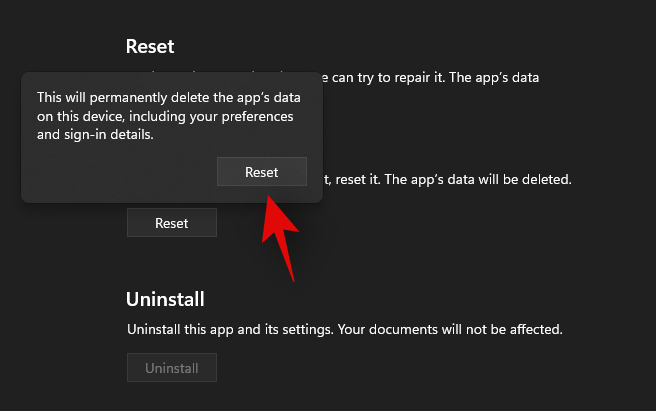
Windows Store will now be reset and any leftover files and cache will now be deleted from your local storage.
Method #8: Delete your browser cache and local files
Clearing your browser cache and local files is another great way to regain some storage space on your system. If you haven’t done this in a few months, then we definitely recommend clearing your browser cache and local files. Use the guide below to get you started. You can clear cache and files for most modern browsers easily. We will be covering the procedure for Microsoft Edge and Google Chrome in this guide.
For Microsoft Edge
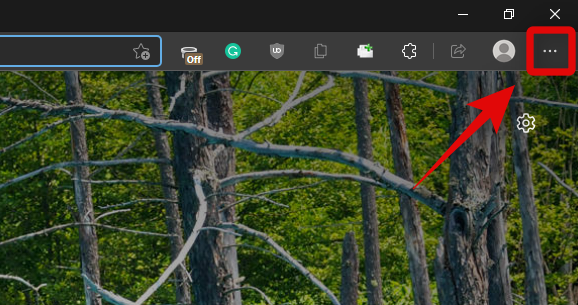
Open Edge and click on the ‘3-dot’ menu icon in the top right corner.
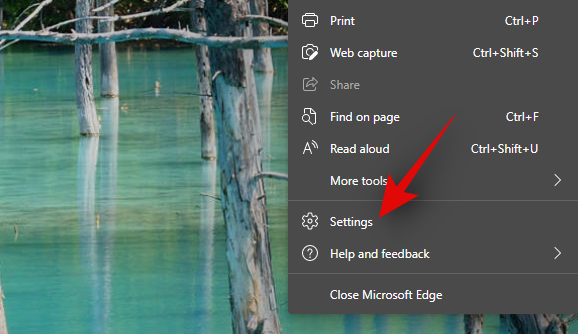
Click and select ‘Settings’.
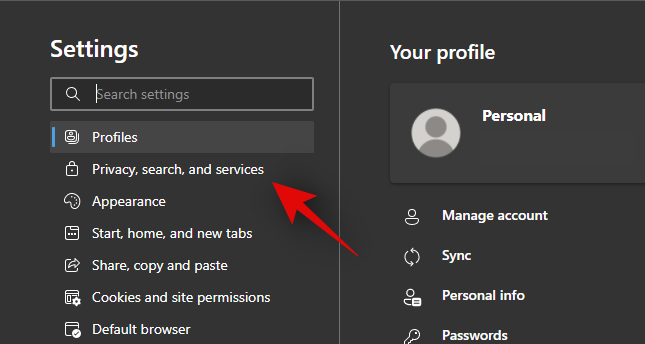
Now click on ‘Privacy, Search, and services’ on your left.
Click on ‘Choose what to clear’ under ‘Clear browsing data’.

Click and check the boxes for all the checkboxes on your screen. We recommend leaving the boxes for Passwords unchecked. If you do not wish to sign back into each service that you use, then we recommend that you leave the box for ‘Cookies and other site data’ unchecked as well.
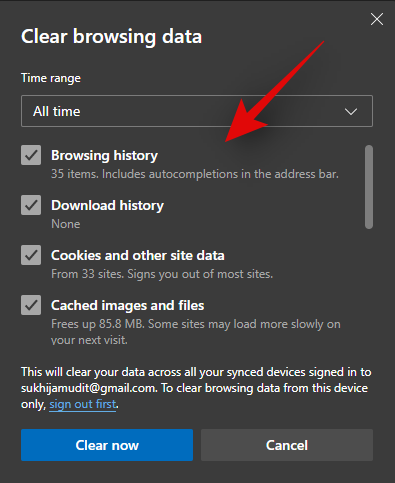
Click on the drop-down menu at the top and select ‘All time’.
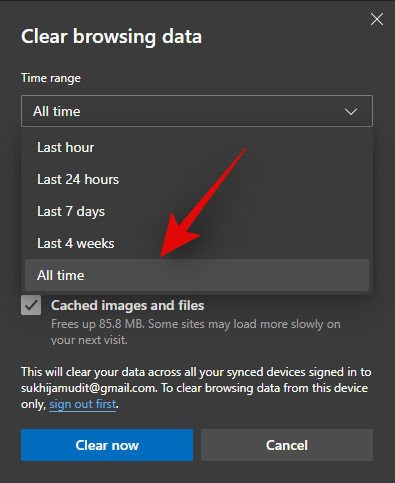
Now click on ‘Clear now’.
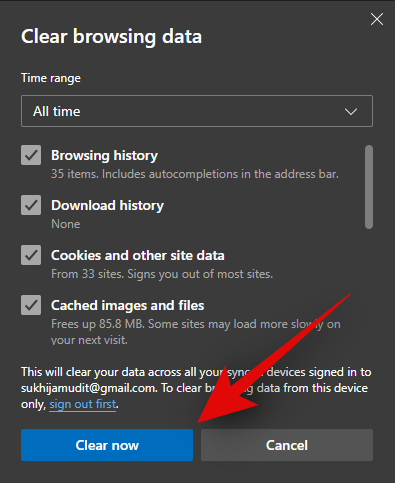
And that’s it! The selected browsing data will now be cleared from your local storage which should help you free up some space on your PC.
For Google Chrome
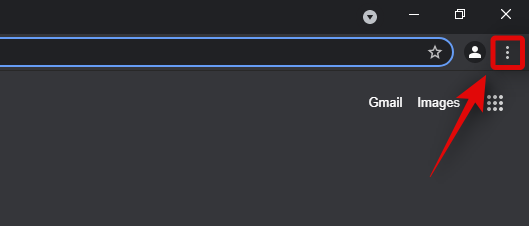
Open Google Chrome and click on the ‘3-dot’ menu icon in the top right corner of your screen.
Click and select ‘Settings’.
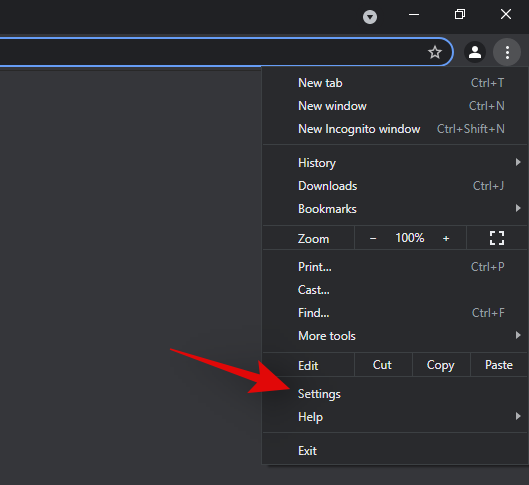
Select ‘Privacy and security’ on your left.
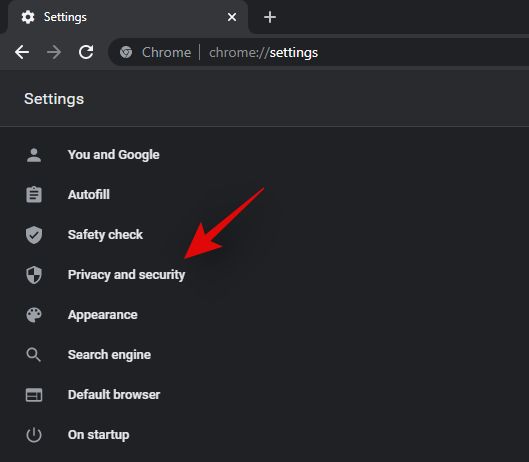
Now click on ‘Clear browsing data’.
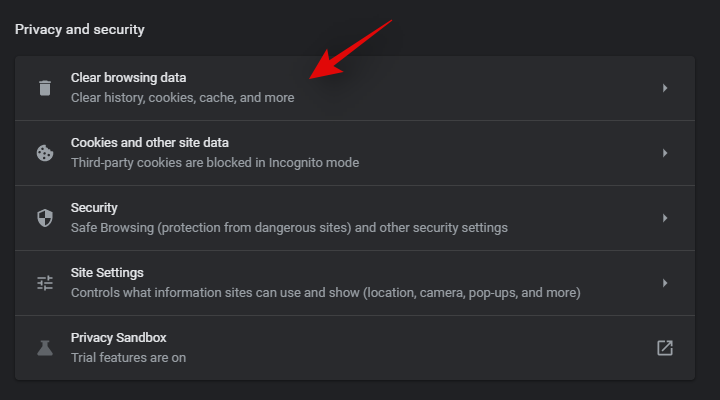
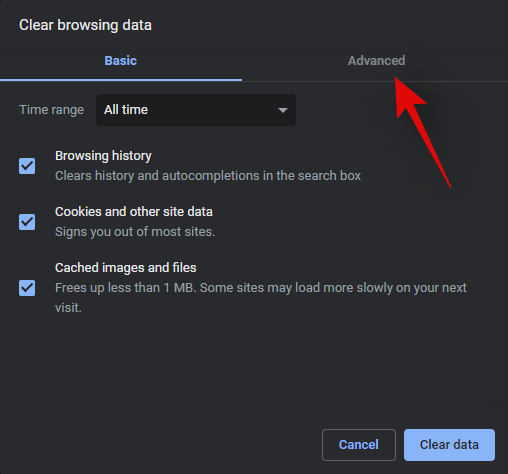
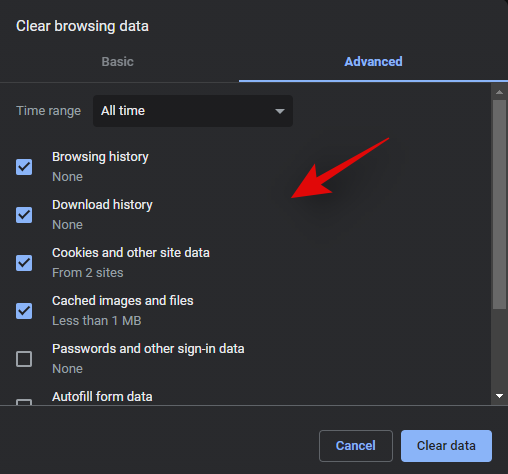
Click on ‘Advanced’ at the top.
Now click on the drop-down menu and select ‘All time’.
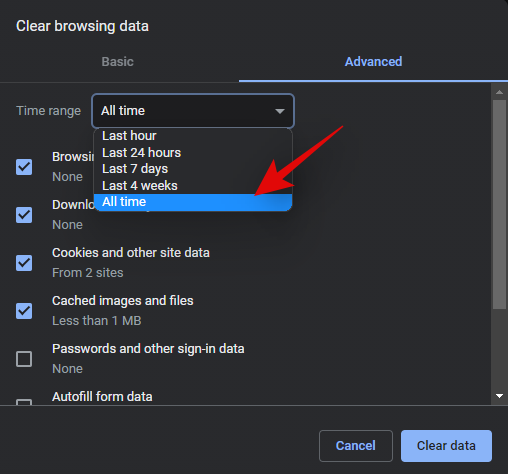
Check the boxes for all the data that you wish to delete from your local storage.
Click on ‘Clear data’ once you are done.
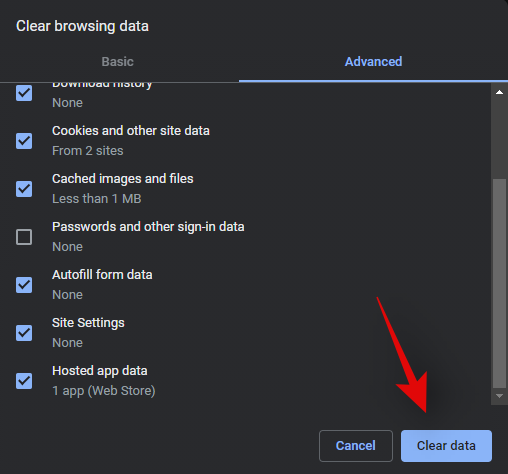
And that’s it! You will now have cleared all your temporary browser and cache data from Google Chrome on your Windows 11 system.
Method #9: Clear Prefetch
Prefetch is a memory management system introduced back in Windows XP as a way to reduce boot times and program launch times on modern systems. Prefetch stores important launch data for Windows and programs in an easily accessible location that can be directly accessed by your RAM and CPU.
Prefetch, however, can end up storing a lot of temporary files over time and if you are facing temporary file storage issues, then it would be a good idea to clear your Prefetch folder. Clearing the prefetch folder does not reset anything and only will increase your boot time for the first or second restart on your system. Use the guide below to clear the Prefetch folder on your Windows 11 system.
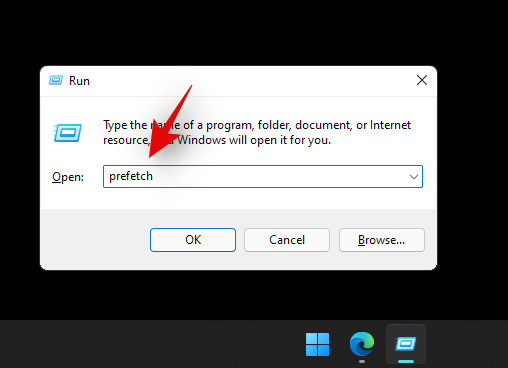
Press Windows + R on your keyboard to launch the Run dialog box. Type in ‘Prefetch’ and press Enter on your keyboard.
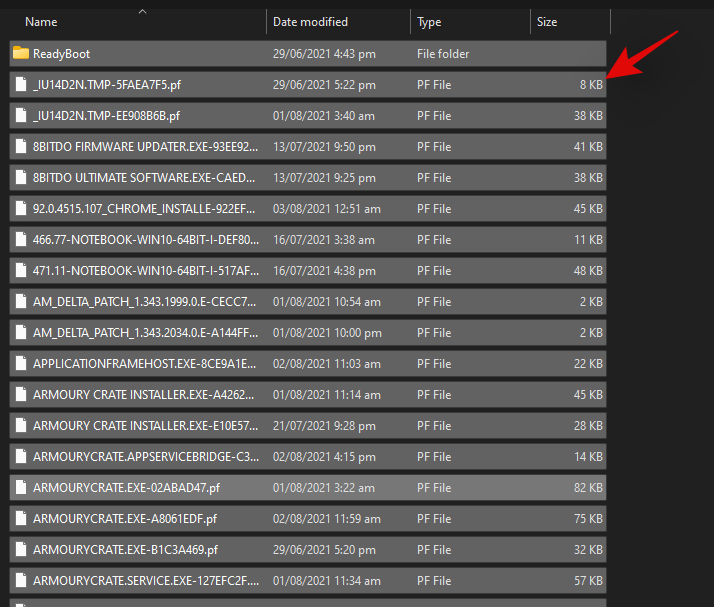
Click on ‘Continue’ when prompted to access the prefetch folder. You will now be in the prefetch folder. Simply select all the files in the folder and press ‘Delete’ on your keyboard. Confirm your choice to delete all the files from your system.
Click on ‘Yes’ to confirm your choice.

Clear your recycle bin and restart your PC for good measure.

And that’s it! You will now have cleared the prefetch folder on your system which should help free up some storage space on your system.
Method #10: Clear your File Explorer History
File Explorer history accumulates minimal data over time however, it can end up being quite huge in size if Windows fails to regularly clear this cache. If you are unable to identify the data taking up storage space on your system then you can try clearing your File Explorer history in Windows 11 as well. Use the guide below to clear File Explorer history.
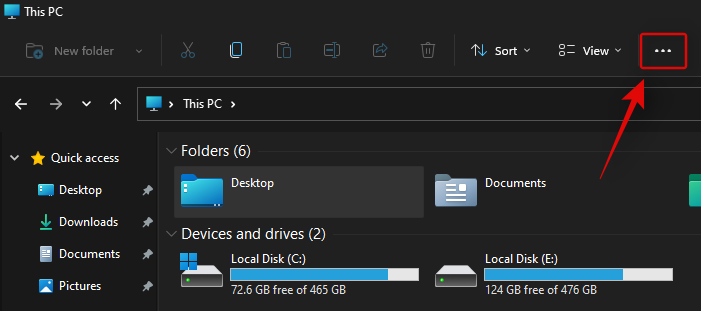
Press Windows + E on your keyboard to open the File Explorer on your system. Click on the ‘3-dot’ menu icon in the top right corner of your screen.
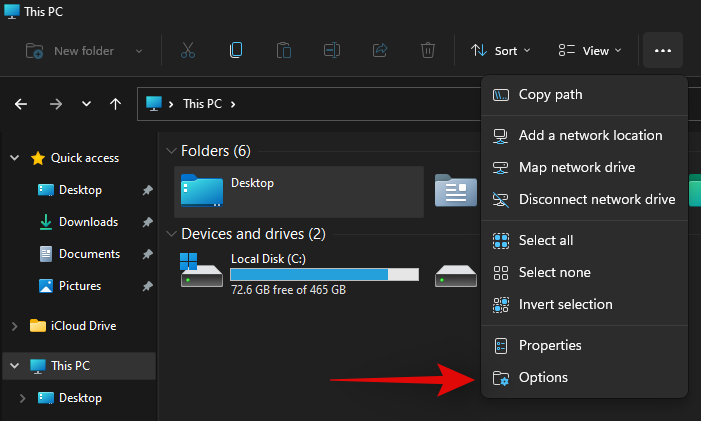
Select ‘Options’.
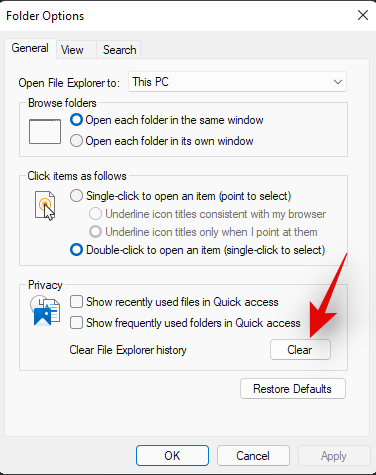
Click on ‘Clear’ under ‘Privacy’.
Click on ‘Ok’.
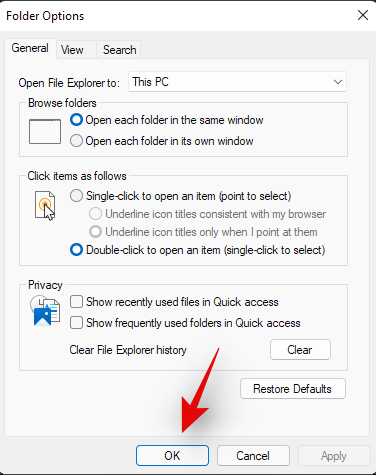
And that’s it! You will now have cleared the File Explorer history from your Windows 11 system.
F.A.Qs
Let’s quickly address some queries that you may have after deleting a whole bunch of files in Windows 11.
Is it okay to delete these files?
Yes, it’s absolutely fine to delete these files. But it is recommended to delete them when you have completed all your work. Temp files are created by applications that are currently open, and deleting them while the parent app is open, may create unwanted complications for the app.
Why are temporary files created?
These files are created by various apps to hold the data being processed while they finish their task. For example, while working on a word document, all the changes are stored on a temp file. The changes are only transferred to the original document when you save the file and close the app.
What happens when I delete these files?
Apart from freeing up space and getting a tiny speed boost, nothing really happens when you delete these files. These files will be re-created when you reopen apps the next time.
Will deleting these files remove any Windows updates?
No. Once the updates are applied, the Windows update files can be removed from your PC. It is only advisable to keep Windows update files in case you need to uninstall an update.
Is it okay to delete previous installations of Windows?
If you don’t plan on reverting to the older version of Windows, you can get rid of the files from the previous Windows installation.
Will deleting these files speed up my PC?
You’ll notice a very slight speed boost. In case you haven’t cleared temp files in ages, and your system drive is almost filled to the brim with junk files, only then you may notice a significant speed boost, only because your system drive now has more room to breathe than before.
When can I delete these temporary files?
The best time to delete temporary files is right after you’ve closed the app. This way, you won’t encounter any alerts saying that the ‘file is being used’, and you don’t risk damaging any data being used by the app.
We hope these methods would be sufficient to help you reclaim the space held back by junk files on your PC. It’s also good practice to periodically clean these temporary files to increase the lifespan of your disk drives while maintaining optimum PC health.
If you find yourself stuck at any point during this guide, do let us know in the comments below.
Related:


