- What does 100% Disk usage mean?
-
18 Ways to Fix 100% Disk Usage in Windows 10
- 1. Delete and Rebuild Search Index
- 2. Stop Superfetch (SysMain) and Windows Search services
- 3. Reset Paging (Virtual Memory)
- 4. Delete Temp files
- 5. Reset Sync Tools
- 6. Stop Disk Defragmentation
- 7. Disable the ‘DiagTrack’ Service
- 8. Update and fix Device Drivers
- 9. Reconnect (or replace) SATA cable
- 10. Run SFC for corrupted system files
- 11. Run Disk Check
- 12. Run Antivirus for potential malware
- 13. Switch to the ‘Best Performance’ Power Setting
- 14. Turn Off Windows Tips, Tricks, and Suggestions
- 15. Turn Off Windows Defender
- 16. Disable ‘Preload pages’ in Google Chrome
- 17. Update Windows
- 18. Reinstall Windows
What to know
- 100% Disk Usage can be caused by hardware issues, problematic Windows services and features, corrupted files, and buggy updates.
- To fix this issue, try rebuilding Search Index, stopping services like SysMain and DiagTrack, resetting OneDrive sync and temp files, deleting temp files and stopping Disk Defrag.
- You can also try updating Device Drivers, reconnecting SATA cables, running SFC and Disk Check, scanning for malware, and enabling Best Performance power settings.
- If all fails, try resetting Windows.
If your PC is slowing down and Task Manager shows the disk usage constantly hovering near the 100% mark (and appropriately marked in red), there is cause for concern. Normally, disk usage should never be maxing out like this. But if it does, you can be sure there are certain things going wrong with your PC.
Here’s everything you need to know about what causes this 100% disk usage and a bunch of ways to fix it.
Related: Windows 11 Shortcuts: Our Complete List
What does 100% Disk usage mean?
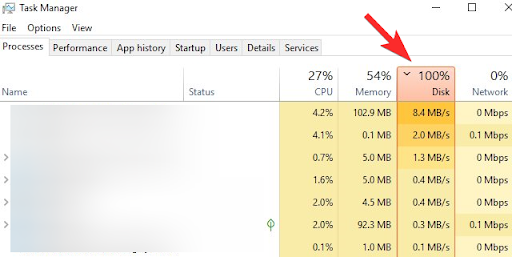
When disk usage reaches its maximum capacity, it means that it is either occupied by overt tasks or services that are running in the background.
100% disk usage almost always goes hand in hand with sub-par computer performance, gaming issues, and loud rattling noises from the hard disk spinning busily. Even new computers can suffer from this issue, which is one of the reasons why there seem to be more than a few components to the problem.
What causes 100% Disk Usage?
There are multiple things that could be going south with your computer if you see the disk usage percentage filled to the brim all the time. Be it a hardware issue, such as an improper cable connection, or a problem with Windows background services and features, corrupted files, and buggy updates – things add up over time and cause the PC to slow down.
Related: How to Repair Windows 11 [15 Ways]
18 Ways to Fix 100% Disk Usage in Windows 10
Now, given the long list of potential causes for an overburdened computer, it can be hard to diagnose exactly what is stressing out the hard disk as such. To that end, we look at all the possible ways that you can fix this problem. Try these fixes out one by one, and see if the disk usage percentage dips.
1. Delete and Rebuild Search Index
One of the common culprits that lead to such high disk usage is Windows Search Index. It is what helps you find files and folders quickly by scanning the disk and turning it into an index to give prompt results.
But certain Windows bugs can cause the search index to run in indefinite loops such that they keep indexing till kingdom come and causing the disk to overload. Here’s how to fix it:
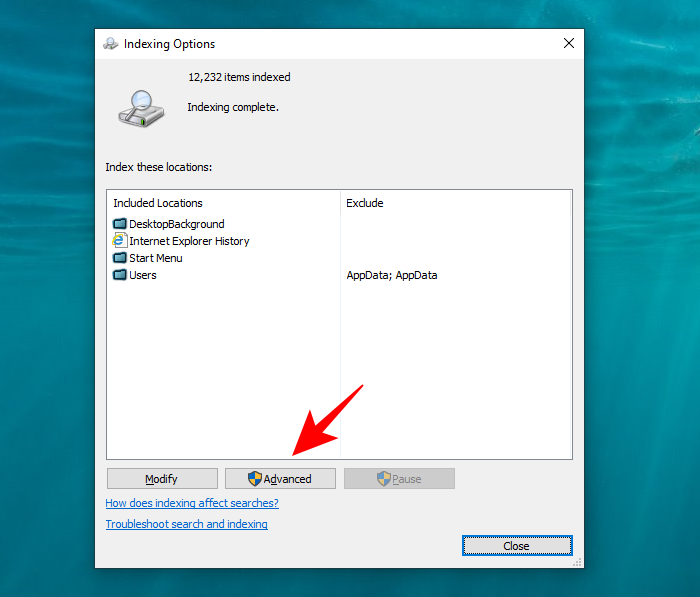
- Press Start and type “Indexing”. Click on Indexing Options.
- Here, click on Advanced.
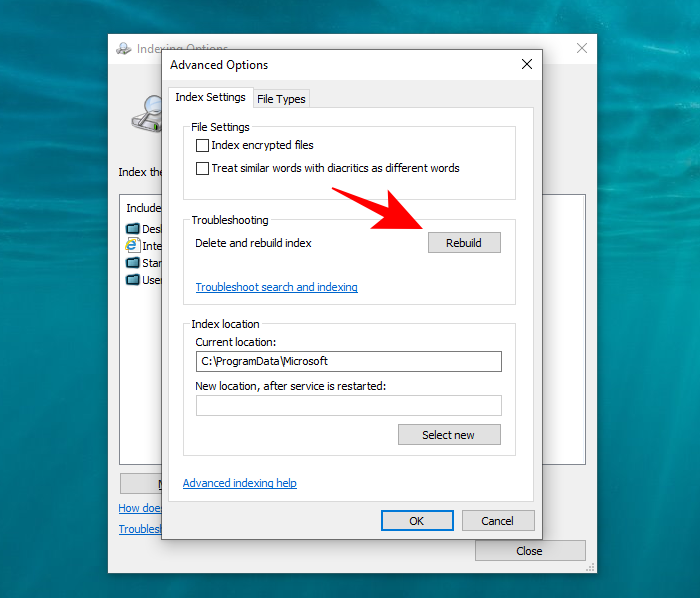
- Then click on Rebuild.
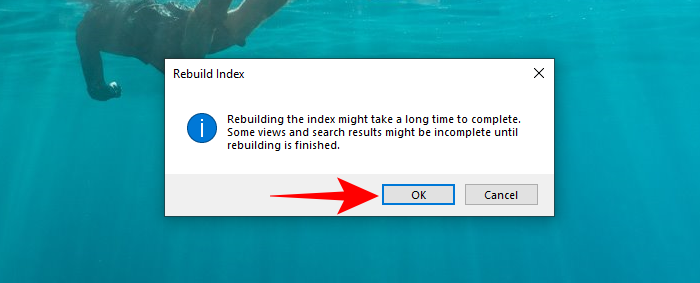
- When prompted, click OK.
However, this may only prevent it from going into a ‘search loop’ temporarily, that is until Windows is rebooted. Fortunately, there’s a way to permanently disable the Windows Search Index. Here’s how:
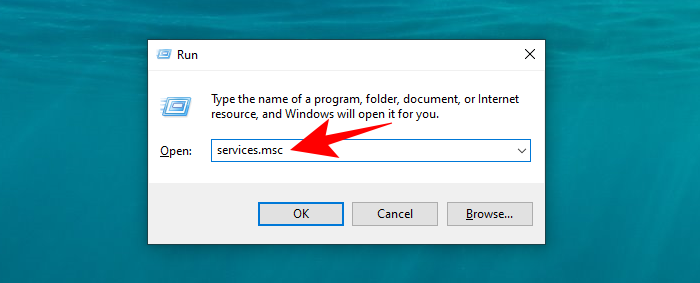
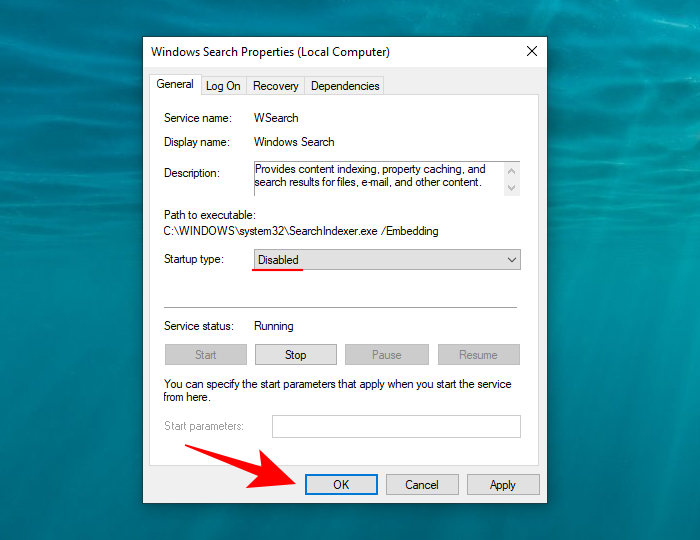
- Press Win+R to open the RUN box, then type in “services.msc” and hit Enter.
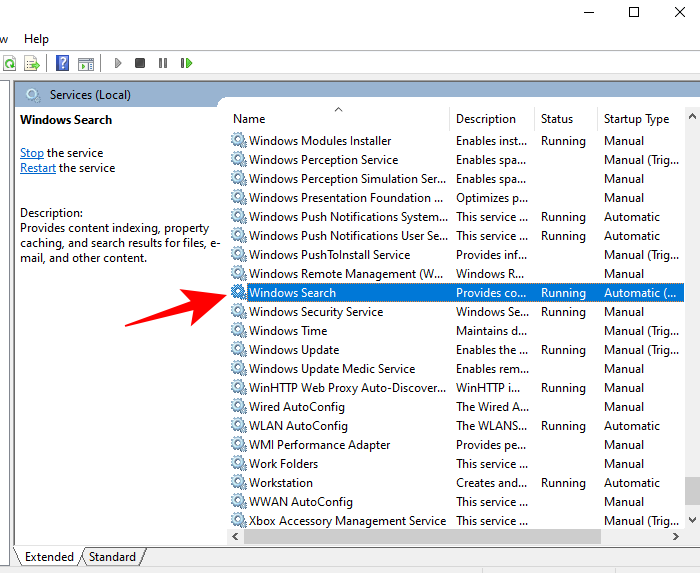
- In the ‘Services’ window, scroll down and double-click Windows Search.
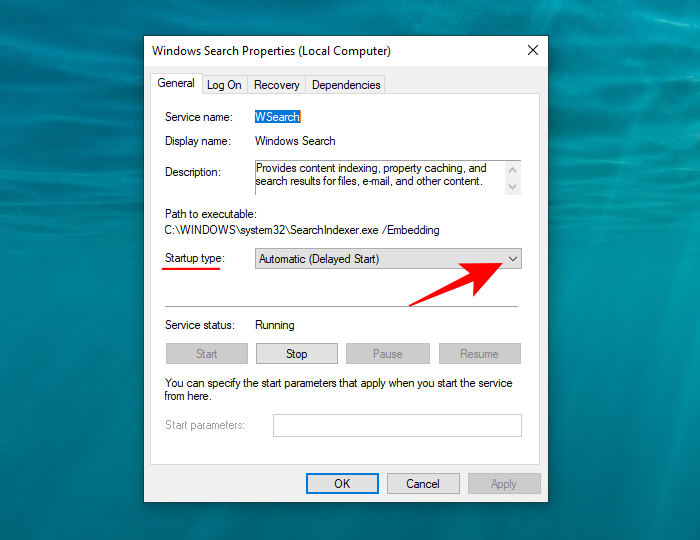
- Then, next to “Startup type”, click to bring the drop-down menu options.
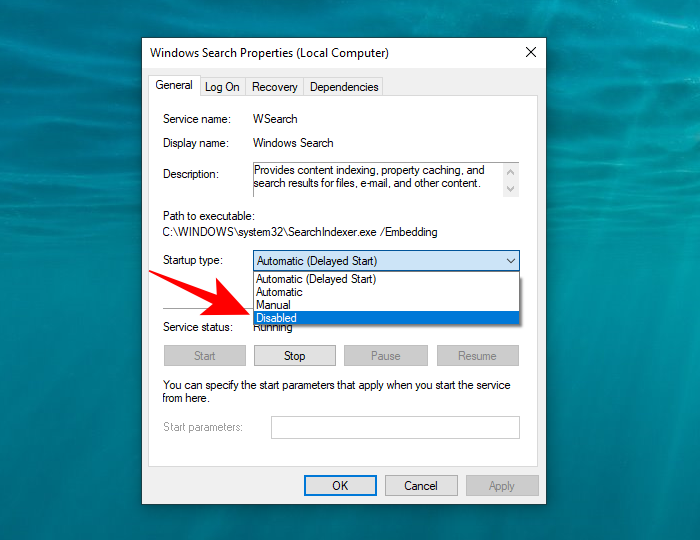
- Choose Disabled.
- Hit OK.
2. Stop Superfetch (SysMain) and Windows Search services
The Superfetch service, or SysMain analyzes your usage patterns, determines how often you use certain programs, and preloads their data to memory so they open faster. But Superfetch (or SysMain) is known to hog up disk usage space and lead to performance shortcomings that otherwise wouldn’t occur. The simple way out is to disable this service altogether.
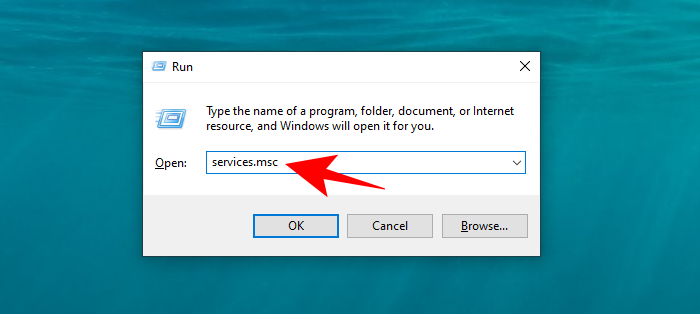
- Press Win+R to bring up the RUN box and type in “services.msc”.
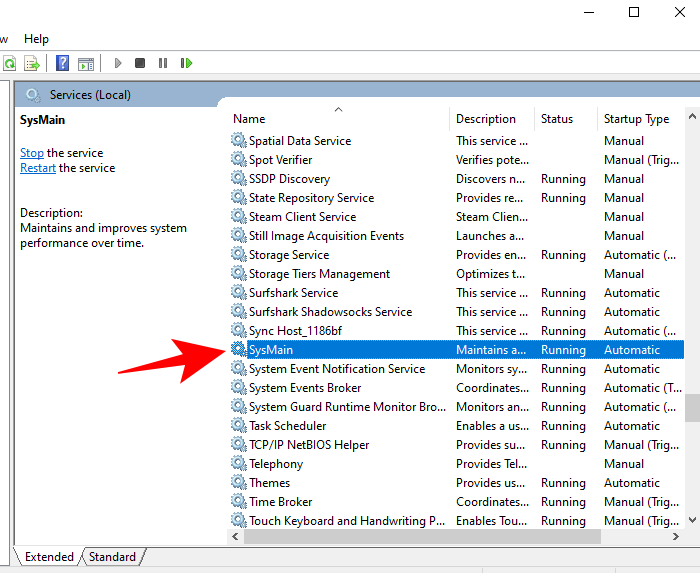
- Then scroll down until you find SysMain and double-click on it.
- Click on the drop-down menu next to Startup Type.
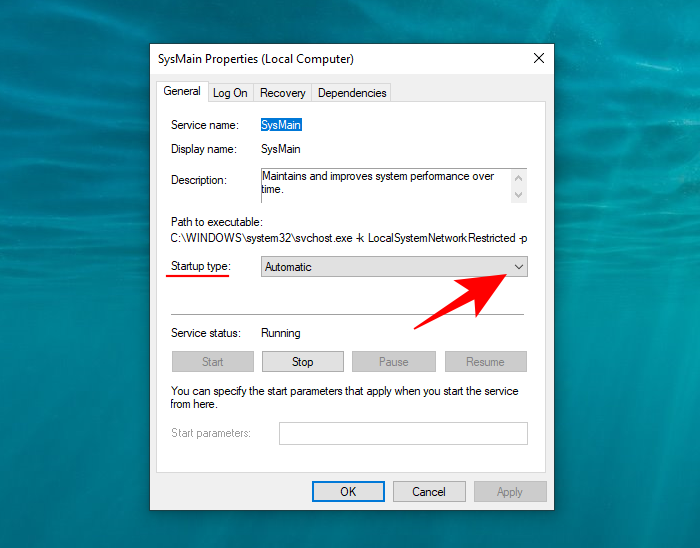
- Select Disable.
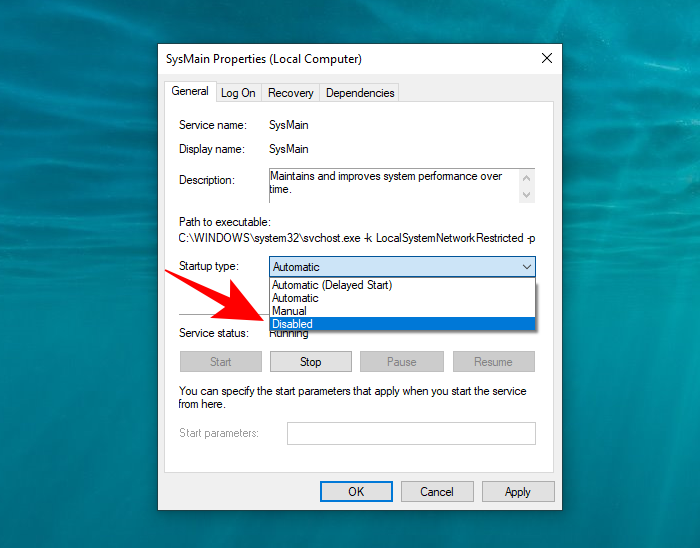
- Hit OK.
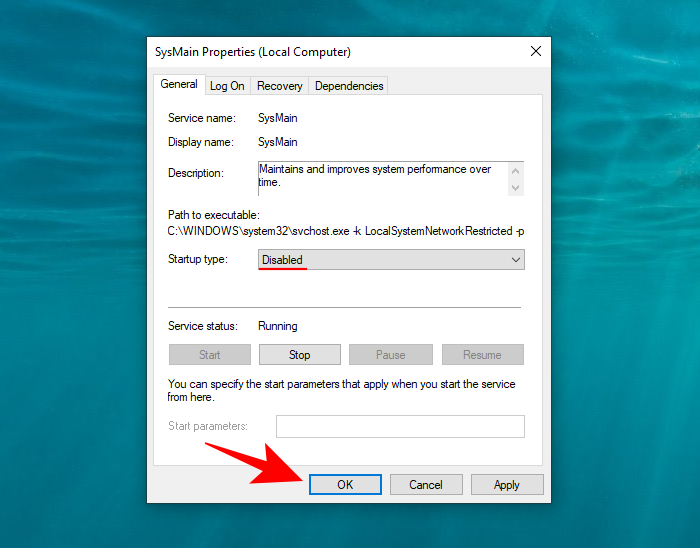
Now, check the disk usage again to see if there’s a difference.
3. Reset Paging (Virtual Memory)
Windows has a nifty solution to virtually expand your memory when it runs out of RAM – page files. It is ‘virtual’ because your PC is using the hard disk to supplement the RAM for processes that demand a lot of memory space.
But the page file is susceptible to damage and can lead to a higher than normal disk usage. The only way to fix a defective page file is to delete it and create one anew. Here’s how to do so:
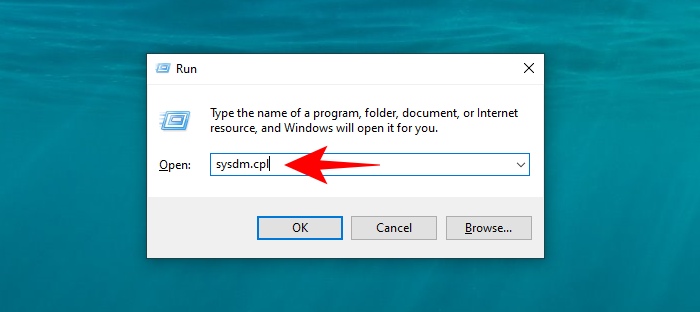
- Press Win+R to bring up the RUN box, type in “sysdm.cpl” and hit Enter.
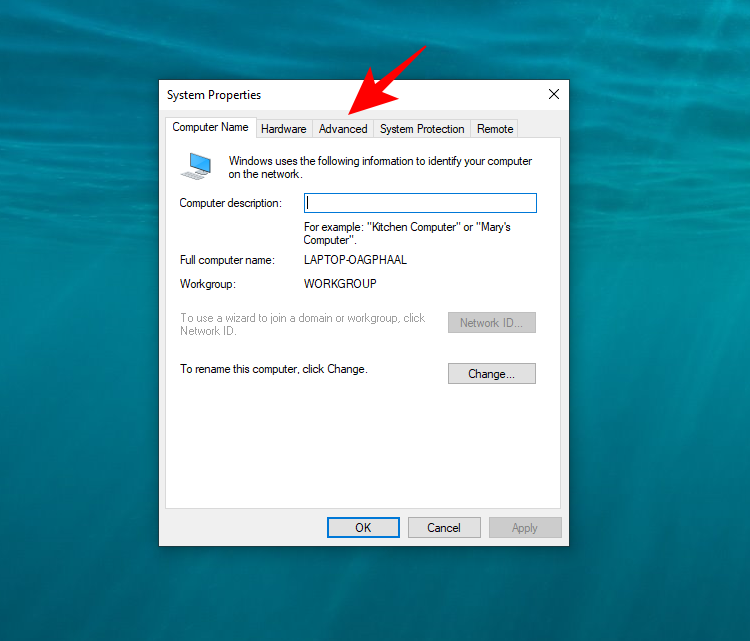
- In the “System Properties” window, go to the Advanced tab.
- Then, under “Performance”, click Settings.
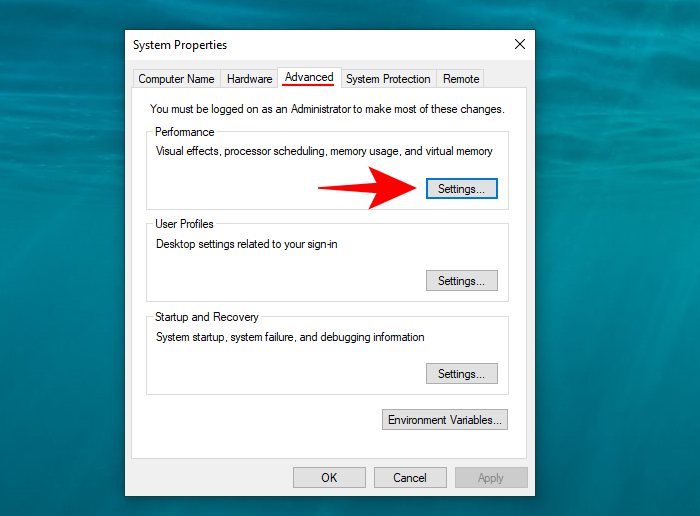
- Under the Advanced tab, click on Change.
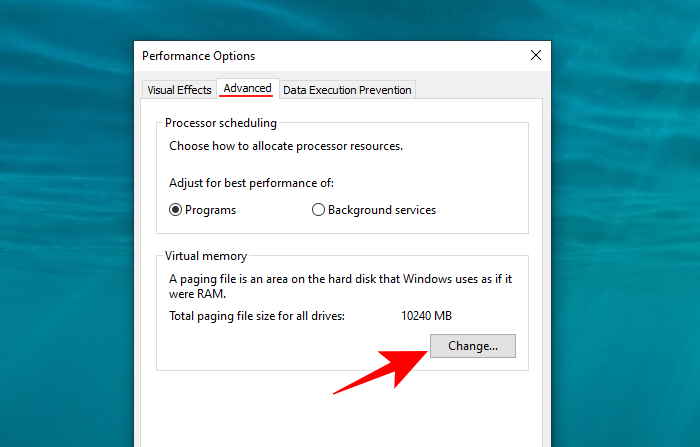
- Uncheck the box that says “Automatically manage paging file sizes for all drives“.
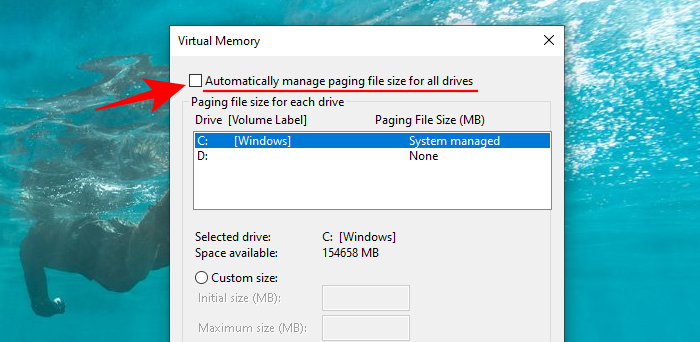
- Select the partition where Windows is installed (C: is the default), and then choose Custom size.
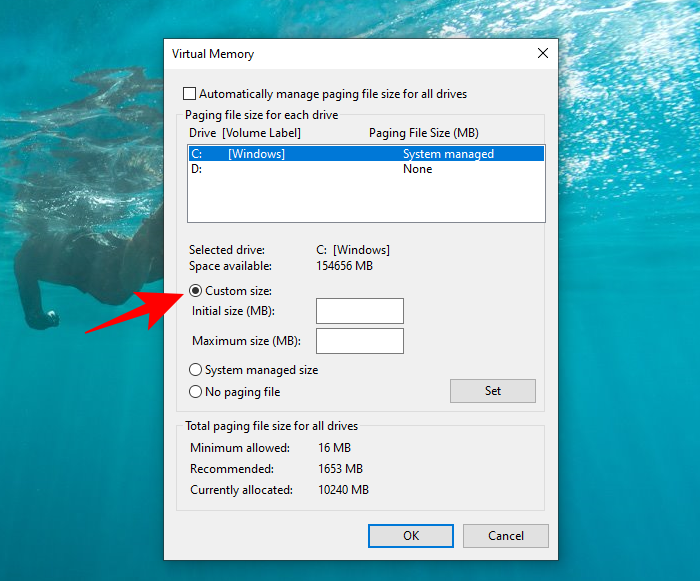
- Here, enter the initial and the maximum size (both in MB) for paging. This may vary depending on your computer. But in most cases, the initial paging file size could just be what’s recommended.
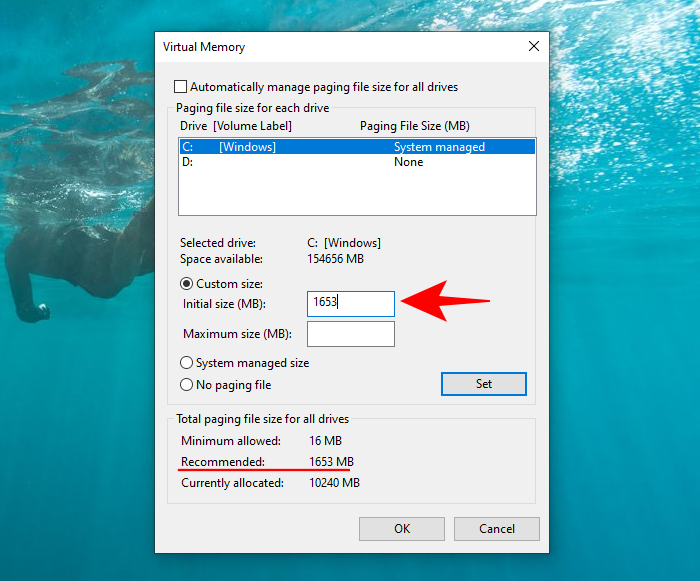
- However, the maximum size shouldn’t be more than 1.5 times your RAM. But in our example, we’re going to keep it limited to 8092 MB, which is a good enough paging file size.
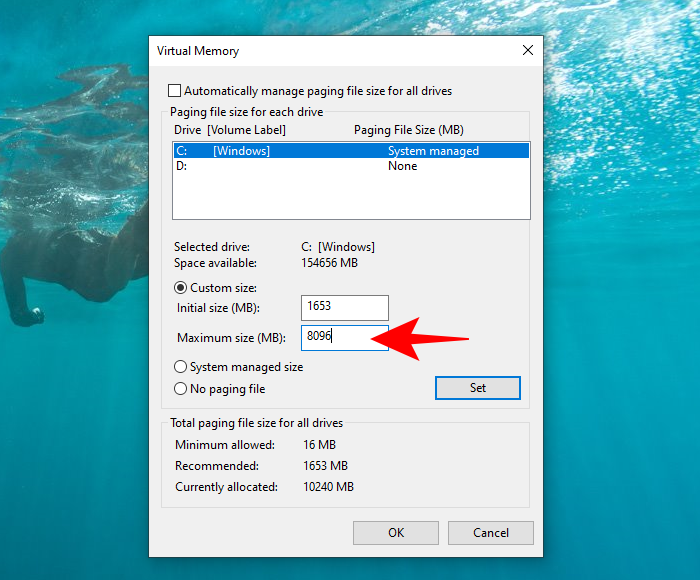
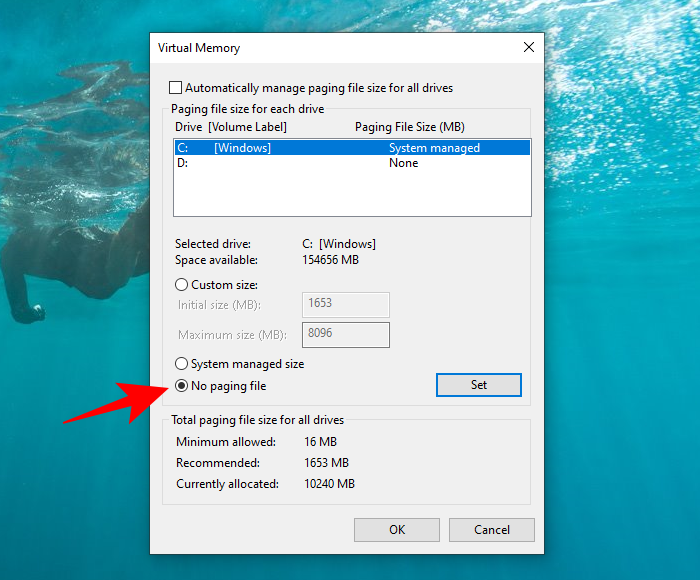
- Don’t make this number too high as we’re trying to keep the disk from getting overtaxed. Alternatively, you could just select the No paging file option and not have your disk impart any virtual memory at all.
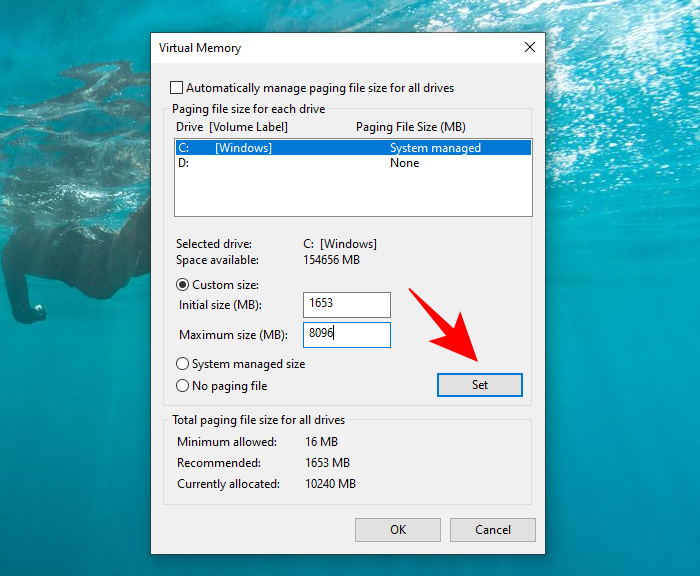
- Once the values are set, click on Set, then OK.
4. Delete Temp files
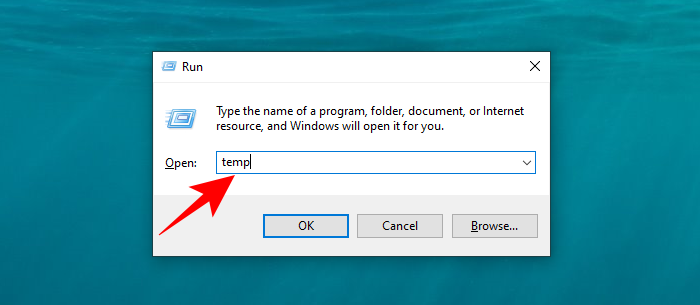
- Navigate to the Temp folder located here:
C:\Windows\Temp - Alternatively, you can simply open up the RUN box by pressing Win+R and search for ‘Temp’.
- Delete all the files in this folder.
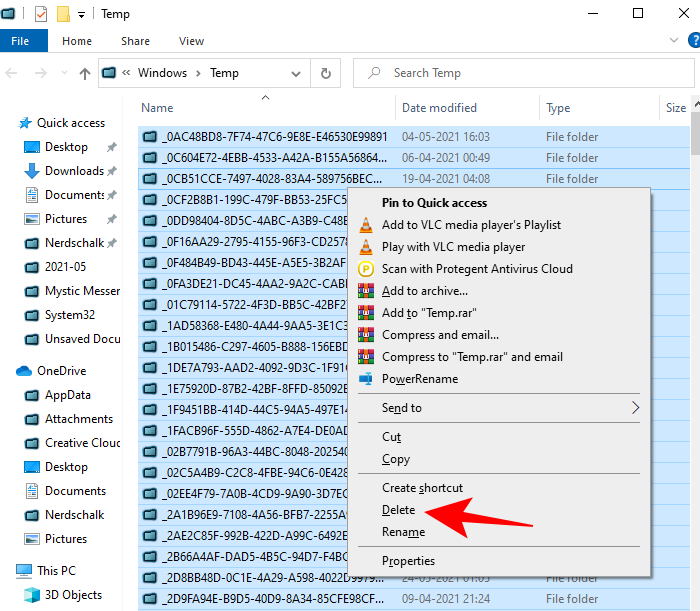
Now check if the issue is resolved.
5. Reset Sync Tools
OneDrive syncing can sometimes get stuck and continue to sync files even when the process is actually over and there’s nothing left to sync. This causes the disk to go into overdrive, especially when it’s syncing large amounts of data. In these scenarios, it is best to reset it. To reset OneDrive, open the RUN box again (as shown before) and type the following command: %localappdata%\Microsoft\OneDrive\onedrive.exe /reset
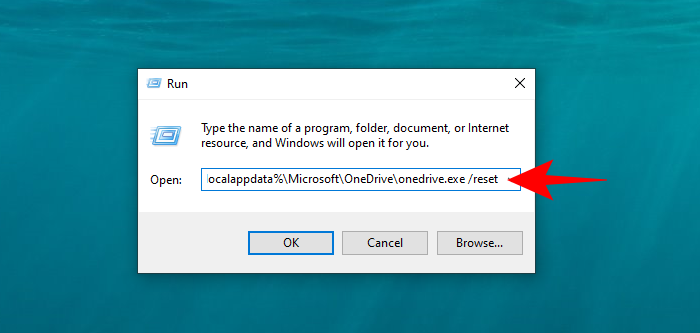
As soon as you hit OK, OneDrive will reset. Doing so is known to declutter the disk memory and keep it from running out.
6. Stop Disk Defragmentation
Disk defragmentation increases the overall efficiency of retrieving data in the future. But it also 1increases disk usage and doesn’t even show up as a process in Task Manager. 1On top of that, Disk Defragmentation is scheduled to turn on by default periodically.
- To disable disk defragmentation, press Start, type ‘defragment’ and select Defragment and Optimize drives.
- Now, click on Change settings.
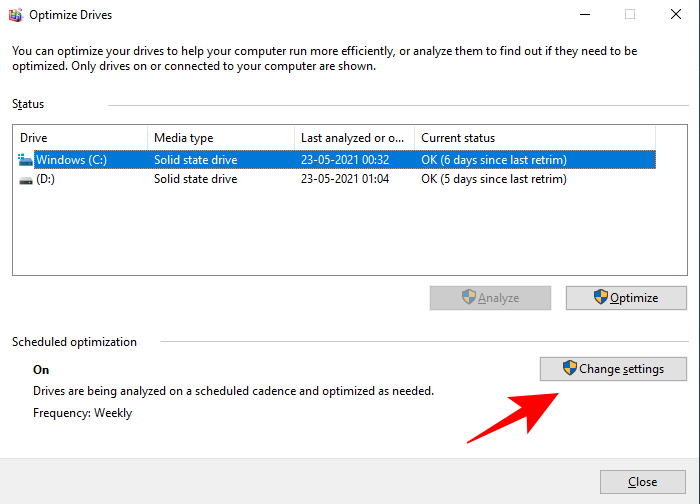
- Uncheck Run on a schedule and click OK.
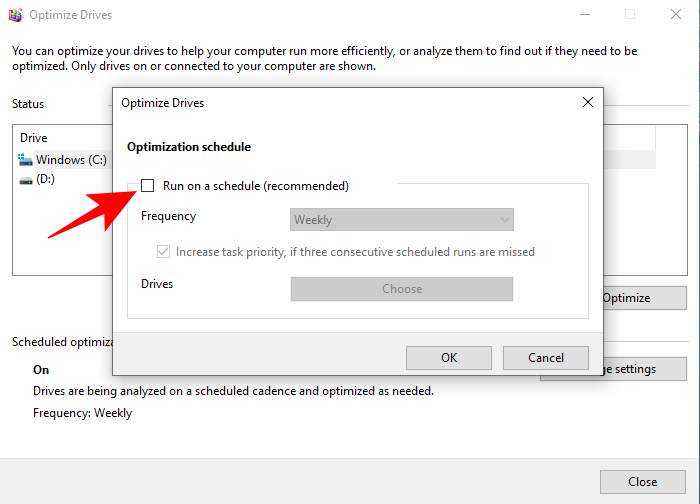
This will stop disk defragmentation from starting and cause less load to disk memory.
7. Disable the ‘DiagTrack’ Service
Diagnostics Tracking, or Connected User Experiences and Telemetry, is one service that is known to cause a higher disk usage percentage. Here’s how you can disable it:
- Open the Task Manager (press
Ctrl+Shift+Esc) and click on the Services tab.
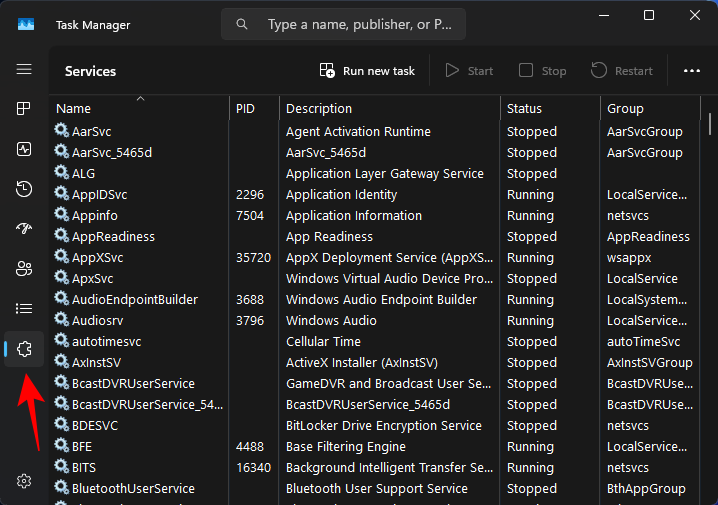
- Scroll down and select DiagTrack (or search for it). Click Stop.
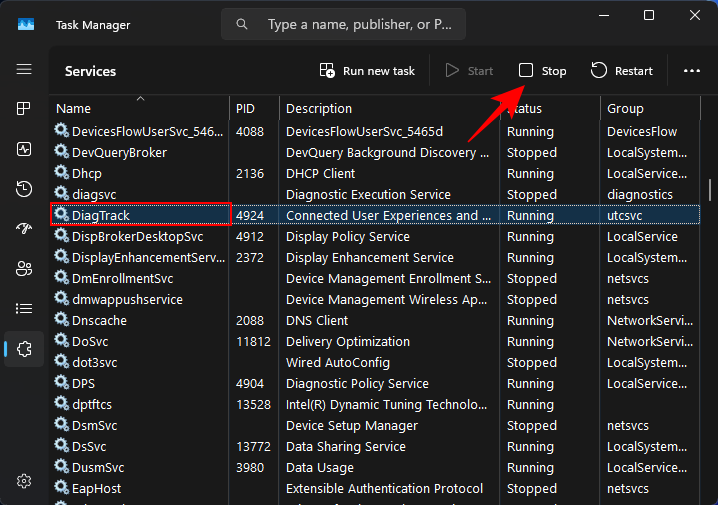
- Once DiagTrack is stopped, it is time to permanently disable it. Click on the three-dot icon and select Open Services.
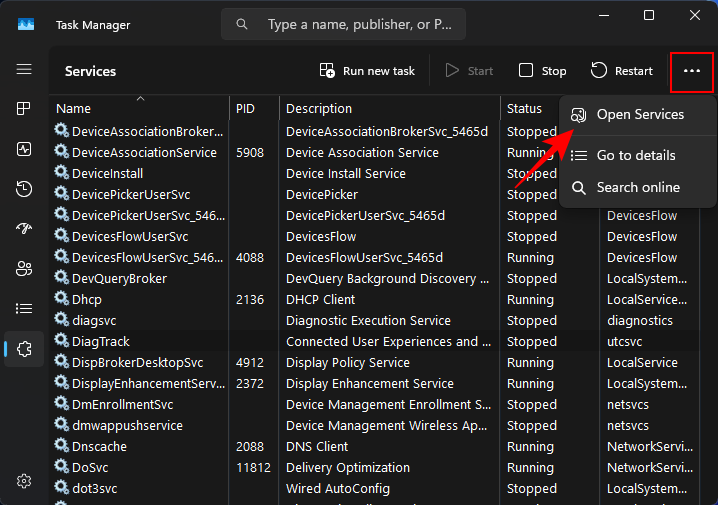
- In the ‘Services’ window, find and double-click Connected User Experiences and Telemetry.
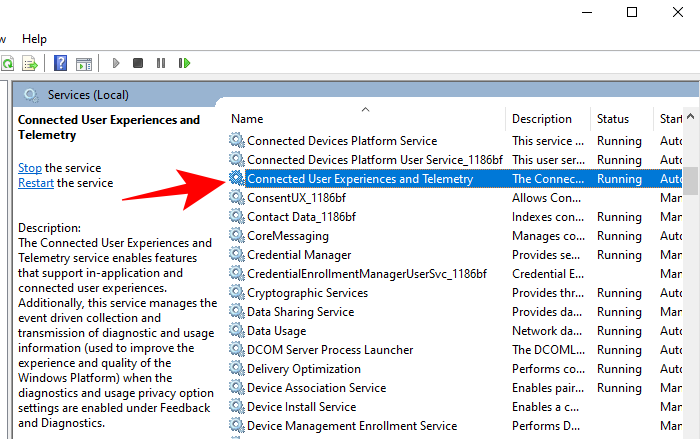
- Under the “General” tab, click on the drop-down menu next to “Startup type”.
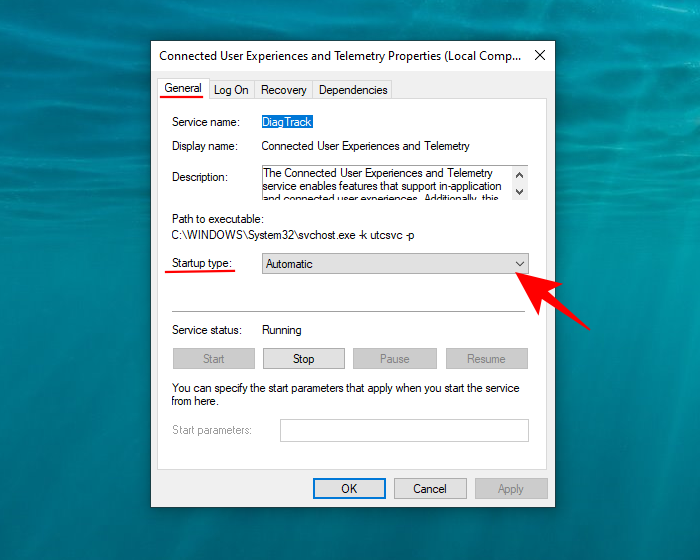
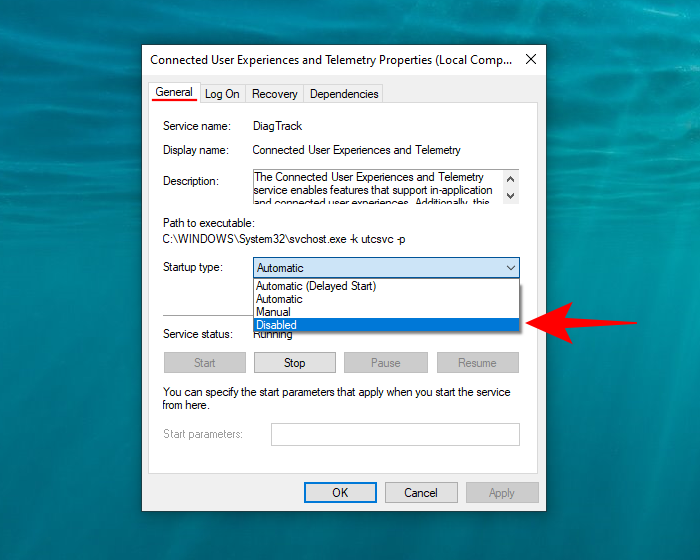
- Select Disabled.
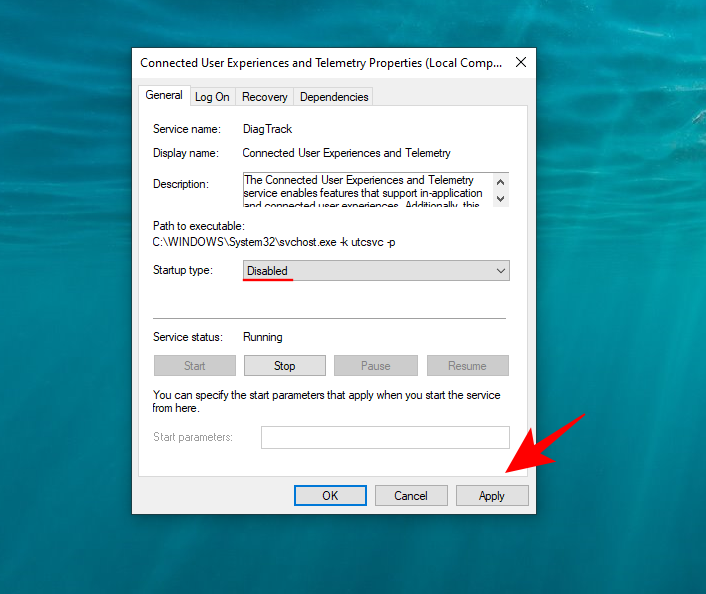
- Click Apply.
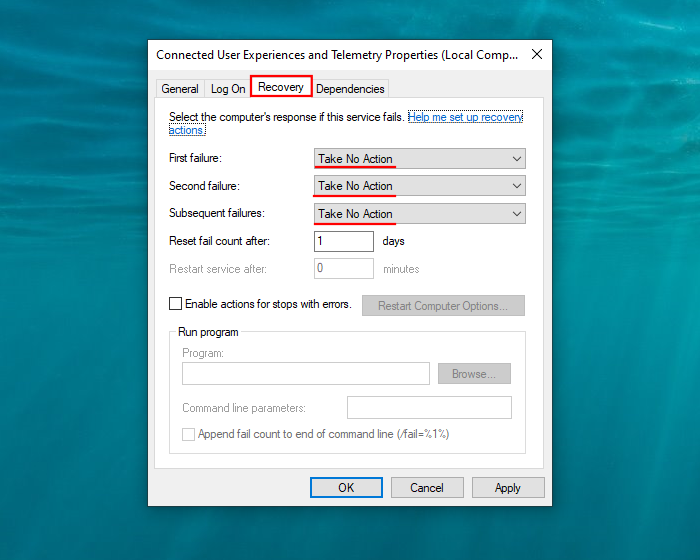
- Now move to the “Recovery” tab. Select Take No Action on the three drop-down menu options. Click OK.
8. Update and fix Device Drivers
Some Advanced Host Controller Interface PCI-Express models are also known to cause this problem, especially with the StorAHCI.sys driver. Safe to say, they will have to go. But first, identify whether or not you’re using this AHCI driver.
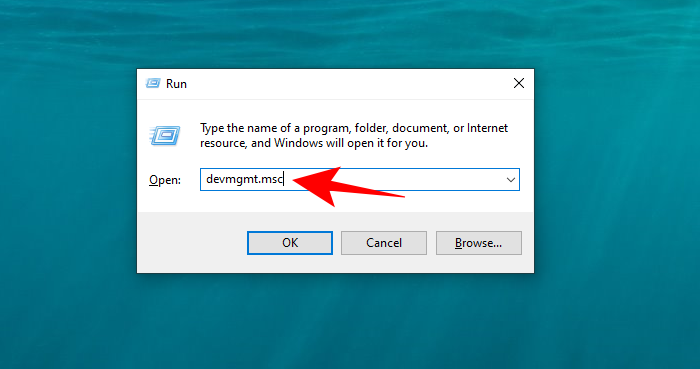
- Press Win+R to open the RUN box, type “devmgmt.msc” and hit Enter.
- Expand the “IDE ATA/ATAPI controllers”, then right-click Standard SATA AHCI Controllers and select Properties.
- Now, under the “Driver” tab, click on Driver details.
- If you find “storahci.sys” in driver files, then you will have to disable it from the registry.
- Now, go to the “Details” tab in the same window and note down the driver’s value. This value will come in handy later so go ahead and right-click and copy it.
- Now, type “regedit” in the RUN box and press Enter.
- Navigate to the following address:
HKEY_LOCAL_MACHINE\System\CurrentControlSet\Enum\PCI\(AHCI Controller)\Device Parameters\Interrupt Management\MessageSignaledInterruptProperties - Replace the “(AHCI Controller)” with the value that you copied earlier.
- Now, on the right, double-click MSISupported to modify it.
- Change its value data to 0. Then Click OK.
If you don’t have this MSI driver, you should still go ahead and update your storage controller drivers from the Device Manager.
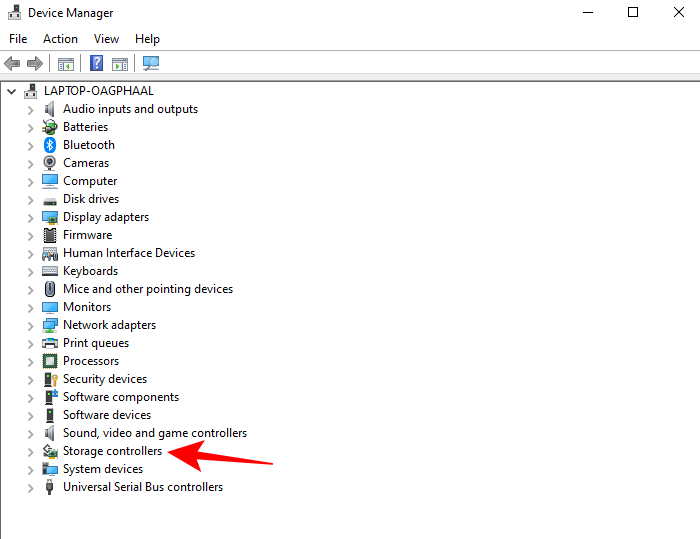
- To do so, click to expand “Storage controllers”.
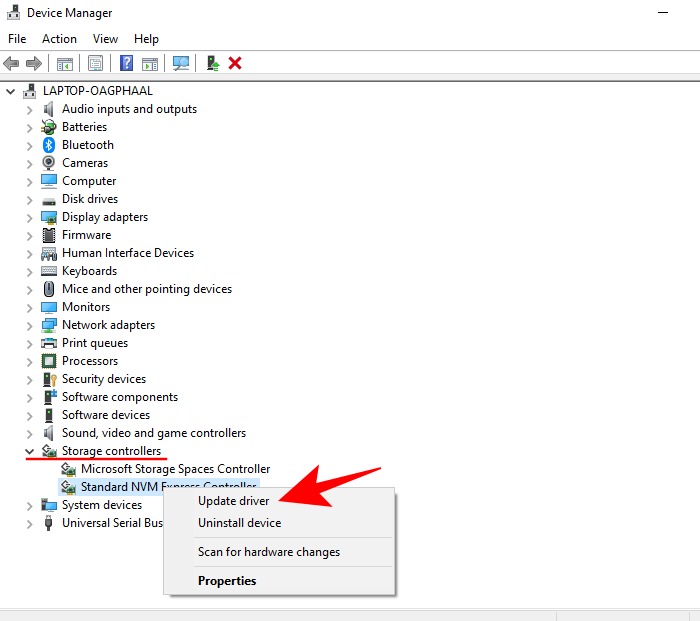
- Then right-click on your storage driver and select Update driver.
- When asked, choose Search automatically for drivers.
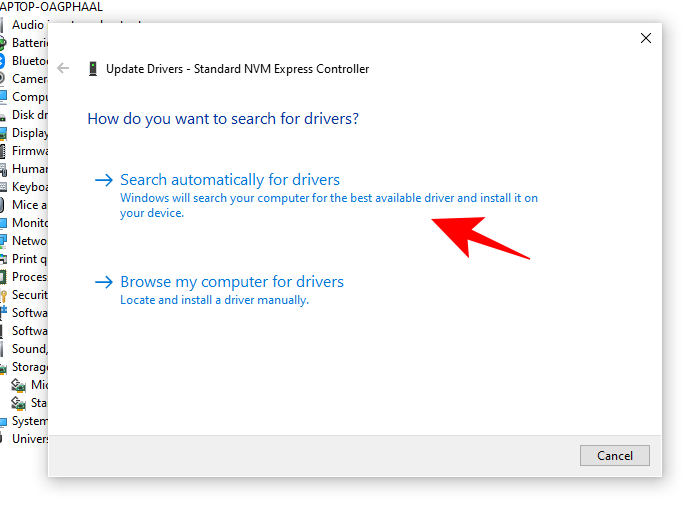
- If there are any updates pending, these will be installed automatically. Once you’re done with this, check your disk usage percentage again to see if there’s any impact.
9. Reconnect (or replace) SATA cable
A problematic SATA cable can also cause this problem. A simple fix for this is to reconnect the SATA cable connected to the hard drive and check if it’s functioning properly. Poor contact with the SATA cable can also force the disk to work harder than usual to have the information go through. You may also want to replace your SATA cable if it’s showing signs of wear, especially at the point of contact.
10. Run SFC for corrupted system files
Corrupt system files can wreak havoc on multiple services and processes and force the disk to go into hyperdrive. To scan for corrupted files and repair them, follow the steps below:
- Press Start, type in “cmd”, and click Run as administrator.
- Here, type in the following commands one by one, hit Enter, and let them complete:
DISM /Online /Cleanup-Image /CheckHealth
DISM /Online /Cleanup-Image /ScanHealth
DISM /Online /Cleanup-Image /RestoreHealth
Once these processes are completed, replacements for damaged files will be downloaded automatically. Additionally, do check if there are any available updates for your computer after this.
11. Run Disk Check
Similar to the previous method, you might also want to check the disk for any potential errors. To quickly run a disk check, open the command prompt (shown in the previous step) and type in the following command: chkdsdk.exe /f /r
When prompted, type Y and hit Enter.
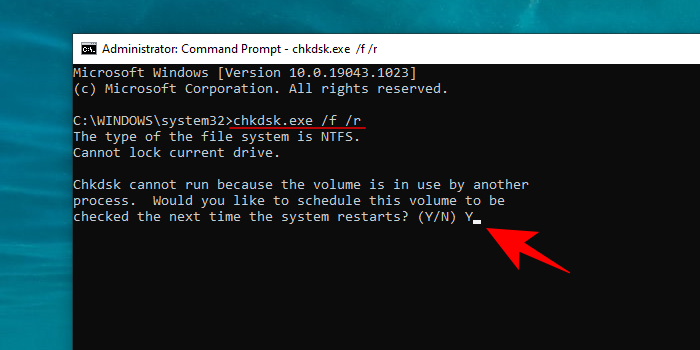
Now, close all your programs and restart the system. The disk check will begin once your computer restarts.
12. Run Antivirus for potential malware
Viruses and malware are a perennial cause of a whole lot of problems, including high disk loads. If you don’t have a third-party antivirus application, scan for viruses from Windows Security.
- To do so, search and open Windows Security from the Start menu.
- Click on Virus & threat protection.
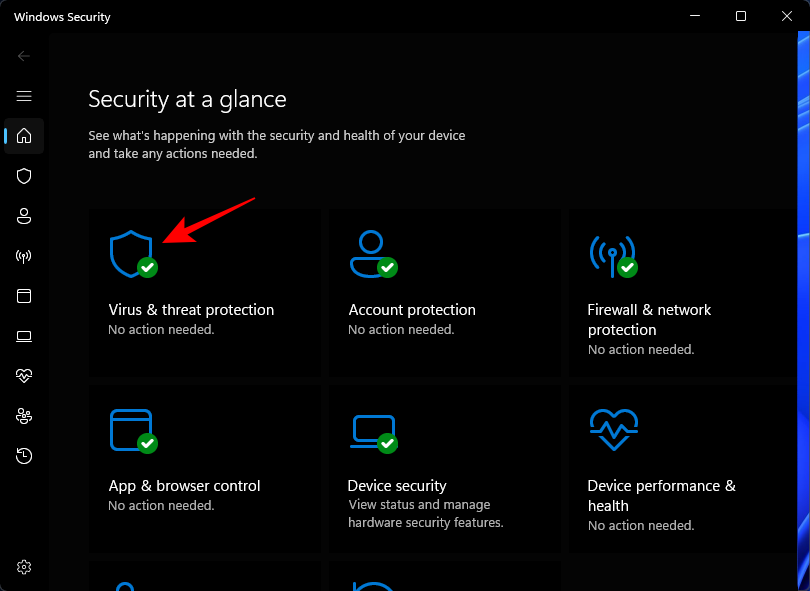
- Now, click Quick Scan.
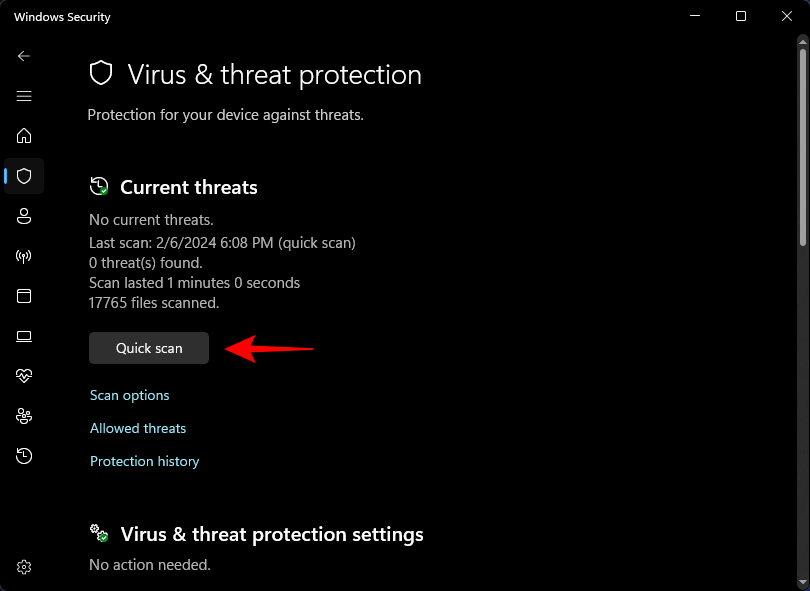
- If there are any threats detected after the scan is complete, click on Remove under “Actions”.
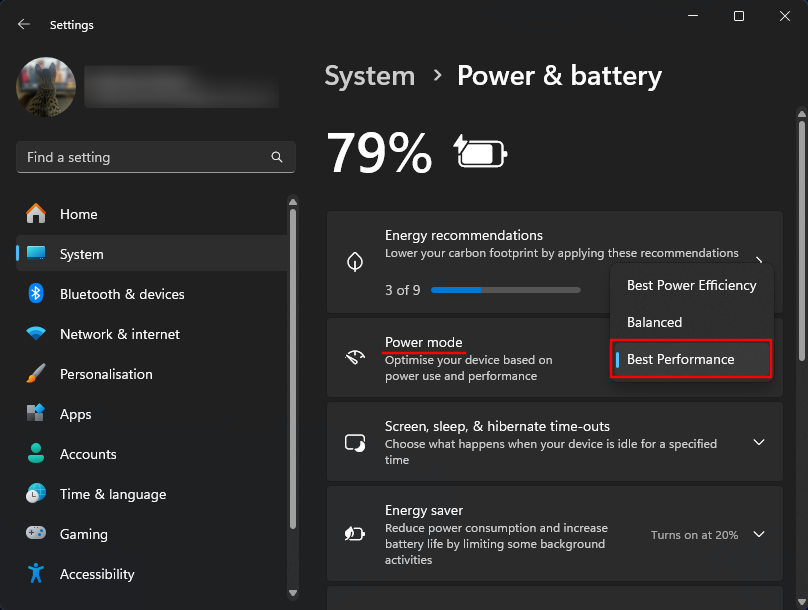
13. Switch to the ‘Best Performance’ Power Setting
The 100% disk usage issues tend to occur more on the Standard power mode, but not as much on the High-Performance mode. Here’s how you can switch to it:
- Open the Settings app, then select System > Power & battery.
- From the ‘Power mode’ drop-down menu, select Best Performance.
14. Turn Off Windows Tips, Tricks, and Suggestions
Windows tips, tricks, and suggestions are wonderful if you’re a new Windows user. But they are not all that important and having them kept on depletes the precious disk memory resource.
- Open the Settings app, then select System > Notifications > Additional settings.
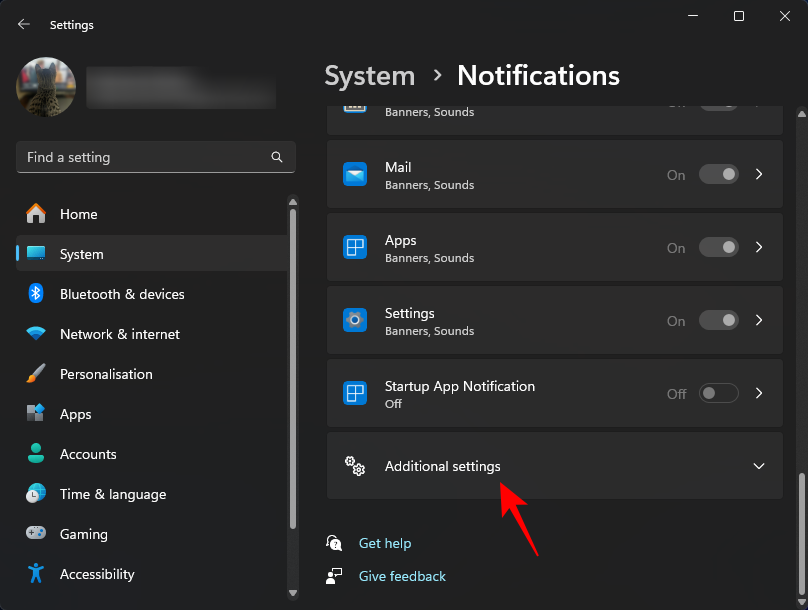
- Uncheck Get tips and suggestions when using Windows.
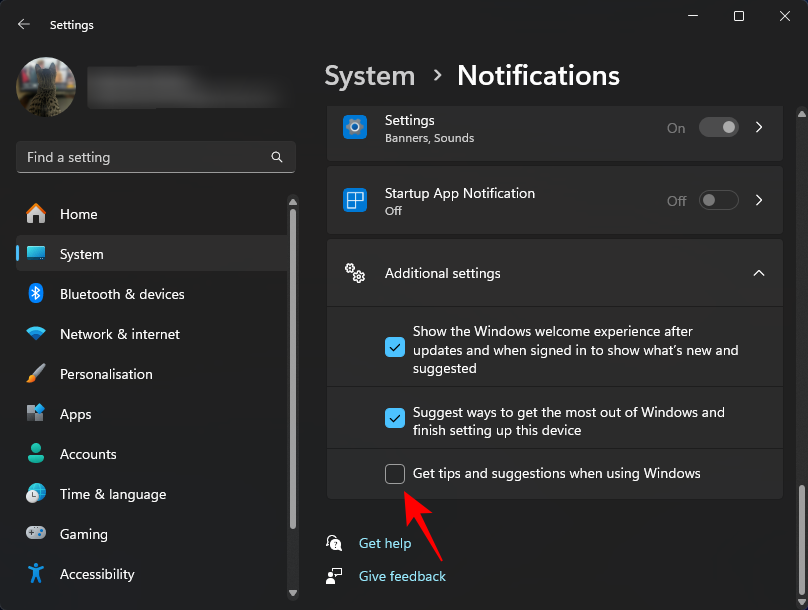
- You can also uncheck other items here that you don’t need.
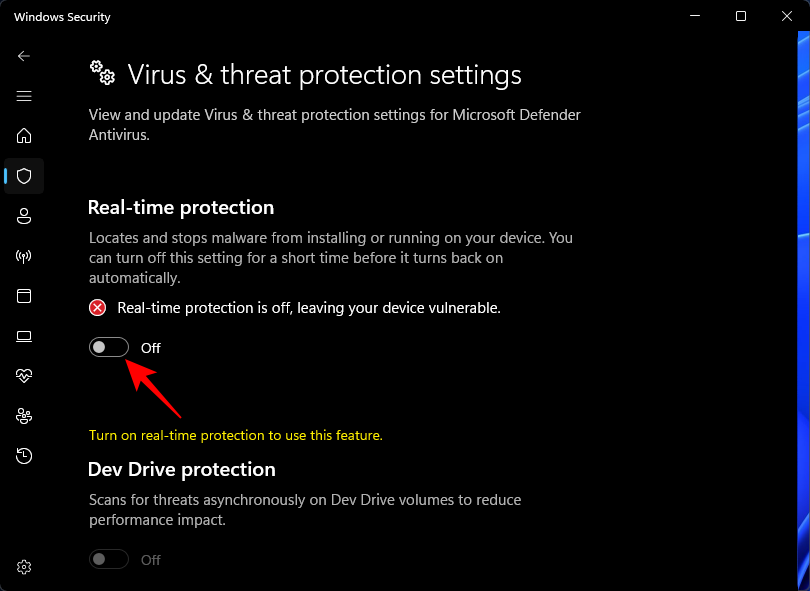
15. Turn Off Windows Defender
If you have an anti-virus program installed as your main bulwark against viruses, Windows Defender is unnecessary since the load it can have on your disk can be massive. Here’s how to disable it:
- Search for and open Windows Security from the Start menu.
- Click on Virus & threat protection.

- Under ‘Virus & threat protection settings’, click on Manage settings.
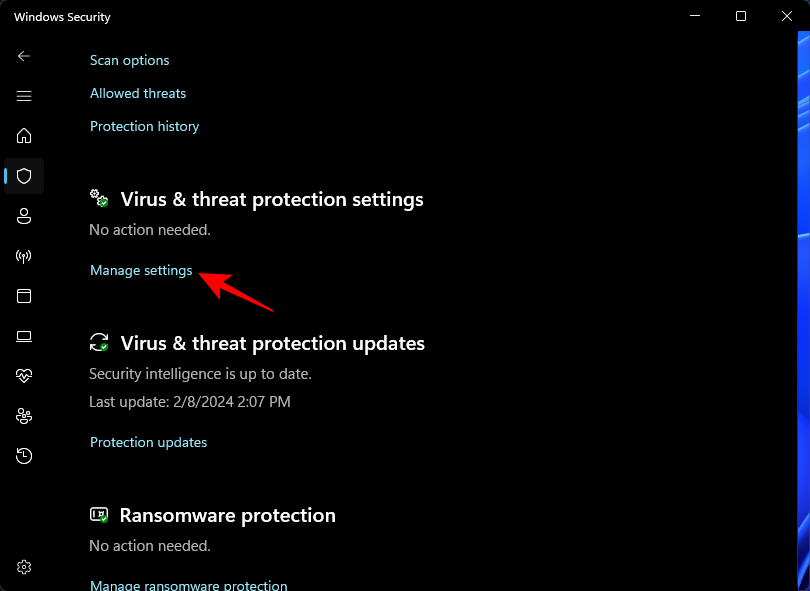
- Disable Real-time protection.
16. Disable ‘Preload pages’ in Google Chrome
It is not uncommon for your browser’s prediction services to hog up disk memory. Here’s how you can disable it:
- Click on More options (three vertical dots) at the top right corner and select Settings.
- Search for ‘Preload pages’ and toggle it Off.
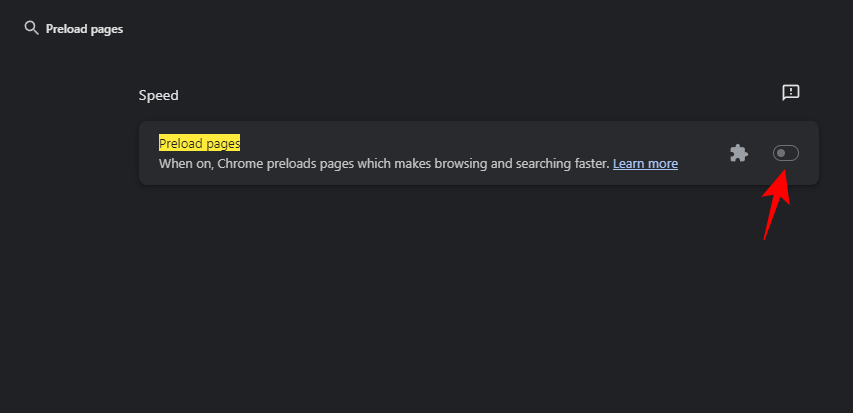
Doing this will ensure that Chrome doesn’t pre-load sites that you might visit depending on the pages you have visited in the past, thereby reducing the load on the disk memory.
17. Update Windows
If you’ve made it until here, chances are that none of the aforementioned have worked for you. One last method that you might want to try before throwing in the towel is to update your Windows.
Keeping your Windows updated to the latest version ensures that any bugs that your system might have had are removed.
- Open the Settings app, select Windows Update, and click on Check for Updates.
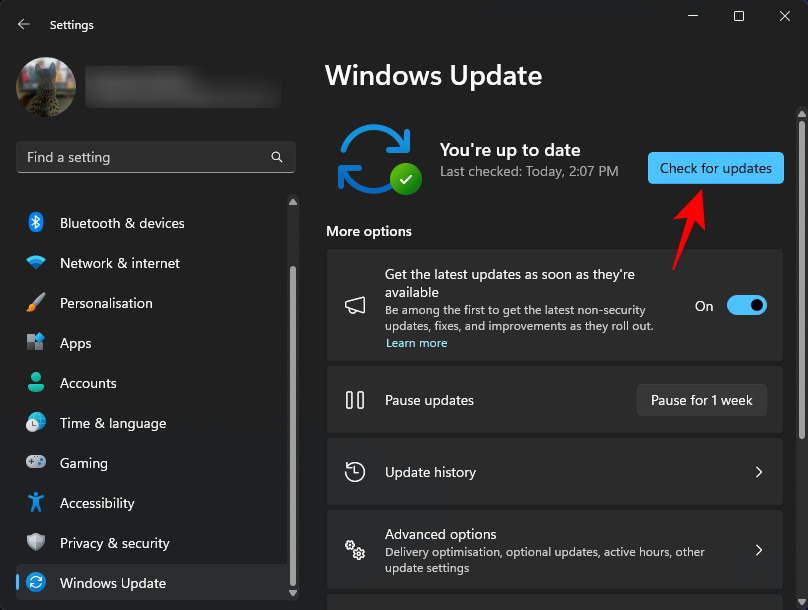
- Download and install any pending updates that might be there.
There’s always a chance that your system needed just this little upgrade to remove existing bugs and glitches that could be causing extraneous disk usage problems.
18. Reinstall Windows
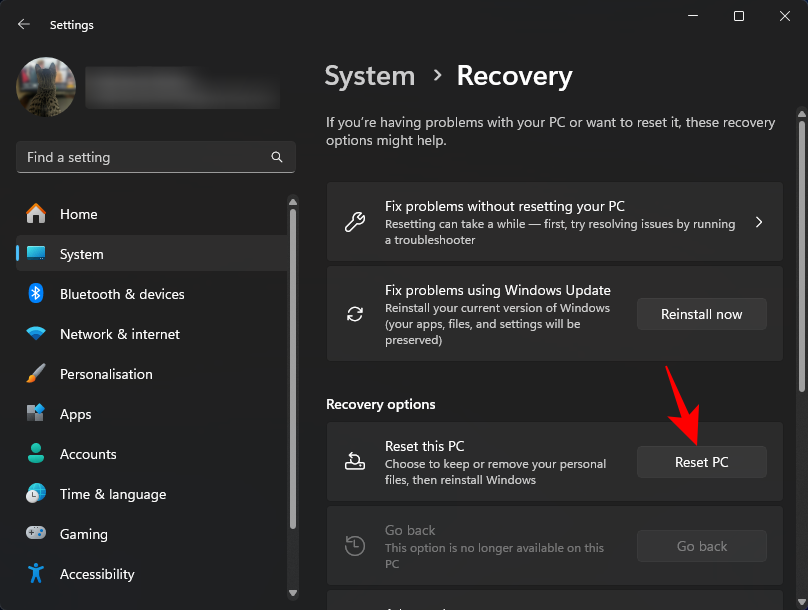
When all else fails, reinstall. This is the common wisdom that most Windows users resort to when other things don’t work out as expected. Here’s how to reinstall Windows while preserving apps, files, and settings:
- Open the Settings app, and select System > Recovery.
- Next to ‘Fix problems using Windows Update’, click on Reinstall now.
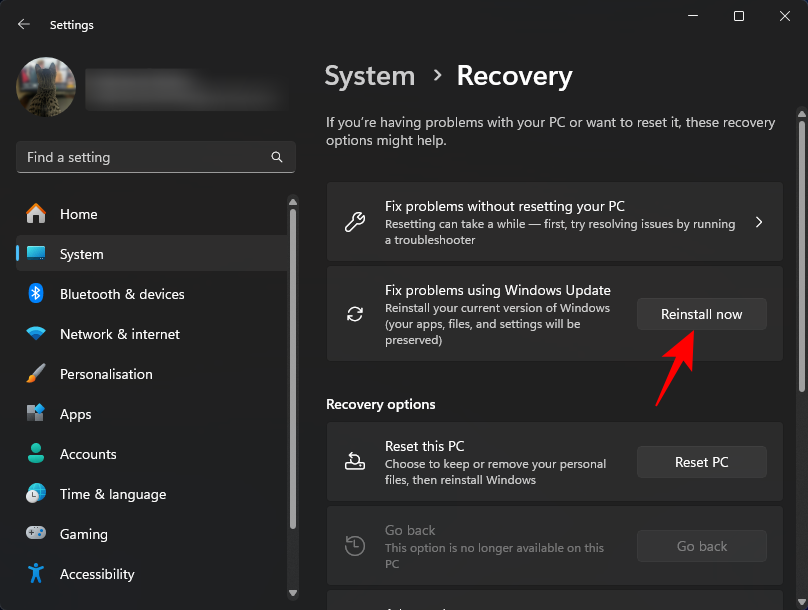
- If you’re using an older version of Windows, click on Reset PC and follow the on-screen instructions.
We hope that one of the fixes mentioned above managed to solve the 100% disk usage problem for you. After going through each method, be sure to check whether or not the fix has worked by firing up Task Manager. Sometimes, a restart is required for the fix to work and for the changes to take effect. So don’t be too rash in discounting any one method until you’re absolutely sure that it did nothing.
RELATED
-
- How to delete temporary files in Windows 11
- How to Fix ‘Windows 11 Start Menu Not Working’ Issue? [17 Ways]
- How to Remove Microsoft Teams Chat From Taskbar on Windows 11
- How to Create a Restore Point in Windows 11
- What Windows 11 Services to Disable Safely and How?
- How to Uninstall Apps on Windows 11: Everything You Need to Know



none of the above worked plz help