The drive letters that Windows automatically assigns to your hard drives and external drives are not permanently etched in stone. Whether you want to personalize your PC further or want the same driver letter for a specific drive, there are various ways by which you can, if you so wish, change the drive letters. Doing so also ensures that Windows doesn’t run into any problems when assigning a new letter to a drive.
Here is everything you need to know to change a drive letter to a drive on Windows 11.
How are drive letters assigned on Windows 11?
Drive letters are initially assigned at the time of Windows installation, with the letter ‘C’ being the default for the system drive. Letters ‘A’ and ‘B’ are used for floppy drives, but as they’re now obsolete, these two letters are free to be assigned to another drive. All other internal drives and partitions come next, with their letters being automatically assigned from the letter ‘D’ onwards.
If a letter is assigned to a drive but it is not connected, Windows will take the liberty of assigning it to another drive. Then, if that drive is connected again, Windows will simply allocate the next available drive letter.
Related: How to Wipe a Hard Drive on Windows 11
Change a Drive Letter on Windows 11
Now, let’s take a look at a few different ways to change a drive letter on Windows 11.
Method #01: Using Settings
One of the simpler ways of changing a drive letter is to do so from the native Settings app. Press Win + I to open it up. With ‘System’ selected in the left panel, scroll down on the right and click on Storage.

Then scroll down and click on Advanced storage settings to expand it.
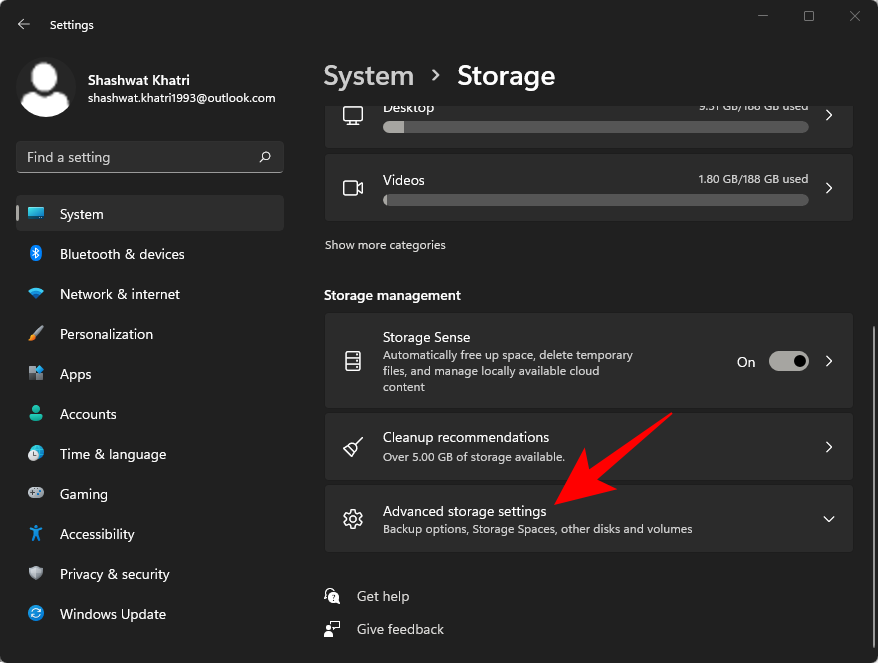
Select Disks & volumes.

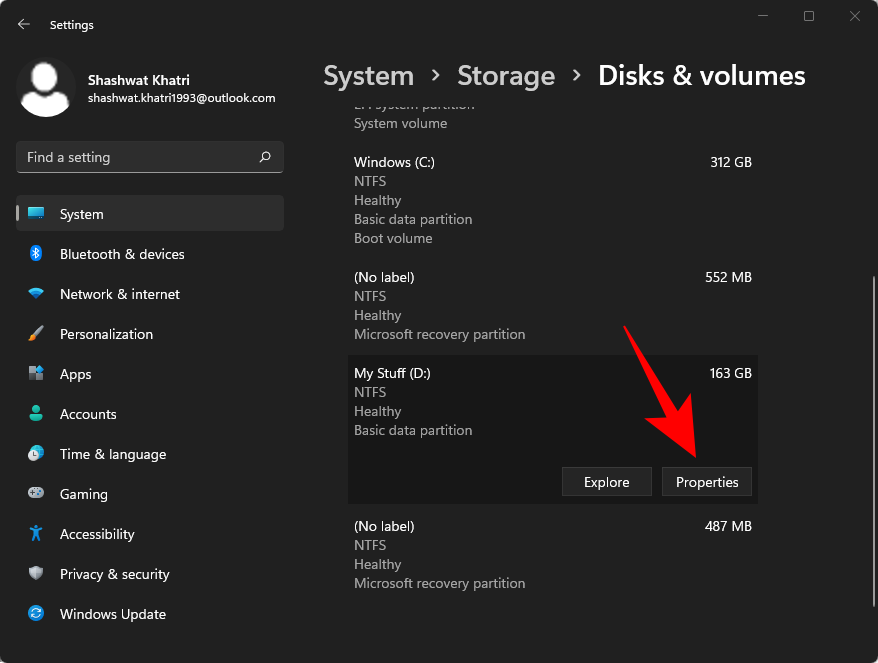
Now select the drive whose letter you want to change.
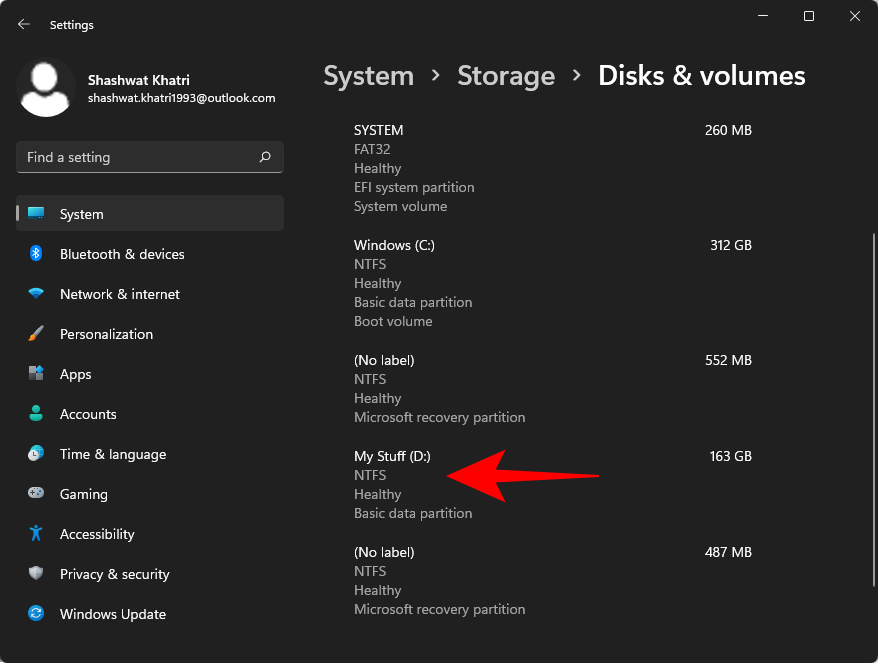
Click on Properties.
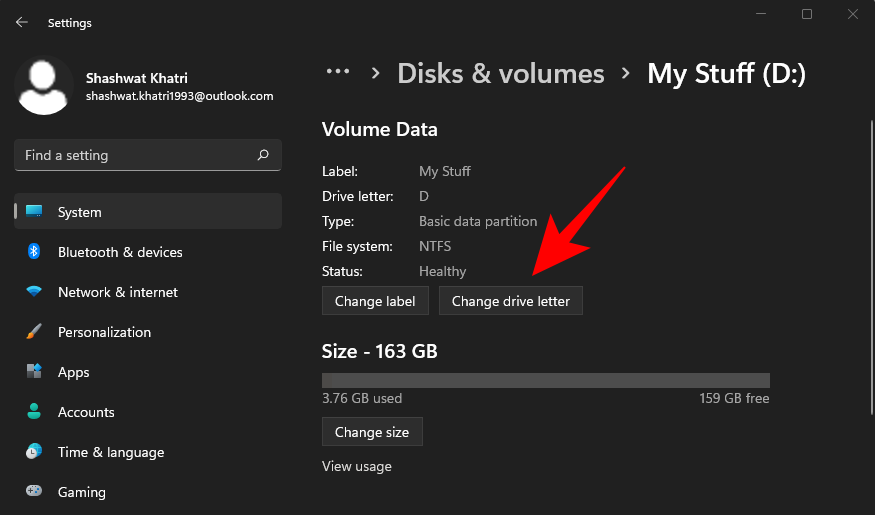
Click on Change drive letter.
Now click on the drop-down menu.
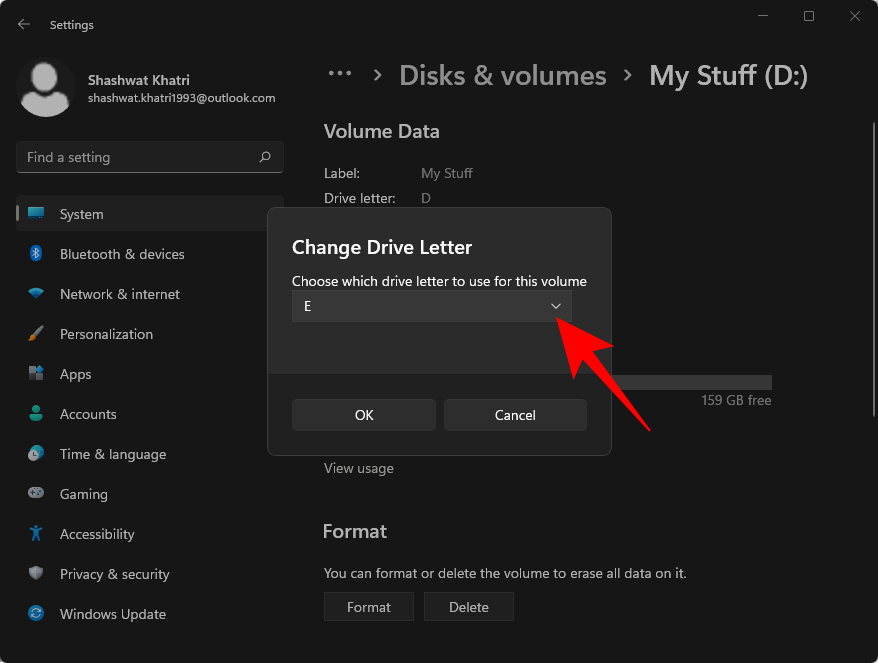
Select a letter for this drive.

Click OK.

Your drive letter is now changed.
Related: How to Use Focus Assist on Windows 11
Method #02: Using Disk Management
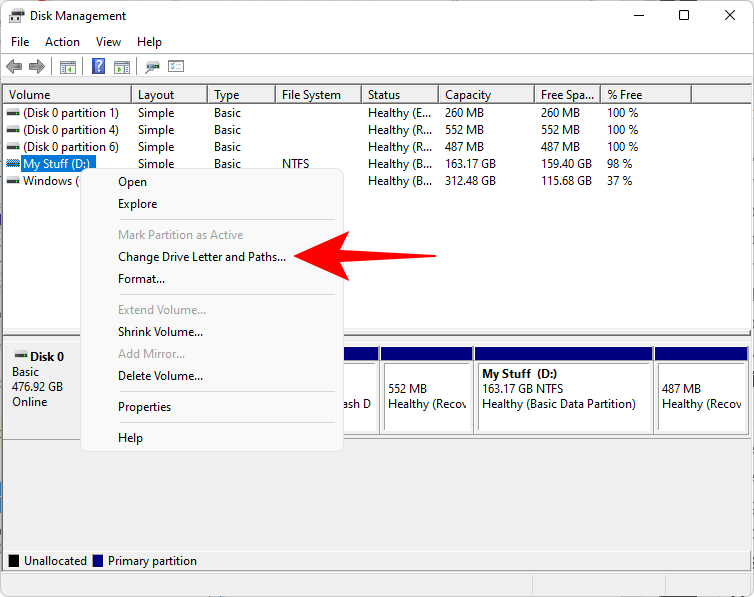
One of the most common ways of changing a drive letter is to use the Disk Management window. To open this window, right-click on the Start menu and select Disk Management.

Right-click on the drive whose letter you want to assign manually and select Change Drive Letter and Paths…
Click on Change…

Now click on the drop-down menu next to “Assign the following drive letter”.

Select a letter.

Click OK.

When prompted, click Yes.

The drive letter is now changed.
Related: How to Check Battery Health Windows 11
Method #03: Using Command Prompt
Another way to change a drive letter is to do so using the Command Prompt. Here’s how to go about it:
Press Start, type cmd, and click on Run as administrator to open an elevated instance of the Command Prompt.

Type the following command:
diskpart

Then hit Enter. Now type the following:
list volume

Press Enter. You will now get a list of the drives on your system. Take a note of the volume number of the drive whose letter you want to change.
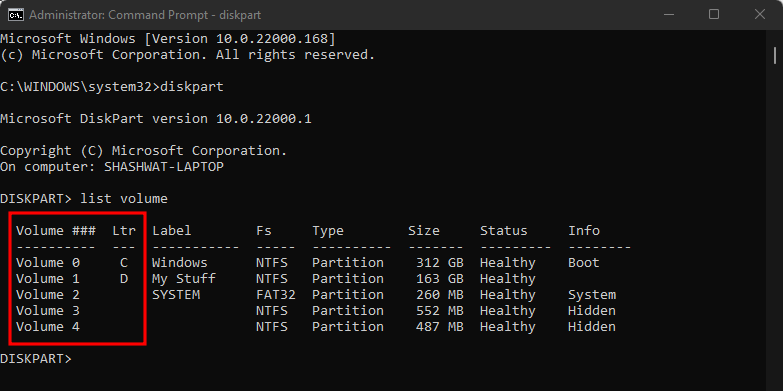
Then type the following command:
select volume 'volume number'
Make sure to substitute ‘volume number’ with the actual volume number. Then press Enter. In our example, we want to change the letter for volume 1, so the command will look something like this:

Now type the following command:
assign letter='new drive letter'
Make sure to change ‘new drive letter’ to the letter that you want to assign. Then Press Enter. In our example, we want to assign the letter ‘S’, so this is what the command will look like:

Once the new drive letter is assigned successfully, you will get a confirmation message for the same.

Method #04: Using PowerShell
The commands to change a drive letter are slightly different if you’re using PowerShell. Here’s how to go about changing a drive letter in PowerShell:
Press Start, type PowerShell, and click on Run as administrator.

Type the following command first:
Get-Partition

Then press Enter. This will display the drives on your system and their corresponding drive letters. Make a note of the drive letter that you want to change.
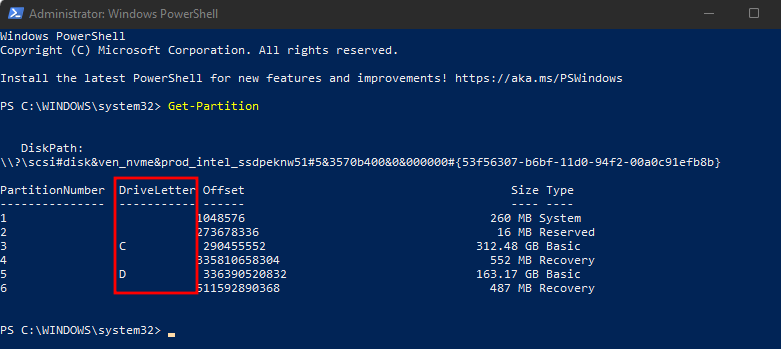
Now type the following command:
Get-Partition -DriveLetter 'current drive letter' | Set-Partition -NewDriveLetter 'new drive letter'
Make sure to substitute ‘current drive letter’ and ‘new drive letter’ with the actual drive letters. Then press Enter. Take a look at our example below to see how the command should look like:

And just like that, you have changed the letter of the drive.
Method #05: Using Registry Editor
The Registry Editor also affords you the luxury of changing the letter of a drive. If the previous methods aren’t working for you, you may want to give this one a shot.
First up, press Win + R to open the dialog box, type regedit, and hit Enter.

Now, navigate to the following address:
Computer\HKEY_LOCAL_MACHINE\SYSTEM\MountedDevices
Alternatively, you can copy the above and paste it in the Registry Editor’s address bar (and press Enter).

With ‘MountedDevices’ selected on the left, you will see a list of registry binary keys on the right. Find the binary value for the drive you want to change (the current letter assigned will be displayed at the end). Right-click on the one that you want to change and click Rename.

Now simply change it to the letter that you want (just as you would rename any other file).

Restart the computer for the changes to take effect.
Method #05: Using 3rd-party apps
There are quite a number of third-party applications that let you assign and change drive letters with ease. AOMEI Partition Assistant, MiniTool Partition Wizard, and EaseUS Partition Master are some of the more common ones that have GUI interfaces to simplify the process.
All of these tools are free to use and offer various other features to manage your partition and drives.
Frequently Asked Questions(FAQs):
Given the importance of internal and external drives for the proper working of programs and applications, users may have a few queries when changing the letter of a drive. Here we answer a few commonly asked questions.
When should you not change drive letters on Windows?
If you have programs and applications installed on a drive, changing the drive letter may cause them to stop working. This is because the files of the software need to refer to the original path used when it was installed.
Even though most of us tend to install programs on the system drive, if you have installed them on another drive, you should either not change that drive’s letter or reinstall the software after making the change.
Can you switch between drive letters on Windows 11?
No, there’s no way for users to switch between drive letters on Windows. You can only change the drive letter and use one that isn’t currently assigned. So, if you want to switch drive letters, say for ‘D’ and ‘E’, you will have to take the long route of first changing one drive’s letter to a letter that isn’t currently assigned (from ‘D’ to ‘Z’ for example). This will free up the letter ‘D’ so that you can change ‘E’ to ‘D’. Finally, change ‘Z’ to ‘E’.
Can you change the drive letter for the System Drive?
No, there is no way to change the drive letter for the system drive (the one on which Windows is installed). By default, ‘C’ is the system drive and once Windows is installed, this can’t be changed. You can, however, reinstall a fresh copy of Windows and select another drive for it. But if it’s not a compulsion, we recommend leaving the system drive alone.
So these were the ways that you can change the letter of a drive on Windows 11. If you’re not able to change the letter for a drive from the main methods mentioned in our guide, you may want to resort to the use of third-party utility tools for the same as managing partitions is their sole purpose.
RELATED
- How to Search in Windows 11: Everything You Need to Know
- How to Disable Keyboard on Windows 11 Permanently or Temporarily
- How to Enable Virtualization in BIOS on Windows 11 or 10
- Where Do Windows Screenshots Go?
- How to Change a File Type on Windows 11
- How to Remove Bing From Windows 11
- How to Disable Updates on Windows 11
- How to Open Control Panel in Windows 11


