
What to know
- Virtualization is a Windows feature that uses Hyper-V to allow the installation of different operating systems without having to wipe system drive or create partitions.
- Check if virtualization is enabled from Task Manager > Processes > Virtualization. Alternatively, use the
systeminfocommand in CMD and check ‘Hyper-V Requirements’. - You can enable virtualization from your BIOS > System configuration. The exact steps for this will vary depending on your PC’s manufacturer.
- You can also enable virtualization using the command
Dism /online /Enable-Feature /FeatureName:HypervisorPlatformand then the commandDism /online /Enable-Feature /FeatureName:VirtualMachinePlatformin CMD. - Alternatively, go to Settings > System > Optional features > More Windows features and enable Virtual Machine Platform and Windows Hypervisor Platform.
Windows is the most popular consumer OS in today’s age. But there might be times you need to switch between operating systems to use a certain feature or just try out other alternatives. Wiping your boot drive and installing a new OS can be cumbersome, counterproductive, and highly time-consuming.
Did you know that it is not the only way to get a new OS installed on your system? Virtualization in Windows 11 via Hyper-V from Microsoft allows you to install guest Operating Systems on your machine and switch between them instantly for easy access. You can test out new operating systems this way and finalize the one that best fits your current requirements.
Let’s take a brief look at virtualization and how you can enable it from your BIOS if you are on Windows 11.
What is virtualization in BIOS?
Virtualization is a feature in Windows from Microsoft that uses an in-house hypervisor, Hyper-V to allow you to install multiple guest operating systems on your PC. You can then switch between these operating systems easily without the need for wiping a drive or creating separate partitions.
You can use tools like VirtualBox to then manage your operating systems and emulate the corresponding environment to get almost any OS running on your PC. You can then easily move between your virtual machines and hosts, and even transfer data between them depending on the tool that you are using.
Related: How to Update Drivers on Windows 11
Why do you need virtualization?
There can be many reasons you need virtualization. You could be a developer looking to code an app for multiple operating systems or a gamer looking to run old games. The possibilities are endless, but here are some ways you can use virtualization to your advantage depending on your interests.
- Code in different environments on the same machine
- Run legacy programs and games
- Browse anonymously
- Use snapshots to access infected data
- Use your virtual machine as your own private server
The possibilities are endless. If you wish to enable virtualization on your system then you can use the guide below to check and enable virtualization on your PC if available.
How to check if your PC supports virtualization
Your PC needs to support virtualization so that you can activate it. If your system was manufactured in the past 5 years, then it likely supports virtualization. Here’s how you can check if your PC supports virtualization.
Method 1: Using Task Manager
- Press
Ctrl + Shift + Escon your keyboard to launch the task manager and switch to the ‘Performance’ tab.

- Now look for virtualization on your right.

- If Virtualization is available, then the option would show up here with its current state beside it.
And that’s how you can use the task manager to check virtualization.
Method 2: Using CMD
- Press
Windows + Son your keyboard and search for CMD. Click on ‘Run as administrator’.

- Now type in the following command once CMD shows up on your screen.
systeminfo

- You will now get a report of your system. If virtualization is enabled then you will find a dedicated section for Hyper-V with all its current details.

- However, in case virtualization is disabled, then you will find an option stating the same at the bottom.
Related: How To Fix Windows 11 Black Screen of Death | Green Black Screen of Death
How to enable virtualization from BIOS
Virtualization can be enabled from your BIOS using the security section. Controlling your virtualization feature through your BIOS is the ideal way to avoid malicious users from installing guest operating systems on your PC or laptop. Use the guide below to enable virtualization in your BIOS.
Enter BIOS and enable virtualization
Use the guide below to enter BIOS on your system depending on your laptop manufacturer or your motherboard manufacturer. Ensure that you are running the latest BIOS available from your OEM to avoid any issues when installing guest operating systems.
On Acer
- Key for newer systems: F2 or Delete
- Key for older systems: F1 or Ctrl + Alt + Esc
- Turn on your system and press one of the corresponding keys above to enter the BIOS depending on your system. If your unit was manufactured in the past 5 years then F2 is the key for you. Older systems will need to try out both the key combinations to find out which one works the best for you.
- Use the arrow keys and enter ‘System Configuration’.
- Select ‘Virtualization technology.
- Highlight ‘Enabled’ and press Enter on your keyboard.
- Press F10 and click/select ‘Yes’. This option will save all your changes and exit the BIOS.
The BIOS will now be exited and your system will restart normally into Windows. Virtualization should now be enabled on your system and you can find out the same using our guide at the top.
On Dell
- Key for newer systems: F2 when Dell logo shows up during boot.
- Key for older systems: Ctrl + Alt + Enter, or Delete key, or Fn + Esc, or Fn + F1
- Alternate Keys: F1, F3, F12, or Delete
- Power on your Dell unit and press one of the corresponding keys above depending on your unit to enter the BIOS.
- Once you are in the BIOS, double click on ‘Virtualization Support’ on your left.
- Check the box for ‘Enable Virtualization Technology’ on your right.
- Click on ‘Apply’ in the bottom right corner of your screen.
Your system will now restart with Virtualization enabled in the BIOS. You can now easily install guest operating systems and you shouldn’t face any issues during the process.
On Asus
- Key for newer systems: F2
- Key for older systems: Delete or Insert
- Alternate Keys: F10
- Restart your system and press one of the corresponding keys above to enter the BIOS.
- Switch to the ‘Advanced mode’ to access additional BIOS settings. You can use the F7 key to do this on most Asus systems.
- Now navigate to the ‘Advanced’ section of the BIOS menu.

- Find and enable the following listings in the ‘Advanced’ menu – Intel Virtualization Technology (or AMD equivalent) and VT-d

- Once enabled, switch to the ‘Save & Exit’ tab and save all your changes before exiting the BIOS menu.

Virtualization should be enabled within the Boot menu on your Asus system.
On HP
- Key for newer systems: F10 or Esc
- Key for older systems: F1, F2, F6 or F11
- Alternate Keys: F10 or F12
- Restart your system and use one of the keys above to access the BIOS on your HP system.
- Switch to the ‘Advanced’ tab once you are in the BIOS menu.
- Use the arrow keys and select ‘Device Configuration’.
- Scroll to the bottom and check the box for Virtualization Technology (VT-d or VT-x).
- Click on ‘Save’ in the bottom right corner.
- Select ‘Yes’ to confirm your choice.
You can now exit the BIOS menu and boot into Windows normally. Virtualization should now be enabled on your system.
On Lenovo
- Key for newer systems: F1 or F2
- Key for older systems: Ctrl + Alt + F3, Ctrl + Alt + Ins, or Fn + F1
- Alternate Keys: n/a
On Thinkpads
- Restart your Lenovo Thinkpad and use one of the corresponding keys above to enter the BIOS menu.
- Once in the BIOS, use the arrow keys to navigate to the ‘Security’ tab and select ‘Virtualization’.
- Press Enter with ‘Disabled’ highlighted and select ‘Enabled’ instead.
- Press F10 on your keyboard and confirm your choice by selecting ‘Yes’. This will save all the changes you made and exit the BIOS.
You will now have enabled virtualization on your Lenovo Thinkpad.
On other Lenovo products
- Power on your system and use one of the keys above to access the boot menu.
- Once you are in the boot menu, switch to the ‘Configuration’ tab at the top.
- Now select ‘Intel Virtualization Technology’ or AMD equivalent by pressing Enter on your keyboard.
- Select ‘Enabled’ once prompted.
- Press F10 on your keyboard and confirm your choice by selecting ‘Yes’.
Virtualization should now be enabled on your Lenovo system.
Related: How to Fix 100% Disk Usage issue on Windows 11
In case you are unable to access the BIOS menu on your system, then you can use the guide below to trigger it from within Windows 11 itself. Fast startup or Fast boot technology from OEMs will sometimes prevent key inputs from being detected at the splash screen. This in turn prevents you from accessing the BIOS menu when the system is booting. Use the guide below instead to access the BIOS menu from Windows 11 on any system.
- Press
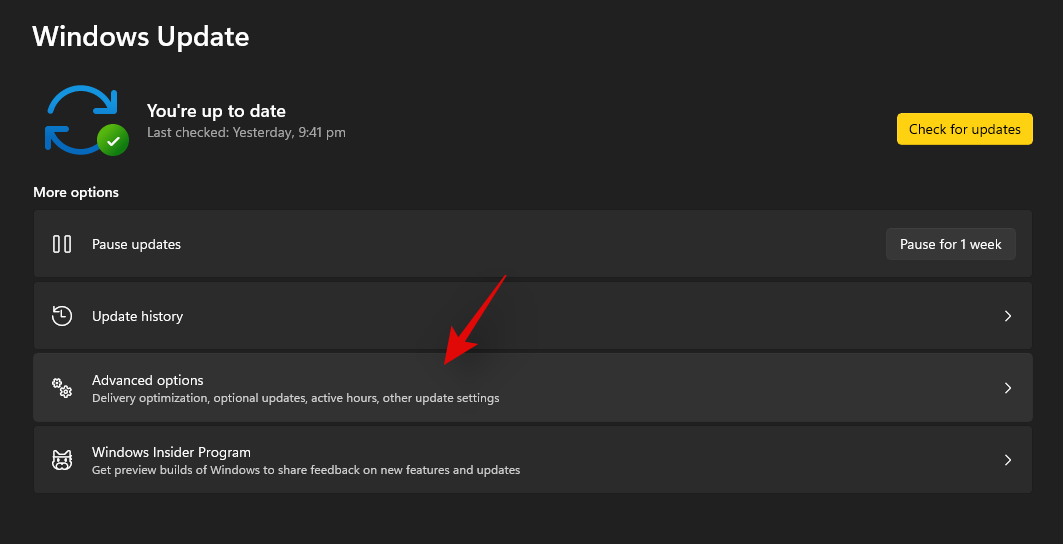
Windows + ion your keyboard and select ‘Windows Update’ from your left.

- Click on ‘Advanced options’.
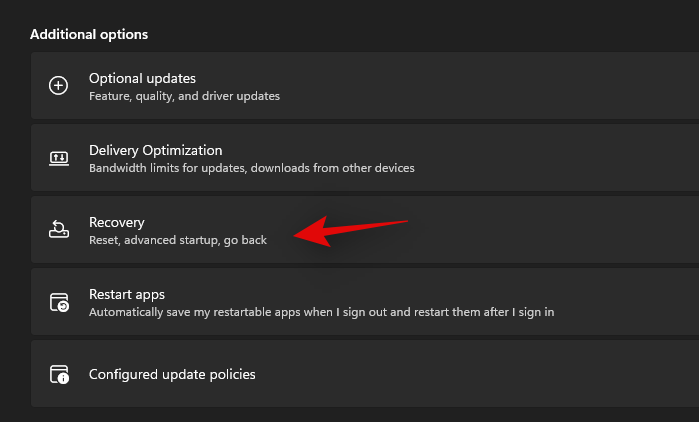
- Click on ‘Recovery’.
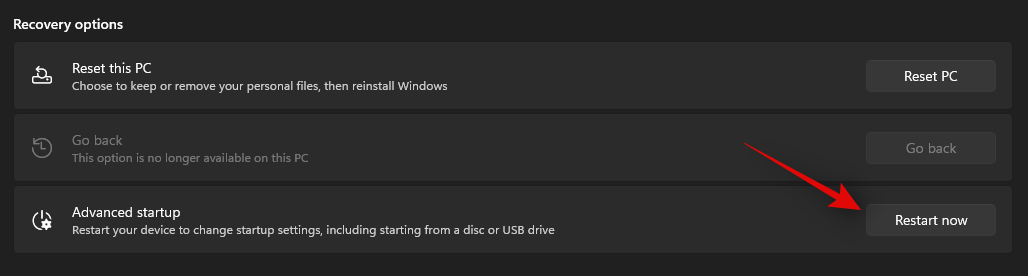
- Click on ‘Restart now’ beside Advanced startup.
- Windows will now restart and boot into the recovery environment. Select ‘Troubleshoot’.
- Select ‘Advanced options’.
- Select ‘UEFI Firmware Settings’.
- Click on ‘Restart’.
Your PC will now restart and automatically boot into the BIOS menu. You can now use the corresponding guide above to activate virtualization on your system.
What can I do If I don’t have virtualization?
In case virtualization is missing from your system then chances are that your unit has already exceeded its intended lifespan. Most modern CPUs nowadays come with in-built virtualization technology to help run virtual machines and systems on any laptop or desktop. However, if your CPU does not have the option for virtualization then there isn’t much you can do about it.
Virtualization is a hardware feature that depends on your CPUs architecture and core count as well. In such cases, you will need to upgrade your CPU and motherboard to get virtualization on your system.
Other ways to enable virtualization
There are other ways to enable virtualization on Windows 11 as well. In case the BIOS menu method does not work for you, you can use one of the guides below to enable virtualization on your system.
Method 1: Using CMD
- Press
Windows + Son your keyboard and search for CMD. Click on ‘Run as administrator’ once it shows up in the search results.

- Type in the command below in CMD and press Enter on your keyboard to execute it. Once executed, the command will download and install all Hyper-V features to your PC.
Dism /online /Enable-Feature /FeatureName:HypervisorPlatform

- DISM will now do its thing and install all the necessary features to your system. Now use the command below to install another virtualization-related feature to your PC.
Dism /online /Enable-Feature /FeatureName:VirtualMachinePlatform

- Once installed, you will be prompted to restart your system. Type in ‘Y’ and press Enter on your keyboard to restart your system.

Once your system restarts, virtualization should be enabled and ready to use.
Method 2: Using Windows Features
- Press
Windows + ion your keyboard and go to System and select ‘Optional features’. - Scroll to the bottom and click on ‘More Windows features’.

- You will now get a list of features that can be and are already installed on your system. Check the boxes for the following listings – Virtual Machine Platform and Windows Hypervisor Platform.

- Click on ‘Ok’ and the features will now be downloaded and installed on your system.

- Once installed, click on ‘Restart’ to restart your system.

And that’s it! Virtualization should now be enabled on your system once it has restarted.
Method 3: Using PowerShell
- Press
Windows + Son your keyboard and search for PowerShell. Click on ‘Run as administrator’ once it shows up in your search results.

- Type in the following command and press Enter:
Enable-WindowsOptionalFeature -Online -FeatureName HypervisorPlatform

- PowerShell will now install the necessary virtualization files on your system.

- Once installed, you will be prompted for a restart. Type in ‘N’ and press Enter on your keyboard.

- Now enter the following command and execute it:
Enable-WindowsOptionalFeature -Online -FeatureName VirtualMachinePlatform

- You will now be prompted to restart your system. This time, type in ‘Y’ to restart your system.

Once your system restarts, virtualization should now be enabled within Windows.
Should you keep virtualization enabled when not in use?
No, keeping virtualization turned on is not a good idea especially when using work systems. Virtualization allows you to install multiple guest operating systems on your PC which can be used by a malicious user to their advantage in case virtualization is always enabled on your system.
However, in case you need to have virtualization always enabled, then we recommend locking down your USB ports and other peripherals in the BIOS so that malicious users can not take advantage of virtualization always being enabled on your system.
We hope this guide helped you easily enable virtualization within the BIOS of your system. If you face any issues or have any more questions for us, feel free to reach out using the comments below.
RELATED
- How to Stop Pop Ups on Windows 11
- How to Check Battery Health Windows 11
- ‘The PC Must Support Secure Boot’ Error: How to Fix
- How to Use Focus Assist on Windows 11
- How to Wipe a Hard Drive on Windows 11
- How to Repair Windows 11 [15 Ways]
- Windows 11 Archives – Page 2 of 5 – Nerds Chalk
- How to Show Hidden Files on Windows 11
- How to Permanently Remove Microsoft Edge From Windows 11 Using Powershell


