Microsoft Windows is the most popular operating system in the world. It is user-friendly, can run games effortlessly, and is a productivity powerhouse. Unfortunately, not all of its updates or software tools are graciously celebrated by the common folk. Today, we will take a look at one such controversial application, tell you all about Microsoft’s PC Health Check application.
Related: Windows 11 Taskbar Not Showing? How to Fix
What is PC Health Check app from Microsoft?
The PC Health Check app from Microsoft allows you to check the current condition of your computer and tells Windows 10 users whether their system is capable of handling Windows 11 in all its glory. The PC Health Check app can either be downloaded from Microsoft’s website for free or could be installed via Windows Update.
The PC Health Check app is not revolutionary by any means but it can be a useful addition to your application library.
Why do you need PC Health Check app?
For any Windows 10 user, the PC Health Check app basically dictates whether you are eligible to get Windows 11. If you are not eligible for the new OS, you are told which components need replacing or upgrading.
The application also allows you to check which applications run when you boot your PC, gives you tips to improve your performance, tells you how much storage space you have available on your computer, and more. The PC Health Check app does not exactly do anything that you cannot do by yourself. However, having the ability to change so many settings on the fly is certainly worth a look.
Can you bypass PC Health Check app?
Yes, you can bypass the PC Health Check app when you are looking to upgrade from Windows 10 to Windows 11. You can click on this link to learn how you could bypass the restriction while upgrading from Windows 10 to 11.
How to download the PC Health Check app
Microsoft rolled out the PC Health Check application as a part of its October Windows Update. The update (KB5005463), which appeared in the final week of October brings the PC Health Check application to Windows 10 users. However, if you have Windows 11 or do not have the new update yet on your Windows 10 PC, you can go ahead and download the application directly from Microsoft itself.
All you have to do is click on the link above and the Windows PC Health check app will start downloading for you. After it is downloaded, double-click on the package to run it.
Related: Can You Disable TPM and Secure Boot After Installing Windows 11?
How to Use PC Health Check app
Using the PC Health Check application is no rocket science. Since it is a rather lightweight application, you will be able to see most of the functions it offers right away. Here is a breakdown of the service for your convenience.
1. Check requirement for Windows 11
If you are on Windows 10, checking the system requirement for Windows 11 is the most basic and notable task you can do with the PC Health Check application. To know whether your computer is capable of running Windows 11, first, launch the PC Health Check app and click on the ‘Check Now’ button inside the banner at the top of the application.

This will kick-start a series of checks that will tell you whether your system is capable.
When all the criteria are met, you will get the green signal to download and install Windows 11 for free.

You can check ‘Device Specifications’ and ‘See All Results’ from this screen itself. Microsoft also offers a few hyperlinks that can come in handy when you are building a new, Windows 11-capable PC.
2. Turn on Backup & Sync
Backing up your data has become one of the most important tasks of this day and age. Microsoft tries to make this a breeze with the PC Health Check app. After you launch the PC Health Check app, click on the ‘Backup & Sync’ banner to expand it. First and foremost, you have to be signed in with a Microsoft account. Follow the on-screen prompt if you have not signed in already.
Next, you will find the option ‘OneDrive Folder Syncing.’ Click on the ‘Manage’ button on the right of the application to manage which folders are synced to OneDrive.

Delete folders and files as you see fit.

Related: First 10 Things to Do on Windows 11
3. Manage Windows Updates
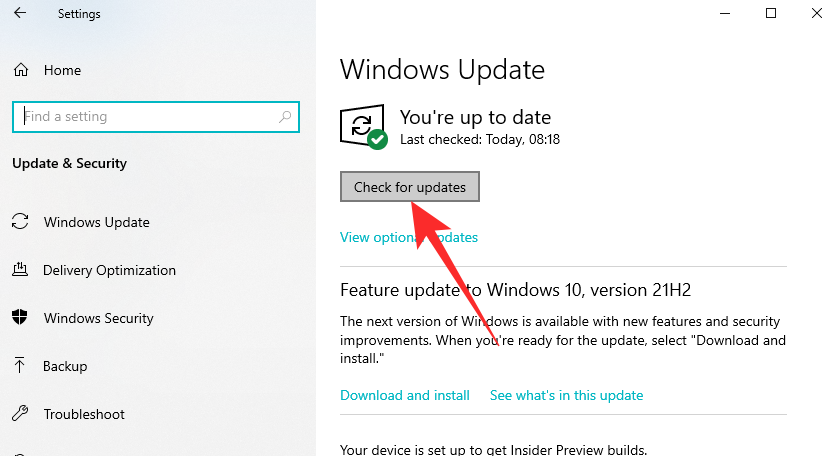
The PC Health Check app also lets you keep tabs on Windows Updates, allowing you to manage them with a couple of clicks. It tells you when your last update was installed and lets you ‘Open Windows Update’ through a hyperlink.

It is to be noted that you will not be able to turn off the Windows Update from this application. You will have to go to the dedicated Windows Update section to do that.
4. Manage your internal storage
When your computer is low on memory, most of your applications feel sluggish, which is why it is important to keep tabs on your internal storage and take the trash out from time to time. The PC Health Check app lets you check how much space you have left on your hard drive and makes it super easy to delete unimportant files. Simply expand the Storage capacity section and click on ‘Manage storage settings.’
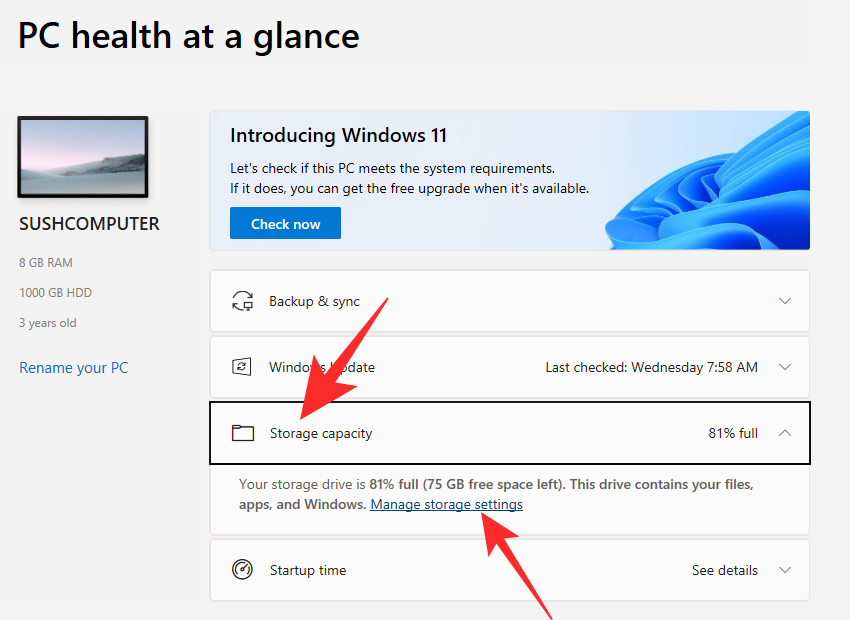
Clicking on it will show all the files, folders, videos, and temporary files on your computer.

Select the files you want to delete and click on ‘Remove files.’

Related: How to Make Windows 11 Look Like Ubuntu
5. Change programs that run at startup
Having too many applications at startup can slow down your computer significantly. So, to improve booting times, it is important to keep the startup programs to a bare minimum. The PC Health Check application knows just how important it is to manage startup programs and gives you all the right tools for it.
Click on the ‘Startup Time’ title to expand the section and then click on ‘Manage your startup programs.’

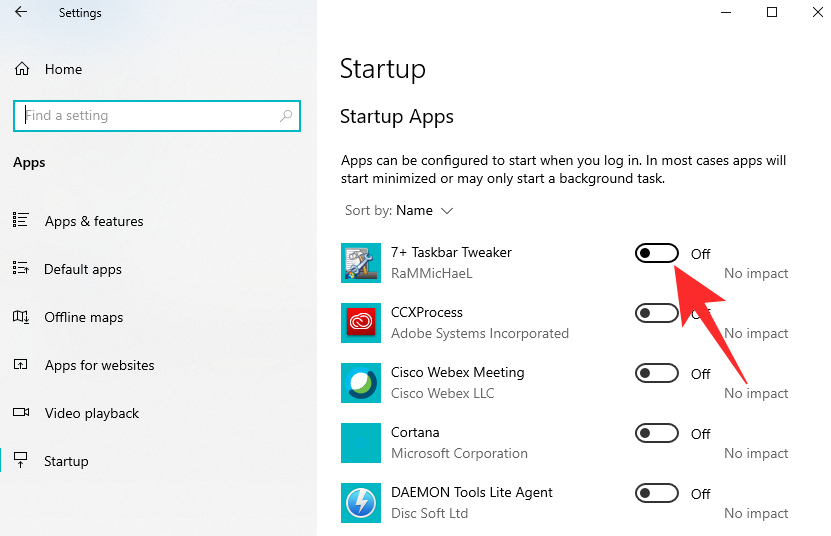
This will take you to the page that shows all the programs that are scheduled to run at startup. Pick out the applications you deem unnecessary and set the toggle to ‘Off.’
6. Rename your PC
You could also rename your Windows PC from the PC Health Check application. After running the application, simply click on the ‘Rename your PC’ hyperlink on the left of your screen.
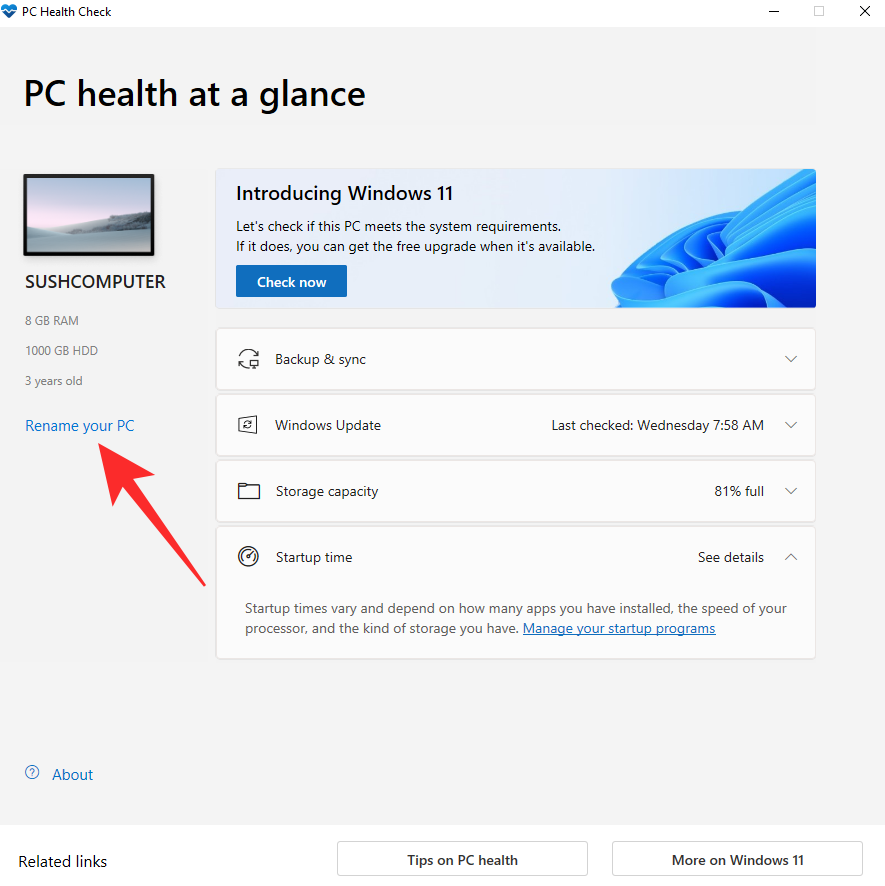
This will take you to the ‘About’ section of the Settings application. Click on ‘Rename this PC’ on the right of your screen to change your name.
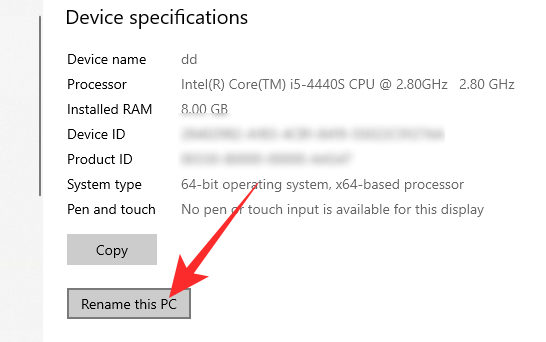
Click on ‘Next’ to change your name after a restart.
7. Check out PC Health Check tips
Microsoft’s PC Health Check application also tells you how you could make your PC feel snappier. Click on the ‘Tips on PC Health’ option at the bottom of your screen to see all the available tips.
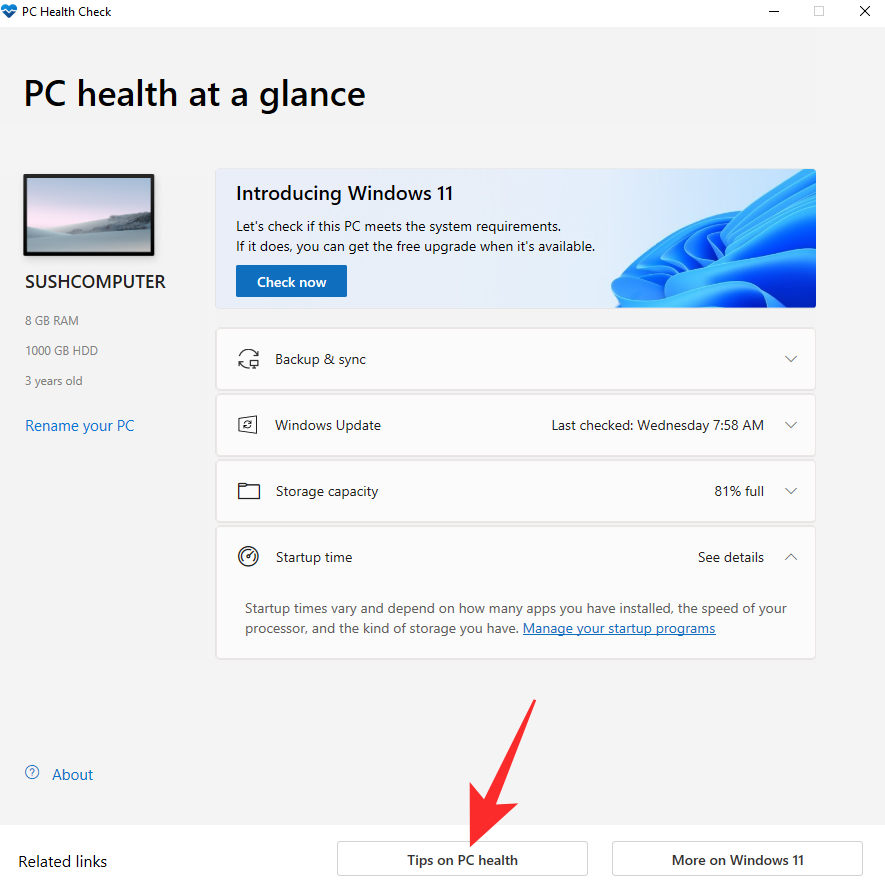
Generally, the PC Health Check application advises you to keep your PC updated, to use Microsoft Edge Browser, and to turn on Windows Defender for a safer computing experience.
Frequently Asked Questions (FAQs):
Is the PC Health Check app free?
Yes, the PC Health Check app comes free of cost. You can download it easily from this link and go on about your day. Alternatively, if you happen to have installed Windows Update version KB5005463 on your Windows 10 system, you should already have the PC Health Check app installed on your PC.
Is it mandatory to have PC Health Check app?
Microsoft has pushed the PC Health Check app through an update for Windows 10 users in October 2021. Not many users are happy with it as they consider the PC Health Check app to be unnecessary bloatware. Unless you want to keep a tab on your PC health through an app, the PC Health Check application is not mandatory. It is a free component that you can either opt for or ignore completely.
RELATED
- How to Remove Microsoft Teams Chat From Taskbar on Windows 11
- How to Get and Use Chat from Taskbar on Windows 11
- Can’t Turn on Developer Mode in Windows 11? How to Fix
- How to Get Google Play Store on Windows 11
- Fix ‘Vcruntime140.dll Not Found’ Error on Windows 11 or 10
- How to Exit Full Screen on Windows 11
- Windows 11 Update Not Showing? How to Fix
- How to Disable VBS on Windows 11 and Does it Help?
- How to Disable CSM to install Windows 11
- Windows 11: Show File Extensions Easily in 6 Ways
- How to Install and Use WSA Toolbox on Windows 11



It’s up to you how many software and apps do you want to install but If you talk about operating system It can be installed within 2 gb but you’ve to block windows updates to avoid red in disk space and If you don’t want to block it, I suggest you to upgrade Windows 10 or activate Existing Windows 11 using specific license key, For which you can go to a Microsoft store but it’ll be costly, So I recommend ODosta Store
Which is absolutely legit store and selling Microsoft genuine products with lifetime warranty.