
Windows 11 is about to be released and everybody is rushing to fix their systems to be compatible with the upcoming OS. Windows 11 has certain security requirements which make it difficult to install the OS on older systems running legacy components. A good example of this would be the need for TPM, Secure Boot, and UEFI. These are all boot menu settings that enhance privacy and security on your system allowing additional security features of Windows 11 to work properly on your system. If you’re using legacy hardware then you might have come across CSM. What is it? And should you disable it? Let’s find out!
What is CSM in BIOS?
CSM or compatibility support module is a part of your UEFI system. UEFI is a modern form of having your hardware communicate with your OS via the BIOS. UEFI is fairly new and in case you have CSM on your system you are likely using a legacy OS currently unsupported by your UEFI system.
Hence, CSM helps emulate a BIOS environment that is compatible with your current OS. Disabling CSM will allow you to enable UEFI on your system which is needed to install the most modern compatible Operating Systems.
How to disable CSM
You will need to access your system’s BIOS menu so that you can disable CSM on your system. Use the guides below depending on your manufacturer to get you started. If your manufacturer is not listed below, you can use the common terms in the next section. These are the commonly used terms in BIOS menus that allow you to disable CSM. You can find the same in your particular BIOS and disable them at your convenience. Let’s get started.
Gigabyte
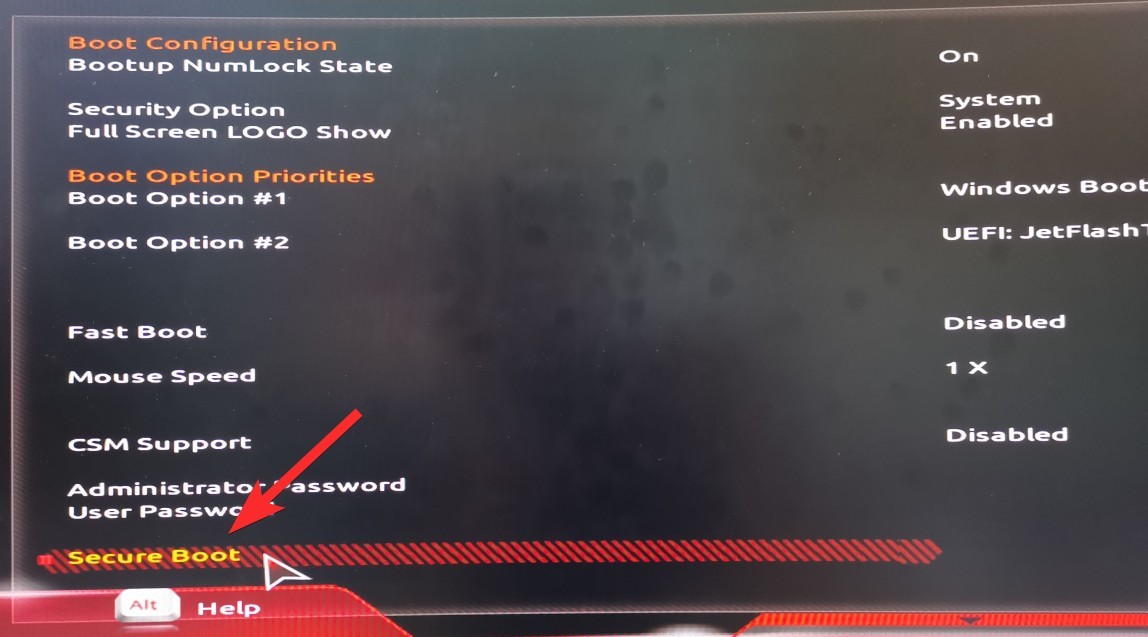
Find CSM under BIOS or Security menu depending on your motherboard, and double click on it.

Click on ‘Disabled’.

CSM will now be turned off on your Gigabyte motherboard.

You will also see the Secure boot option. But wait, you can’t enable it just yet. So, save and exit your changes and then enter the BIOS again when your system restarts.
Go to the Power menu and select Save & Exit setup.

Click Yes to save the settings and reboot the system. Be sure to press the required key again to reboot into BIOS settings again.

So, boot into the BIOS settings again by hitting the delete key or F12 key your PC uses.
Now, go to BIOS settings again and double-click Secure boot.
Select Enabled.

The BIOS screen will now show Secure Boot as enabled.

Go back to the Power menu and select Save & Exit setup.
Click Yes to save the settings and reboot the system. Be sure to press the required key again to reboot into BIOS settings again. Yes, again, as we need to enable TPM too.
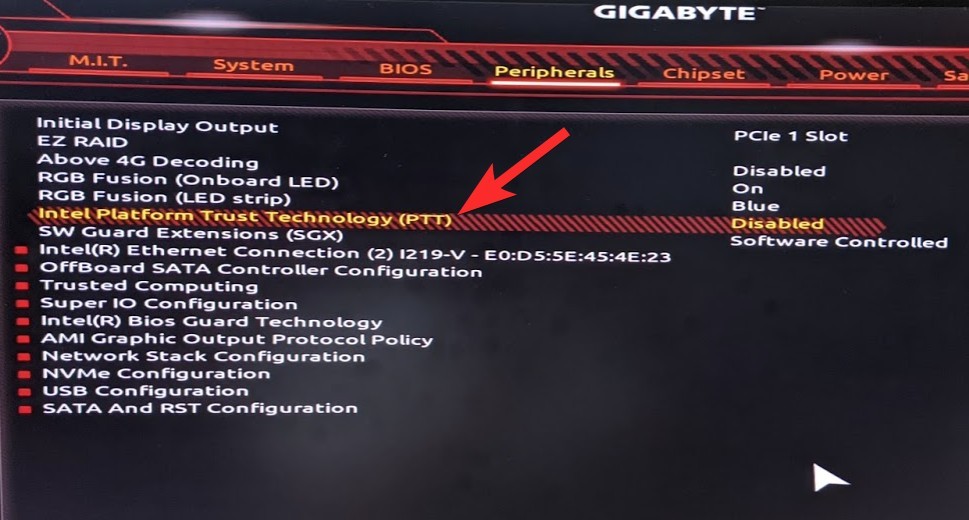
Let the PC restart but boot into the BIOS again. Go to Peripherals (that is what it is on our PC), and double-click on Intel Platform Trust Technology (PTT). You can see it is disabled right now.
Note: TPM could be under the same name as well if you are using a more recently manufactured motherboard from Gigabyte. Additionally, if you find no options, you can try looking for the common terms mentioned in the next section.
Click Enabled in the pop-up.

Now, it will show the PTT as enabled too. Meaning, TPM 2.0 is now available to your PC.

When you check in the Windows 11 health check app now, it should show Windows 11 to be compatible now.

Here is our TPM Management screen you get from the TPM.msc command. It now shows that TPM 2.0 is now available. You can

We are good to go now. Let’s save and restart and you should be able to install Windows 11 now.
Asus
Asus users can use the following guide below. If you have a pre-built system you could be using an ASRock motherboard instead. If that’s the case then we recommend you verify your motherboard manufacturer before proceeding with the guide below.
Boot into the recovery environment and enter the BIOS on your PC. You can also restart your system and hit the corresponding key to boot into your BIOS. Asus systems usually use the F2 or F8 key to boot into BIOS.
Once you are booted into the BIOS, switch to the ‘Advanced’ mode by pressing F7 on your keyboard.
Switch to the Boot tab at the top.
Scroll down and select ‘CSM (Compatibility Support Module’.
Now set ‘Launch CSM’ to ‘Disabled’.
Switch to the last tab and select ‘Save and Exit’.
Confirm your choice and let your PC reboot. You can now boot into your BIOS again and enable Secure Boot on your system. Continue with the steps below to enable Secure Boot or use this guide at a later point when Windows 11 is released to enable Secure Boot on your system.
Biostar
If you have a Biostar motherboard then you can use the following guide to disable CSM on your system.
Enter the BIOS menu on your PC. Biostar motherboards usually use the F12 key to enter the BIOS menu.
Switch to the ‘Boot’ tab once you enter your BIOS menu.
Select ‘UEFI Boot’.
Set it as Enabled.
Once enabled, reboot your system and press the F9 key to enter your Boot menu. You can now select a compatible OS to boot into. Biostar motherboards do not have a dedicated toggle for CSM. You instead get the option to enable UEFI mode. Enabling UEFI automatically disables legacy support which disables CSM on your system. If you are unable to find the UEFI option in the ‘Boot’ tab then we recommend you check the ‘Advanced’ tab instead.
ASRock
Reboot your system and boot into the BIOS menu. ASRock motherboards use the F2 key to enter the BIOS menu during the POST test.
Once you are in the Boot menu, switch to the ‘Boot’ tab by clicking on the same at the top of your screen.
Scroll down and select ‘CSM’.
Set it as ‘Disabled’.
Select ‘Exit’ at the top.
Click on ‘Save and Exit’ and let your PC reboot with the applied changes.
Once rebooted, boot into a compatible OS to continue with your setup process.
MSI
MSI users can use the following guide to disable CSM on their systems. Let’s get started.
Enter the BIOS menu on your MSI system. MSI motherboards usually use the ‘Del’ key during POST to enter the BIOS menu.
Once you are in the BIOS menu, switch to the ‘Boot’ tab at the top of your screen.
Go to ‘Boot mode select’.
Now select ‘UEFI only’.
Note: Legacy enables CSM while UEFI + Legacy allows MSI motherboards to detect and automatically use the optimum settings for your OS.
Press F10 on your keyboard to save the changes and exit BIOS. Your PC will automatically restart at this point. You can now select the desired OS or recovery drive from your boot menu. The boot menu can be entered on MSI systems by using the F11 key during the POST process.
Disable on other boards and units: Common Settings you can look for to disable CSM
If your manufacturer was not listed above then do not worry, entering the BIOS and disabling CSM is a rather simplified process. You need to keep in mind that enabling UEFI will disable CSM automatically and vice versa. This means that if you don’t find a dedicated toggle for CSM, then you can look for the option to enable UEFI on your system instead. Additionally, your motherboard manufacturer could be using other terms to denote CSM on your system depending on your manufacturing date. Here are some common settings that essentially refer to CSM on your motherboard. When you find either of these options, you need to select either ‘Off’, ‘Disabled’, ‘UEFI’, ‘UEFI only’, or ‘No Legacy Support’ for them. Refer to the list below to find the desired CSM settings in your BIOS menu.
- Legacy Support
- Boot Device Control
- Legacy CSM
- Launch CSM
- CSM
- UEFI Boot
- Legacy Boot
- Boot mode
- Boot option filter
- UEFI Priority
- Legacy Boot Priority
We hope this guide easily helped you disable CSM on your system. If you face any issues, feel free to drop some comments below.
Why can’t I find CSM? What do I need?
You need to access your BIOS and have a compatible OS ready to install on your system to disable CSM. CSM usually has a convenient toggle in the BIOS settings which can help you turn it off. Once turned off, UEFI support will be enabled on your motherboard and you will need a compatible OS and BIOS version to manage your system. Additionally, ensure that you have gone through the following checks to ensure that you do not face any issues once you have disabled CSM.
Ensure that you have a compatible OS installed: If you are using a legacy OS then it is likely why you need CSM. We recommend you install a compatible OS ie: Windows Vista or higher on your system to ensure that you can exit the boot environment properly once CSM is disabled.
Ensure that you have compatible hardware: You could be using all modern components on your system and yet face issues when disabling your CSM. Peripherals matter a lot when POSTing your PC hence ensure that you aren’t using legacy components or peripherals with your system, If you’re using an older graphics card, monitor, CPU, mouse, or keyboard, then it could be also the reason why your PC is using CSM instead of UEFI despite being on Windows 10. You might need to upgrade your peripherals before you can disable CSM on your PC without breaking its functionality.
Ensure that your drives use the GPT partition table instead of MBR: UEFI and CSM go hand in hand. If either one is disabled, the other one is automatically enabled (with exceptions). This means that when you disable CSM, your BIOS will automatically resort to UEFI. However, UEFI is only compatible with GPT partition tables. This means that you will need to convert your hard drive to MBR if you wish to disable CSM. It won’t matter if you have a compatible OS installed on an MBR drive. You will need to format your drive in most cases when converting it hence we recommend you perform a full backup before proceeding with the guide.
Ensure that your drives are set up properly: If you are trying to install a new version of Windows to a different drive or wish to dual boot then ensure that you are installing the compatible OS on your drive with the ‘Bootloader’ partition. This will prevent your system from facing mismatched partition table issues where a drive is MBR and the other one is GPT.
Use the guides below to disable CSM on your system. This will help you prepare for the upcoming Windows 11 release.
RELATED:
- Fitness App Not Working on iPhone 13 or iOS 15: How to Fix (nerdschalk.com)
- Tap to Wake Not Working on iPhone 13 or iOS 15? How to Fix (nerdschalk.com)
- What does Background App Refresh mean on iOS 15 on iPhone? (nerdschalk.com)
- Does Live Text Work on iPhone 6, 7, 8, X, and XS? (nerdschalk.com)
- Apple Pay Not Working on iOS 15? How to Fix in 5 Ways (nerdschalk.com)


4 responses to “How to Disable CSM to install Windows 11”
Thank you very much for this useful guide!!!
I was just to change the bios options but then i found the important information my boot-drive have to be “GPT”. I think this information is very important, so the “What do I need?” section should be the first any user should read in your guide.
You have a typo:
“However, UEFI is only compatible with GPT partition tables. This means that you will need to convert your hard drive to MBR if you wish to disable CSM. ”
It should be:
“…you will need to convert your hard drive to GPT..”
Thanks again for you useful guide, i will change my disk to GPT (there is a new Tool MBR2GPT.exe from Mircrosoft to convert the drive, even if you have allready partitions/data on the disk) and then i will disable CSM.
thank you for this great article.
it all works exactly as described above, except that when I disable CSM, both of my SSD hard disks ( a seagate and a Kingston ) are not recognized any more, and the PC reboots and automatically goes to the BIOS.
Any idea?
My CSM was enabled while TPM and Secure Boot were disabled, I have fixed everything, got all greens WhyNotWin11 and checked with msinfo32 and TPM.msc – all requirements are met but both the watermark near the system clock/notification area and the one in the system settings are still there, why would the system not rescan and disable those now false notifications?
I have ASUS PRIME H510M-E Motherboard with i3-10100 (10th Gen.). CSM is greyed out (disable / enable is inactive). Problem is that I am unable to install Windows 10 via Bootable USB created using RUFUS tool with GPT partition and UEFI mode (FAT32) even after making my evey best effort to adjust options in BIOS.
Kindly suggest to troubleshoot.