Windows 11 has just been released to the public and it seems to be enticing a lot of new users. Many users have jumped the ship and have upgraded to Windows 11 while others are looking to take the leap right away. If you are in the same boat, then sadly, you might have realized that Windows 11 still has its TPM and Secure Boot requirements.
What’s more, is that a new bug going around with the media creation tool and Windows update is preventing compatible users from updating to the new Windows 11. If you’re facing the same issue then here’s how you can fix it on your PC.
- This PC doesn’t currently meet all the system requirements for Windows 11″ error: Why are you seeing this on a compatible system?
-
5 Ways to fix the “This PC doesn’t currently meet” error when installing Windows 11
- Fix #1: Make sure you are meeting all the requirements
- Fix #2: Use an alternative way of upgrade
- Fix #3: Disable CSM in Boot menu or Ensure UEFI is enabled
-
Fix #4: Install Windows 11 on Unsupported systems using MCT.bat script
- 4.1 – Download the script
- 4.2 – Bypass checks when updating to Windows 11 from Windows 10
- 4.3 – Bypass all checks on Windows 11 ISO
- 4.4 – Bypass all checks on Windows 11 USB drive
- 4.5 – Bypass checks on an already created USB or ISO for Windows 11
- 4.6 – Bypass checks when installing feature updates in Windows 11
- Fix #5: Install Windows 11 on Unsupported systems using the registry bypass hack
This PC doesn’t currently meet all the system requirements for Windows 11″ error: Why are you seeing this on a compatible system?
If you’re facing this issue on a system that passes the PC Health check app test from Microsoft then you are likely using the media creation tool or Windows update to update your PCs.
This is a known issue that has been acknowledged by Microsoft and a fix for the same is underway. Users are randomly affected by this error on Windows 10 when using either the Windows Update tool or the Meda Creation tool to directly update your PC from your local storage.
In such cases, you can use the fixes mentioned below to solve your issue.
5 Ways to fix the “This PC doesn’t currently meet” error when installing Windows 11
You can use the following ways to fix this error on a compatible PC. We recommend you try the first fix as that seems to fix the issue for most users.
If using a different upgrade tool does not solve your issue, then you can move to the subsequent fixes mentioned in this guide. Let’s get started.
Fix #1: Make sure you are meeting all the requirements
- Ensure that you are on Windows 10 v2004 or higher.
- Ensure that you meet the basic requirements for installing Windows 11 on your system.
- Ensure that you have at least 9GB of free disk space on your system so that you can download Windows 11 on your local storage using the Assistant.
- Ensure that you run the Installation Assistant as an administrator.
- Processor: 1GHz or faster with 2 or more cores.
- RAM: 4GB or higher
- Graphics: DX12 compatible with WDDM 2.0 driver
- Disk Space: 64GB free space on the drive you want to install Windows 11 on
- System: UEFI, with Secure Boot
- TPM: 2.0 or higher
- Display: 720p @ 8bits or higher
Why is this important? Well, because small issues may remain unattended sometimes.
See the screenshot below for example.
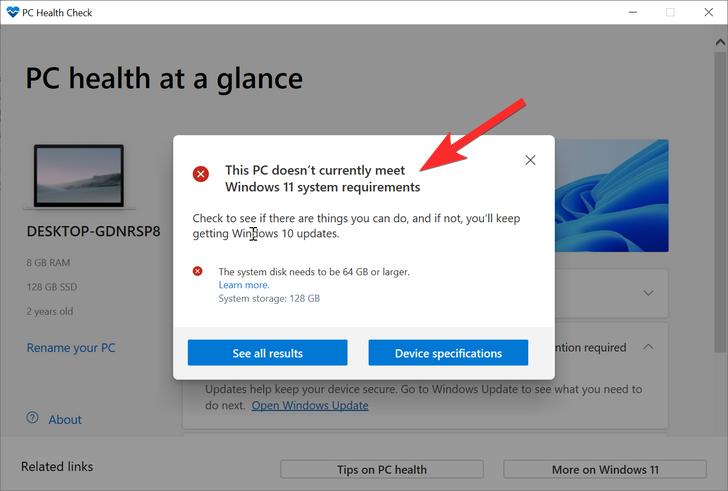
The drive on which we were installing Windows 11 had only 53 GB of total space. This didn’t meet Windows 11 requirement. Once we increased the size of that disk, we were able to fix this issue.
So, do review the Windows 11 requirements again.
Fix #2: Use an alternative way of upgrade

As the issue is prevalent when using the Media Creation tool or Windows update, the known fix is to simply use another upgrade method from Microsoft.
We recommend you start with the new Installation Assistant from Microsoft which is a dedicated utility developed to help you easily upgrade from Windows 10 to Windows 11.
You can use this comprehensive guide from us to use the Installation Assistant to update your OS directly. You will need a working internet connection to update using the same.
Read: How to Use Windows 11 Installation Assistant to Upgrade From Windows 10
If Update Assistant doesn’t seem to fit your requirements or if it presents you with the same error, then we recommend you use a Windows 11 ISO instead. Microsoft has also released dedicated ISOs for the new OS and you can upgrade using the same by following this guide.
Read: How to Download and Install Official Windows 11 ISO

CSM or compatibility support module is a BIOS environment that helps your OS communicate with your hardware when using older Operating Systems that do not support UEFI.
CSM creates a compatible legacy environment where your OS can properly operate on your new hardware. However, if you’re installing Windows 11 then this won’t work for you as you will need to have UEFI enabled on your system.
A big issue with such systems is the fact that you can’t boot into your currently installed OS with UEFI enabled on your system. Hence if you have such a system, then we recommend you create a bootable USB for Windows 11 using this guide and then enable UEFI on your system. Once enabled, boot into your USB drive and then upgrade your PC to Windows 11.
Read: How to Disable CSM to install Windows 11
Fix #4: Install Windows 11 on Unsupported systems using MCT.bat script
You can also install Windows 11 on an unsupported system. We recommend you use the .bat script if you are unable to meet any requirements however, if you manage to meet the basic requirements then we recommend you use the registry hack instead. This is the official way recommended by Microsoft to get past the Windows 11 requirements and get it installed on your PC. Follow one of the guides that best suits your current needs and requirements.
A new script has been released for the community which makes upgrading, updating, and installing Windows 11 on unsupported hardware much easier. All processes to bypass checks are automatically carried out in the background and the script has a nifty GUI to help you through the process.
Lately, Microsoft blocked the original workarounds used to bypass checks for Windows 11 but this script still works as intended, and here’s how you can use it to your advantage depending on your situation.
4.1 – Download the script
You will need the MediaCreationTool.bat archive that contains all the necessary tools to help you upgrade. You can download the same by visiting the link below in your favorite web browser.
Once the Github page is open on your screen, click on ‘Code’ on your left and select ‘Download ZIP’. The archive will now be downloaded to your PC and we recommend extracting it in a convenient location that best suits your needs. Once done, you can follow one of the relevant guides below depending on your current situation.

Note: While the script is creating new media or upgrading your PC, it will need the official Windows 11 ISO which will be automatically downloaded in the background. However, this will take some time and you might have to wait for an hour or so depending on your network speeds.
- MediaCreationTool.bat | Download Link
4.2 – Bypass checks when updating to Windows 11 from Windows 10
Open the MCT.bat folder that we extracted earlier and run the ‘MediaCreationTool.bat’ file by double-clicking on the same.

Click on ‘Run’ once you are prompted.

A command window, as well as a Powershell-based GUI, will now launch on your system. Click and select ’11’ from the OS list on your screen.

Now click on ‘Auto Upgrade’.

And that’s it! You can now sit back and relax as the process is carried out in the background. The script will automatically download the necessary ISO on your system and launch the setup while applying the necessary patches in the background. You can then simply continue with the setup as intended and automatically upgrade your PC to Windows 11.
4.3 – Bypass all checks on Windows 11 ISO
Here’s how you can create an already patched ISO for Windows 11 that will bypass all installation checks so that you can install the OS on unsupported hardware.
Launch ‘MediaCreationTool.bat’ by double-clicking on it from the archive we extracted earlier.
Now click on ’11’.
Select ‘Make ISO’.

Let the process continue and the background and the script will automatically create a patched ISO for you in the ‘Downloads’ folder.
4.4 – Bypass all checks on Windows 11 USB drive
If you wish to create a Windows 11 USB then use the guide below to get you started.
Plug in your desired USB and format it once to delete all the data stored on it. Now launch the ‘MediaCreationTool.bat’ script from the archive we extracted earlier by double-clicking on the same.
Click on ‘Run anyway’ when prompted’.
Now click on ’11’.
Click on ‘Make USB’.

Note: Ensure that you have only the concerned USB connected to your PC or the tool can end up selecting the other one on your system.
Now simply sit back, relax and let the process continue in the background. You can track the progress for the same in the command window on your screen.
4.5 – Bypass checks on an already created USB or ISO for Windows 11
If you have already downloaded the ISO or created a bootable USB for the Windows 11 setup, then we recommend you use the guide below instead. This way you won’t have to download the ISO again when using the MediaCreationTool.bat script on your PC. Let’s get started.
Navigate to the archive we extracted earlier and open the folder named ‘bypass11’.

Now double click and run the ‘Quick_11_iso_esd_wim_TPM_toggle.bat’ file.

You will now be shown a command window that is unable to find your ISO or USB stick. Do not fret, we needed to open this window to add the script to your right-click context menu.

Now navigate to the desired ISO and right-click on it. If you have a Windows 11 USB drive, then open the drive, open the Sources folder, and right-click on ‘install.wim’ instead. Click on ‘Show more options’.

Now select ‘Quick_11_iso_esd_wim_TPM_toggle.bat’ from the ‘Send to’ context menu.

The script will now automatically patch the selected ISO or USB drive. Once patched, you can launch the Windows 11 setup as intended and continue with the upgrade to your PC.
4.6 – Bypass checks when installing feature updates in Windows 11
If you already bypassed checks and installed Windows 11 on your PC then you might be disappointed to know that new feature updates are actively blocked by Microsoft on unsupported hardware. Thankfully you can use this script to bypass these checks as well and install feature updates to your system. You can use the guide below to get you started.
Navigate to the extracted archive and open the folder named ‘bypass11’.

Now double click and launch the script ‘Skip_TPM_Check_on_Dynamic_Update.cmd’.

Confirm your choice to get past UAC.

Hit a key on your keyboard when the PowerShell window launches and you are prompted for the same. The disclaimer at the top should be green in color when you first run the script.

The changes will now be automatically applied to your PC. You can now upgrade your system as intended. We recommend you revert the changes made by this script once you have updated your system.
To revert the changes, double click on ‘Skip_TPM_Check_on_Dynamic_Update.cmd’ again. This time the disclaimer should be in red at the top. Simply hit a key on your keyboard to revert the changes made to your system.

The script will automatically close once the necessary changes have been reverted to your system.
And that’s it! You can now continue using your PC as intended without any issues.
Fix #5: Install Windows 11 on Unsupported systems using the registry bypass hack
If you meet all the basic requirements for Windows 11 then you can install Windows 11 by bypassing TPM and Secure Boot requirements.
Windows allows you to do this officially while warning you that you will be vulnerable to security threats.
Not much information is available for the same but for now, it seems that you will miss out on all security and privacy updates from Microsoft in the future if you opt to do so.
To do this, youneed to disable the system check in the refgistry for TPM and Secure Boot.
Note: This hack involves editing your registry values which is why we recommend backing up the same before proceeding with the guide.
Now, let’s see how to do this.
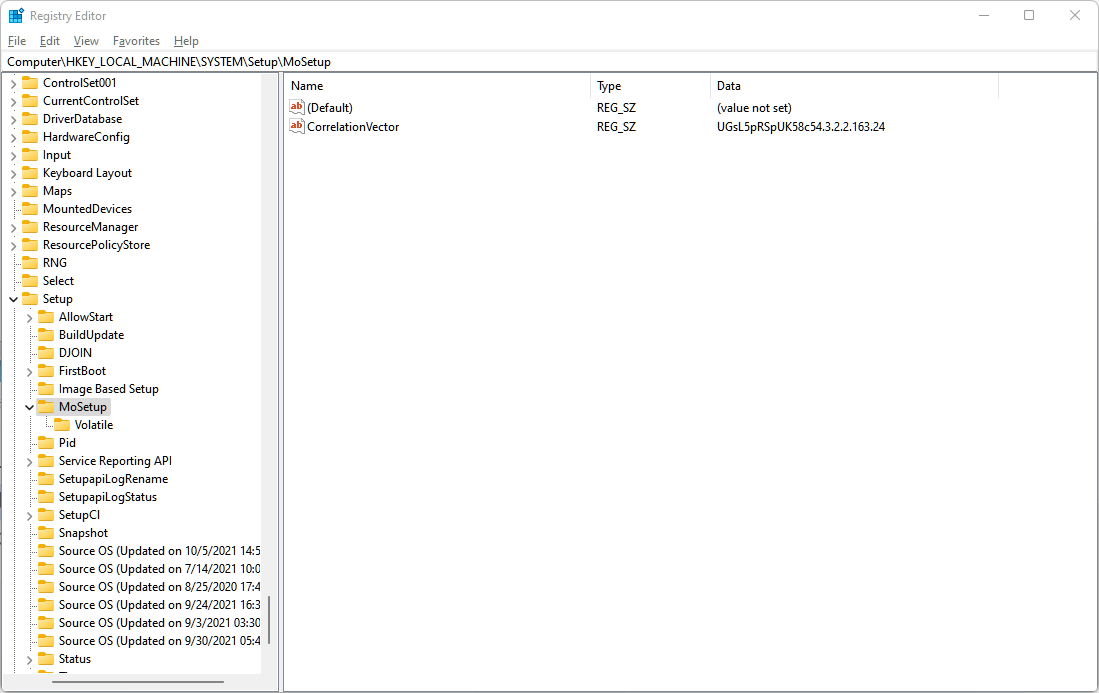
Open the Registry Editor and go to this address:
HKEY_LOCAL_MACHINE\SYSTEM\Setup\MoSetup
Here, create a new DWORD (32-bit) Value called AllowUpgradesWithUnsupportedTPMOrCPU. Now, double-click on the new Value to edit it, and replace Value data from 0 to 1 and then click OK to save it. Check out the GIF below for help.
Next, restart your PC and then try to install Windows 11 now using the Windows 11 Installation Assistant. Else, you can also use the Windows 11 ISO file.
The method above is the best one really, as even Microsoft themselves suggested it. However, if you fear editing a registry file, then you tweak the Windows 11 ISO file to disable it from checking the Secure Boot and TPM requirements and install the Windows 11 upgrade right away.
All you need to do is install Windows 11 using the ISO file provided by Microsoft but removing the appraiserres.dll first inside it.
See the link below.
Related: Install Windows 11 on Unsupported PC Without TPM and Secure Boot
We hope this guide helped you get familiar with the new incompatibility error faced when installing Windows 11. If you have any more questions, feel free to drop us a comment below.
Related:
- How to Fix Windows 11 Right Click Menu to Show More Options Like Windows 10
- ‘Secure Boot Can Be Enabled When System in User Mode’ issue: How to Fix
- How to Upgrade to Windows 11 in 3 Easy Ways
- How to Disable VBS on Windows 11 and Does it Help?
- How to Ungroup Icons on Windows 11 Taskbar With a Registry Hack


15 responses to “How to Fix “This PC Doesn’t Currently Meet All the System Requirements for Windows 11” Error”
Your article is very useful, the content is great, I have read a lot of articles, but for your article, it left me a deep impression, thank you for sharing.
I do not want to install Windows 11.
Is there a way to remove the notification?
why not and just click the x in the right
There is a white X in a red circle next to it but it is not clickable.
crap bullshit site dont use info dont exist
Windows 11 has many new features so you can format windows 10 and install clean windows 11 but it may delete your data and setting so you should upgrade from old OS to new windows 11 operating system for which you need to buy a license for windows 11 activation and I recommend you to buy it from ODosta Store, which is a legit store.
Your article is exceptionally helpful, the substance is extraordinary, I have perused a ton of articles, yet for your article, it had me a profound impression, thank you for sharing.
I have an Intel i7 7700 cpu and the PC health check says its not supported for windows 11……I checked the Microsoft site for a list of compatible cpu’s and mine is listed as compatible, so why cant I update to windows 11????????
Turned out my CSM was enabled and secure boot and TPM were disabled. I have Win11 already installed since the beta. Now I am wondering, because the “your system does meet the Win11 req…” on top of the clock/notification bar is still there but fixed everything that caused the issue? How do I get Windows11 to rescan this?
Thank you for this. With your instructions my PC is now fixed! Cheers
This is a host of information that should accommodate many users with PCs that do meet the requirements for Windows 11 upgrade. Great job!
Although my Intel i5 is listed as Win11 compatible, I can’t install it. Any ideas why? Thanks
Windows 11 is not working for me. Maybe it’s time to go back to XP
Very good helped a lot 🙂
Amazing article, unfortunately of zero assistance to me, I have the unique issue of having not been able to upgrade despite meeting all specifications, it seems my processor, while having double the needed requirements, simply is not compatible with Windows 11.