The heroes who use the early Windows 11 builds have come across plenty of features and bugs, which we have covered extensively. Today, we will be taking a look at a new issue that is making life difficult for early adopters. Let’s talk about whether Windows 11 have ads and if yes, how you could get rid of them.
Does Windows 11 have ads?
Windows 7 was one of the last major operating systems to not have ads. With Windows 10, Microsoft adopted an ad-first policy, which pushed ads for first-party products without warning. It even sneakily showed “Upgrade to Windows 10” ads to Windows 7 and 8.1 users, nagging them into installing the latest version of Windows OS. The system is not going to change with Windows 11.
So, yes, if you come across ads every now and then while running chores in Windows 11, do not be alarmed. They are inserted by Microsoft themselves and are supposed to nudge you towards their services.
That said, you wouldn’t see ads like the ones you see all over the web. After all, it’s a paid product, not freeware or freemium.
Related: What Windows 11 Services to Disable Safely and How?
What type of ads are displayed and where?
As of now, Microsoft is sticking with first-party ads — promoting services that are created by the developers at Microsoft. You can find these ads under Start Menu, see them pop as us notifications, and you might even see them occasionally on your taskbar.
Since Windows is not pushing ads for third-party software at this time, we can still overlook the breach of sanity that is taking place in the latest Microsoft Operating System. However, Microsoft could very well switch sides in the future and start pushing real advertisements, as we are seeing in mobile devices.
Related: How to Clean Registry on Windows 11 [4 Ways]
Are ads making Windows 11 unstable?
This is where things get a little dicey. As per numerous reports, Windows 11 has been crashing incessantly due to the Start menu and taskbar ads. The affected parties have seen their entire system become unresponsive and could not even save their current tasks. Having an ad is the least of our concerns at the moment. However, seeing the Windows 11 shell crumble under such conditions is hardly encouraging.
Since ads are integrated into the fabric of Windows 11, unpredictable behavior can put your browsing sessions at risk. Microsoft has taken note of the situation and should find a solution before the public build goes live in a few weeks. For the time being, it is best to learn about the coping mechanisms.
How to disable ads on Windows 11
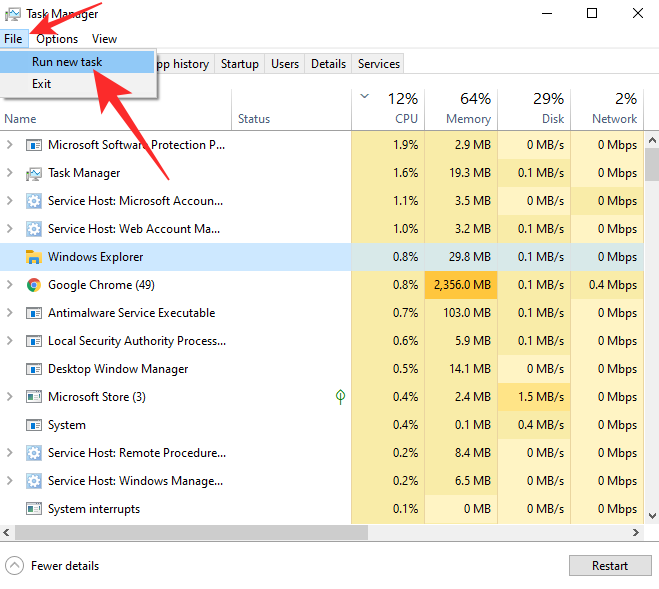
Love Windows 11 and wish to turn off the ads instead? You could look to disable the registry entry responsible for the pesky ads. You will need to run a task through the Task Manager that will kill the ad service responsible for the crashes. First, run the Ctrl + Alt + Del command to call upon the task manager. Now, click on the ‘File’ tab at the top and click on ‘Run new task.’
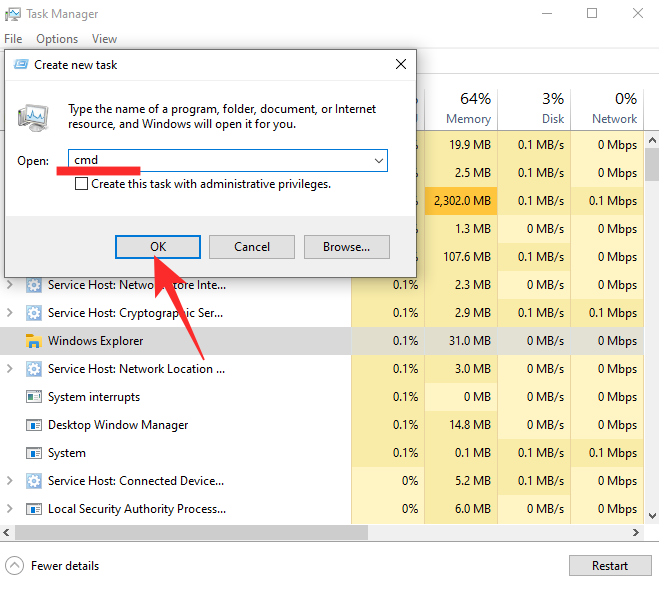
Next, it will open Run. Write cmd in the text field and hit ‘Ok.’
Then, run the following command:
reg delete HKEY_CURRENT USER\SOFTWARE\Microsoft\Windows\CurrentVersion\IrisService /f && shutdown -r -t 0
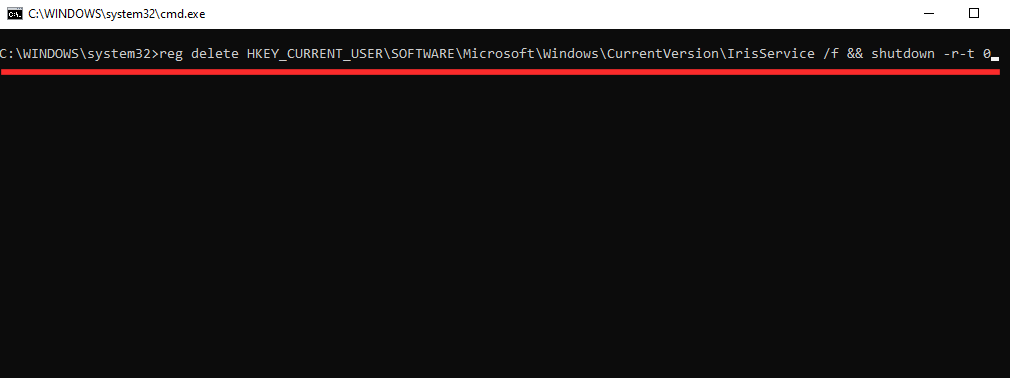
And hit enter. If all goes to plan, your PC will restart and the ads will be gone for good.
If there is something that is causing the start menu to not work in your Windows 11, then try the tips given below:
Check out: How to Fix ‘Windows 11 Start Menu Not Working’ Issue?
What should you do if your Windows 11 keeps crashing?
If your computer crashes even after trying the fixes given above, then here are the things you should do.
1. Restart Windows Explorer
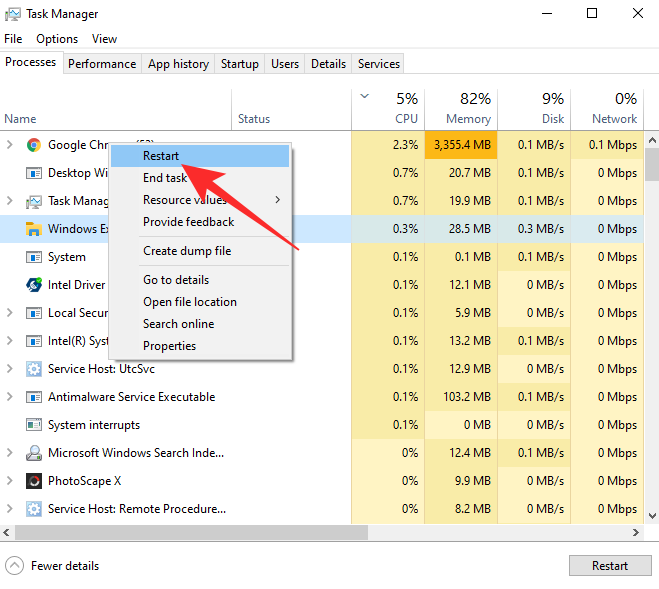
When an ad brings your Start menu or taskbar down, the first course of action should be to reset Windows Explorer. Since both, the Start menu and taskbar, are part of the Windows Explorer suite, you can restart the Explorer to get the two back in working condition. To restart Windows Explorer, first, you will need to access Task Manager. Hit Ctrl + Alt + Del to invoke the Task Manager. Next, locate the Windows Explorer application and locate the ‘Restart’ button at the bottom-right corner of the screen.
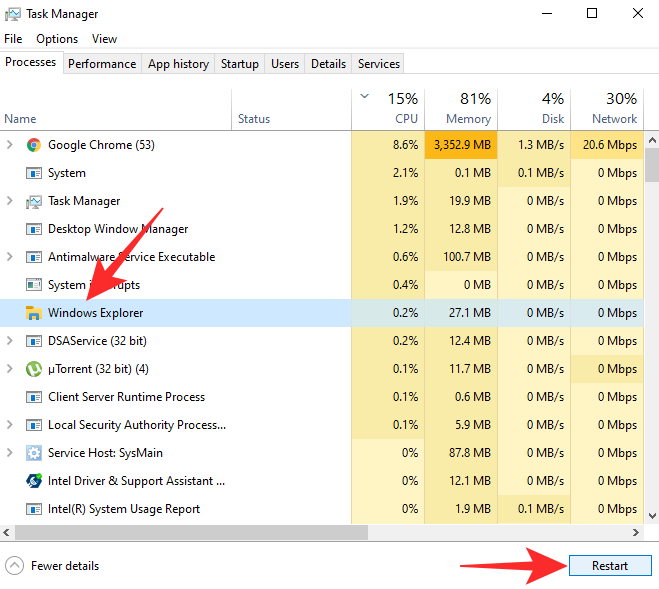
Click on it to restart your Windows Explorer. The screen might flash when you do so, but rest assured that all is being taken care of.
Alternatively, you could right-click on ‘Windows Explorer’ in Task Manager to access its options. Then, all you have to do is click on ‘Restart’ from the resulting pop-up menu.
That is it!
2. Restart Windows
If restarting Windows Explorer does not do the trick, you will have to restart the entire system to get things back in working condition. After you restart, the crashes related to ads should be gone but the files you were working on might also take the hit.
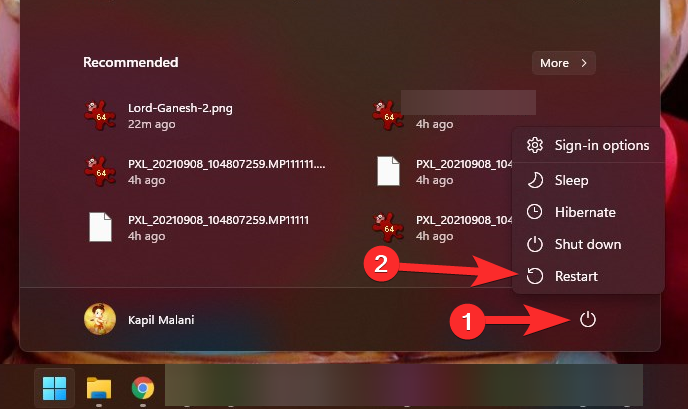
Press the Windows key (Win) on your keyboard to open the Start menu, or click the start menu button for this. Next, click the Power button in the bottom right of the start menu. Now, click Restart.
Alternatively, press Windows key + X on your keyboard together, and then press U (or click “Shut down or sign out”), and then press R (or click Restart).
3. Go back to Windows 10 and wait for the public release of Windows 11
Microsoft will release the stable build of the Windows 11 Operating System on the 5th of October, which is less than a month away. Currently, Windows 10 is available as a public beta, but not without its fair share of bugs. As we have seen, the ad issue is pretty difficult to circumvent, and it is unlikely to be rectified in the next few days in the beta build. However, in the final build, Microsoft will do its best to resolve all known issues and make it as smooth as possible for the end-user.
If you cannot do without a Windows PC, we would recommend you to go back to Windows 10 and get your Windows 11 copy later. It will be available as a free upgrade nonetheless and Microsoft will leave no opportunity to get you to their new invention.
Luckily, Windows 11 comes with an official roll-back program that will keep your files but take your system back to Windows 10. The only catch is that you have to make it work within 10 days of upgrading to Windows 11.
If you miss the mark for some reason, you will have to download the Windows 10 ISO or installer from Microsoft and get to work. Click on this link to get the Windows 10 media creation tool or to download the ISO file. Click on the article below to learn all about downloading and installing an ISO from Microsoft.
RELATED


