Audio output and input require specific drivers and services to work as intended on Windows 11. These can sometimes end up facing bugs in the background which can lead to audio issues like no audio output, missing audio devices, distorted audio, and more.
If you too have been having an issue with audio services failing to respond on Windows 11, then here’s how you can fix it on your PC. Let’s get started!
How to fix audio services not responding on Windows 11
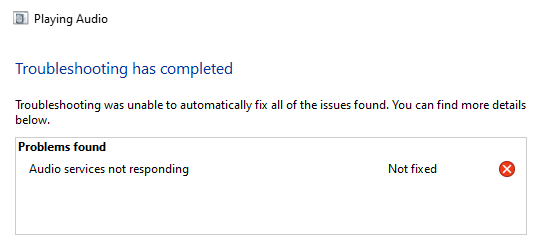
We recommend you start with the fixes mentioned below and make your way through the list until you manage to fix your issue. Audio services can fail to respond due to several reasons on Windows 11.
This list will help you verify and fix most issues that stop audio services from responding on Windows 11. Follow the relevant sections below to help you along with the process.
Related: How to Screen Record on Windows 11 With Audio
Method 1: Restart audio services
You could be facing a one-time bug where the audio service has simply failed to launch on your PC. You can fix this by simply restarting the audio service on your Windows 11 system. Follow either of the methods below to restart audio services on Windows 11.
1.1 – Using command prompt (CMD)
Press Windows + R to launch Run.
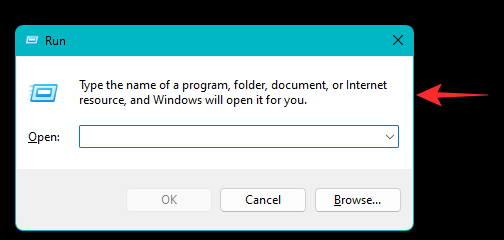
Now type CMD in the RUN window and then press Ctrl + Shift + Enter to open the command prompt with admin privileges.
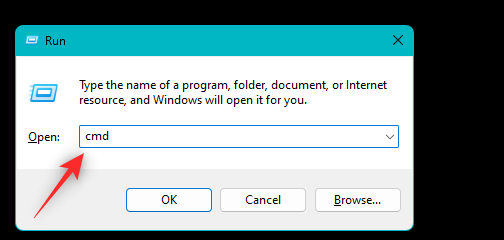
Now use the following command to stop audio services on Windows 11.
net stop audiosrv

Once done, use the following command to launch and start the audio service again.
net start audiosrv

Now use the following command to restart the Windows Audio Endpoint Builder service.
net stop AudioEndpointBuildernet start AudioEndpointBuilder
Confirm your choice by pressing Y when prompted.

Note: Restart the Windows Audio service using the command we used previously when restarting Windows Audio Endpoint Builder.
Similarly use the following command to restart the Plug and Play service on your system.
net stop PlugPlay

net start PlugPlay

Use the following command to close CMD once done.
exit

And that’s it! You will now have restarted the audio service on Windows 11 using CMD.
1.2 – Using Windows Services
Open the Start menu, search for Services and launch the same from your search results.

Services will now open up on your screen. Find and right-click Windows Audio from the list on your screen.

Select Restart.
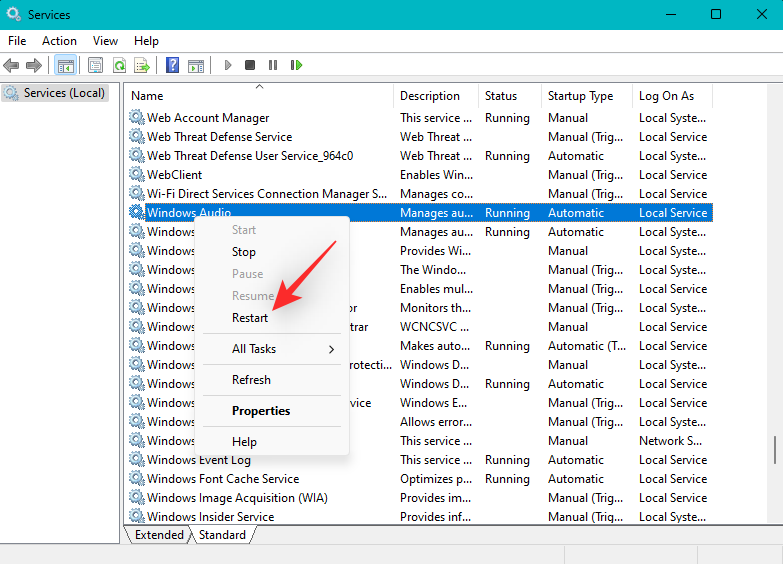
Windows Audio service will now be restarted. While you’re at it, we recommend you restart the Windows Audio Endpoint Builder as well.

Finally, restart the Plug and Play service using the steps above.

And that’s it! You will now have restarted Audio services on your PC.
Related: How to Set the Default Audio Device on Windows 11
Method 2: Using Audio troubleshooter
Windows troubleshooters have come a long way and can now help fix most issues with your system. We recommend you now try running the audio troubleshooter to see if that fixes the issue for you.
Press Windows + i to launch the Settings app. Now click Troubleshoot on your right.
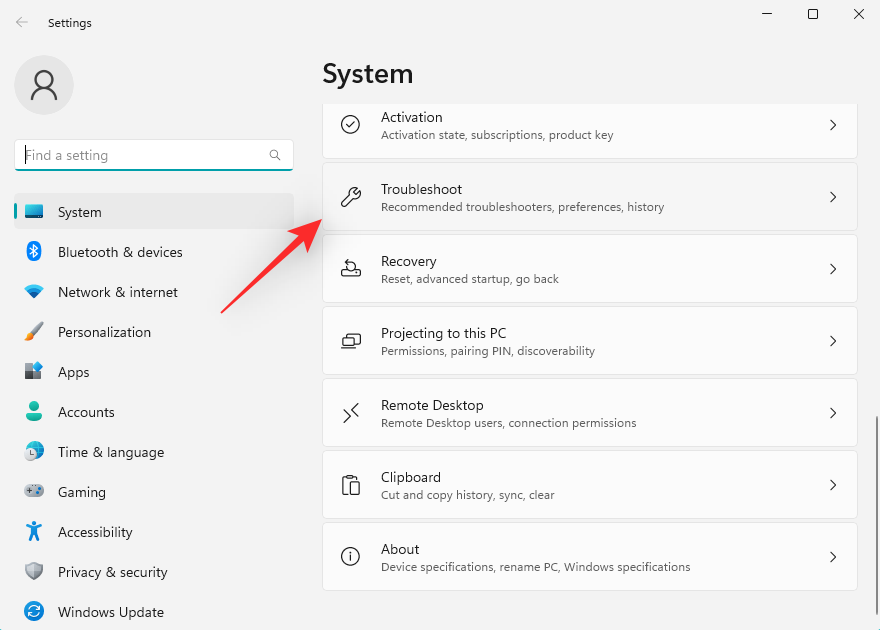
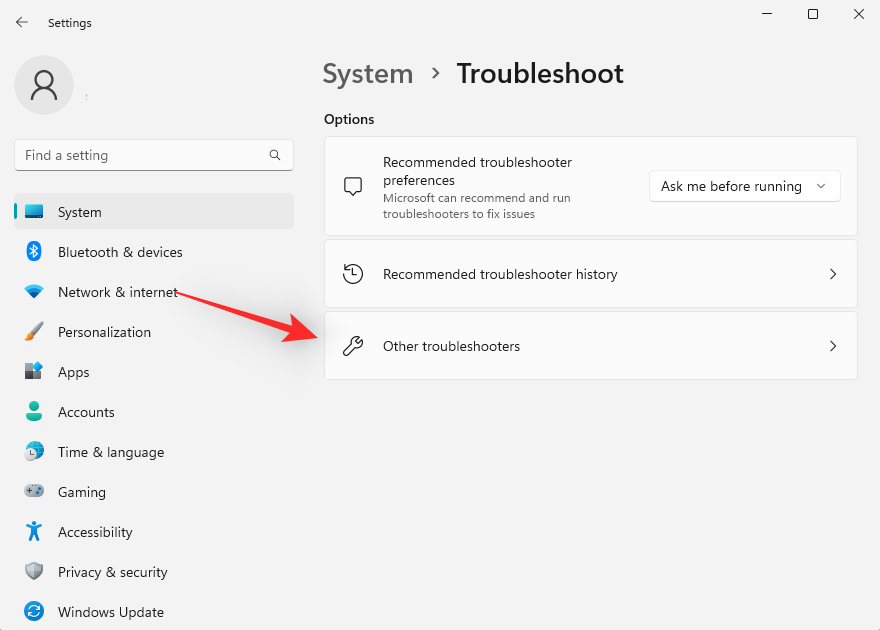
Click Other troubleshooters.
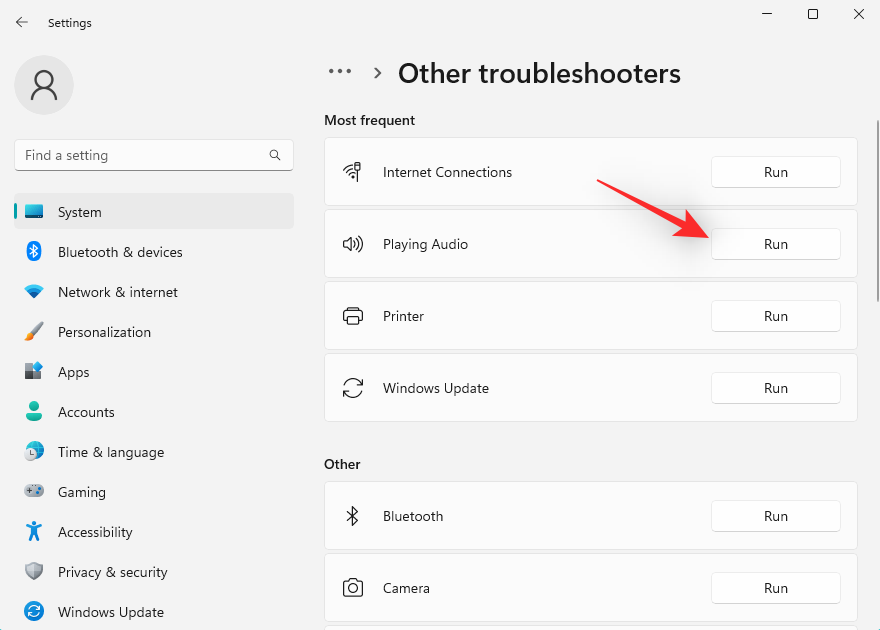
Click Run beside Playing Audio.
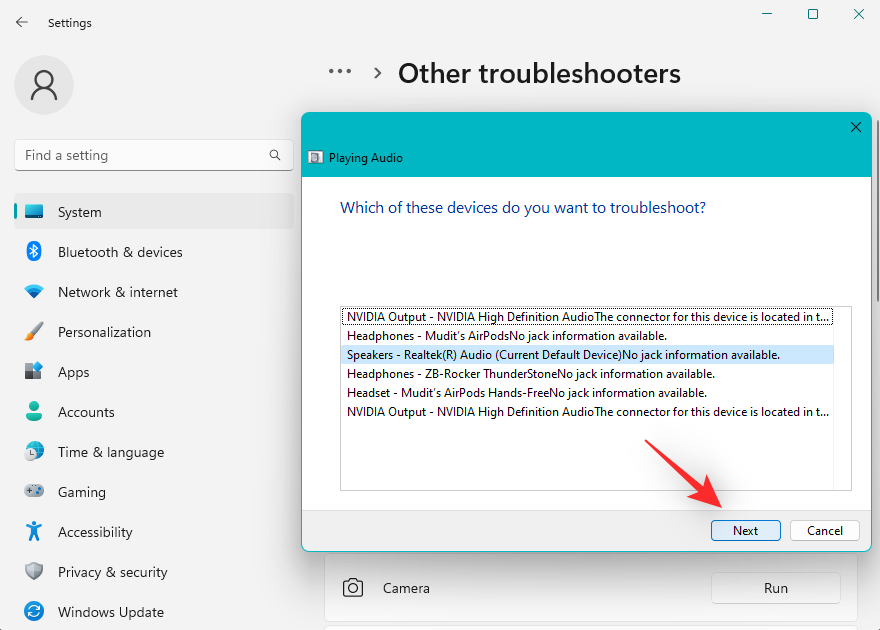
The troubleshooter will now scan your system for errors relating to audio devices. If you have multiple audio devices installed on your PC, you will be asked to select the device experiencing issues. Click Next once done.
Windows will now detect issues with the selected device and suggest appropriate fixes. Follow the on-screen instructions to apply the suggested fix based on the selected audio device.
Once done, click Close.

We now recommend you run the following troubleshooter as well.
- Recording Audio
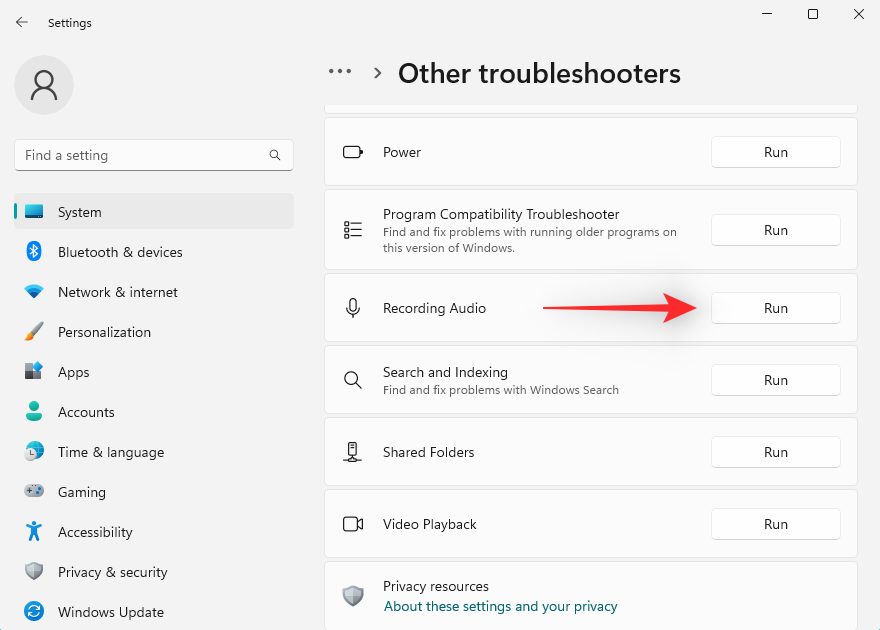
And that’s it! We recommend you restart your PC for good measure once you’ve run the necessary troubleshooters.
Method 3: Start supporting audio services
The Windows Audio service does not handle all audio tasks on your PC. It instead, relies on additional services that help audio function on your device as intended. If everything seems to be working for the Windows Audio service, then we now recommend you try starting its supported services if not already running. Use either of the methods below to restart supporting services on your system depending on your preferences.
Note: In most cases, when the services mentioned below failed to start on your system, you will get an error when logging into your user account. In some cases, it can also lead to crashes and BSODs. If you’ve experienced either on your system, then it could be the reason for failing audio services on your system.
3.1 – Using command prompt (CMD)
Press Windows + R to launch Run.

Now type CMD in the RUN window and then press Ctrl + Shift + Enter to open the command prompt with admin privileges.
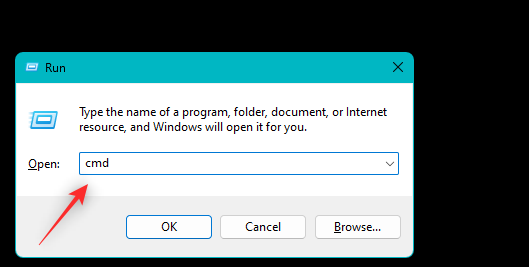
Use the following command to start the supporting services on your PC.
net start RpcEptMapper

net start AudioEndpointBuilder

Finally, use the following command to close CMD.
exit

And that’s it! You will now have restarted supporting audio services on your PC.
3.2 – Using Windows Services
Open the Start menu, search for Services and launch the same from your search results.

Now find and check the following services on your PC. If either is not running, right-click them and select Start.
- Remote Procedure Call (RPC)

- Windows Audio Endpoint Builder
And that’s it! You will now have started the supporting audio services required by Windows 11 on your system.
Method 4: Select a different audio driver
We now recommend you try switching audio drivers on your system and see which one works the best for you. Follow the steps below to help you along with the process.
Press Windows + X and click Device Manager.

Double click and expand Audio inputs and outputs at the top.
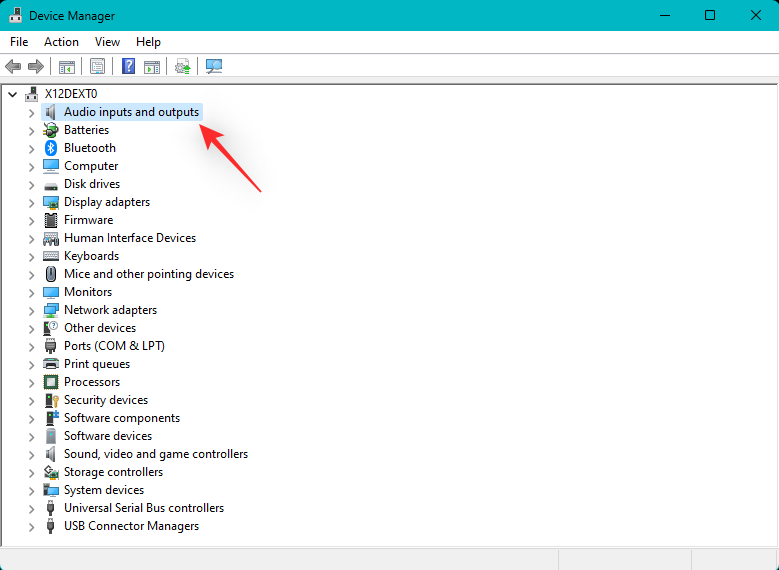
Now right-click the concerned audio device you’re facing issues with, and select Update driver.
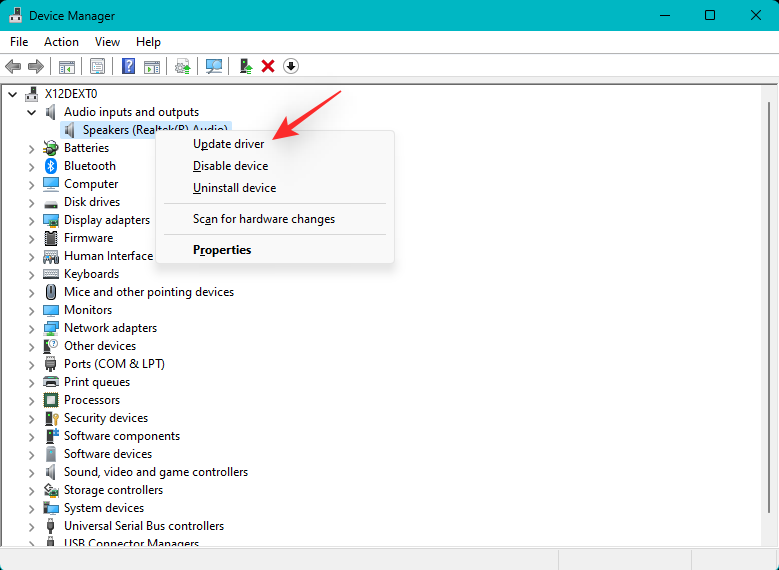
Click Browse my computer for drivers. Now click Let me pick from a list of available drivers on my computer.

Click and select an alternative driver from the ones available in the list on your screen.
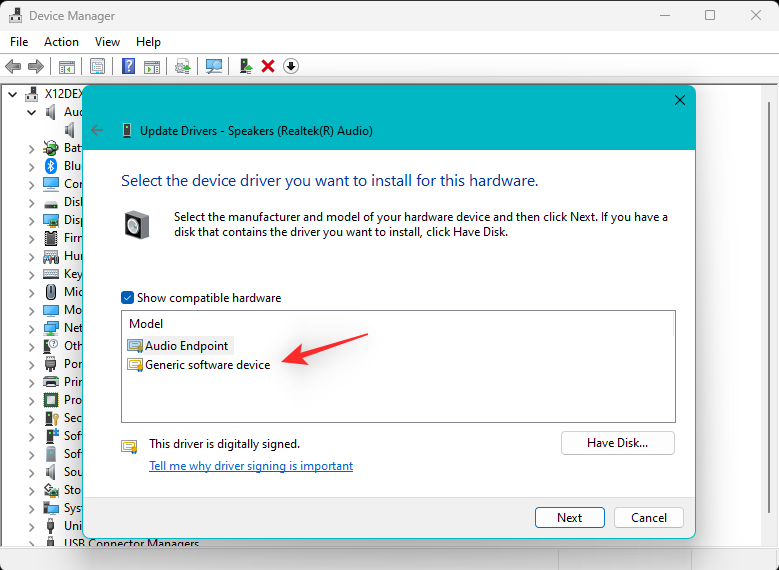
Click Next.

The selected driver will now be used for the selected device. Click Close once done.
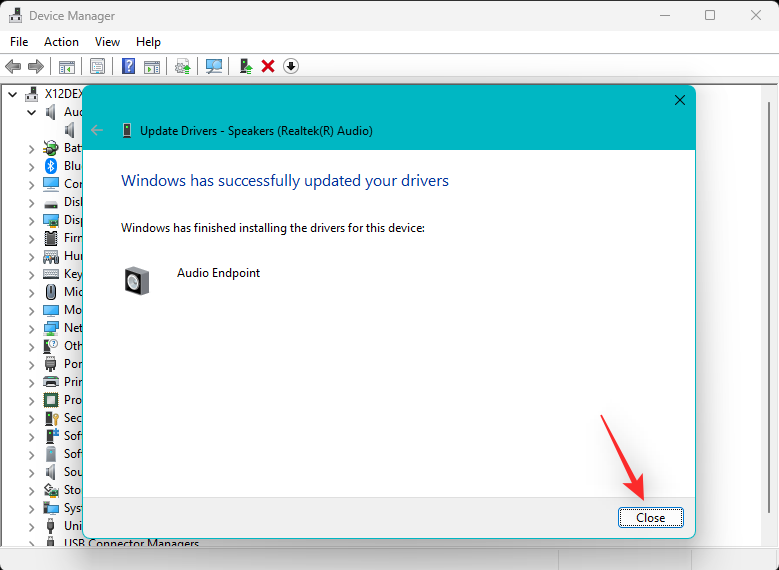
You can now try using audio on your PC. If everything works as intended then you can continue using the selected driver. However, if audio services still fail to respond then we recommend you repeat the steps above but choose a different driver for your device this time. You should be able to find a working driver from the ones installed on your device.
Method 5: Uninstall recently installed updates
Recent Windows updates can also cause audio services to malfunction on certain systems. We recommend you use the guide below to uninstall recent updates and see if that fixes the issue for you. Follow the steps below to help you along with the process.
Press Windows + i to open the Settings app and click Windows Update on your left.
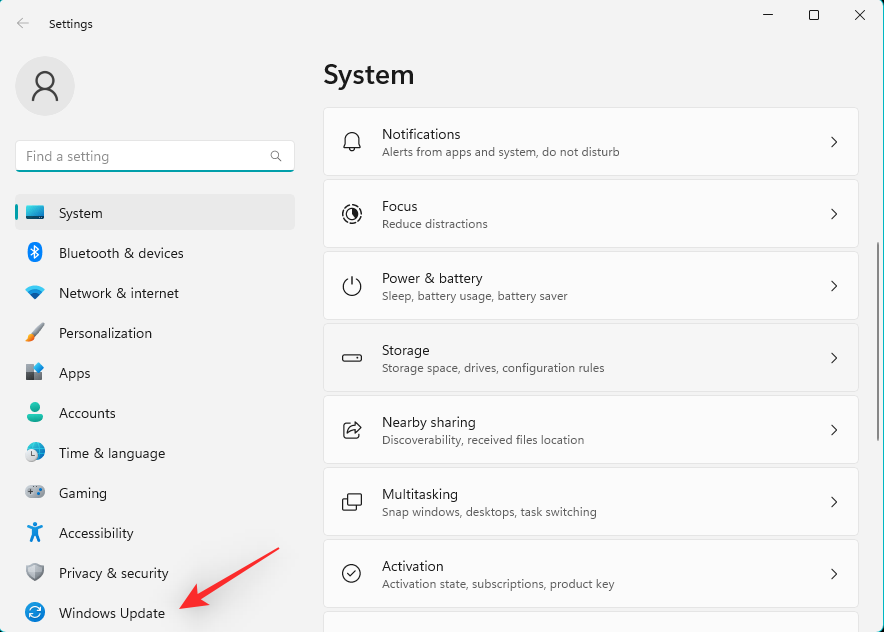
Click Update history.

Now scroll to the bottom and click Uninstall updates.
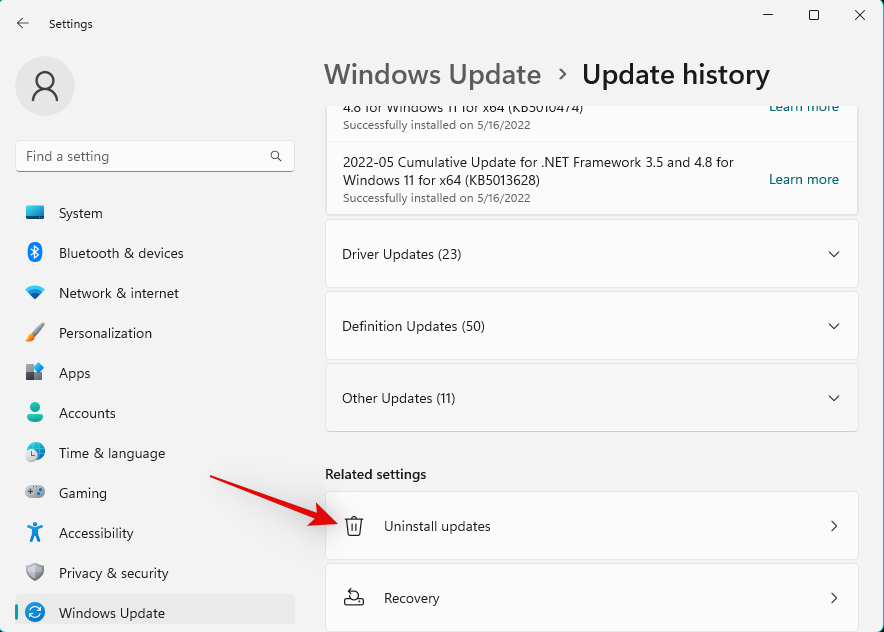
Use the details to identify the latest update installed on your PC and click Uninstall beside the same.

Click Uninstall again.
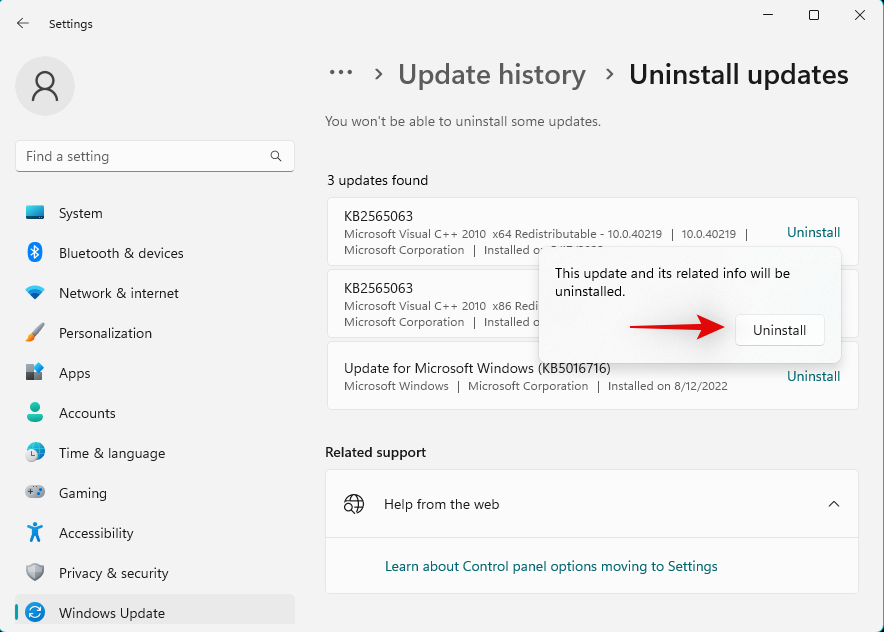
The selected update will now be uninstalled from your device. Restart your device and try testing the audio on your PC. If everything works as intended then a recent update was likely causing issues on your system.
If you still face audio issues, we recommend you uninstall any other updates that you suspect might be leading to audio issues using the steps above.
Once you’ve found the culprit, use the tool below to block the update permanently on your system. This will prevent Windows from installing the update in the background which might cause audio issues again on your system.
- wushowhide.diagcab | Download Link
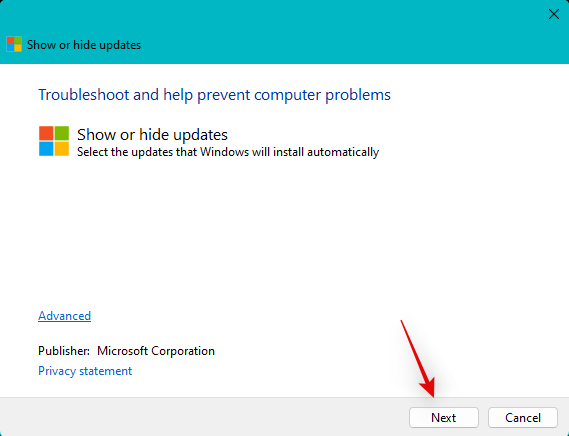
Download and launch the Windows update tool linked above on your system and click Next.
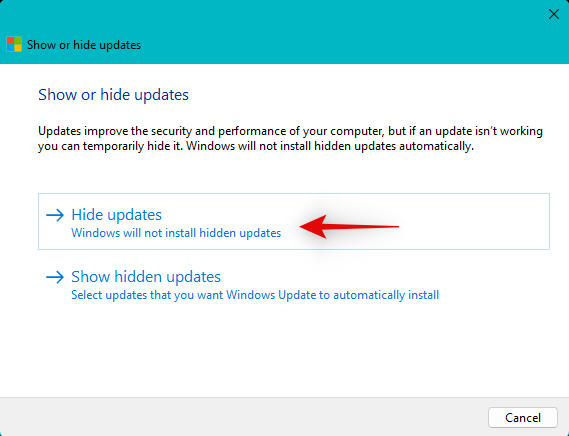
Now click Hide updates.
The tool will now scan and show a list of available updates for your system. Check the box for the culprit update from the list on your screen.

Click Next.

The selected update will now be hidden from your PC. Click Close once done. And that’s it! You will now have uninstalled the problematic update from your system. A future update package might help you fix the same on your PC once issued by Microsoft.
Method 6: Downgrade to an older driver
If you have a custom DAC or a dedicated audio enhancer installed on your system then you likely get custom drivers issued by your OEM. In such cases, the latest drivers can end up encountering bugs and issues that aren’t documented yet due to the limited userbase when it comes to testing. In such cases, you can download an older driver from your OEM and try using the same on your PC. Use the steps below to help you along with the process.
Press Windows + X and select Device Manager.

Double click Sound, video and game controllers.
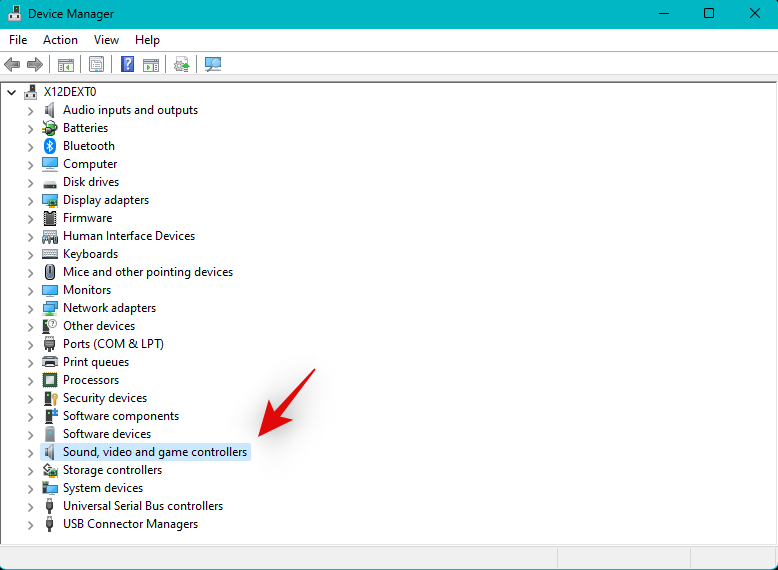
Now right click the concerned audio device facing issues.

Select Uninstall device.
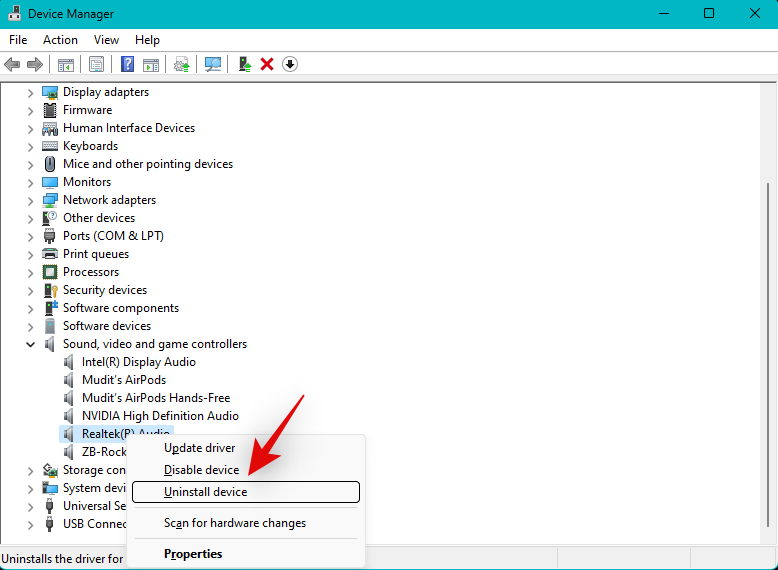
Check the box for Attempt to remove the driver for this device if available to you.
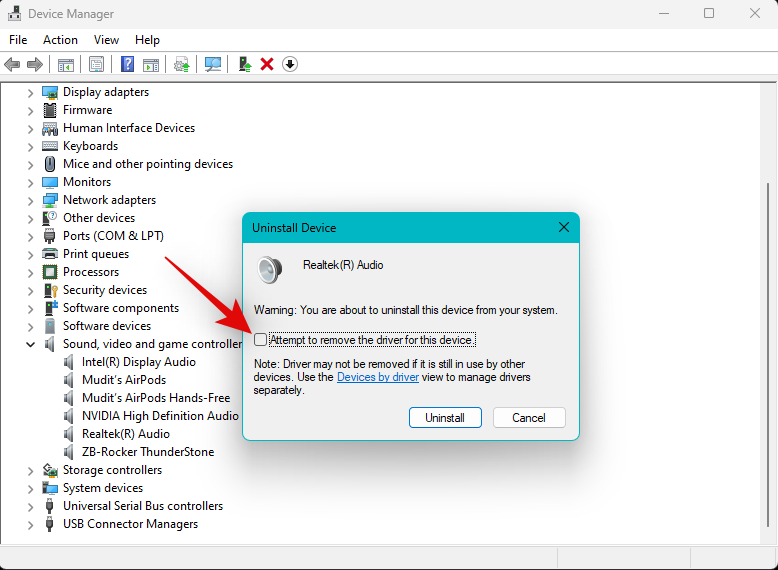
Click Uninstall to confirm your choice.

Once uninstalled, click the Add drivers icon at the top of your screen.

Click Browse.
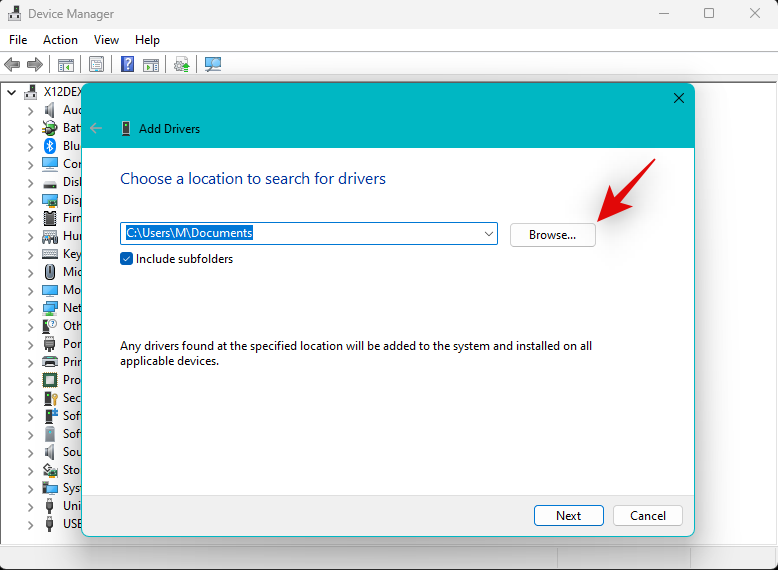
Now select the driver you downloaded from your OEM support site.

Note: If your OEM supplies a .msi package for your driver, then we recommend you first extract it to find the .INF driver file relevant to your device.
Click Next.
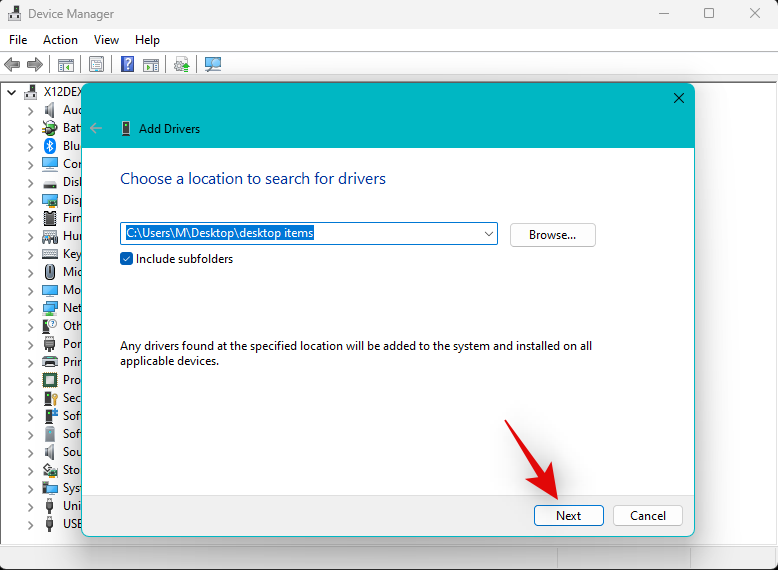
The driver will now be installed on your system. Once done, click Close.

If new drivers were causing issues with the Audio service then all should now be working on your device as intended.
Method 7: Uninstall recently installed programs and apps
Recent third-party programs and updates can also cause audio issues on your system especially if you use your PC for audio production or editing. This requires dedicated drivers that help with proper audio output and customizable sample rates.
However, misconfigured or bugged drivers can end up causing issues with audio on Windows 11 and break everything in the worst-case scenarios. Uninstalling any such third-party programs and apps should help fix the same on your system.
You can then re-install an older version of the program on your system to fix audio services. Follow the steps below to help you along with the process.
Press Windows + i to open the Settings app and then click Apps.

Click Installed apps.

Now click the 3-dot () icon beside the concerned program from the list on your screen.

Click Uninstall.

Click Uninstall again to confirm your choice.

Once the program is uninstalled from your system, restart your PC for good measure. If the suspected third-party program was causing issues with the audio service on your Windows 11 system then the problem should now have been fixed on your system.
Method 8: Change the audio output format
Audio output format helps you dictate the audio output quality on your system to support high-end audio devices. Changing and toggling the same can help refresh background services which might be causing issues with audio on your system. Use the steps below to help you along with the process.
Press Windows + i to open the Settings app and then click Sound on your right.
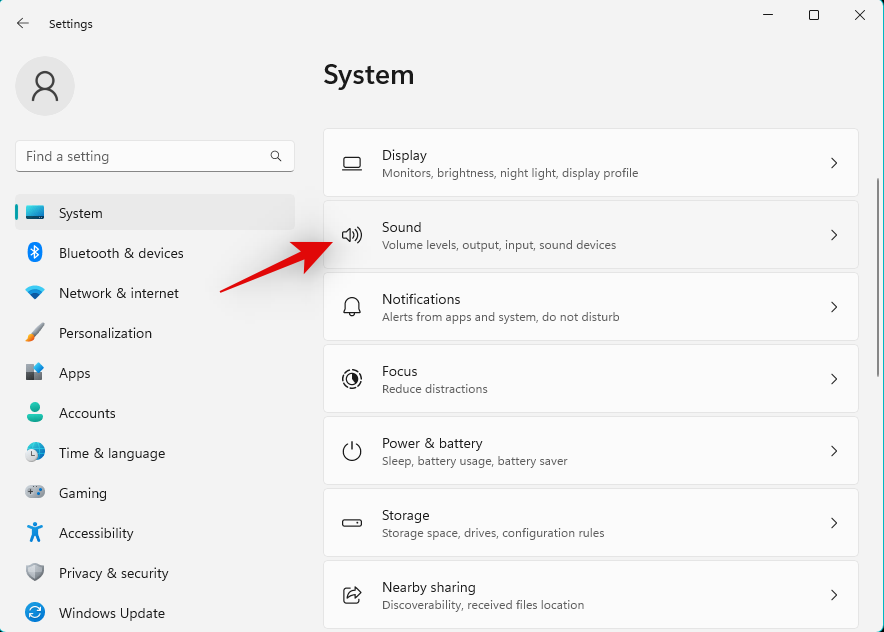
Now click and select the concerned audio output device under Output.
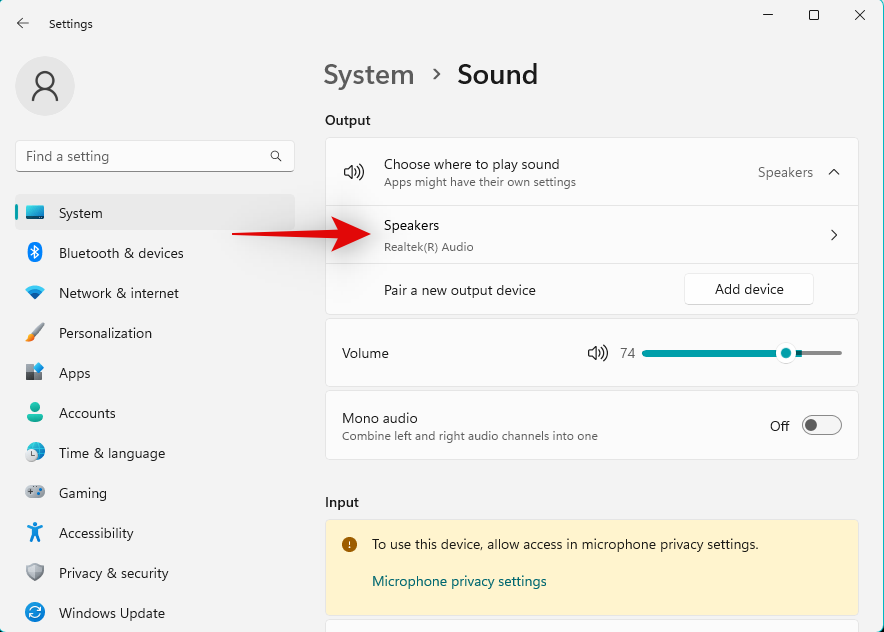
Click the drop-down menu beside Format and select an alternate option to your default selection. The idea is to toggle this option a few times between available choices until audio is back up and running on your system again.

If you manage to get your audio working at a lower sample rate or when using a single channel, then you’re likely facing compatibility issues with your current output device. In such cases, you can switch to a different output device or try updating your drivers from your OEM to fix your issue. Specific drivers could be issued by your PC OEM or your audio output device OEM. You can refer to your device’s support page for more information.
Method 9: Check and fix the registry entry for audio services
Registry changes and incorrect values can also prevent audio services from not responding on Windows 11. Use the steps below to help verify and fix the same on your system.
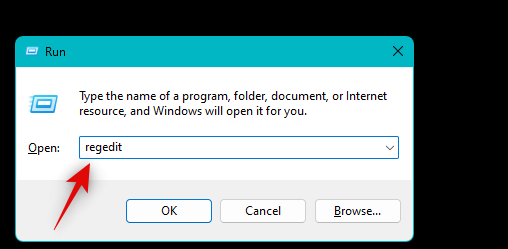
Press Windows + R to launch Run.

Now type in the following and press Enter. You can also click OK if needed.
regedit
Navigate to the following path using the left sidebar. You can also copy-paste the address below into the address bar at the top of your screen.
Computer\HKEY_LOCAL_MACHINE\SYSTEM\CurrentControlSet\Services\AudioEndpointBuilder
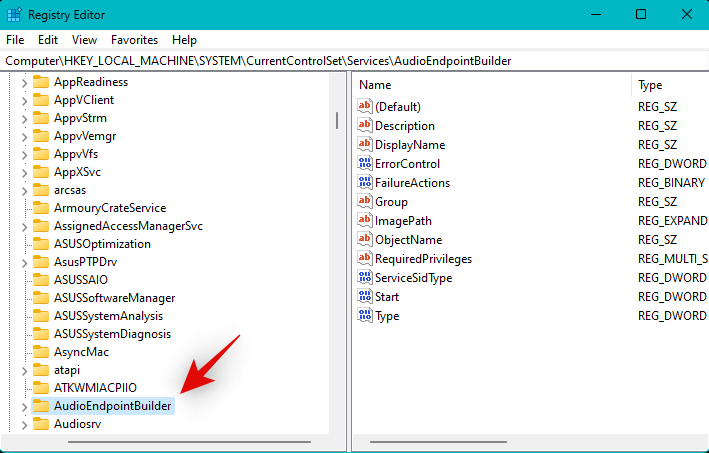
Expand the AudioEndpointBuilder key on your left and select Parameters.

Double click ServiceDll on your right.
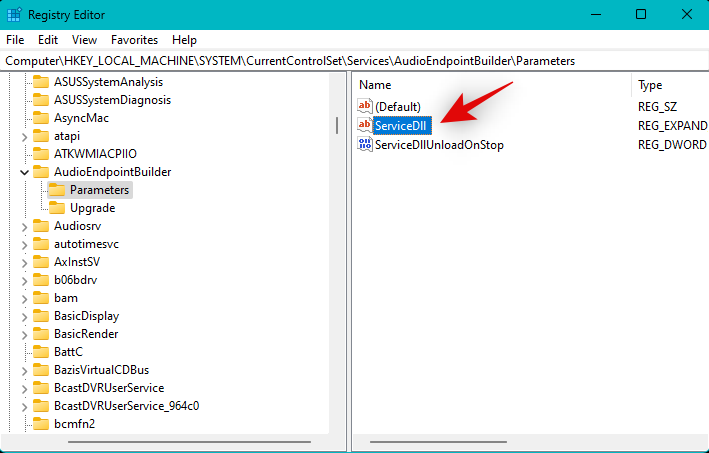
Ensure that the following is set as its Value data. If not, type in the value below and click OK.
%SystemRoot%\System32\AudioEndpointBuilder.dll

Restart your PC for good measure once done.

And that’s it! Audio services should now work as intended on your PC if you were facing issues due to misconfigured registry values on your PC.
Method 10: Add Local and Network Services
We will now try registering local and network services on your Windows 11 PC again. Follow the steps below to help you along with the process.
Press Windows + R to launch Run.

Now type in the following and press Ctrl + Shift + Enter.
cmd

Now use the following command to register network services.
net localgroup Administrators /add networkservice

Similarly, execute the following command to register local services.
net localgroup Administrators /add localservice

Now use the following command to close CMD once you’re done.
exit

Restart your PC for good measure and try using audio on your PC again. If audio services were failing to respond due to unregistered services, then the issue should now be fixed on your PC.
Method 11: Toggle Audio enhancements
Audio enhancement is an in-built feature in Windows that helps enhance the audio output on your system as the name suggests. However, this enhancement can sometimes prevent audio output on your system and prevent audio services from responding altogether. Use the steps below to toggle audio enhancements to see if that fixes the issue for you.
Tip: We recommend you play a video or song in the background. This will help you determine when audio starts working on your PC again.
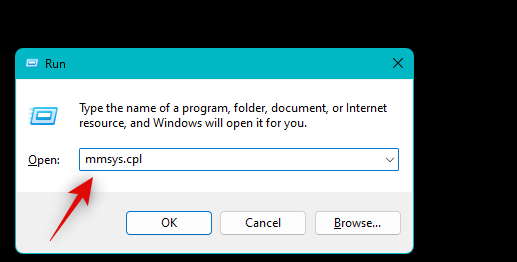
Press Windows + R to launch Run.

Type in the following and press Enter. You can also click OK if needed.
mmsys.cpl
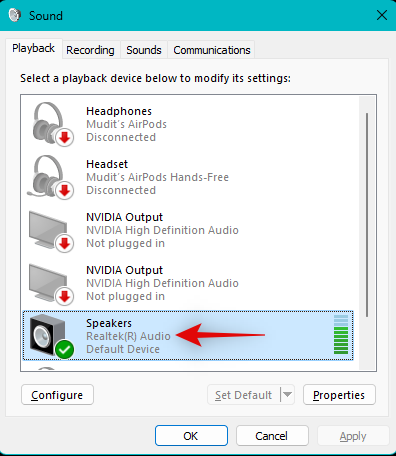
Click and select the concerned audio device from the list in the Playback section.
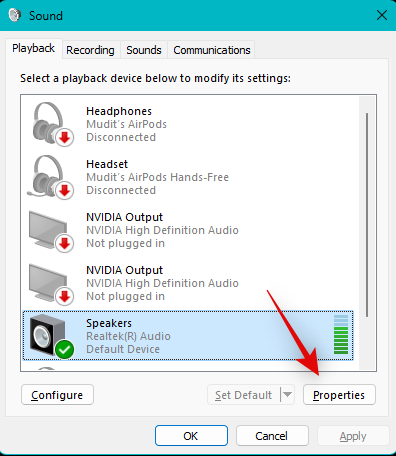
Click Properties.
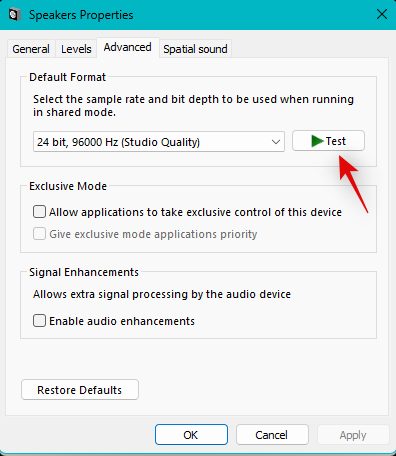
Click and switch to the Advanced tab.

Now uncheck the boxes for the following items on your screen.
- Allow applications to take exclusive control of this device
- Give exclusive mode applications priority
- Enable audio enhancements
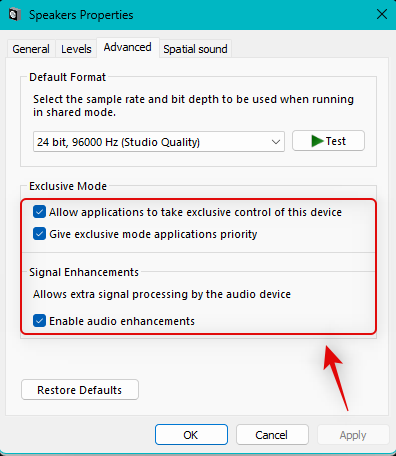
Click Apply.

Now click Test at the top. If you can hear the test tone then audio enhancements were likely causing issues on your PC.
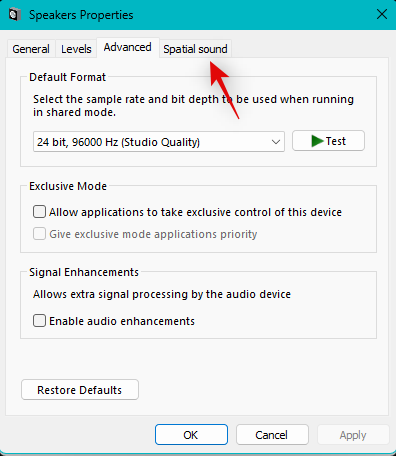
If not, then click and switch to the Spatial Sound tab at the top.
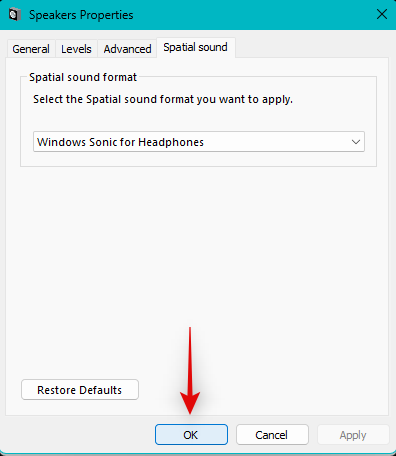
Click the drop-down menu and select an alternative option depending on your current selection.

Click OK once done.
If Audio enhancements were preventing audio services from responding on your PC, then the issue should now have been fixed.
Method 12: Disable Fast Boot
You can now disable Fast Boot and try and test if it fixes the audio service. You could be facing driver or startup issues with third-party programs that are causing audio services to malfunction on Windows. Follow the steps below to help you along with the process.
Press Windows + R to launch Run.

Now type in the following and press Ctrl + Shift + Enter on your keyboard.
cmd
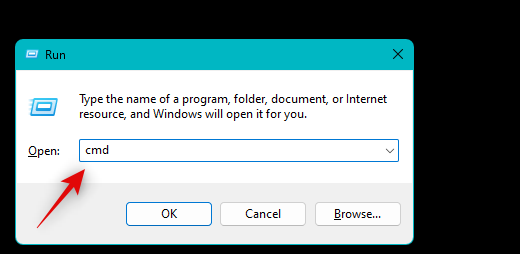
Use the following command to disable fast startup on your system.
powercfg -h off

Fast startup should now have been disabled on your system. Use the command below to close CMD.
exit

Now let’s check if Fast startup is disabled on your system. Press Windows + R to launch Run again and use the following commands to access your power options.
powercfg.cpl

Click Choose what the power buttons do on your left.

Now check the listing for Turn on fast startup (recommended).
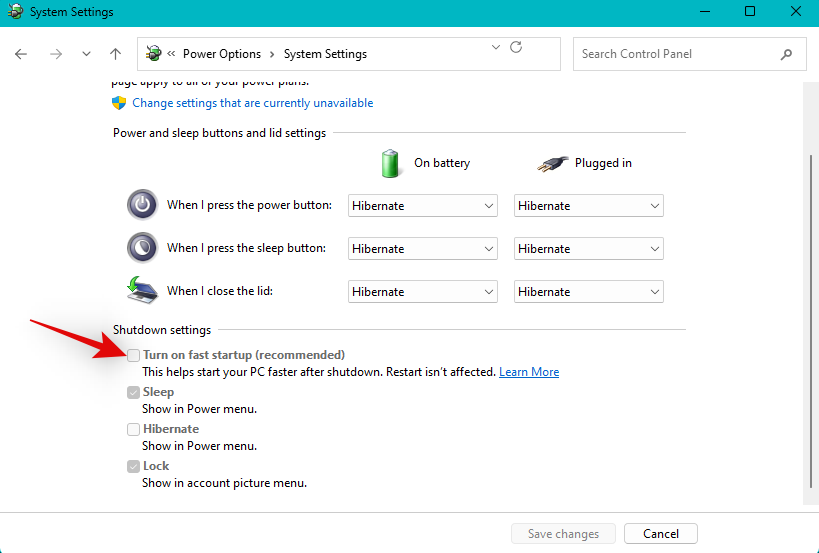
If the listing is unchecked then a fast startup is disabled on your system. If however, it is checked, then click Change settings that are currently unavailable.
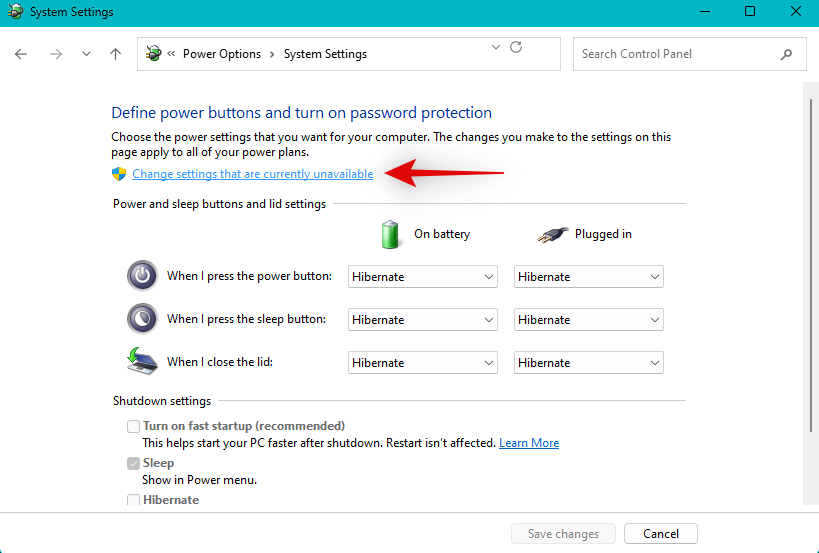
You can now uncheck Turn on fast startup (recommended).

Click Save changes.
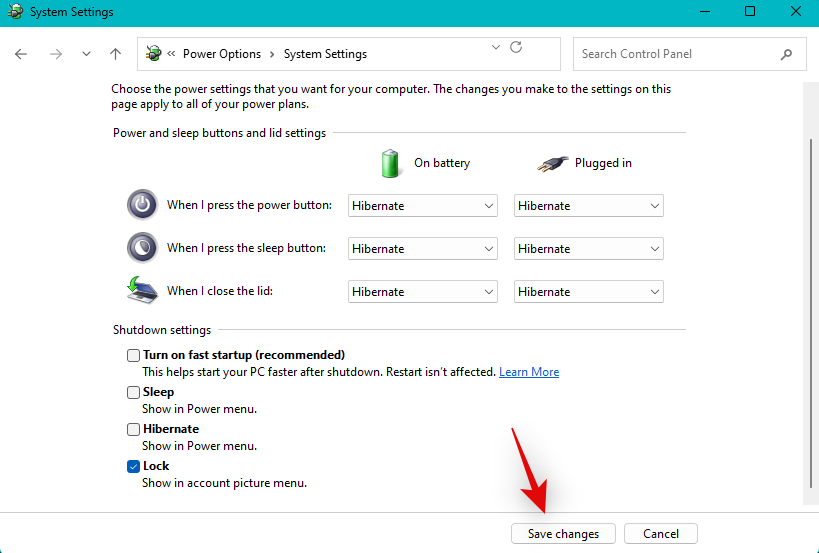
Reboot your PC once you’re done.

If fast startup was causing issues with audio services on your system, then audio should now be fixed.
Method 13: Disable Plug & Play in BIOS
Plug & Play allows you to use plug-and-play devices without even booting your OS. However, some systems can encounter bugs with certain devices and drivers that break Windows 11’s audio services. Disabling Plug & Play in your BIOS can help you prevent errors with the same. Unfortunately, depending on your motherboard, this option could be unavailable to you, however, if your PC was manufactured in the past 5 years or less then this option should be available to you.
Use this guide from us to find out your BIOS key and then use the same when rebooting your PC to boot into the BIOS. You should be able to find your Plug & Play settings in the Advanced BIOS options.
Method 14: Reinstall generic audio drivers
Sometimes custom drivers from your OEM might fail to work altogether. This could mainly be due to outdated drivers that haven’t been updated for Windows 11 yet. Windows 11 significantly changes how your drivers are handled in the background.
This required dedicated updates for most existing hardware components from OEMs. However, if your OEM did not issue an update, then it could be the reason for failing audio services on your setup. We recommend you try using generic drivers, in this case, to see if that fixes the issue for you. Follow the steps below to help you along with the process.
Open the Start menu, search for Device Installation Settings and then launch the same from your search results.

Click and select No.
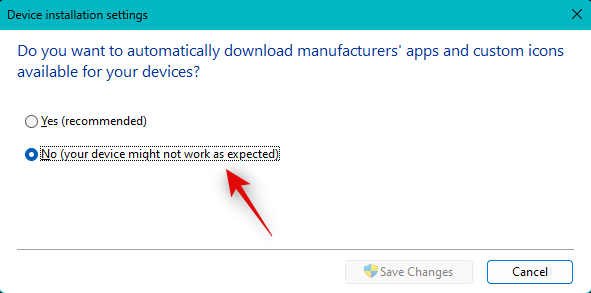
Now click Save changes.

Press Windows + X and select Device Manager.

Now right-click the concerned audio device you’re facing issues with and select Uninstall device.
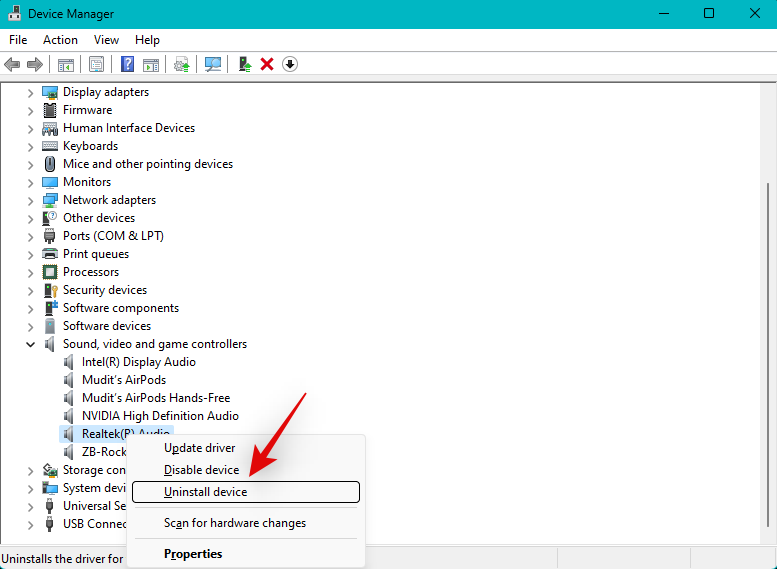
Check the box for Attempt to remove the driver for this device.
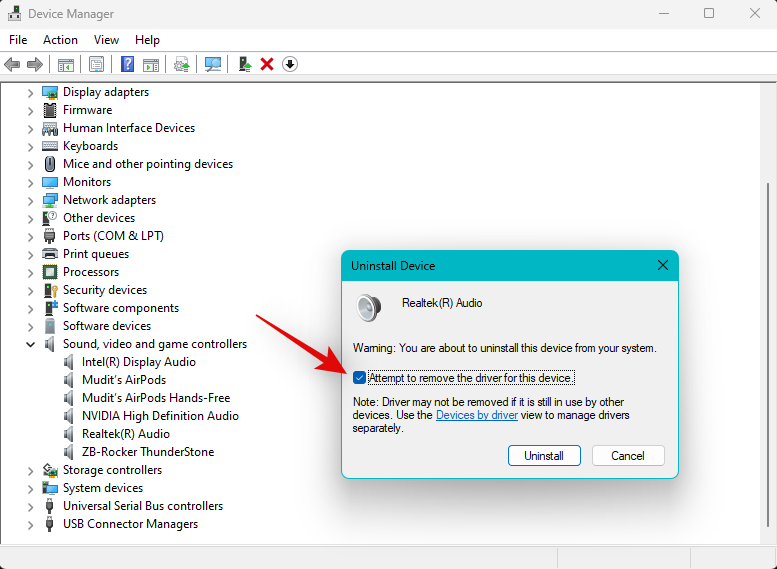
Now click Uninstall.

The selected device will now be removed from your PC. Click the Scan for hardware changes icon at the top.

Windows will now scan your PC and install generic drivers for your audio device.

If custom drivers were the cause of issues with audio services on your system then the same should now have been fixed.
Method 15: Use your OEM’s sound software
If you’re using a custom DAC or have a custom audio utility from your OEM that helps you enhance audio on your PC then we recommend you check the same for any errors in your setup.
A simple restart of the utility can help with the same. We recommend you open up your sound utility and turn it off and restart your PC. You can then test audio again and restart the utility if everything works as intended on your system.

In some cases, you might have to reduce your output quality to match your output device especially if you’ve recently changed it on your system. We also recommend you check for any updates that could have been issued by your OEM for your audio utility. This could be a known issue that gets fixed with a recent bug fix issued for the utility. You can find updates and more information on the same using the dedicated support page for your PC.
Method 16: Use System Restore
If you’re still facing issues with audio services then we now recommend you use system restore. System restore can help you restore your PC to a previous point in time when everything was working as intended provided you have a valid restore point. Follow the steps below to help you along with the process.
Press Windows + R to launch Run.

Type in the following and press Enter. You can also click OK if needed.
rstrui.exe

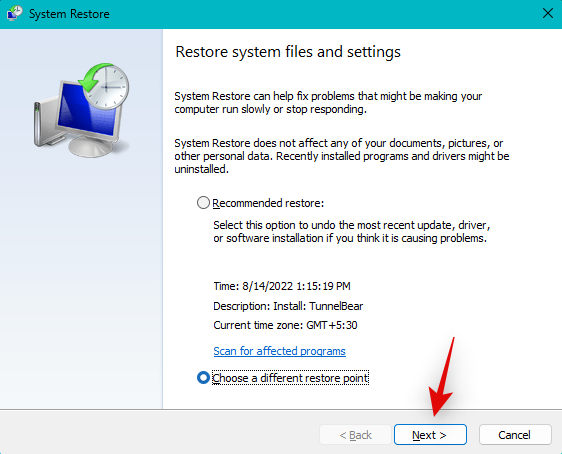
Click Choose a different restore point.

Click Next.
Now choose a restore point for the time when everything was working from the list on your screen by clicking it.
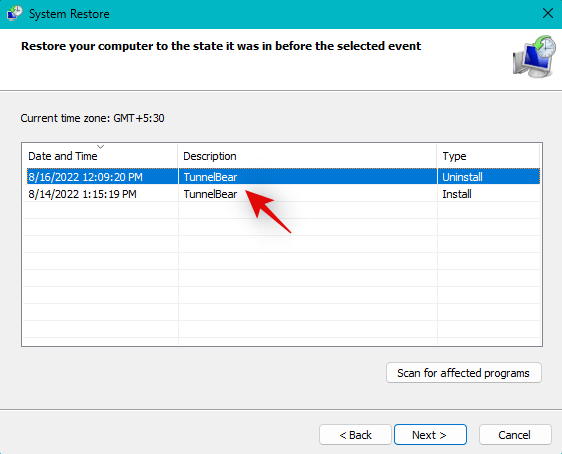
Click Next once you’ve made your choice.

Tip: You can click Scan for affected programs to view all programs and apps that will be uninstalled or reverted during this process.
Click Finish.

System Restore will now restore your PC to the selected restore point. Wait for the process to finish, and audio services should now function on your PC as intended.
Method 17: Run SFC and DISM scan
An SFC scan and DISM scan can help identify and fix corrupted system files for your Windows 11 installation. It can also help repair the Windows image for your current installation which might also fix issues with audio services. Follow the steps below to help you along with the process.
Press Windows + R to launch Run.

Type in the following and press Ctrl + Shift + Enter.
cmd

Type in the following and press Enter to run an SFC scan.
sfc /scannow
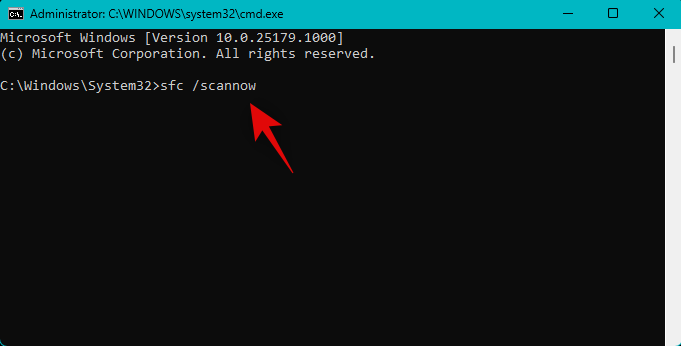
Once done, execute the following command.
DISM /Online /Cleanup-Image /RestoreHealth
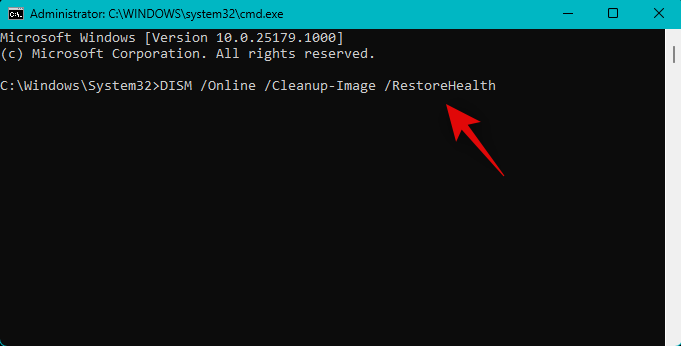
Use the command below to close CMD once you’re done.
exit

We now recommend you restart your system for good measure. Once restarted, audio should work as intended on your system if corrupted system files were the cause of your issue.
Method 18: Force remove all your audio drivers and reinstall drivers
We now recommend you force remove all audio drivers relevant to the devices installed on your system. Once removed, you can then re-install the concerned drivers to get everything back up and running on your PC. Follow the steps below to help you along with the process.
Press Windows + X and click Device Manager.

Right-click your audio device and select Uninstall device.

Check the box for Attempt to remove the driver for this device.

Click Uninstall.

Repeat the steps above to remove any additional drivers related to audio devices on your system. Once done, download Driver Store Explorer on your PC using the link below.
- DriverStoreExploer | Download Link
Extract and launch DriverStoreExplorer once downloaded.

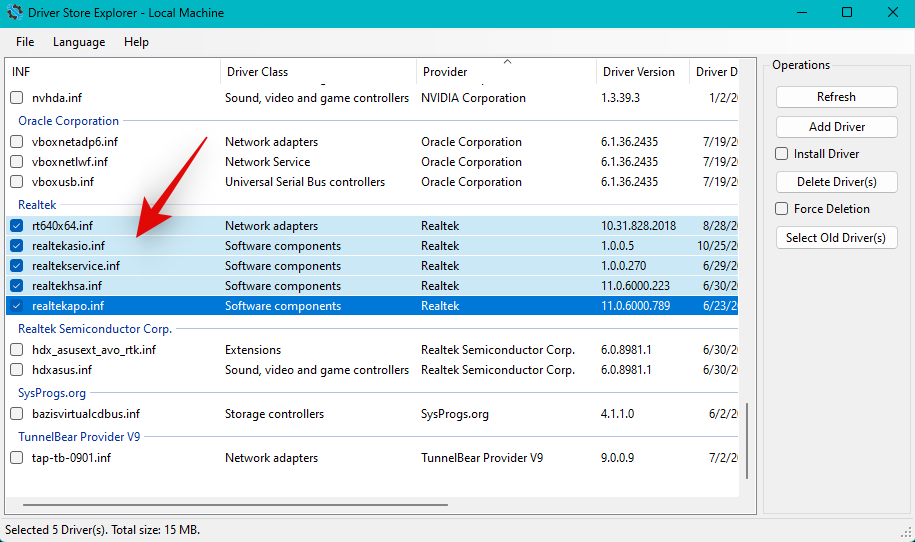
DriverStoreExplorer will now launch and scan your system for all installed drivers. Find and check the box for any additional audio drivers currently installed on your system using the list on your screen. You can use the Driver Class and Provider columns to easily identify your audio drivers.
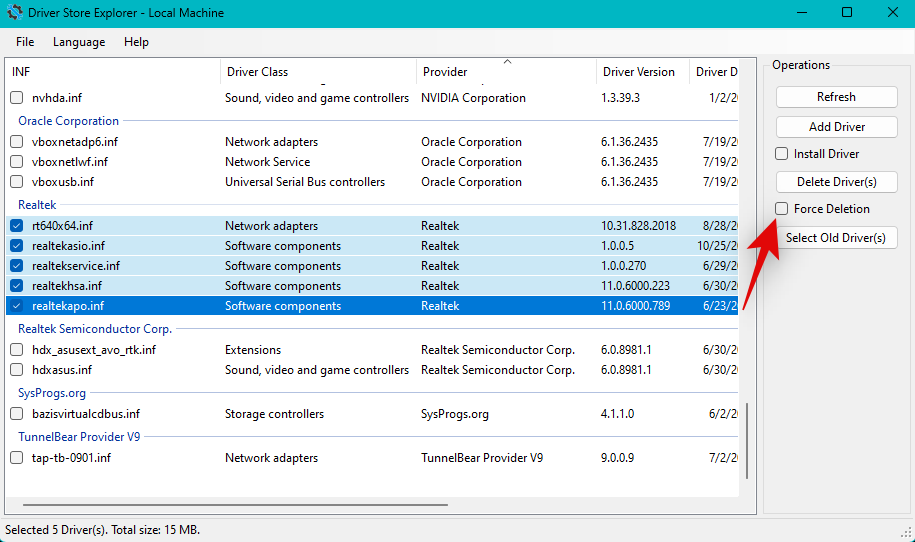
Check the box for Force Deletion.
Click Delete Driver(s).

Confirm your choice by clicking OK.
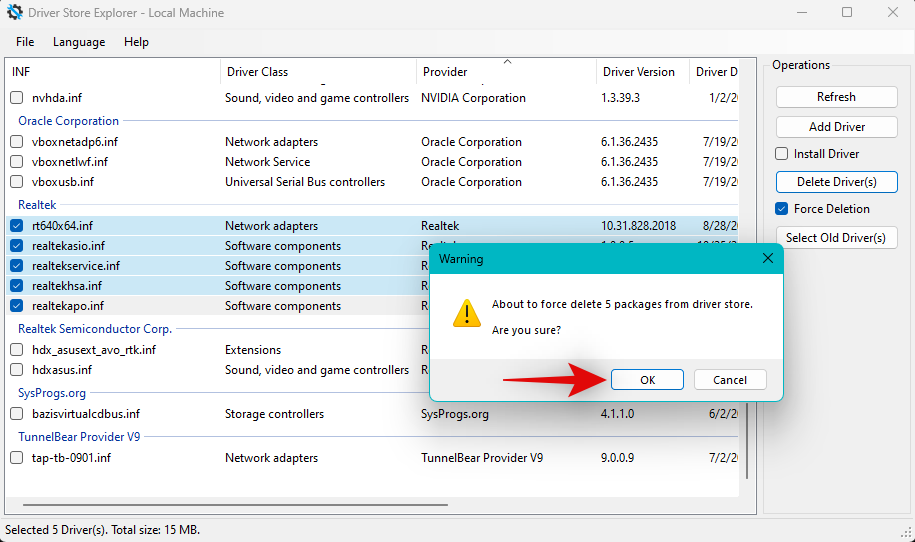
The selected drivers should now have been forcibly removed from your system. Once done, open the Start menu, search for Control Panel and launch the same from your search results.

Click the drop-down menu in the top right corner and select Large icons.

Now click Programs and Features.

Look for any packages related to your audio drivers. These could have been issued by your OEM, by your audio provider, or even your audio enhancement utility. If you have an Nvidia GPU, then you might even have Nvidia HD audio drivers installed on your system. Click and select either that you find installed on your PC.

Click Uninstall at the top.

Now follow the on-screen instructions to uninstall the concerned drivers from your system.
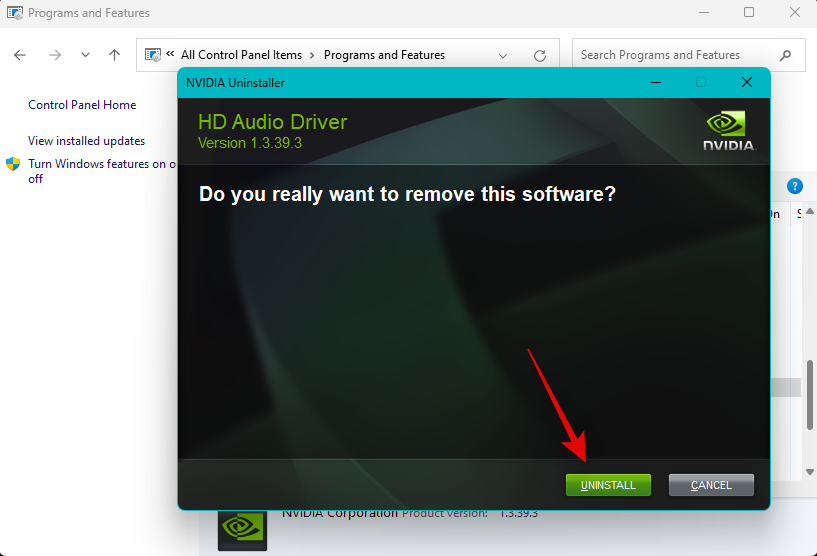
Repeat the steps above to uninstall any additional driver packages you find in the Control Panel.
It’s now time to reinstall your drivers. For driver .msi and .exe packages, you can simply launch the file and follow the on-screen instructions to install the necessary drivers. In the case of raw. INF files, use the steps below to manually install them on your system. If you have multiple files, then you can move them all to a single folder and install them at once.
Open the Device Manager using the Windows + X keyboard shortcut.

Now click the Add Drivers icon at the top.

Click Browse.
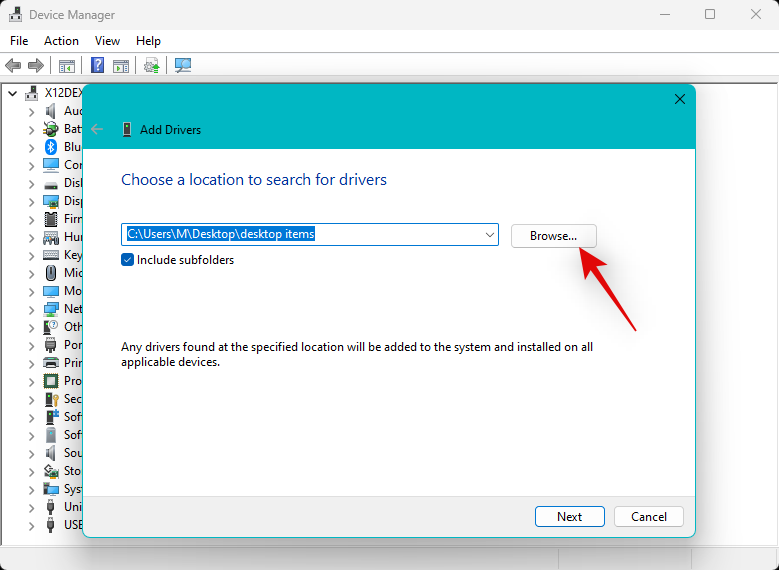
Now navigate to the .INF file you wish to install for your system. Double click and select the same once found.
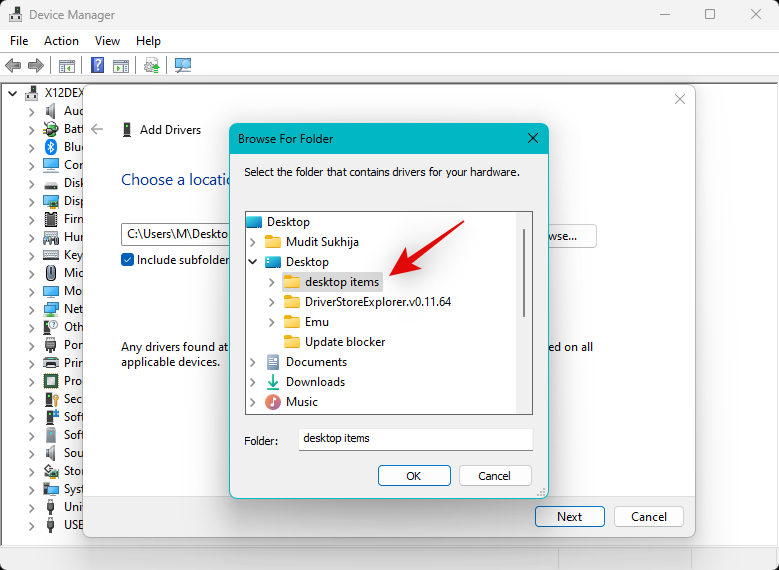
Click Next.
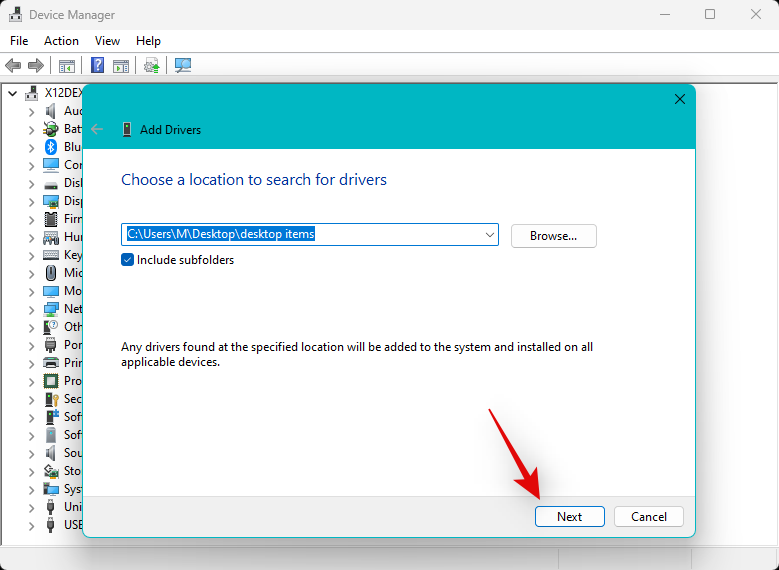
Windows will now install the .INF file for the relevant audio device on your system. If you had multiple drivers in the folder then all of them will be installed on your system. Click Close once done.
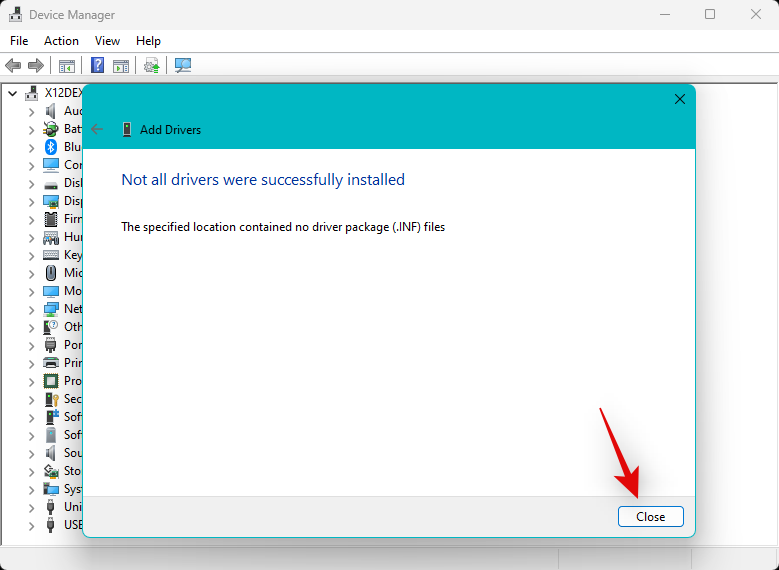
We now recommend you restart your PC at the earliest. Once done, audio services should be working as intended if drivers were the cause of your issue on Windows 11.
If you’re having issues with Bluetooth audio
Bluetooth audio issues are not uncommon on Windows 11 or Windows as a whole. Windows 11 brings along numerous UI changes and background optimizations that make it easier to pair and use Bluetooth devices. However, Bluetooth audio devices can end up facing a lot of issues depending on your OS, PC, and hardware components.
Bluetooth incompatibility or outdated drivers can prevent you from pairing or using devices on Windows 11. Such errors will cause issues with audio services on your system and prevent them from responding as intended on your PC. If you’re facing issues with Bluetooth audio on your PC but the system audio is working as intended, then you can use this guide from us to troubleshoot and fix the same.
Read: 14 Ways to Fix Bluetooth Audio Not Working Issue on Windows 11
Last Resorts
If by this point audio services are still not responding and working as intended on your system, then it’s time for some drastic measures. We recommend you try the last resorts mentioned below before opting to reset or reinstall Windows 11 if nothing seems to fix your issue. Let’s get started.
Last resort 1: Remove and reinstall appropriate drivers in Safe mode
It’s a long shot, but we recommend you try removing and re-installing drivers in safe mode to see if that fixes the issue for you. Some third-party programs on your system could be interfering with driver removal and driver installation leading to audio services malfunctioning on your system.
Safe mode will blacklist all third-party services and allow you to reinstall your drivers with a clean setup and with only Windows system services running in the background. Use the steps below to boot into Safe mode and then use the guides above to remove and reinstall audio drivers on your PC. Let’s get started.
Press Windows + i to open the Settings app. Click Recovery.
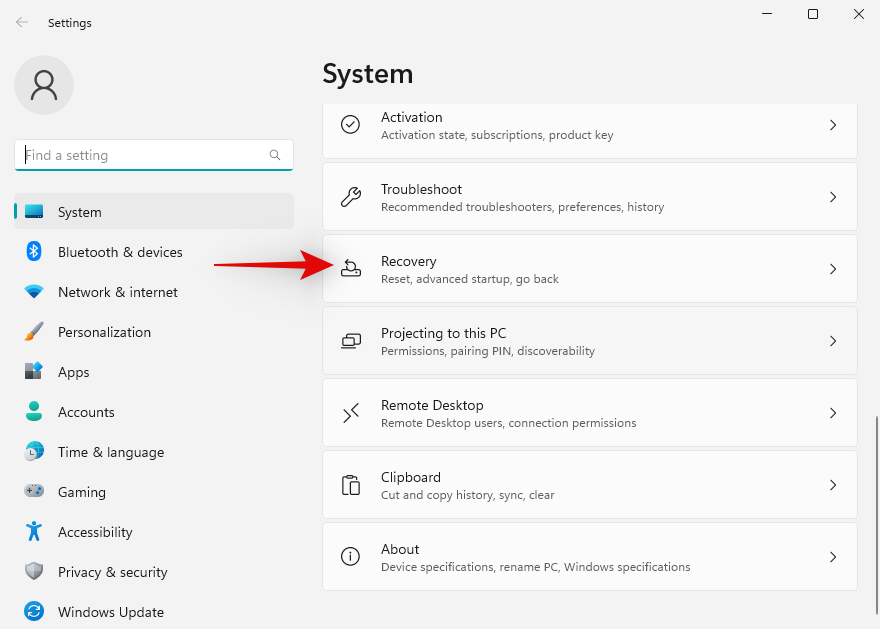
Click Restart now beside Advanced startup.

Click Restart now again to confirm your choice.

Your PC will now restart to Recovery mode. Click Troubleshoot to get you started.
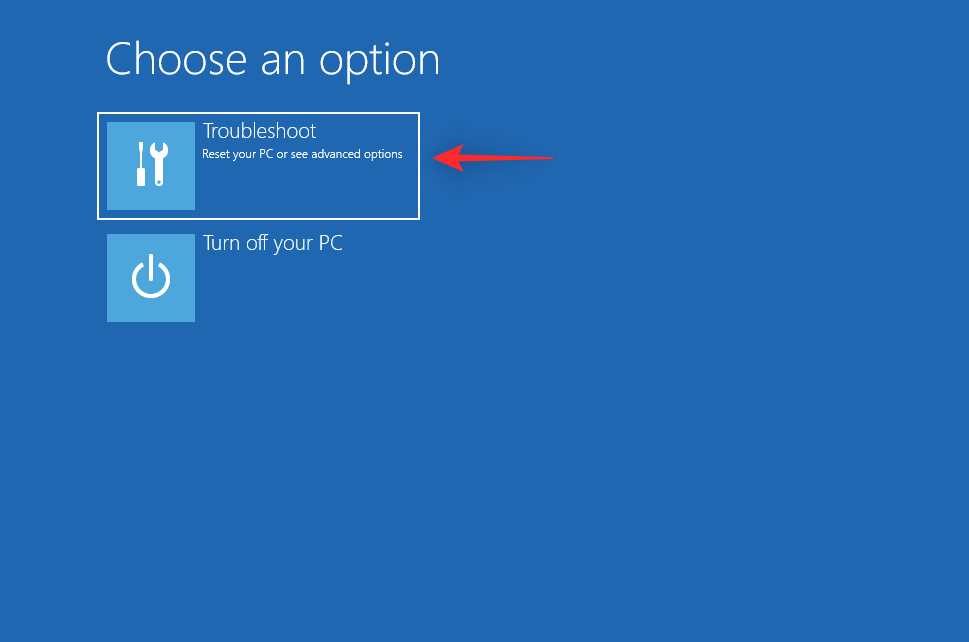
Now click Advanced options.

Click Startup settings.
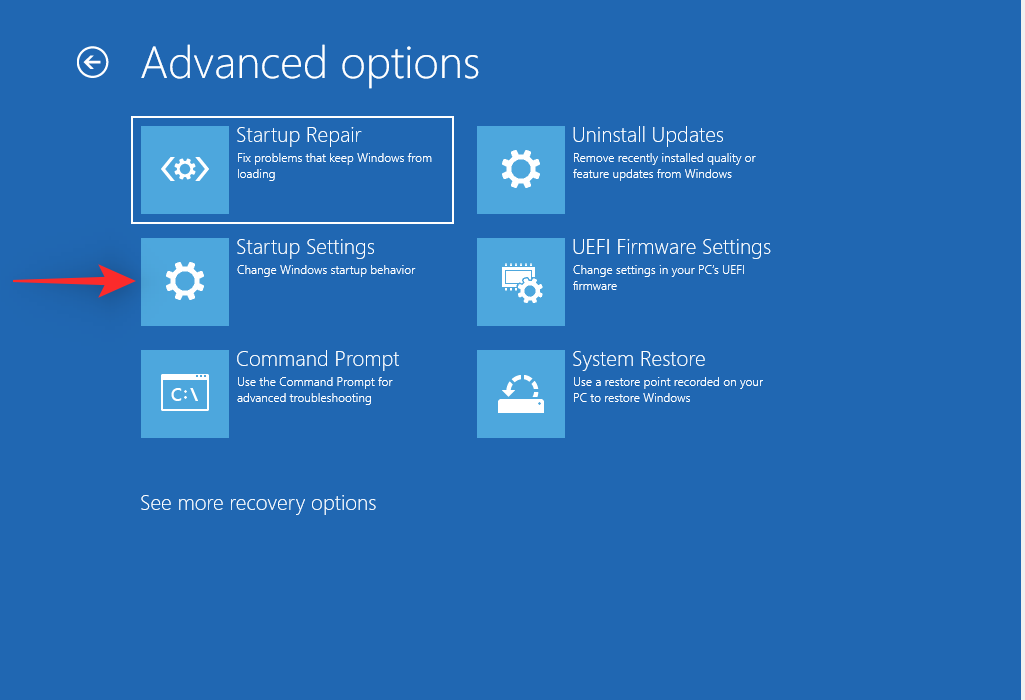
Now click Restart. Your system will now restart and present you with Startup settings for your system.

Press 4 or F4 to launch Windows in Safe mode. If you need an internet connection when in Safe mode, then press 5 or F5 instead.
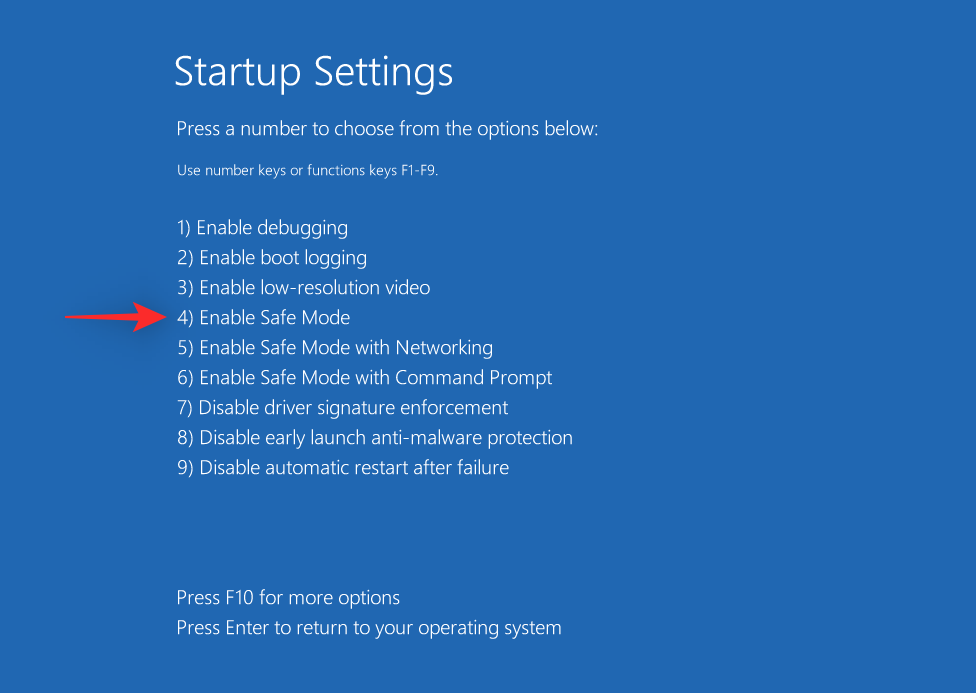
Your PC will now restart and boot into Safe mode. Use the guides above to remove and reinstall audio drivers while in Safe mode. Once done, we recommend testing audio in Safe mode itself before trying it out in the normal boot mode for Windows 11.
Last resort 2: Reset Windows 11
If you haven’t been able to fix the audio on your system by this point then you could be facing issues with your Windows 11 installation. In such cases, we recommend you try resetting Windows to see if that fixes the issue for you.
Resetting Windows 11 will allow you to retain your data and apps which is a good way to get started. You can use this comprehensive guide from us to reset Windows 11. In case resetting Windows fails for you, then we recommend you try a clean install of Windows 11 using the next section.
Last resort 3: Clean install Windows 11
We now recommend you try formatting your boot drive and clean installing Windows 11. This will help ensure that leftover files, drivers, and more do not interfere with audio services on your new installation. You can clean install Windows 11 on your system using this post.
We hope this post help fix audio services on Windows 11. If you face any issues or have any more questions, feel free to reach out using the comments below.
RELATED
- 16 Ways to Fix Airpods Audio Issues on Windows 11
- How to Disable Windows 11 Alert Sounds
- How to Use System-Wide Live Captions on Windows 11
- Can’t Connect Airpods to Windows? 11 Fixes to Try

