Windows 11 has introduced numerous UI changes. The new Settings app now holds most of your settings in an attempt to phase out the Control Panel in the coming years. However, these new UI changes can make it challenging to find your tried and tested settings pages.
Many users seem to be facing problems when changing the default audio device on Windows 11. If you’re in the same boat, here’s how to change your default audio device.
How to set the default audio device on Windows 11
You can set your default audio device on Windows 11 in four ways. Using these methods, you can change both your default audio input and output device. Follow either of the sections below, depending on your preferences.
Set the default input audio device on Windows 11
Here’s how to change and set your default audio device on Windows 11. Follow either of the methods below, depending on your preferences.
Method 1: Using the Settings app
The steps below will help you change the default input device using the Settings app.
- Press
Windows + ito open the Settings app. Click Sound on your right to access your Sound settings. - Click and select your desired input device under Input.
- Click the drop-down menu beside Set as default sound device.
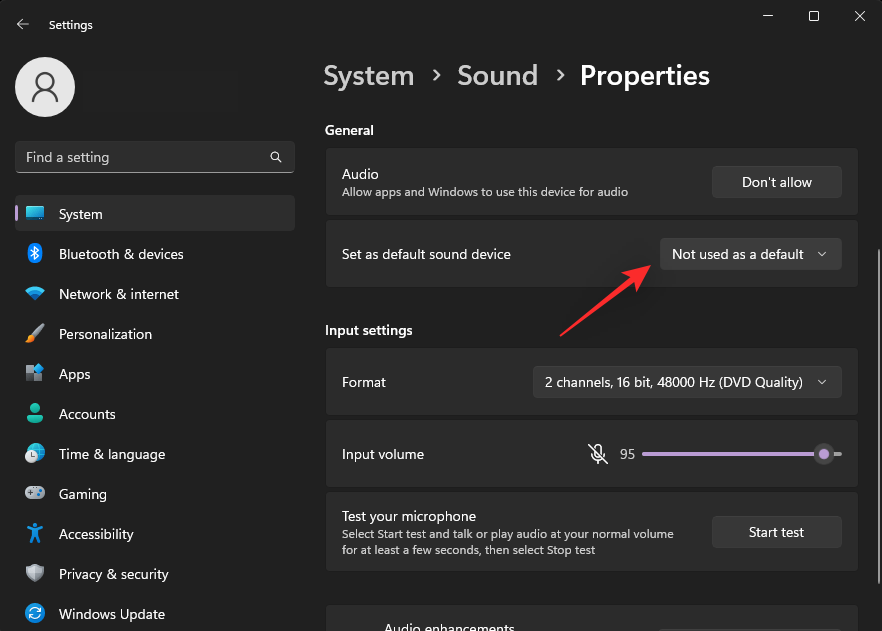
- Click and select one of the following options depending on your preferences.
- Use as default for audio
- Use as default for communications

Tip: If you wish to use the device as default for both audio and communications, then select either of the options. Once done, click the drop-down again and select the next option.
And that’s it! You will now have changed and set your default audio input device in Windows 11.
Related: How to Run Old Games on Windows 11
Method 2: Using advanced Sound settings
Here’s how you can use the advanced Sound settings to change your default device. Follow the steps below to help you along with the process.
- Press
Windows + Rto launch Run. - Type in the following and press Enter.
mmsys.cpl - Click and switch to the Recording tab.
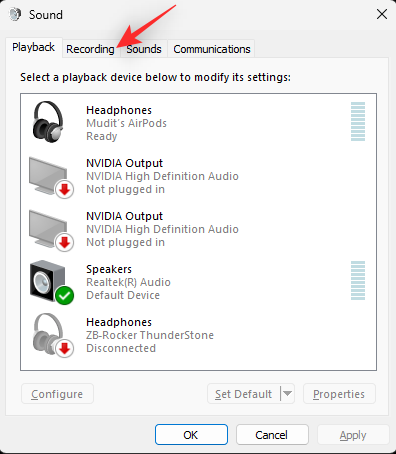
- Click and select the Microphone you wish to set as default on your device.

- Click Set Default.

- Click OK to save your changes.

And that’s it! You will now have changed your audio input device on Windows 11.
Related: How to Project Laptop to TV on Windows 11
Method 3: Using the XBOX Game Bar
You can also use the XBOX Game Bar to change your default input device on Windows 11. Follow the steps below to help you along with the process.
- Press
Windows + Gon your keyboard to launch the XBOX Game Bar. Click the Audio icon at the top. - Click and switch to the Voice tab.

- Click the drop-down menu at the top. Your current audio device should be selected for this menu by default.
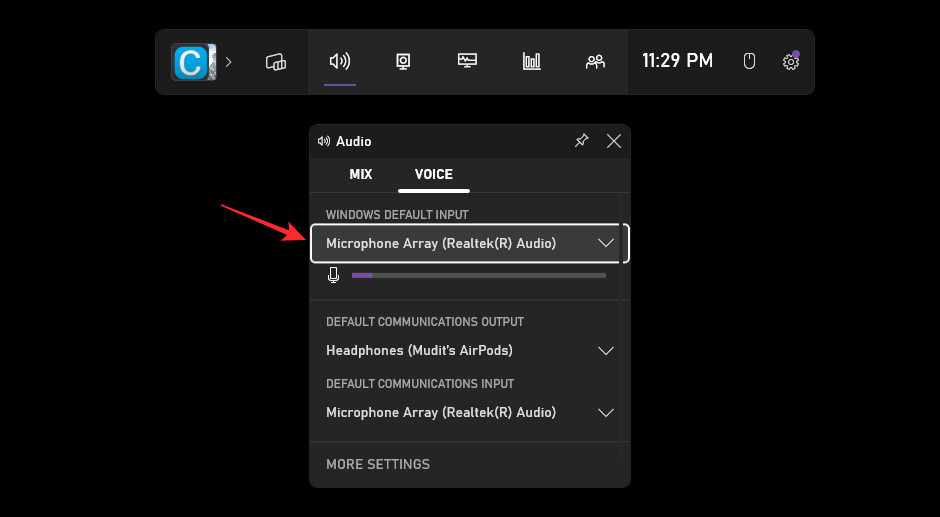
- Now select your desired microphone from the menu.

You will now have changed your default Windows input device. You can also change your DEFAULT COMMUNICATIONS OUTPUT and INPUT device using the subsequent drop-down menus.
And that’s how you can set your default audio input device using the XBOX Game Bar.
Related: How to Fix Copy and Paste on Windows 11
Set the default output audio device on Windows 11
If you’re looking to change your default output device, then you can use either of the methods below. Let’s get started.
Method 1: Using the Settings app
- Press
Windows + ion your keyboard to open the Settings app and navigate to your sound settings as we did above. Click and select the output device you wish to set as default under Output - Click the drop-down menu for Set as default sound device.
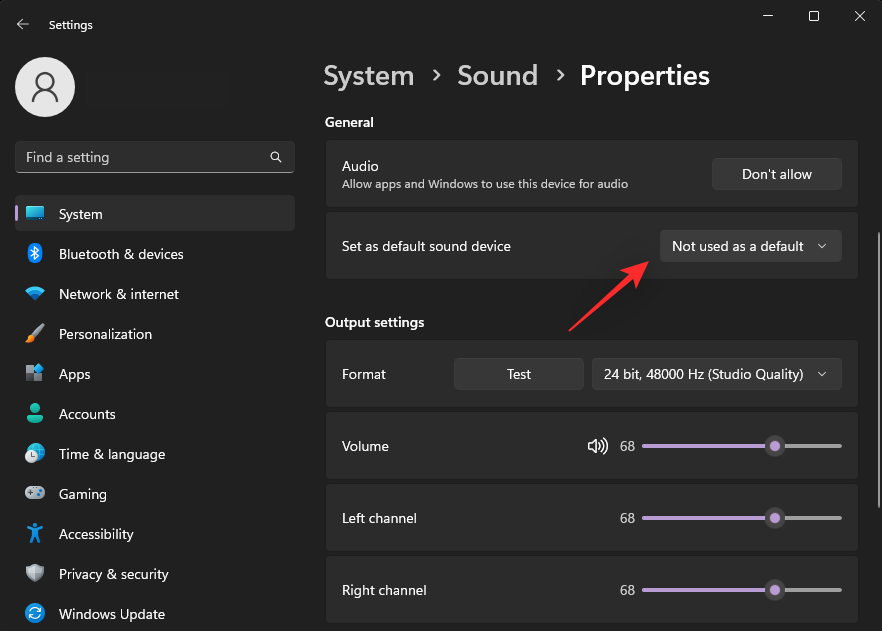
- Select one of the following options depending on your preferences.
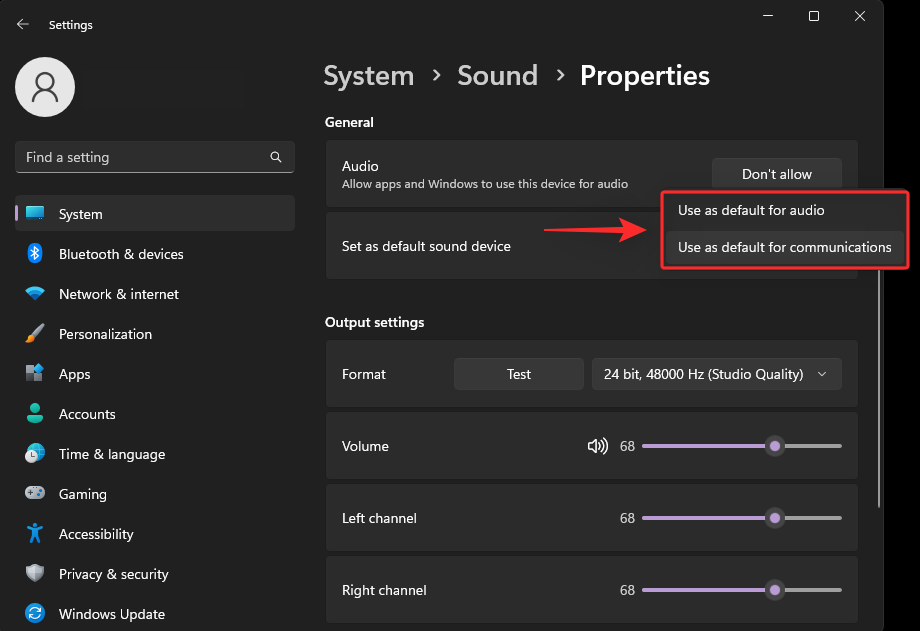
- If you wish to set the device as the default for both, start by selecting either of the options. Subsequently, click the drop-down menu again and select the next option.

And that’s how you can change your default audio output device on Windows 11.
Method 2: Using the Action Center
Here’s how you can use the Action Center to change your default output device. Follow the steps below to help you along with the process.
- Press
Windows + Ctrl + Vto open the Action Center. Now, click and select your default audio output device from the ones available on your screen.

And that’s it! You will now have changed your default audio output device using the Action Center.
Method 3: Using advanced Sound settings
Use the steps below to help you use advanced Sound settings to change your default output device. Let’s get started!
- Launch advanced Sound settings like we did above on your PC and click on your preferred output device.
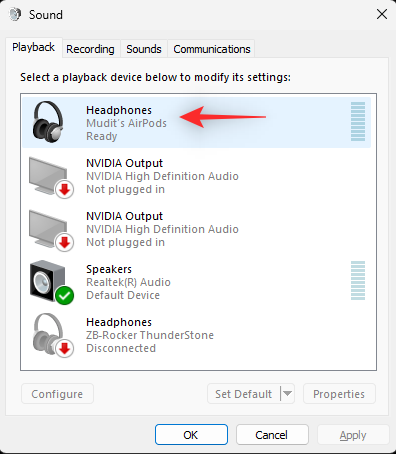
- Click Set Default.

- Click OK to save your changes.

And that’s how you can change your default audio output device using the advanced sound settings.
Method 4: Using the XBOX Game Bar
Here’s how you can use the XBOX Game Bar to change your default output device on your Windows 11 PC.
- Press
Windows + Gto launch the XBOX Game Bar. Now click the Audio icon at the top. - Click the drop-down menu under WINDOWS DEFAULT OUTPUT.

- Select the desired output device you wish to set as default on your device.
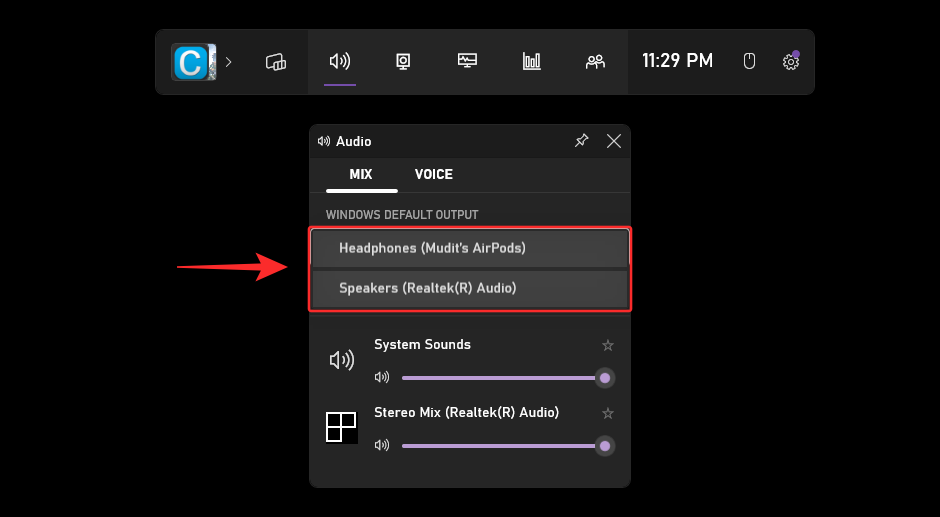
And that’s it! You will now have changed your default output device using the XBOX Game Bar.
We hope this post helps you change and set your default audio device on Windows 11. If you have any more questions, feel free to drop them in the comments section below.
RELATED
- Using Windows 11 Without Microsoft Account: Everything You Need to Know
- 5 Top Ways to Check VRAM on Windows 11 in 2022
- Where is ‘My Computer’ on Windows 11? How to Find ‘This PC’ Easily!
- How to Repair Windows 11 Without CD: 12 Methods Explained!
- How to Search in Windows 11 [4 Ways Explained]


very nice