
- What to know
- Move the Start menu to the left
- Pin useful apps and folders
- Unpin unnecessary apps
- Add More pins or More recommendations
- Turn your Start menu into the older Windows 10 Start menu
- Change Start menu color
- Disable/Enable Recently added apps
- Disable/Enable Most used apps
- Disable/Enable Recently opened items
- Move most used Pinned items to the top
What to know
- Change Start Menu alignment from Settings > Personalization > Taskbar > Taskbar behaviors > Taskbar alignment.
- Pin or unpin apps to the Start Menu by right-clicking on them and selecting Pin to Start.
- To get more space for pins or recommendations, go to Settings > Personalization > Start > select More Pins or More recommendations.
- Enable/disable recently added, most used, and recently opened apps from Settings > Personalization > Start.
Windows 11’s new Start menu has received mixed reviews at best. On one hand, people love the fact that Microsoft hasn’t messed up like Windows 8 last time and more importantly has managed to keep the Start menu sleek and stylish while including productive features in the new menu. However, the lack of detailed settings, the ability to access various programs, and the huge pinned apps section seem to be throwing some people off.
In any case, you can always customize your Start menu in Windows 11 depending on how you like it. Here’s how you can customize the Start menu to your advantage.
Related: How to use Print Screen on Windows 11
Did you know that you can move your Start menu to the left in Windows 11? That’s right! If the center-aligned Start menu is too Apple-like for you, then you can always switch to the traditional left-aligned start menu using the guide below.
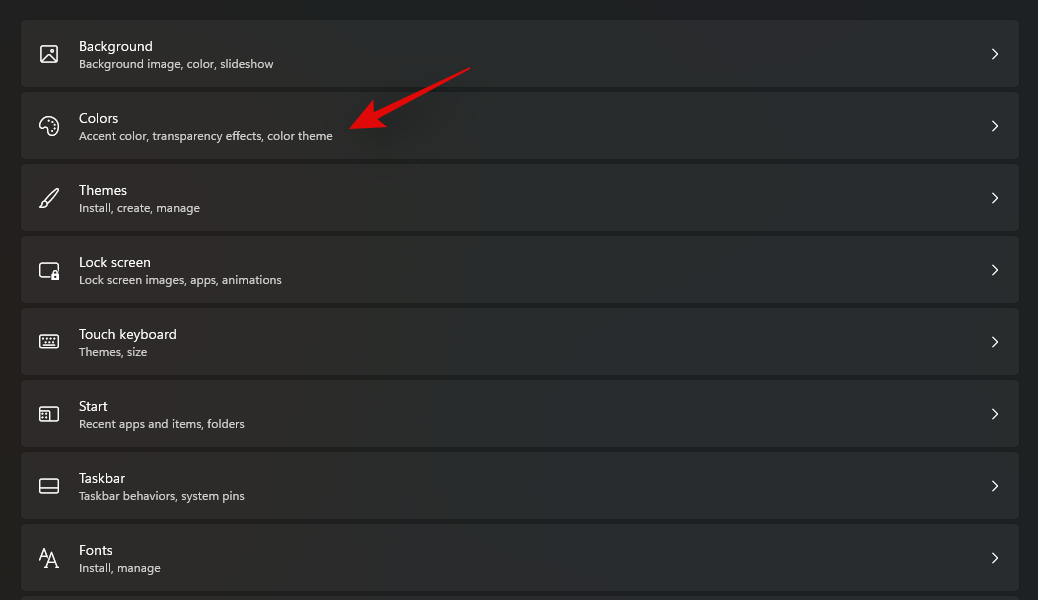
- Press ‘Windows + I’ on your keyboard to open the Windows Settings app on your PC. Now click and select ‘Personalization’.

- Click on ‘Taskbar’ on your right.
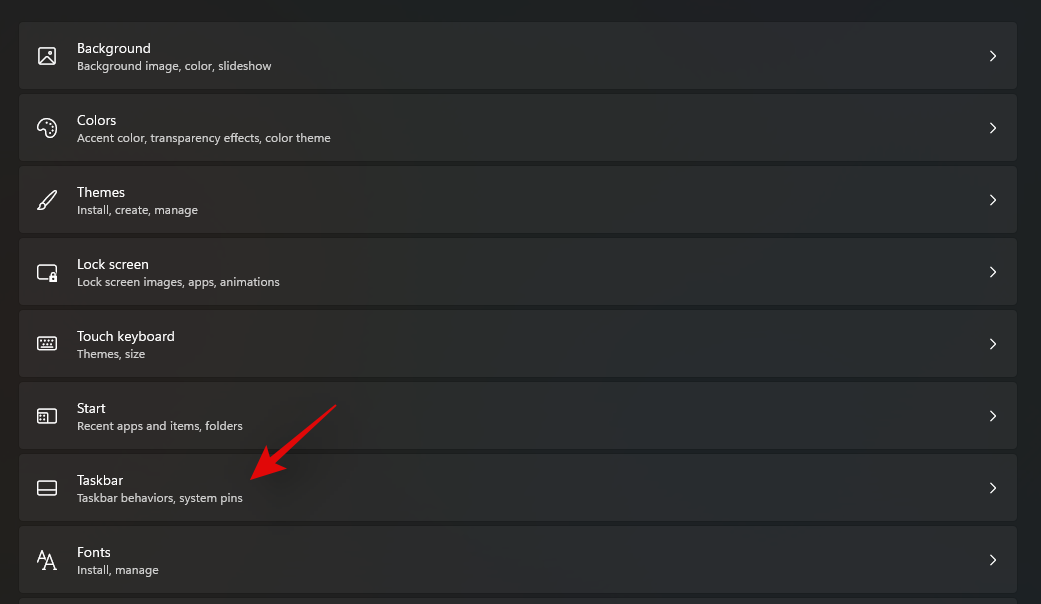
- Click and expand ‘Taskbar behaviours’.
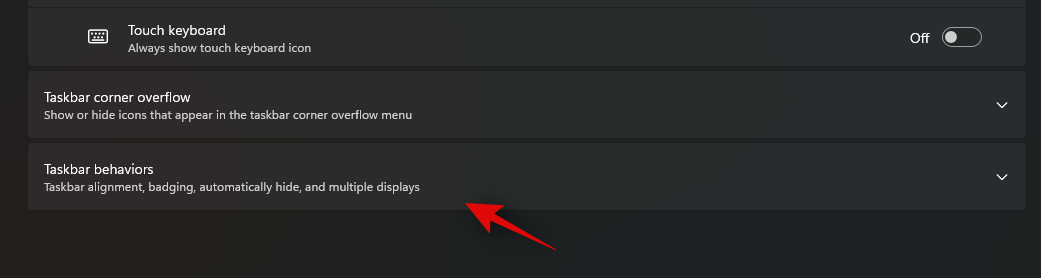
- Now click on the drop-down menu for ‘Taskbar Alignment’ and select ‘Left’.
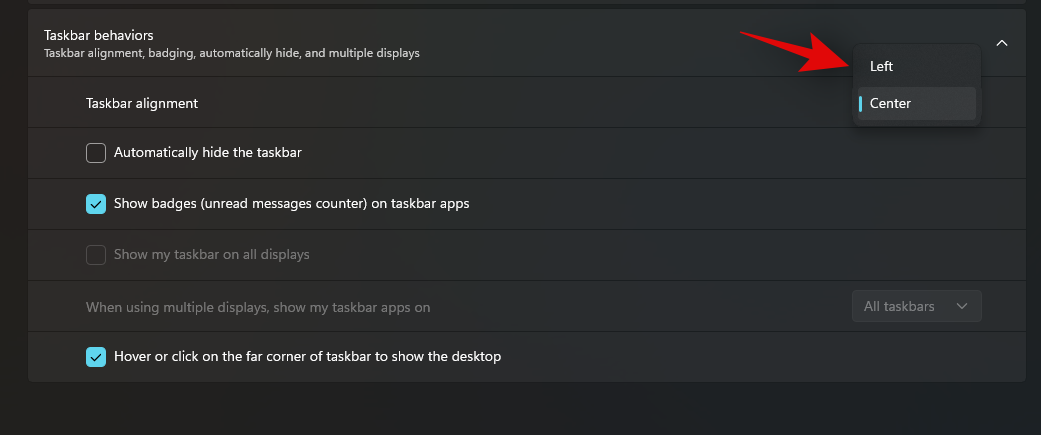
And that’s it! The entire taskbar along with the Start menu will now be aligned on the left side of your screen.
Pin useful apps and folders

Another way to customize your start menu is to pin your most accessed files and folders to it. This way you can directly access your most-used files and folders from the Start menu, with a simple click, no matter where you are on your desktop. To Pin, an item to a start menu, be it a file or a folder, right click on it, and then select ‘Pin to Start’. Once selected, the item will be automatically added to the ‘Pinned’ section of your Start menu.
Unpin unnecessary apps
The next step would be to Unpin all unnecessary default apps automatically added by Microsoft to your Pinned section. By default, Microsoft adds tons of apps and shortcuts to your Pinned section so that they can be directly downloaded on your PC with a simple click. However, not everyone likes a cluttered Start menu. And you can use the guide below to easily remove Pinned items from your Start menu.
Click and open the Start menu on your Windows 11 PC and right-click on the app you wish to remove from the ‘Pinned’ section. Now click and select ‘Unpin from Start’.

And that’s it! The selected app should now be automatically unpinned from your Start menu.
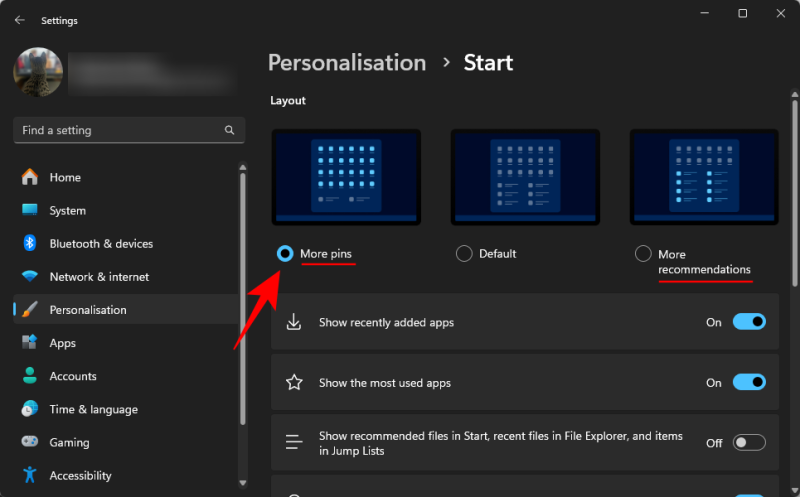
Add More pins or More recommendations
If you have need additional space for either ‘More pins’ or ‘More recommendations’, you can set that up in the Start menu as well. Here’s how:
- Open the Settings app.
- Go to Personalization > Start.
- Here, select either More pins (to add more apps to the Start menu) or More recommendations (for more space for recommendations).
In addition to the above customizations, you can also go back to the old Windows 10 Start menu if you wish. The Start menu will automatically appear on the left side of your screen if you opt for the older Start menu.
You can use this comprehensive guide by us to get the old Windows 10 Start menu on your Windows 11 PC using a registry edit. Keep in mind that this might not be a suitable guide for beginner users, especially if you are unfamiliar with the registry editor.
► How to Get and Customize the New Windows 10 Start Menu Redesign
You can also individually set the accent color for your Start menu which can be different from your Windows theme accent color. This can help you give a unique and contrasty look to your Start menu. You can also use this customization to your advantage to create a unique UI look for your system by using a different color palette altogether. Here’s how you can change the color of your Start menu.
- Press ‘Windows + I’ on your keyboard to open the Settings app. Click and select ‘Personalization’.
- Click on ‘Colors’ on your right.
- Under ‘Choose your color’ click on the drop-down menu and select ‘Dark’ or ‘Custom’.
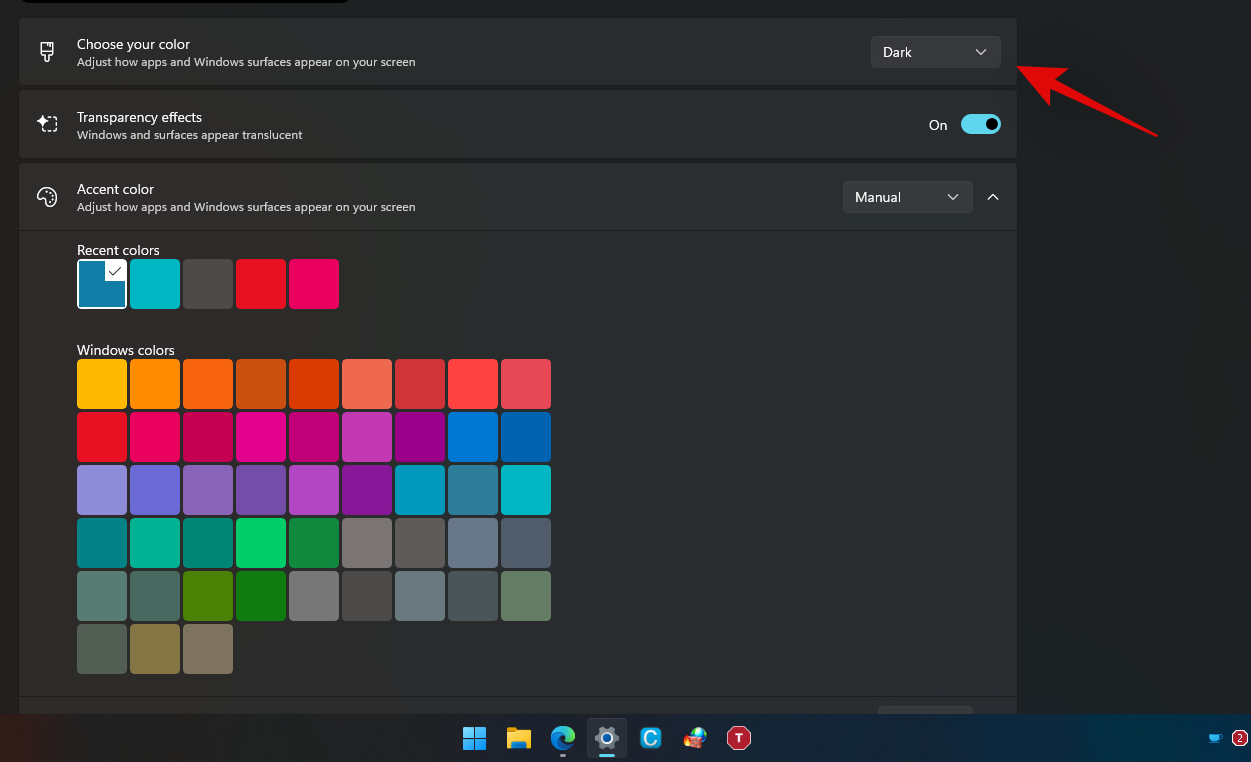
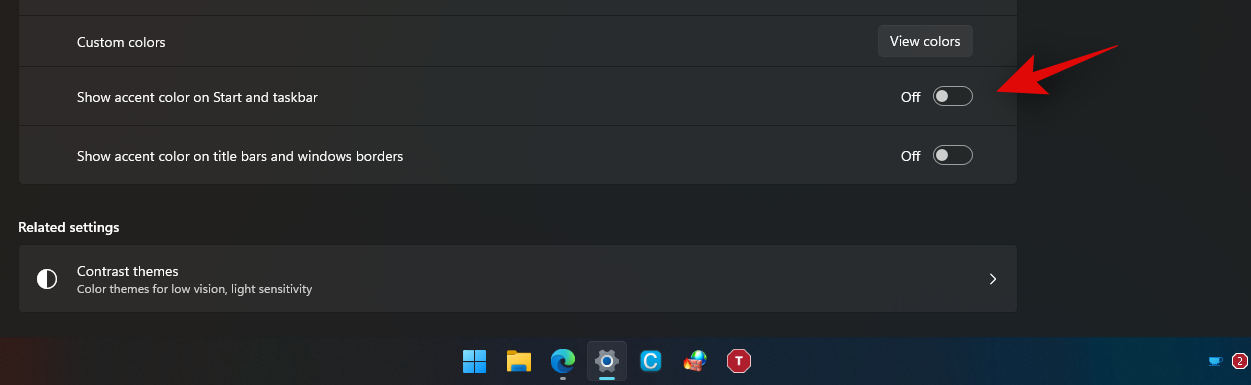
- Now turn on the toggle for ‘Show accent color on Start and taskbar’.
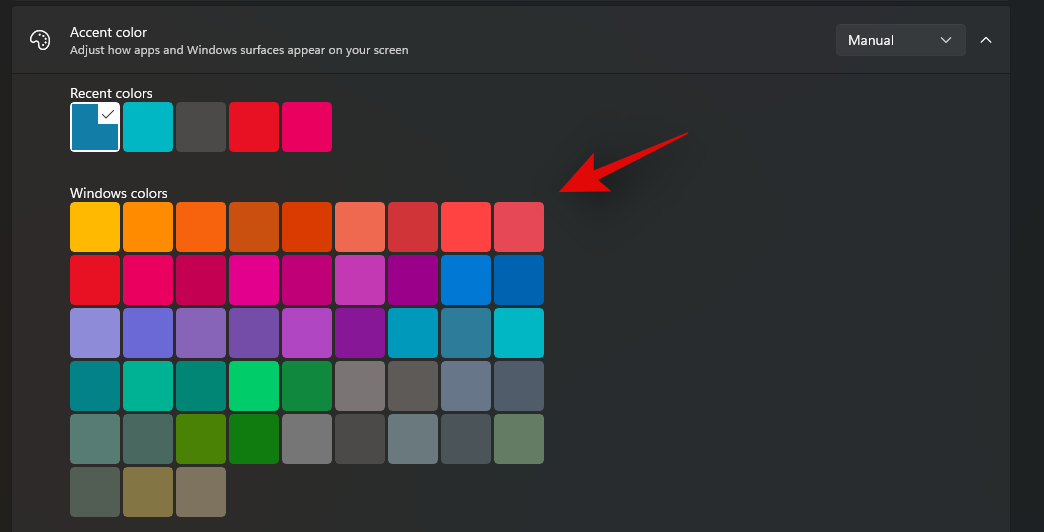
- Pick and choose an accent color you like.
And that’s it! The color should now be changed and you can confirm the same by accessing the Start menu from your taskbar.
Disable/Enable Recently added apps
The start menu will automatically start showing you recently added apps and programs on your device at the top. If you wish to disable/enable this feature, then you can use the guide below.
- Press ‘Windows + I’ on your keyboard to open the Settings app and click on ‘Personalization’.
- Now click on ‘Start’.

- Disable the toggle for ‘Show recently added apps’.

And that’s it! Recently added apps will no longer show up in the top section of the Start menu.
Disable/Enable Most used apps
The new start menu also has a ‘Recommended’ section where Windows will suggest the most accessed files, apps, and folders based on your usage. This can be used to easily access your most-used apps and locations.
However, if you wish to turn off this setting you can easily do so using the guide below. If you wish to enable this setting then enable the toggle in the guide below instead of disabling it. Let’s get started.
- Press ‘Windows + I’ on your keyboard to open the Settings app. Click on ‘Personalization
- Now click on ‘Start’ on your right.
- Now disable the toggle for ‘Show most used apps’.

And that’s it! Windows will no longer show you your most-used apps and files in the Start menu.
Disable/Enable Recently opened items
In addition to most used and recently added apps, Windows will also suggest items based on your usage and recently opened items. While a great feature, it can sometimes be time-consuming and unnecessary to have multiple random files show up in your Start menu. You can use the guide below to easily enable or disable ‘Recently Opened’ items on your device.
- Press ‘Windows + I’ to open the ‘Settings’ app. Now click and select ‘Personalization’.
- Select ‘Start’ from your right.
- Now click and disable the toggle for ‘Show recently opened items in Start, Jump lists, and File Explorer’. Additionally, enable the toggle if you wish to enable this feature instead.

And that’s it! Recently opened items will now be removed from your Windows 11 Start menu.
Move most used Pinned items to the top
Pinning items is a great feature in Windows that allows you to quickly access your most used, files, apps, programs, folders, and locations. But you only have limited screen real estate when it comes to Pinned items and if you have tons of them, then they will be scattered and split into different pages. This can be quite detrimental to the feature itself if you have to still find your desired item from a list of pinned items. Hence if you have a large list of pinned items, then you can use this guide to bring the most used ones to the top for easy access. Let’s get started.
Click and open the Start menu and scroll to the Pinned app that you wish to move to the top. Now right click on the app icon and select ‘Move to top’.

And that’s it! The selected item will now be moved to the top of the Pinned app list.
Recently, Microsoft has also been experimenting with new sections to the Start Menu, such as a Phone Link integration. Although it’s not a reality yet, we’ll be sure to provide an update (and a How-to) when it’s released.
We hope this guide helped you customize your Windows 11 Start menu the way you like. Although Microsoft doesn’t offer many options, we hope you were able to achieve the look that you were going for. If you face any issues or have any more questions for us, feel free to reach out using the comments section below.
RELATED
- How to install Windows 11 offline
- How To Fix Windows 11 Can’t Install Error
- Will VB6 Apps work on Windows 11?
- How To Replace appraiserres.dll t fix Windows 11 error
- Windows 11 Not Installing on Virtualbox? How To Fix
- How To Remove Windows 10 Installation Files on Windows 11
- How to Change Time on Windows 11


