
Windows 11 is the new iteration of Windows in town. It brings a new and improved UI, enhanced services, Microsoft Edge integration and more importantly, the new and improved Start menu. For now, it seems that Windows 11 is quite similar to Windows 10 under the hood, with many of the programs running the same services and tasks as Windows 10.
However, this hasn’t deterred early adopters, who have been facing a few compatibility issues with the new OS here and there. If you too have been getting incompatibility errors or installation errors when installing Windows 11 on your system then you can try one of the fixes below. In case you are trying to install the OS on a VM and are facing issues, then we recommend you jump to the ‘VM Specific fixes’ section below. Let’s get started.
If you are trying to install Windows 11 on a VM or your daily system, here are a couple of general fixes that will help you fix installation errors on all kinds of systems. Let’s start with the first one.
Fix #1: Enable TPM 2.0
TPM 2.0 or Trusted Platform Module is a small microcontroller on your PC that helps store encrypted information on your system like your Windows Hello data, Windows PIN, passwords and more. Windows 11 needs TPM 2.0 to function properly. Without this enabled, Windows 11 can not securely install or function on a modern system. Let’s check if TPM 2.0 is enabled or disabled on your system.
Let’s first check the current status of TPM on your Windows PC first.
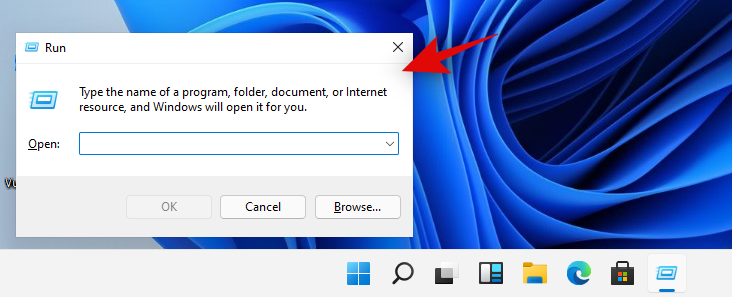
Press ‘Windows + R’ on your keyboard to open the Run dialog box.
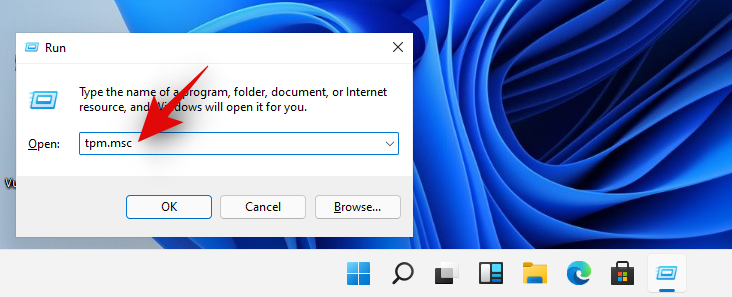
Now type in the following command and press ‘Enter’ on your keyboard.
tpm.msc
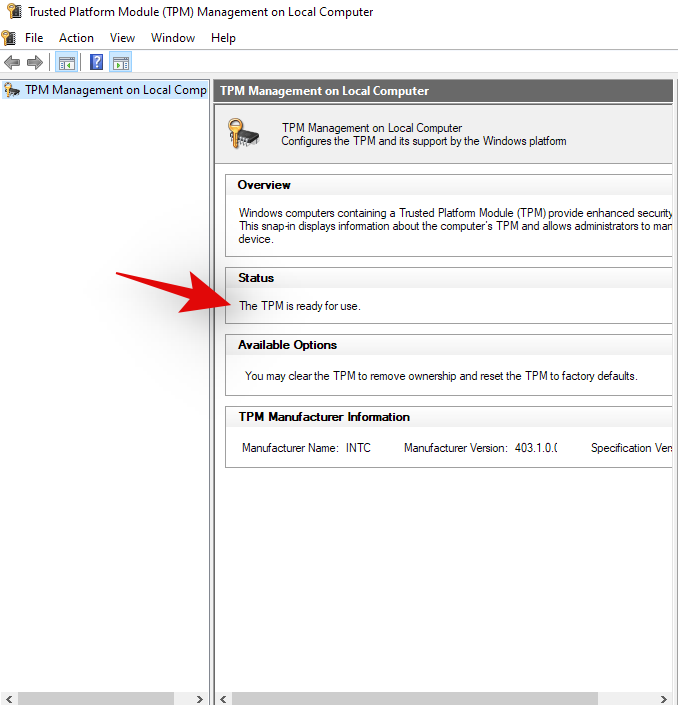
Check the ‘Status’ section on your right. If the status says ‘Ready to use’ then it is already enabled on your system and you can try one of the other fixes below. If however, the status reads, ‘Compatible TPM cannot be found’ then TPM is likely disabled in your BIOS settings.
Enabling TPM can be a different experience for everyone depending on their system, OEM or motherboard manufacturer. BIOS menus differ slightly with every manufacturer be it of the component or your entire system. Hence we recommend you visit your OEM support site to check for TPM 2.0 and how to enable it. Generally, you will find the TPM option located in the ‘Security’ section of your BIOS menu. You can enable TPM by selecting a compatible device from this list on your system.
Fix #2: Enable Secure Boot
Secure Boot is another BIOS setting that Windows 11 requires to be enabled for a proper error-free installation on your system. Use the guide below to check if secure boot is enabled on your current system. Let’s get started.
Let’s first check if Secure Boot is enabled or disabled on your PC right now.
Press ‘Windows + S’ on your keyboard to bring the Windows search.

Now search for ‘msinfo32’ and press ‘Enter’ on your keyboard. Launch the ‘System Information’ app once it shows up in the search results.

Ensure that ‘System Summary’ is selected on your left.
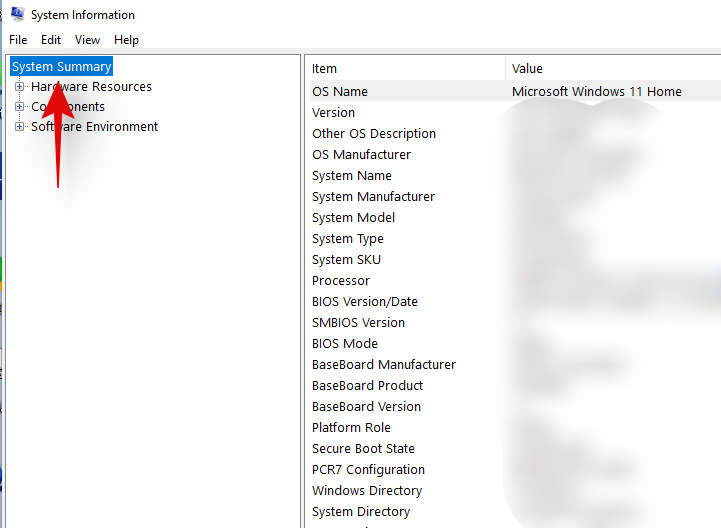
Now look for ‘Secure Boot State’ value on your right. Here is what each option means in this category.

- On: Secure Boot mode is enabled on your system.
- Off: Secure Boot mode is disabled on your system.
- Unsupported: Your system’s current resources or configuration currently does not support Secure Boot mode state.
If your Secure Boot Mode option says ‘Off’ or ‘Unsupported’ then it is likely the cause of your issue. For ‘Unsupported’ systems, you can try updating your BIOS, but if the lack of hardware resources is causing this, then you might need to upgrade your system.
Now, enable Secure Boot mode in BIOS.
As stated above, every BIOS is slightly different, hence you will have to reach out to your OEM to easily and safely edit your BIOS settings. Most OEM’s have a dedicated support guide on their support pages, so you might find some help there as well. Additionally, if you are looking to be a little adventurous, then always remember, that the Secure Boot mode setting is usually located in the ‘Security’ section of your BIOS.
Fix #3: Replace appraiserres.dll under Sources folder
Windows 11 like any other Windows is distributed through a digital ISO which is downloaded over your network connection. Network packets can sometimes go missing or get corrupted due to network issues or errors. In such cases, some files can get corrupted in the download process. Additionally, appraiserres.dll in the ISO is also known to cause this issue which can be easily fixed by replacing the said .dll file. You can use our comprehensive guide at this link to fix your issue. See the page linked below, please.
► How To Replace appraiserres.dll in Windows 11 Setup
Fix #4: Change your storage configuration
While Windows 11 works and requires only around 20GB of storage for installation, it needs additional storage space to properly unpack and store temporary files. If you seem to be running out of space and only have the required amount of space available, then it is possibly the reason why you are unable to install Windows 11.
We recommend you back up your files and free up some additional storage from your device for a proper installation of Windows 11. If however, you have enough storage space on your install disk, then you can try one of the other fixes mentioned below.
Fix #5: Ensure that you have enough RAM
Windows 11 requires a minimum of 4GB RAM to function properly. While the OS is known to run on less powerful systems, you can face memory leaks or overstress during the install process which causees your PC to freeze and in the worst cases, cause your installation to fail.
We would recommend you increase/allot more RAM to your Windows 11 system to avoid any possible memory leaks which could interfere with the installation. If you still insist on installing Windows 11 on your system, then we would recommend you start from scratch with the least amount of services running in the background to save up on resources.
► Windows 11 Compatibility: Can Your PC Run Windows 11?
Fix #6: Ensure that you have enough video memory
Video memory seems to be another requirement for Windows 11 that many people seem to have overlooked. Windows 11 lists at least 64MB of dedicated video RAM to function properly. And in case you are limiting resources for your new OS then it might be the reason why Windows 11 won’t install on your system. We recommend increasing your video memory and even allotting some of your RAM from the BIOS if your OEM allows you to do so. Once Windows 11 is able to install on your system, you can try limiting its resources again with only a few minor glitches as the consequence.
Virtual Machine (VM) Specific Fixes
In case you are trying to install Windows 11 on a Virtual Machine then there might be a few settings that you might have overlooked which in turn are causing incompatibility issues with Windows 11. These also include things like limited RAM, Storage, and video memory. Hence we recommend you go through the checklist above on your VM before proceeding with the specific fixes below. Once you have gone through the checklist above, you can start with the first fix listed below.
VM Fix #1: Ensure that the correct Windows type has been selected
Most VM’s including Virtualbox allows you to dictate which version of Windows will be installed on your VM. Your choice of VM client then applies the default settings for the selected OS for optimum function. However, as Windows 11 is still in its infancy, it is still yet to be officially supported by most emulators, hence you will need to make a correct compatible choice for your default settings. In case you are using Virtualbox, you will need to select ‘Windows 10’ as your Windows type when setting up your Virtual machine.

Windows 11 is an upgrade to Windows 10 hence it is compatible with most default settings for the OS. In case this option was selected incorrectly, then the virtual machine you created will be incompatible with Windows 11 which is likely the cause of your errors.
VM Fix #2: Ensure that the correct Video Adapter is selected
In addition to the default VM settings, you will also need to ensure that the correct video adapter has been selected for your VM. Just like the lack of video memory can cause installation errors, so can incorrectly selected video adapters currently incompatible with Windows 11. If you are using Virtualbox, then you need to select ‘VBoxSVGA’ as your video adapter. Selecting any other adapter will result in video artifacts and cause installation or incompatibility errors during the process.

We hope this guide helped shed some light on fixes that you can use to fix incompatibility errors when installing Windows 11. If you have any more questions, feel free to reach out to us using the comments section below.


