The security of your PC is of paramount importance, no matter what you do it. Being the world’s most popular operating system, Windows users are the target of a lot of online and malware attacks. Fortunately, Windows’ security features have remained ahead of the game thanks to a slew of features.
Even if you have a third-party antivirus installed, Windows’ in-built protection system – the Windows Defender – which is part of a yet wider suite of security features, can provide an additional layer of protection. In this guide, we take an in-depth look into what Windows Defender is, why you should keep it on, and how to do it.
What is Windows Defender?
Windows Defender is Windows’ native anti-virus program. When taken together with other security features like cloud protection, firewall & network protection, and controlled folder access, we have Windows Security – a central hub for all your security settings. Over the years, Windows has been upgrading its security features and adding more and more ways to keep your system and your data secure. But Windows Defender has been around for a while, and now finds itself part of a larger retinue that serves Windows Security on the whole.
Related: How to disable Windows Defender in Windows 11
Why should you keep Windows Defender turned on?
When turned on, Windows Defender will actively protect your system from the moment you turn it on. The Windows Security suite will scan for viruses, malware, and other threats. On top of this protection offered in real-time, Windows Defender will ensure that the latest signature updates are in place so that your device stays protected from the ever-changing types and kinds of computer viruses.
For all these reasons you should keep Windows Defender turned on. Moreover, if you haven’t installed an antivirus software separately, you should definitely turn Windows Defender on now if you don’t want to be at the mercy of online attacks.
Related: How to Scan for Malware on Windows 11 in 2022 [AIO]
How to check if Windows Defender is running
If you have never made any changes to the Windows Defender, in all likelihood it would be turned on and running in the background. Nevertheless, if you want to confirm the same, here’s how you can check if Windows Defender is running on your system:
- Press Start, type windows security, and hit Enter.
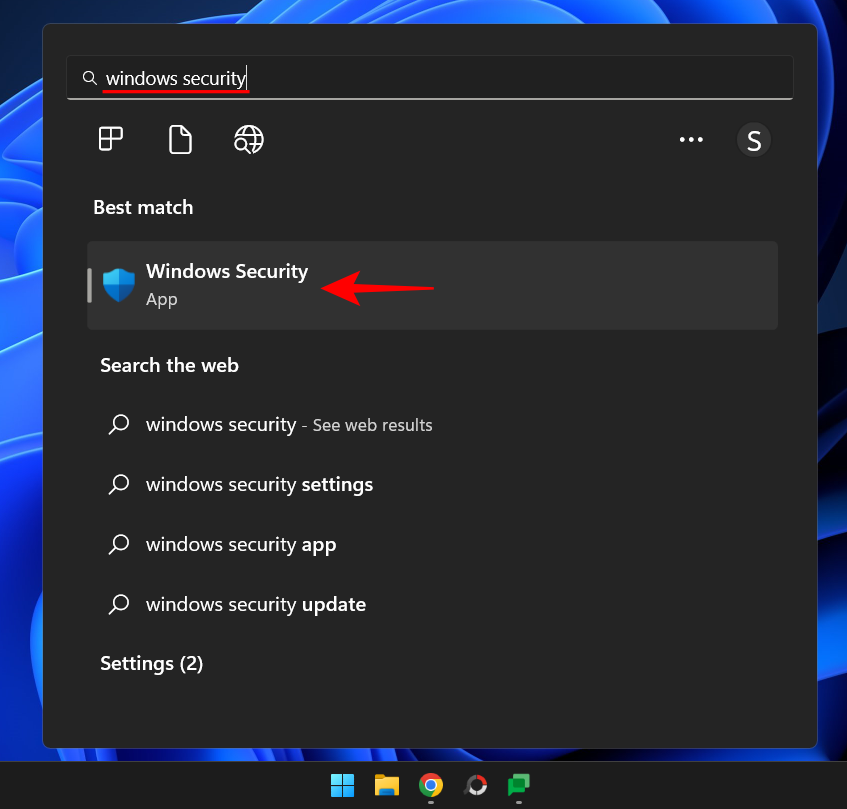
- On the ‘Home’ page, if there’s a check next to Virus & threat protection, Windows Defender is turned on.

- There’s another, simpler, way to check if Windows Defender is running. Click on the up arrow just before the system tray.
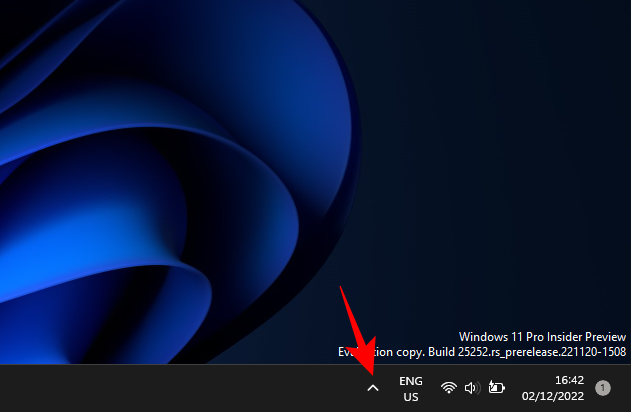
- Here, look for a small shield icon. If it has a green tick, then Windows Defender is on and running normally.

- If there’s a yellow exclamation mark on it, then there are Windows Security features that are turned off and your system might experience some security issues.

- If there’s a red cross on it, it means that some important parts of Windows Security are turned off.

- Simply click on it to get to the Windows Security app.
Related: How to use the PC Manager App on Windows 11
How to turn on Windows Defender in Windows 11 (5 ways)
There are a few ways to turn on Windows Defender on Windows 11. Here’s a look at how to ensure that it is turned on and your system is well protected in the absence of a third-party antivirus.
Method 1: Using Windows Security
- Press Start, type windows security, and hit Enter.

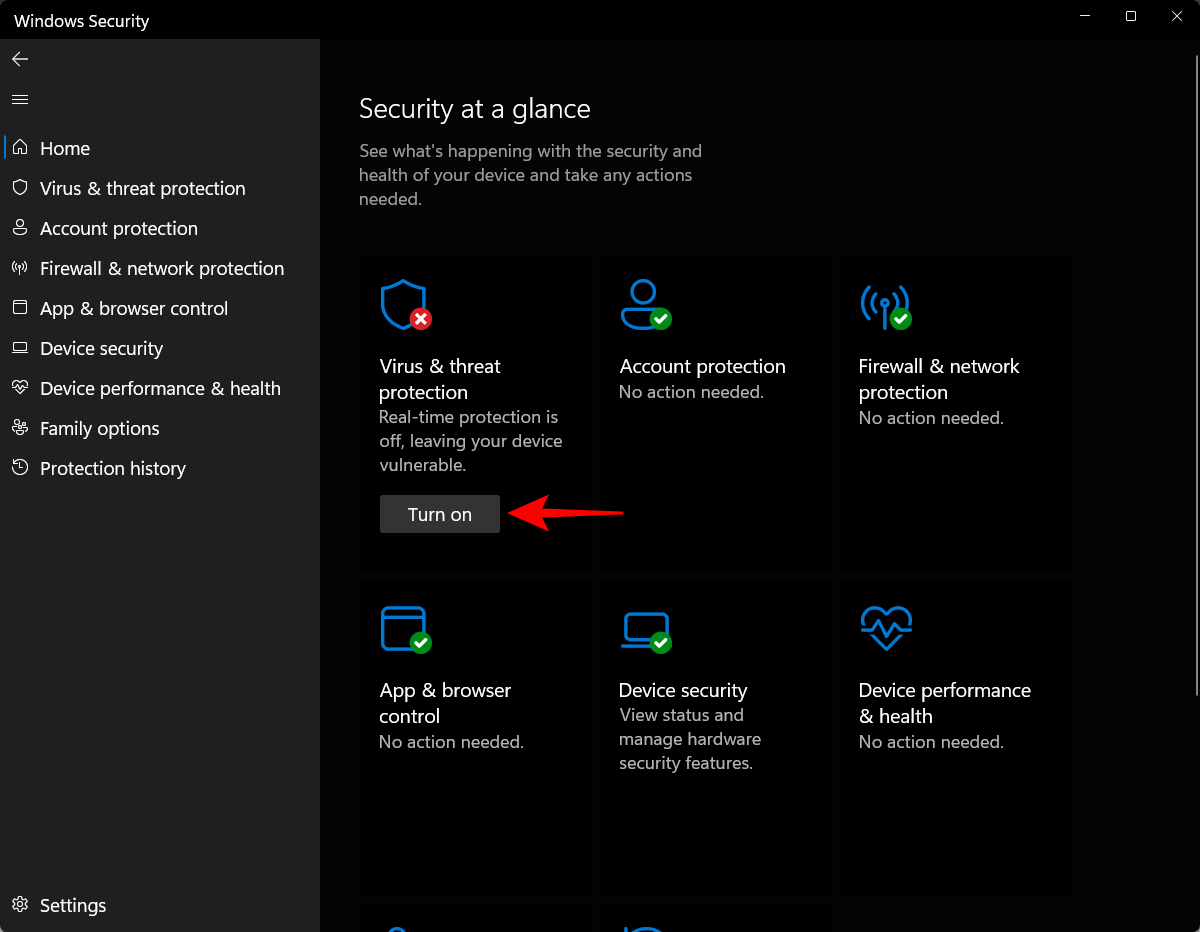
- Now, on the ‘Security at a glance’ page, click on Turn on under ‘Virus & threat protection’.
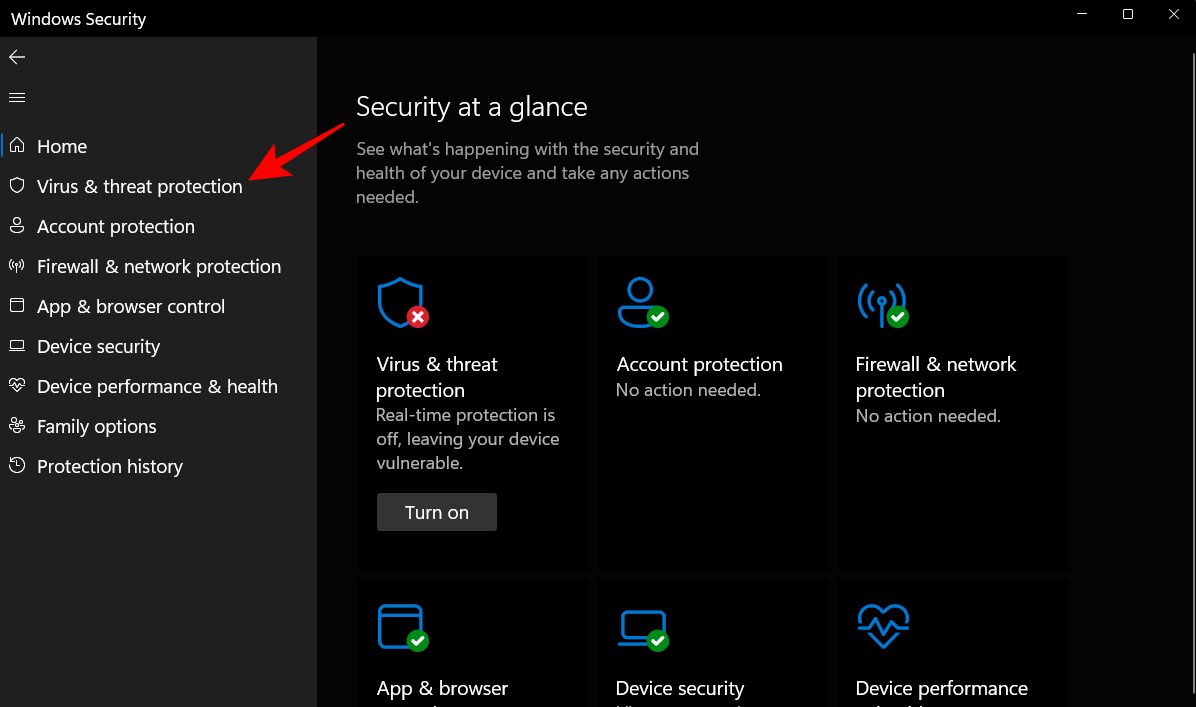
- Alternatively, click on Virus & threat protection in the left pane.
- If you see the option to Turn on ‘Virus & threat protection settings’, then click on it.

- Otherwise, click on Manage settings under ‘Virus & threat protection settings’.
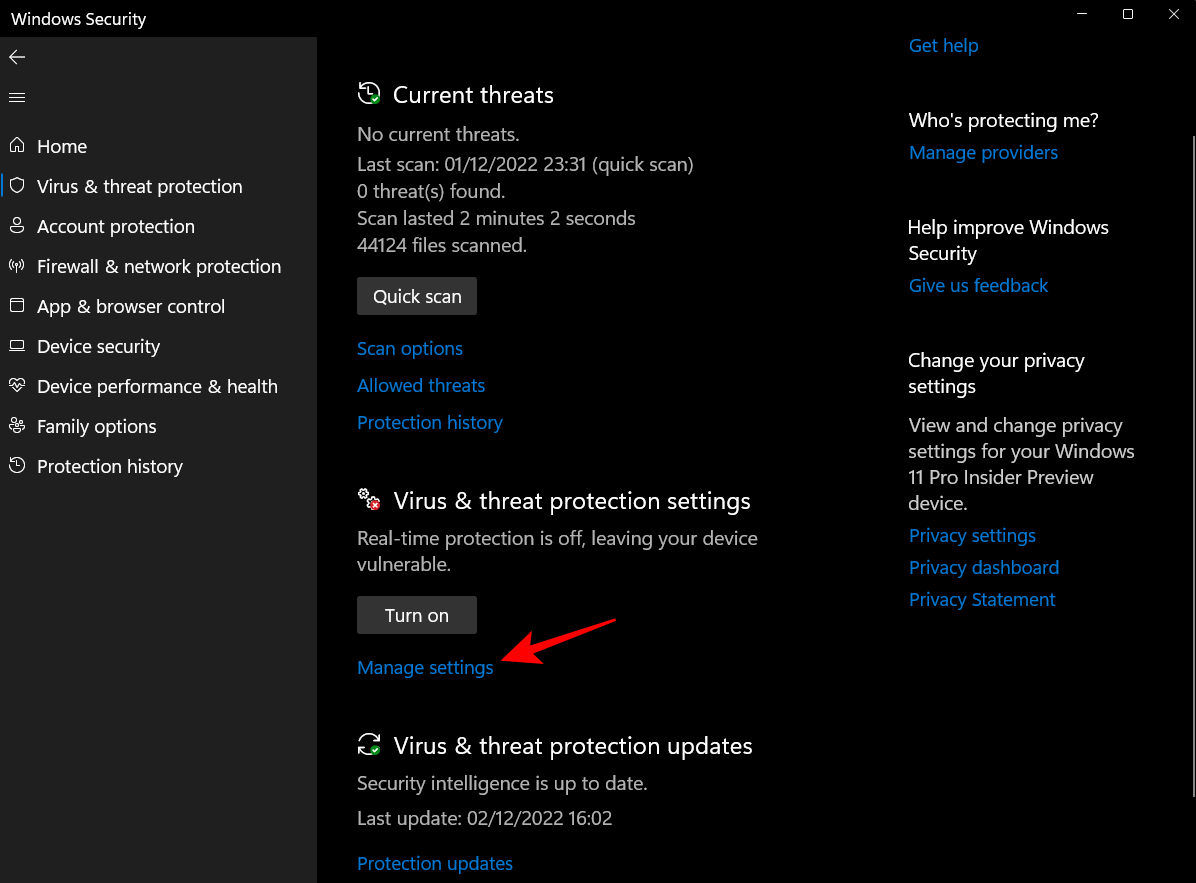
- Now, under Real-time protection, toggle the switch to On.

- You can also turn on other security features inside the Windows Security app.

- All you have to do is click on ‘Turn on’ under the features that you want to turn on, or toggle individual functions to the ‘On’ position.
Method 2: Using Settings
Another way to access the Windows Security app in order to turn on Windows Defender is to do so from the Settings app. Here’s how to go about it:
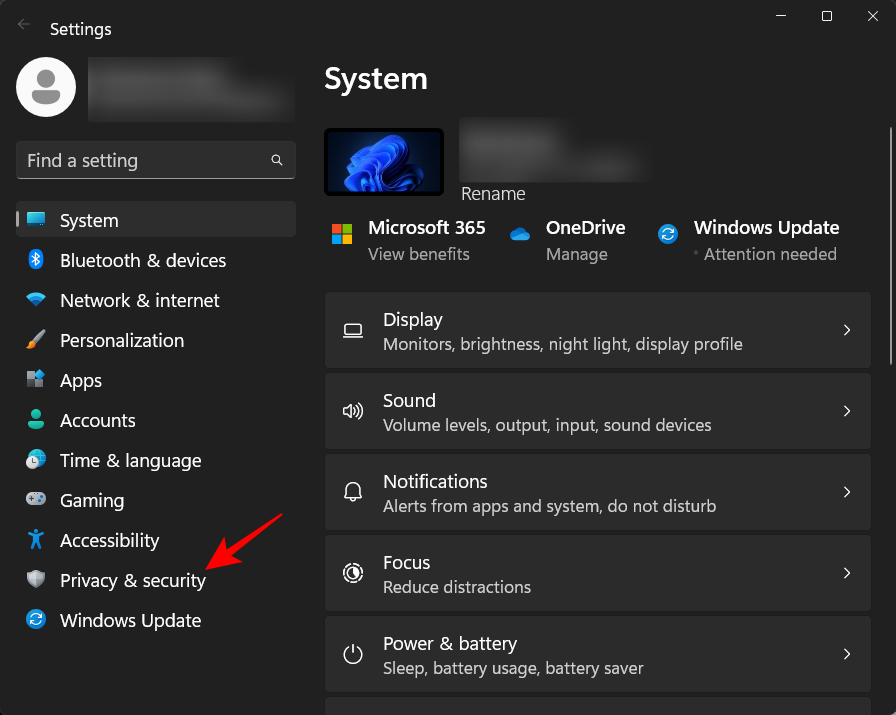
- Firstly, press
Win+Ito open the Settings app. Then click on Privacy & Security in the left pane.
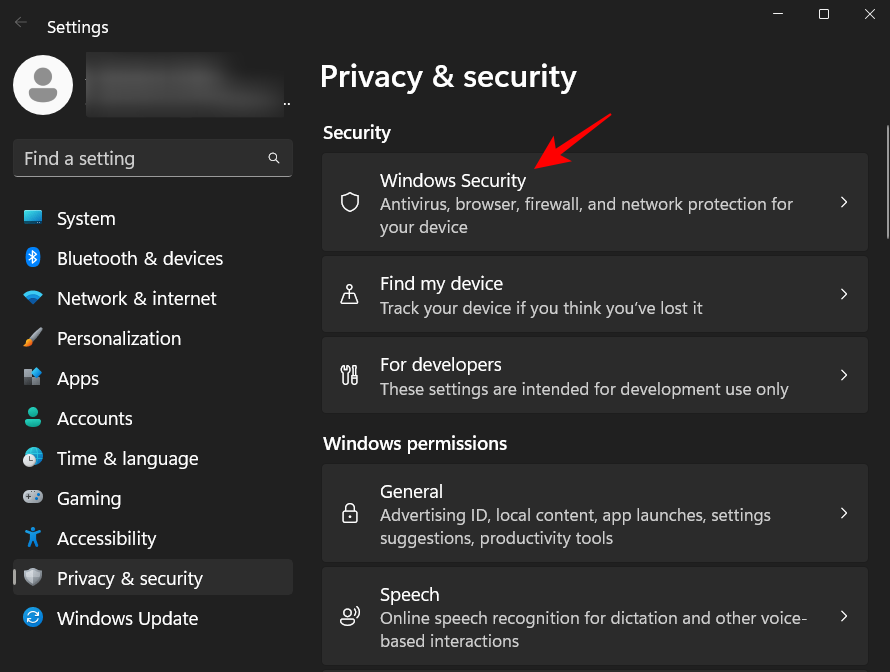
- Then click on Windows Security.
- Here, click on Virus & threat protection under ‘Protection areas’.

- This will open up the Virus & threat protection page of the Windows Security app. Here, simply click on Turn on under ‘Virus & threat protection settings’.
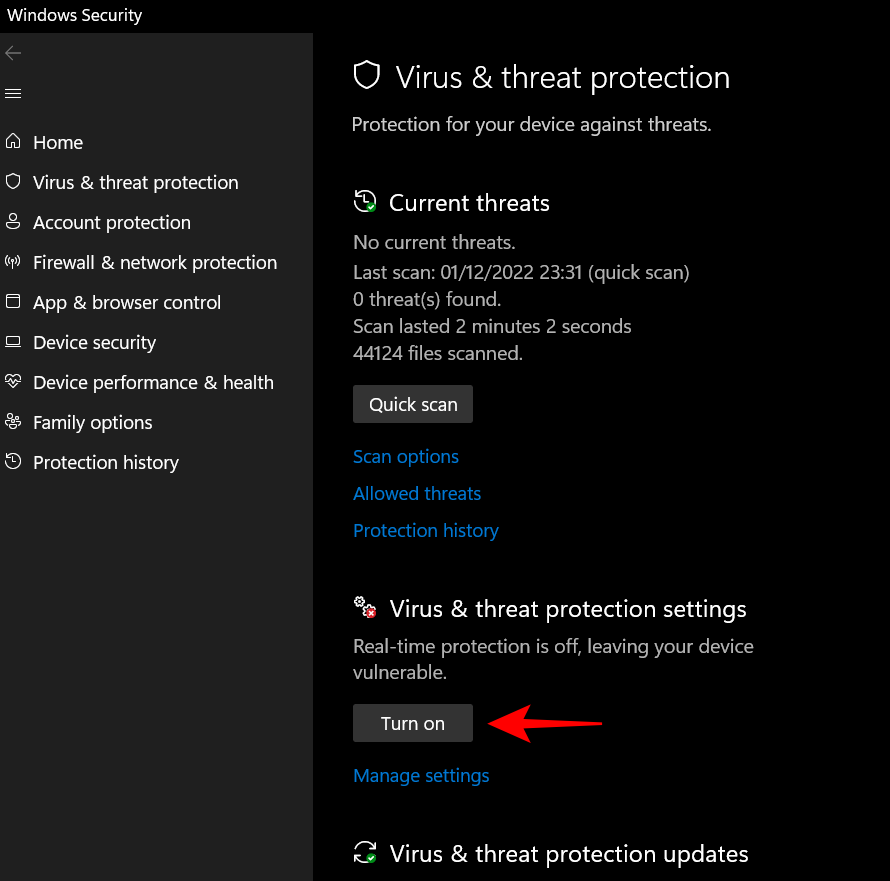
- Alternatively, click on ‘Manage settings’ and turn on Real-time protection as shown in the previous method.
Method 3: Using PowerShell
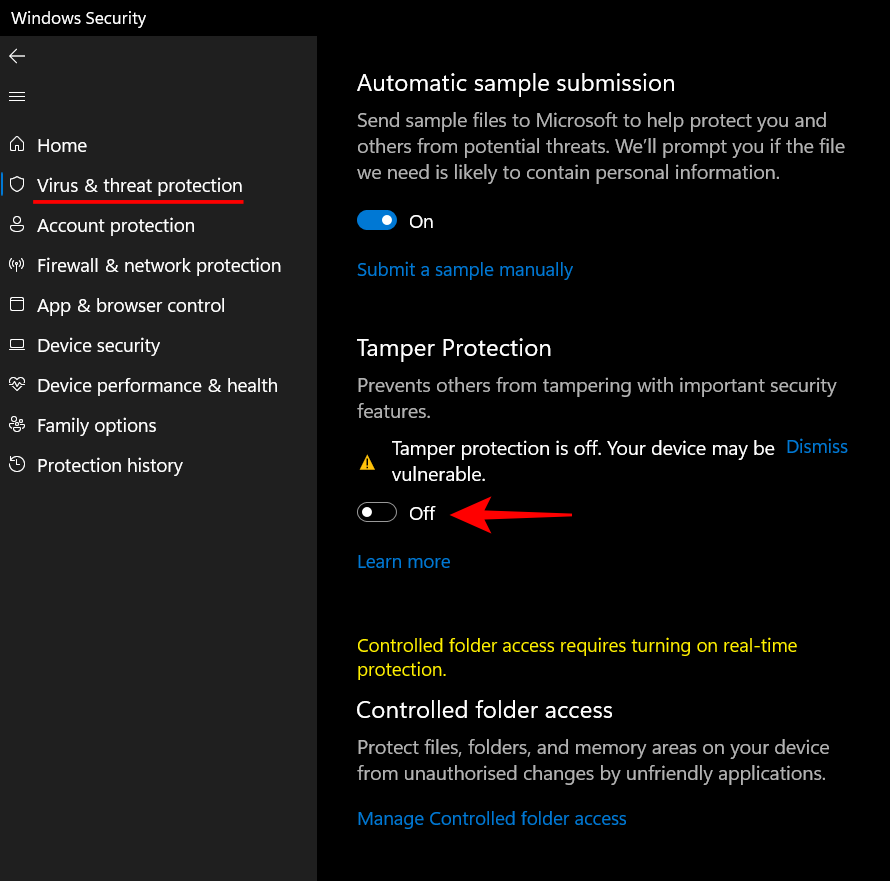
Before we move on to enabling Windows Defender from outside of the Windows Security app, there’s one feature that you need to know about – Tamper Protection.
Tamper Protection is an added security feature that prevents users and apps from making changes to Windows Defender from outside the Windows Security app. If this is turned on, no changes can be made to Windows Defender.
- The Tamper Protection settings can be found on the ‘Virus & threat protection settings’ page. Make sure it is turned off before moving on.
- Then, press Start, type powershell, then right-click the best-match result, and click on Run as administrator.

- Now type the following command to turn on the Windows Defender antivirus:
Set-MpPreference -DisableRealtimeMonitoring $false
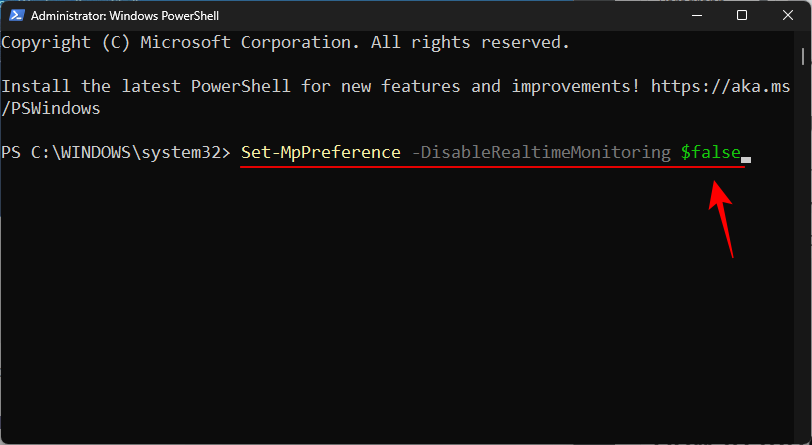
- Then hit Enter. Real-time protection will now be turned on. You can check this from the Windows Security app’s ‘Virus & threat protection settings’ page.
- Alternatively, you can also check this from within PowerShell as well. Type the following command:
Get-MpPreference | Select-Object DisableRealtimeMonitoring
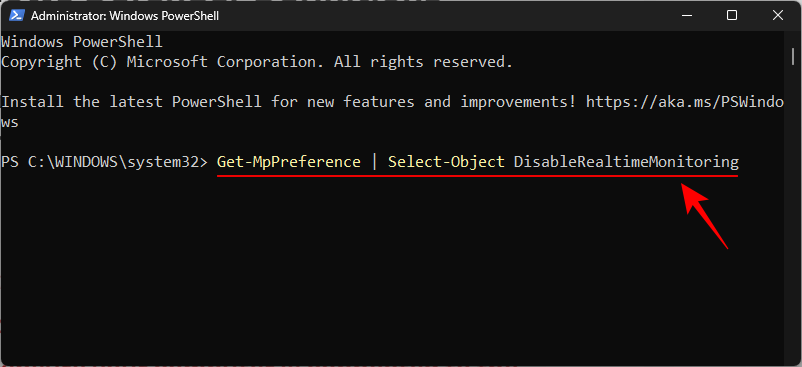
- Then hit Enter. If you get the ‘False’ message, that means that Windows Defender’s real-time monitoring is turned on and is serving its anti-viral purpose.

Method 4: Using Group Policy Editor (GPE)
Windows Defender can also be turned on from the Group Policy Editor. Of course, as before, any changes to Windows Defender from the outside can only be made if Tamper Protection is turned off. Refer to the earlier method to know how to turn it off.
- Once Tamper Protection is turned off, press Start, type gpedit, then hit Enter.
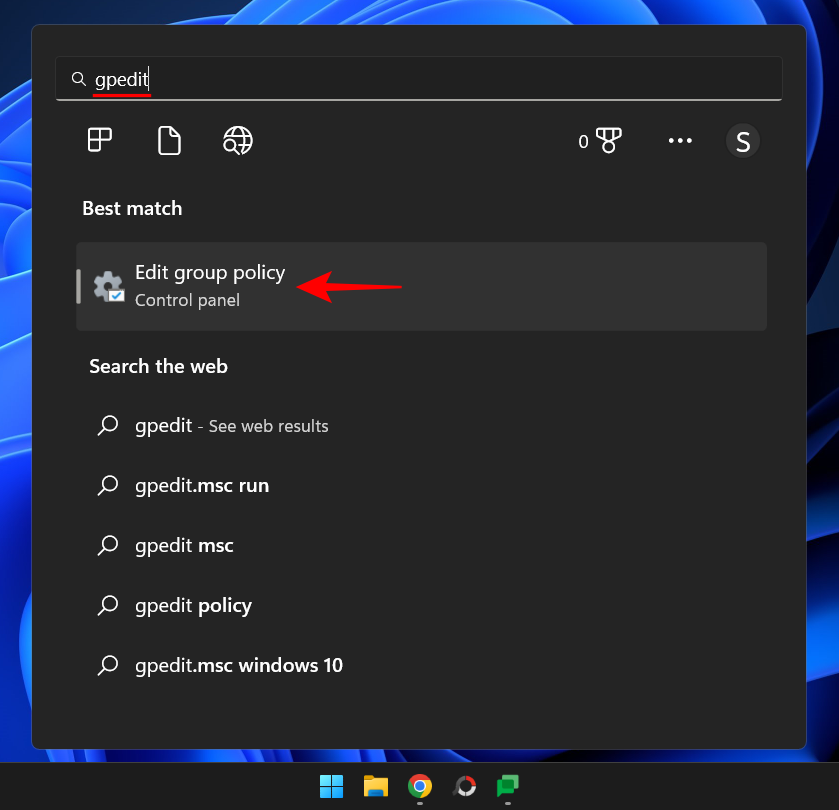
- Under ‘Computer Configuration’, expand the Administrative Templates branch.
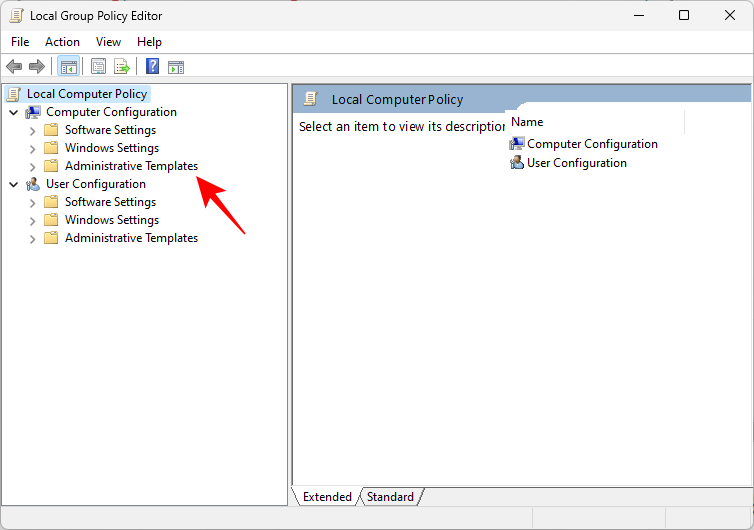
- Then expand the Windows Components branch.

- Scroll down and click on Microsoft Defender Antivirus.
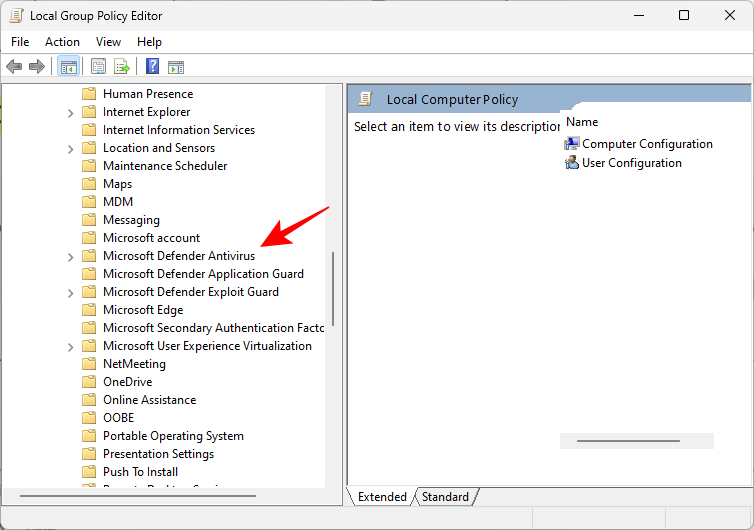
- On the right, double-click on Turn off Microsoft Defender Antivirus.

- Now, make sure you either select Not Configured or Disabled.
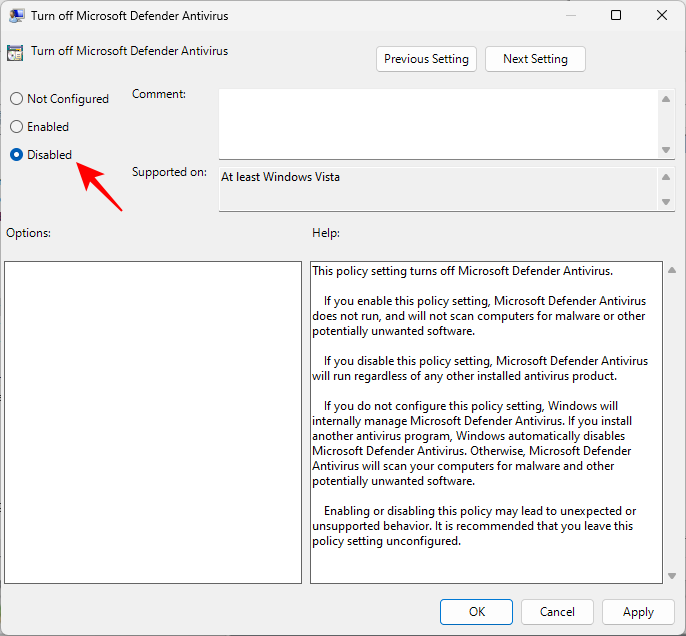
- Then click OK.
This will ensure that Windows Defender is not turned off.
Method 5: Using Registry Editor
This method is for users who like to tinker with the registry editor to make changes to their system. If you used the registry to disable Windows Defender, which can be a rather tedious process since it involves taking ownership of the Windows Defender folder (sometimes from the Safe Mode), then this is how you can re-enable it:
- Press Start, type regedit, and hit Enter.

- Navigate to the following address:
HKEY_LOCAL_MACHINE\SOFTWARE\Microsoft\Windows Defender
Alternatively, copy the above and paste it into the registry editor’s address bar as shown below.

- Then hit Enter. On the right, double-click on DisableAntiVirus.
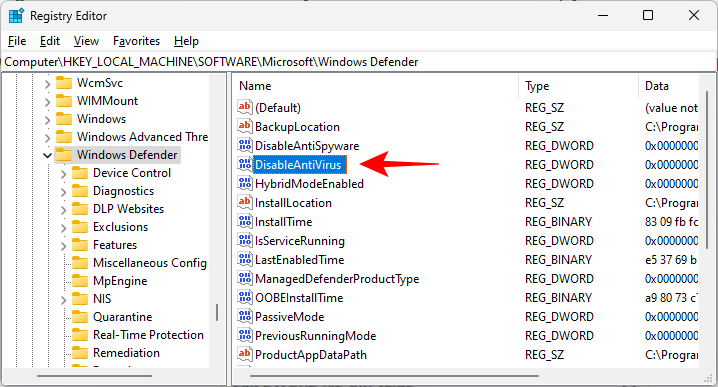
- Change the value data to 0.

- Then click OK.

- Now double-click on DisableAntiSpyware.

- Change the value data to 0.
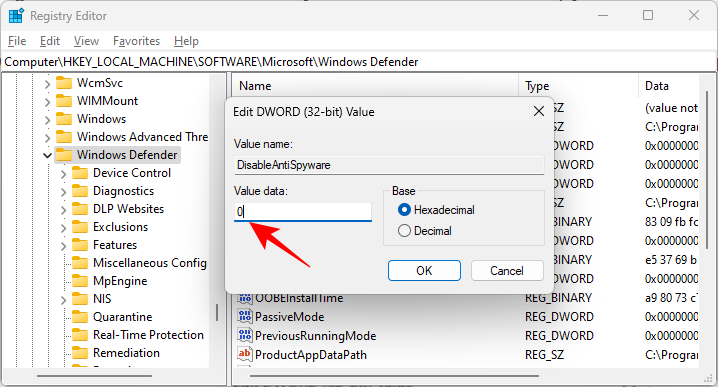
- Then click OK.
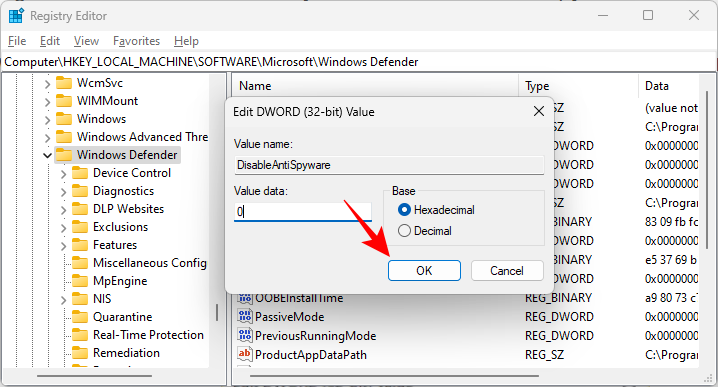
- Restart your computer for the changes to take effect.
How to turn on Windows Defender Firewall (2 ways)
Windows Defender Firewall is an important security component of Windows Security that safeguards users from online attacks. If you’re going to give your system all-round protection, the firewall should be turned on as well. Here’s how to do so using a couple of methods.
Method 1: Using Windows Security
- Press Start, type window security, and hit enter.

- On the Home page, you will see Firewall & network protection. Click on the Turn on button below it.

- Alternatively, you can go within this setting and choose which network type you want to turn the firewall for. To do so, click on Firewall & network protection.

- To turn on the firewall for the Domain network, click on Turn on under “Domain network”.

- To turn on the firewall for the Private network, click on Turn on under “Private network”.
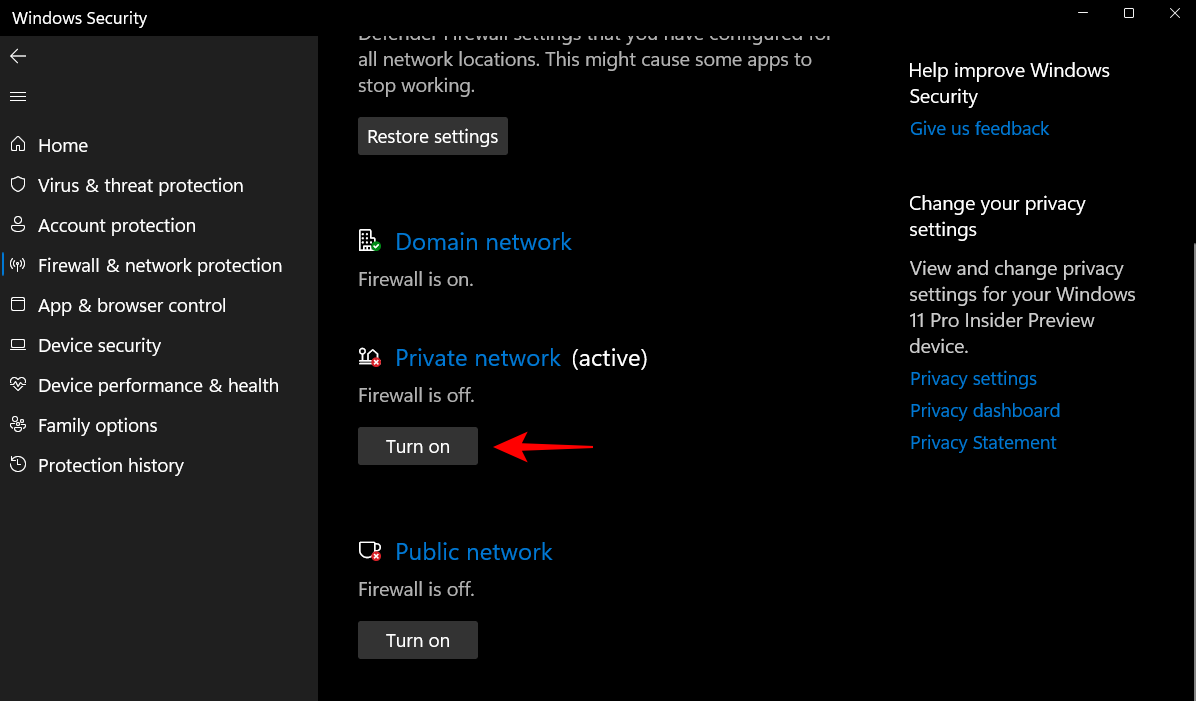
- To turn on the firewall for the Public network, click on Turn on under “Public network”.
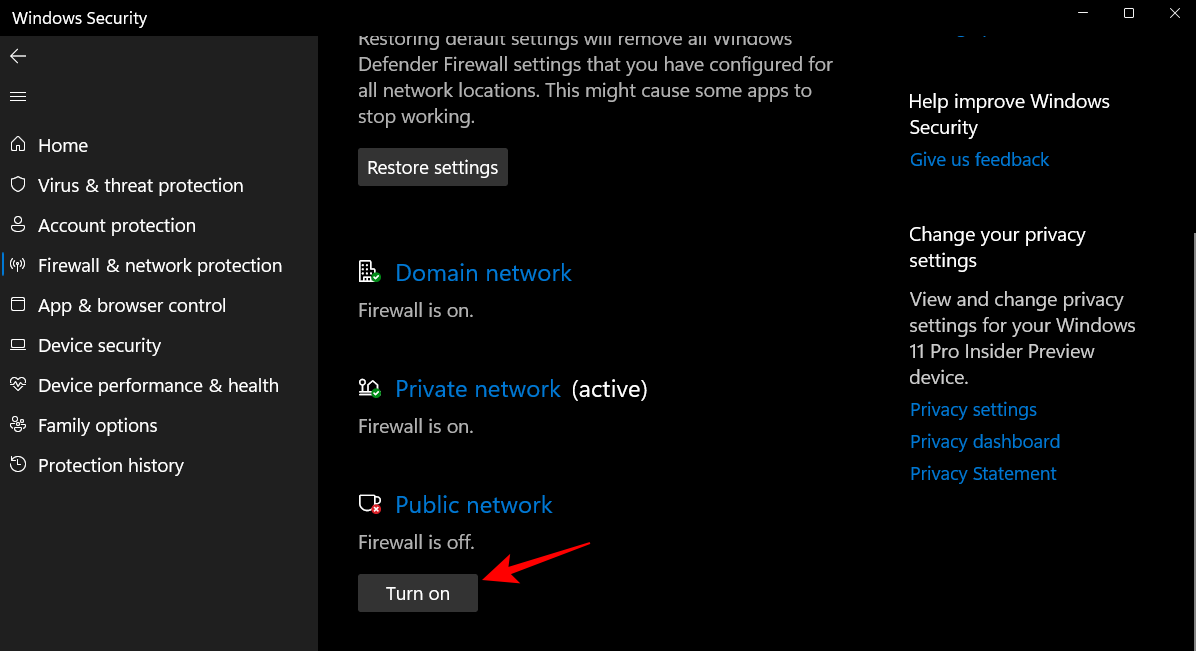
- Alternatively, to turn on the firewall for all three simultaneously, click on Restore settings.

- And just like that, you will have turned on Firewall & network protection on your system.

Method 2: Using PowerShell
Here’s how you can use PowerShell to turn on the firewall for different network types:
- Press Start, type powershell, then right-click on the best-matched result and select Run as administrator.
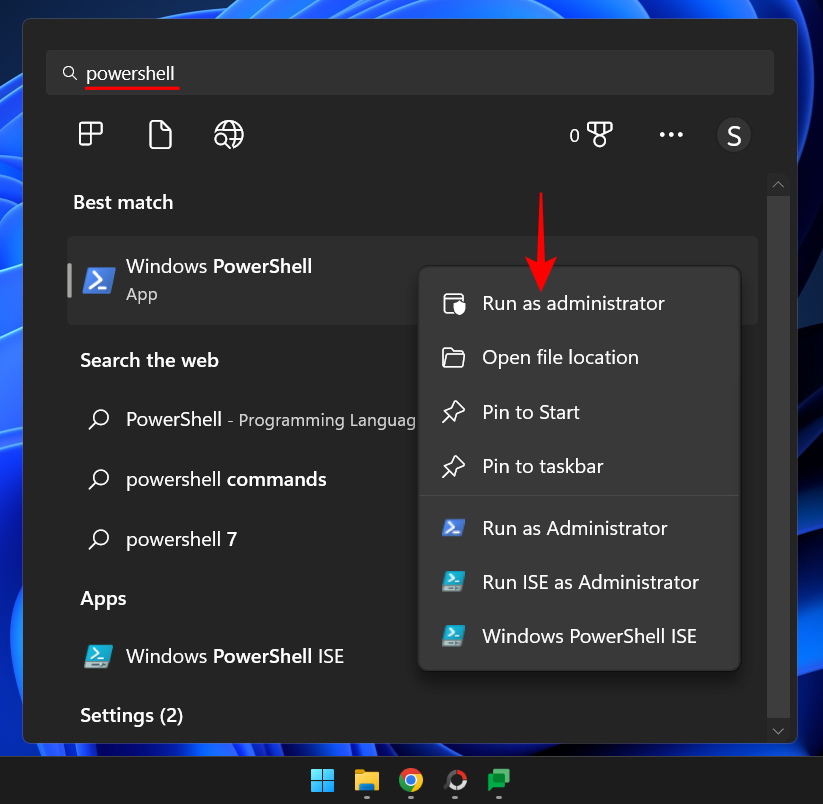
- Now, to turn on the firewall for your domain network, type the following command:
Set-NetFirewallProfile -Profile Domain -Enabled True

- Then hit Enter.
- To turn on the firewall for your private network, type the following command:
Set-NetFirewallProfile -Profile Private - Enabled True

- Then hit Enter.
- To turn on the firewall for a public network, type the following command:
Set-NetFirewallProfile -Profile Public - Enabled True

- Then hit Enter.
- To turn on the firewall for all network types and profiles, type the following command:
Set-NetFirewallProfile -Enabled True

- Then hit Enter. All your network profiles will now receive firewall protection.
How to reset or reinstall Windows Defender?
In case your Windows Defender is experiencing issues, you may need to reinstall or reset it. However, since Windows Defender (and Windows Security) is not installed in the same fashion as other apps on your system, you will mainly be resetting the whole Windows Security suite. Here are a couple of ways to do so:
Method 1: From the Settings app
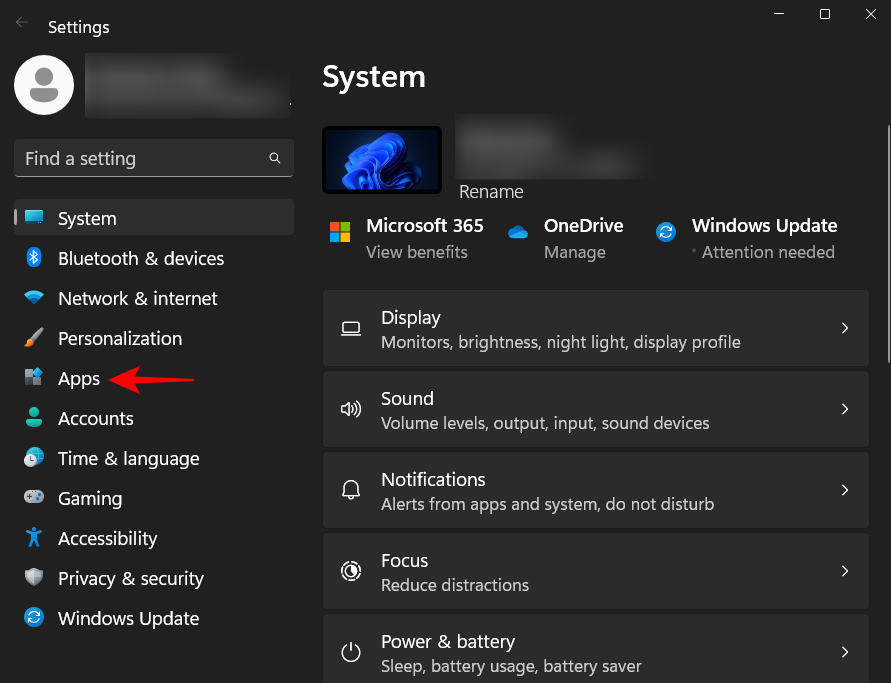
- Press
Win+Ito open the Settings app. Then click on Apps in the left pane.
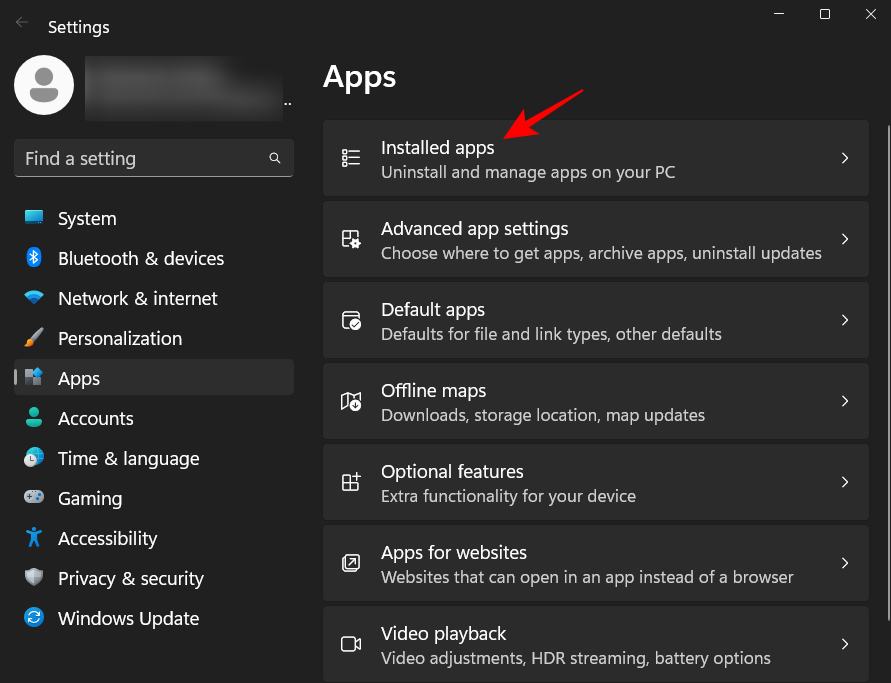
- Now click on Installed Apps.
- Search for ‘Windows security’ in the field above, then click on the three-dot menu to the right of Windows Security.

- Click on Advanced options.

- Now scroll down and click on the Reset button.
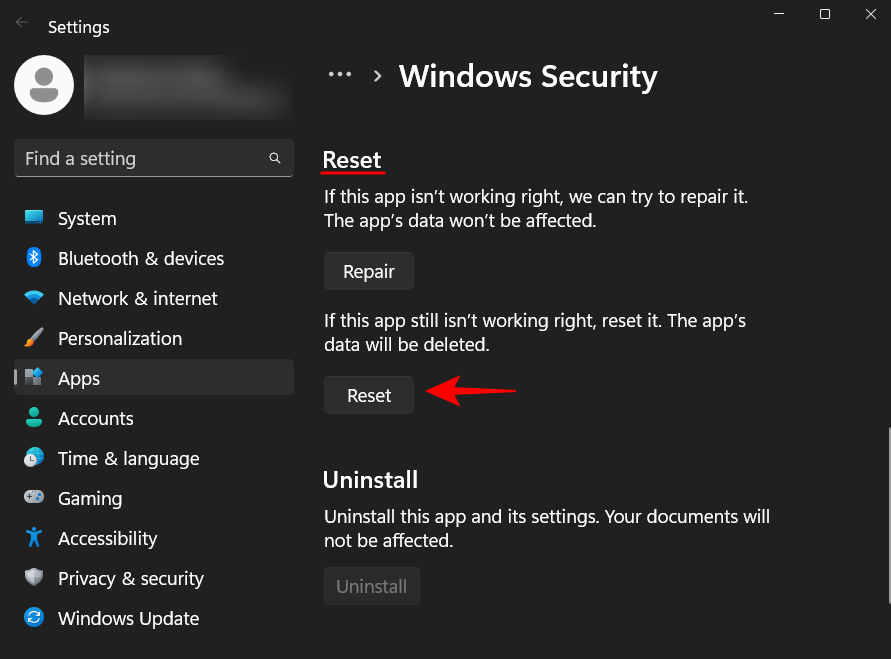
- Click on Reset again.

- Once done, you should see a tick mark appear next to the ‘Reset’ button.

This will reset not just the Windows Defender, but the whole Windows Security suite.
Method 2: From PowerShell
- Press Start, type powershell, right-click on the best-matched result, and click on Run as administrator.

- Now type the following command:
Get-AppxPackage Microsoft.SecHealthUI -AllUsers | Reset-AppxPackage

- Then hit Enter. This will start the process to reset Windows Defender (and Windows Security) to its default settings so that it functions as a newly installed app.

FIX: Can’t turn on Windows Defender
If you’re unable to turn on Windows defender, then there are a number of possible reasons why that may be so. In this section, we go through the various possible scenarios for why Windows Defender won’t turn on and offer solutions to fix the problem.
1. Check if a third-party antivirus is installed
The most common reason why Windows Defender won’t turn on is if you already have a third-party antivirus software installed. This is because Windows Defender automatically turns itself off if it detects the presence of another security application on your system.
- To check if that is the case, open Windows Security as shown before. Then click on Virus & threat protection.

- Here, if you see that another antivirus is turned on, then that is the reason why Windows Defender isn’t turned on.
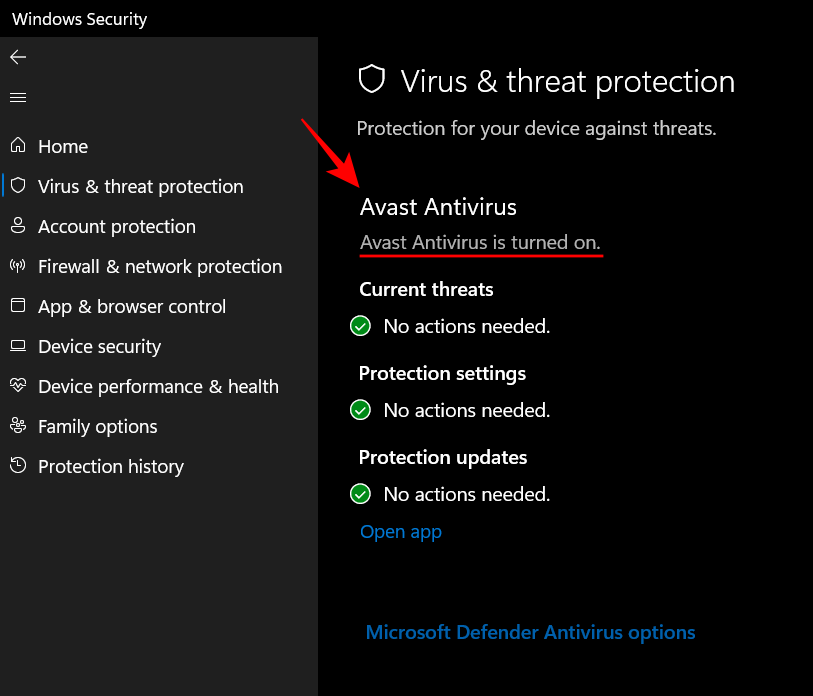
- All you have to do is to uninstall the antivirus application and then turn on Windows Defender via one of the methods given above
If that doesn’t fix the issue, move on to the following fixes.
2. Run Windows Update
Windows not being up to date is another common reason why your Windows Defender might be malfunctioning. Just like any other application, Windows Defender too needs the latest features and fixes to operate optimally. So, make sure to update Windows regularly.
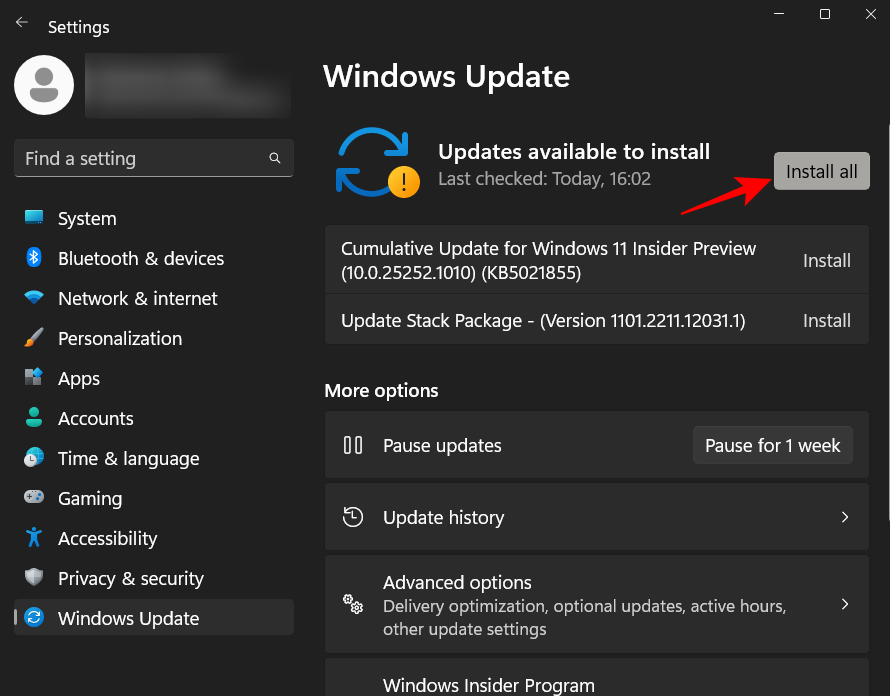
- To check if there are any updates pending, open the Settings app (press
Win+Ikey combination), and then click on Windows update in the left pane.

- Then click on Check updates and then install any updates that there might be.
3. Check the date and time on your system
Most Windows functions rely on the date and time of your system. If your system clock is not set right, there will be a mismatch between your system and the servers that many Windows features rely on. Check out our guide on How to change date and time on Windows 11 to know more.
4. Check Registry settings for Windows Defender
Another reason why you may not be able to turn on Windows Defender could be the Windows Defender’s registry settings. If you ever made changes to the registry keys that correspond to Windows Defender, then you will have to undo those. Check out method #5 in the guide above to know how to turn Windows Defender on via the registry editor.
5. Check the Group Policy Settings for Windows Defender
Similar to the registry, changes made from the Group Policy Settings app could also hinder you from turning on Windows Defender. To know how to turn it on, refer to method #4 in the guide above.
6. Restart the Windows Defender service
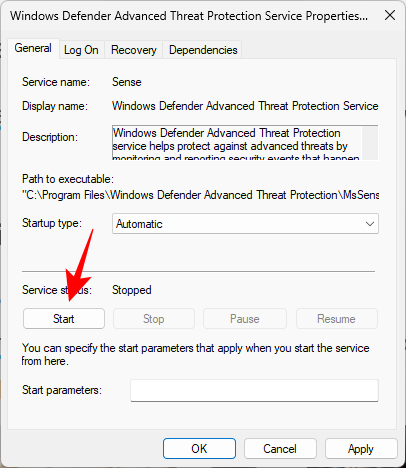
Windows Defender relies on the automatic startup of a service by the same name. To ensure that this service is running, follow the steps below:
- Firstly, open up the Services app from the Start Menu.

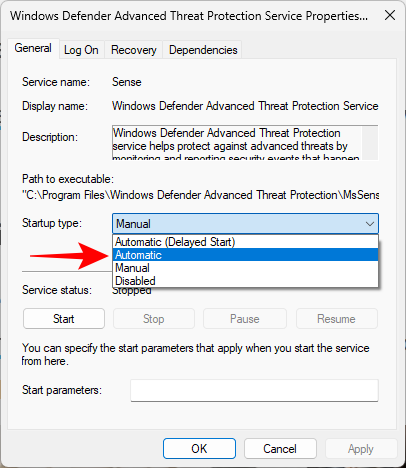
- Then scroll down the list of services and double-click on Windows Defender Advanced Threat Protection Service.

- Click on the drop-down menu next to Startup type.

- Select Automatic.
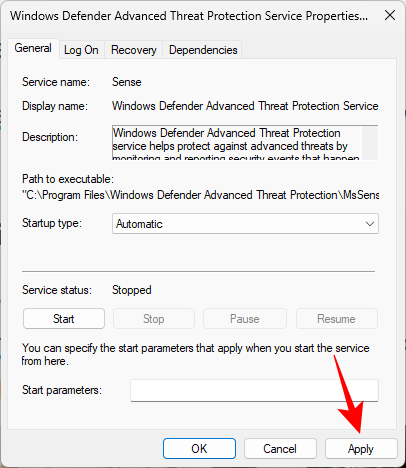
- Then click Apply.
- Then click on Start to start the service immediately.
7. Scan your PC for malware and virus
It’s also a possibility that malware or virus on your system could be blocking Windows Defender itself. To resolve this issue, you will have to install a third-party antivirus and scan your PC for and eliminate malware and virus.
FAQs
In this section, we take a look at a few commonly asked queries about Windows Defender and look to answer the same.
Why can’t I open Windows Defender in Windows 11?
There is a spate of reasons why you may not be able to turn on Windows Defender. Refer to the previous section on fixing this to know how to resolve the issue.
How do I turn Windows Defender on?
Windows Defender can be turned on in a number of ways. The fastest way is through the Windows Security app. To know more, refer to our guide above.
Does Windows 11 have Windows Defender?
Yes, Windows 11 has Windows Defender which serves as Windows’ native antivirus feature. There are a number of other features as well that altogether make up the Windows Security suite. Taken together, these features work to keep your system safe and secure.
We hope you found this guide useful in turning on Windows Defender on your system as well as fixing issues related to the same. Until next time, keep safe!
RELATED
- What Windows 11 Services to Disable Safely and How?
- How to Uninstall McAfee on Windows 11 [5 Ways]
- Where Are Administrative Tools in Windows 11?
- How to Disable VBS on Windows 11 and Does it Help?


