Collaborating with others requires access to shared resources, regardless of whether you are the one who’s doing the sharing or others. Sharing files and folders is a quick and easy process on Windows 11. But what about sharing full-fledged drives?
If others depend on the files on one of your drives and need to access them frequently, sharing your whole drive with them is a better alternative in the long term. In this guide, we take a look at how you can share a drive on Windows 11, how to configure the whole setup, and how others can access it.
How to share a drive on Windows 11
Sharing your drives on a network can be a lengthy process. To make matters simple, we’ve divided the process into three basic steps. These are as follows:
Step 1: Configure your Network settings
The first thing to do is to configure your network settings so your device is discoverable on your private network.
To start, press Win+I to open Settings. Then click on Network & internet.

Choose your Wi-Fi or Ethernet.

Then click on your network’s properties.

Here, select Private network.
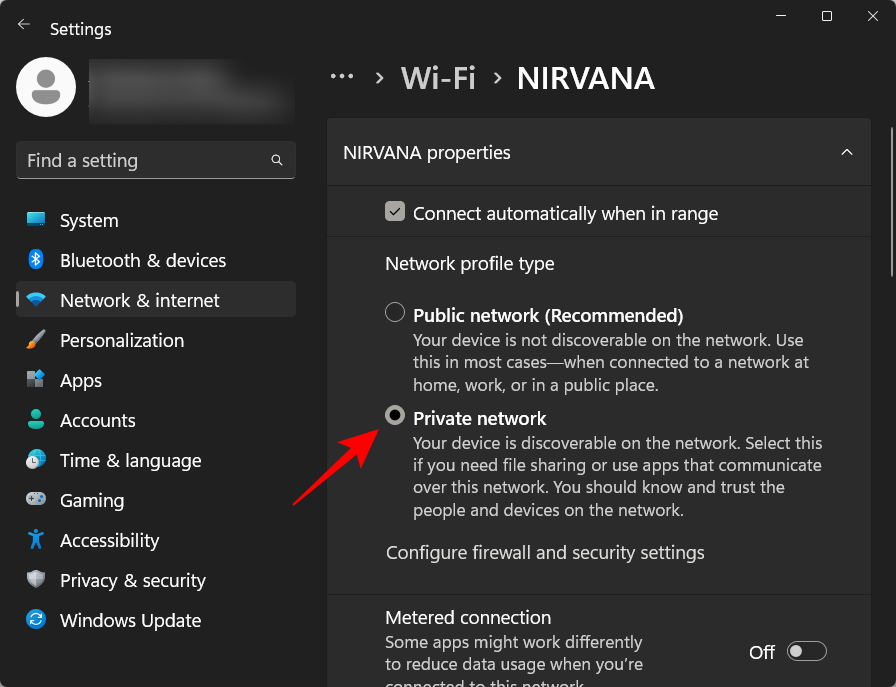
Selecting the public network profile type will restrict your device from becoming discoverable by default. Though you do have the option to change that, it is not recommended to have device discovery enabled for public networks, for security reasons.
Step 2: Turn on File Sharing
The next step involves turning on file and folder sharing for your network. Here’s how to go about it:
In the same “Network & internet” Settings page, scroll down and click on Advanced network settings.

Then scroll down and click on Advanced sharing settings under “More settings”.

Turn on File and printer sharing under “Private networks”.

Then click on All networks to expand it.

Now turn on Public folder sharing.

And that’s that. You have now turned on file and folder sharing so that whoever’s on the same network as you can access the contents of the drive easily.
Step 3: Share a drive on a network
Now that we’ve taken care of the pre-requisites, let’s see how to go about sharing a drive on a network on Windows 11:
First up, press Win+E to open File Explorer. Then right-click on the drive that you want to share and select Properties.

Note: If File Explorer opens to ‘Quick Access’, click on “This PC” in the left pane.
Once your drive’s properties open, click on the Sharing tab.

Then click on Advanced sharing.

Then place a check next to Share this folder.
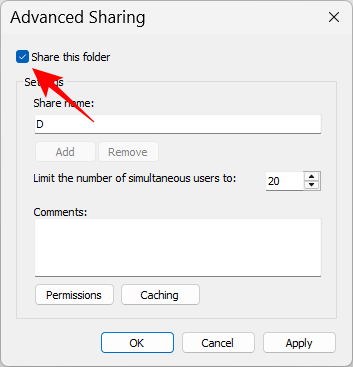
Now click on Permissions.
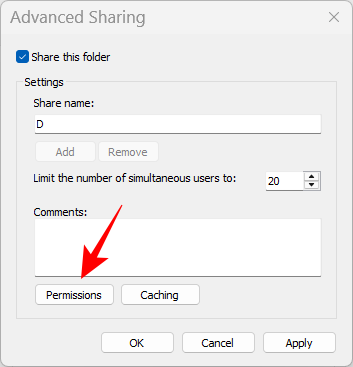
Change the permissions as per your needs. If you want to let others have full control, click on the box under “Allow”.
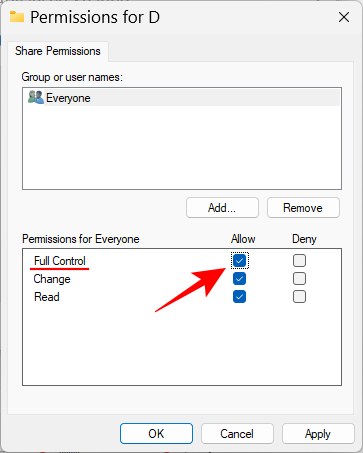
Then click OK.

Click OK again.

Then click on Close.
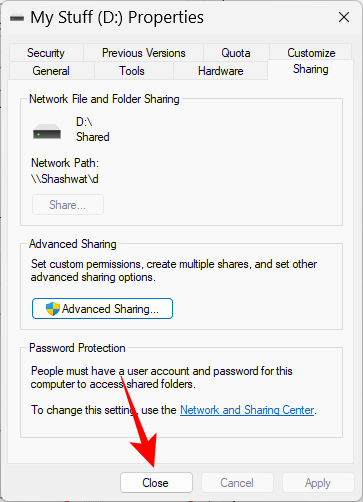
Your drive will now be shared with other computers on the same network. The drive will now be accessible to those who have the user account and password for your computer.
How to remove password protection from the Shared drive
To remove the password, open the ‘Advanced sharing settings’ window as shown in Step 2 above. Then scroll down and toggle off Password protected sharing.

How to check if the drive is being shared on the Network
To check if the drive is now available on your network, open File Explorer by pressing Win+E. Then click on Network in the left pane.
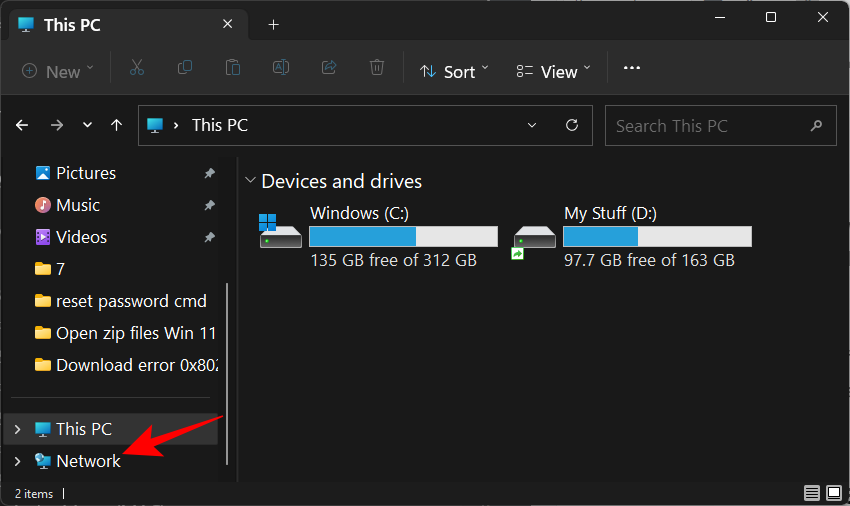
Wait for the network to search for shared computers. Then double-click on your computer name.

Here, you will see your shared folders and drives.

Double-click on it to check the shared folder.
How to access shared drives on a network
In order to access the shared drives, others will have to open the “Network” page from File Explorer as shown above.
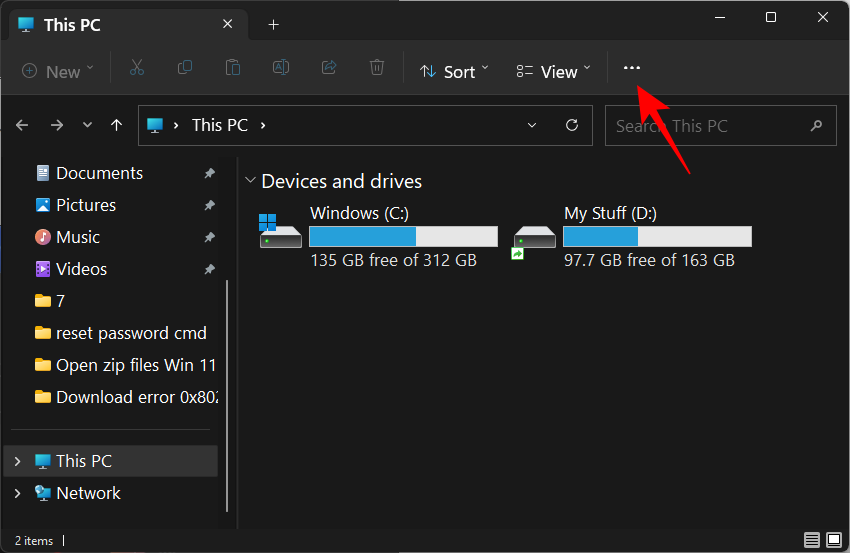
But another, much better way to permanently have your shared drive appear in their File Explorer is by mapping the drive. Mapping a drive is a relatively simple procedure. To do so, click on the three-dot icon in File Explorer’s toolbar.
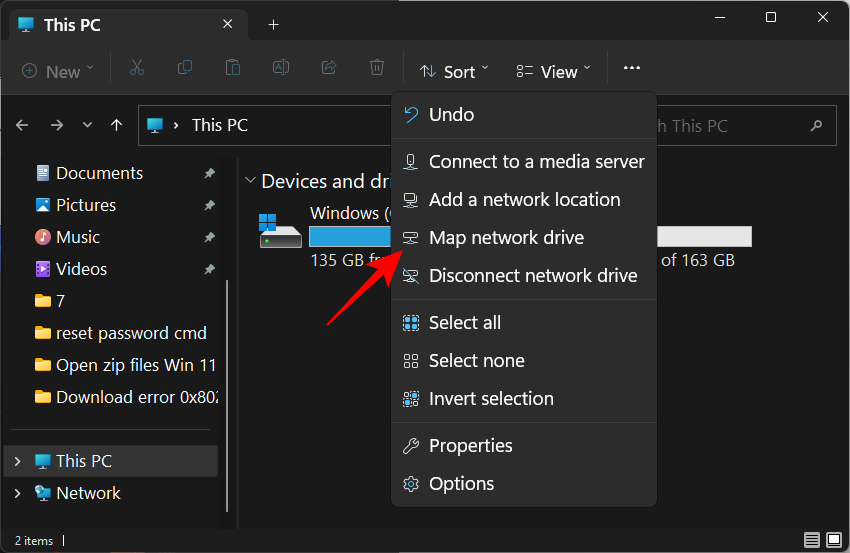
Then select Map a network drive.
In the ‘Map Network Drive’ window, select the Drive letter that you want to appear in File Explorer.

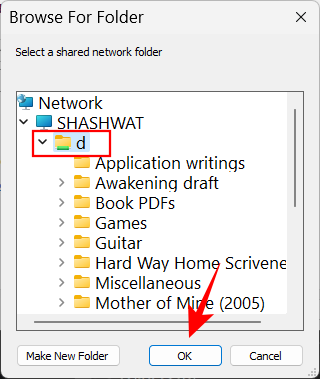
Then click on Browse next to ‘Folder’ to choose which folder to map.

Now select the folder that you want to map. If you want to map the whole drive, then select the drive. Then click OK.
If you’d like to have the drive mapping occur automatically every time you log in, make sure there is a check next to Reconnect at sign-in. Then click on Finish.

Once done, you should see the mapped drive on the “This PC” page of File Explorer.

To know more about mapping drives in Windows 11, go through our guide on how to map a drive in Windows 11.
Related: How to Map a Drive in Windows 11
FAQs
Here, we take a look at a few frequently asked queries and answers about drive sharing on Windows 11.
How do I share files between computers on the same network Windows 11?
There are a number of ways to share files between computers on the same network. One way is to share the folder or the drive that contains them, as shown in the guide above. Alternatively, if you want to share with others regardless of whether they’re on your network or not, you can use nearby sharing, share using apps, Edge and Photos apps, etc. To know more, refer to how to share on Windows 11.
How do I access drives in Windows 11?
To access drives shared on a network, make sure that network discovery is turned on in the “Advanced sharing settings” page in the Settings app and then click on “Network” in File Explorer.
Why can’t I share drives in Windows 11?
If you’re not able to share drives, you may have public folder sharing and network discovery turned off in the Advanced sharing settings page in the Settings app. Once turned on, you should be able to continue sharing drives and folders again.
We hope you were able to share your drives with others on a network on Windows 11.
RELATED
- 6 Ways to Open a Pages File on Windows 11
- 5 Ways to Change Folder Icon on Windows 11 (And 3 Tips)
- How to Fix Copy and Paste on Windows 11
- How to Project Laptop to TV on Windows 11
- How to Search in Windows 11 [4 Ways Explained]


