Windows updates have had a notorious reputation in the past for introducing more bugs than they fix. While Microsoft has managed to fix such issues recently, a recent update seems to take us back to the old era. Windows 11 update KB5013943 seems to be the latest culprit causing 0xc0000135 errors on many PCs. So if you’re in the same boat, then here’s how you can fix the same on your system.
What is the 0xc0000135 error and why am I getting it?
0xc0000135 error code according to official documentation from Microsoft relates to .Net Framework issues. It seems that many applications that require .Net Framework 3.5 to work are unable to use the same with the latest Windows 11 update.
This is what leads to the 0xc0000135 error code and you can fix the same by enabling .Net Framework 3.5 on your PC.
Most modern-day applications rely on .Net Framework .dll files to operate in the background as intended. However, applications are specific to .Net Framework versions which means that applications that require v3.5 will not work with v4.0 and vice versa.
Thus you can fix this error code by enabling or installing .Net Framework 3.5 on your Windows 11 PC.
In addition to this, the issue can also be caused by leftover cache files from the previous update or by outdated drivers currently incompatible with the latest Windows 11 update. Use the guide below to help you fix this error on your PC.
How to fix the 0xc0000135 error code on Windows 11
As discussed above, you can fix this error code mainly by enabling/installing .Net Framework 3.5 on your PC. If however, this fix does not work for you, then you can try one of the other fixes mentioned in this guide. Let’s get started.
Fix 1: Enable .Net Framework 3.5
While ideally, .Net Framework 3.5 will be installed on your PC, a few subsequent features are still left to be enabled manually based on user preferences. Enabling these sub-features should help you solve the 0xc0000135 error code on your PC. Follow either of the methods below to get you started.
Method 1: Using Windows Optional Features
Press Windows + R to launch Run.

Type in the following command and press Enter.
optionalfeatures
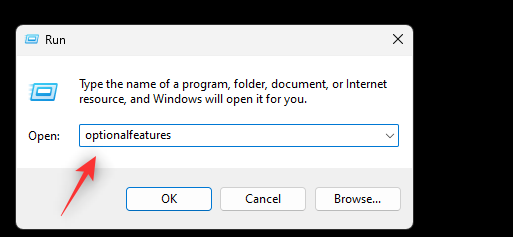
Now scroll the list to find .Net Framework 3.5 in the list and click and expand the same. Check the box for .Net Framework 3.5 if it isn’t already checked.

Check the boxes for the following listings.
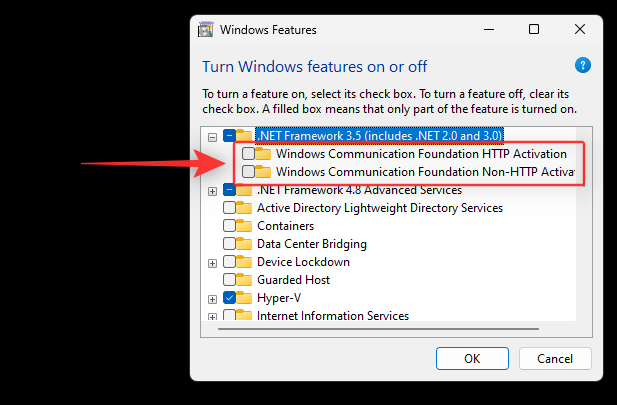
- Windows Communication Foundation HTTP Activation
- Windows Communication Foundation Non-HTTP Activation
Now click and expand .Net Framework 4.8 Advanced Services. Check the box for the same if unchecked.

Check the boxes for the following listings as well.

- ASP .NET 4.8
- WCF Services
Click OK.

The selected features will now be installed on your system and you might be asked to perform a restart. We recommend you perform a restart at the earliest and then try using the app causing the 0xc0000135 error again. If everything worked as intended, then the 0xc0000135 error should now be resolved on your system.
Method 2: Using CMD
We can enable and install the same features using CMD as well. Follow the guide below to help you along with the process.
Press Windows + R to launch the Run dialog box.

Type in the following and press Ctrl + Shift + Enter.
cmd

Now use the following commands to install .Net Framework 3.5 and 4.8 on your PC. Execute each command one by one to complete the process.
dism /online /enable-feature /featurename:netfx3 /all

dism /online /enable-feature /featurename:WCF-HTTP-Activation

dism /online /enable-feature /featurename:WCF-NonHTTP-Activation

Restart your PC for good measure and the 0xc0000135 should now be fixed when launching third-party apps.
Fix 2: Clear cache files
Clearing cache files in Windows 11 does not have a single toggle, especially if you want to clear system cache files. Thus you can use this comprehensive post by us to completely remove cache files from your system.
Leftover cache files are known to cause .Net Framework issues, especially on systems virtualizing different environments. If you have a similar PC, then we recommend you follow this guide to clear cache files from your PC.
Fix 3: Last Resort: Uninstall update KB5013943
This is not a recommended solution, but if you’re desperate to get everything working on your PC again then you can uninstall the latest Windows 11 update ie: KB5013943. Use the guide below to help you uninstall Windows updates from your system.
Press Windows + i to launch Settings. Click Windows Update.
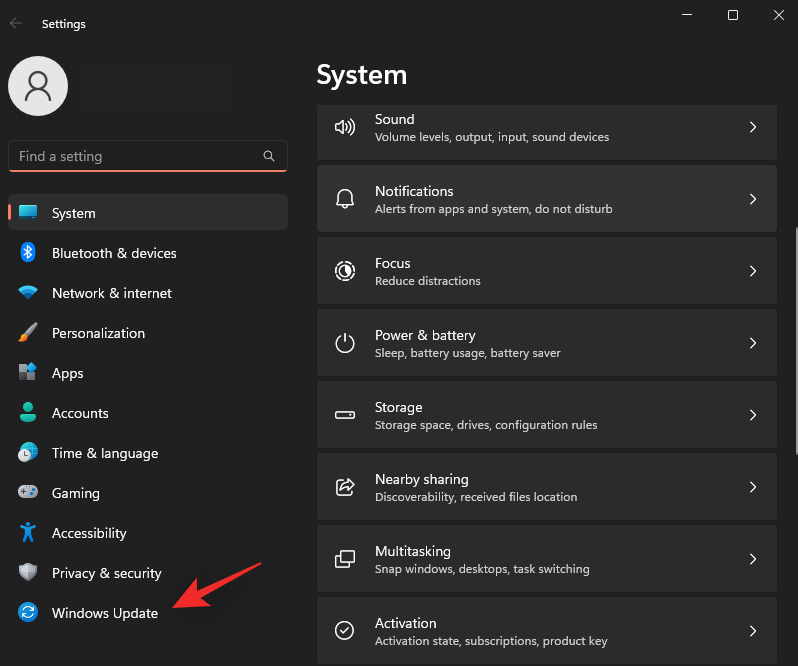
Click Update history.

Scroll to the bottom and click Uninstall updates.

Click Uninstall beside KB5013943.

Click Uninstall again to confirm your choice.

The selected update will now be uninstalled from your system. Your system should automatically restart once this process completes. If it does not, we recommend you restart it manually. Once restarted, your PC should work as intended and you should no longer face the 0xc0000135 error.
We hope this post helped you fix the 0xc0000135 error on your system. If you face any issues or have any more questions for us, feel free to reach out using the comments below.
RELATED:
- 0x80888002 error: How to fix it when installing Windows 11
- [Update: Nov 8] Snipping Tool Not Working on Windows 11? How to Fix ‘This app can’t open’ Error or Shortcut Issues
- Unable to Start Windows Subsystem for Android: How to Fix ‘Virtualization Not Enabled’ Error on Windows 11
- VAN 1067 Windows 11 Error: How to Fix the Valorant Issue
- How to Fix ms-resource:Appname Error on Windows 11
- Controller Bar Not Available or Working on Windows 11? 10 Fixes and 6 Checks to Try
- How to Hide, Disable or Uninstall Widgets on Windows 11 (and Disable Windows+W Shortcut)






Discussion