In the first week of October 2021, Microsoft officially rolled out the stable build of Windows 11. All new products released after the unveiling will run Windows 11 right out of the box, and Windows 10 users, too, are allowed to make the jump to the latest version of Windows OS for free.
Windows 11 has received overall positive reviews so far but there are a lot of bugs and inconveniences that the OS needs to overcome. Today, we will take a look at one, and tell you how you could enable Virtualization on Windows 11.
Related: How to Install Windows Subsystem for Android Manually With Msixbundle
What is Virtualization on Windows 11?
On Windows 11, Virtualization creates a virtual computing environment that allows you to run non-native applications natively on the OS. Virtualization is not required for day-to-day applications running on Windows, but you need Virtualization to run Android apps on your system.
This feature has been available on Windows OSes for a while now and keeps growing more and more powerful with every new release. The current iteration of Virtualization on Windows 11 is the most powerful it has ever been and is capable of handling Android apps without breaking a sweat.
Related: How to sideload APK on Windows 11 Using Windows Subsystem for Android
Why are you getting the “Virtualization not enabled” error?
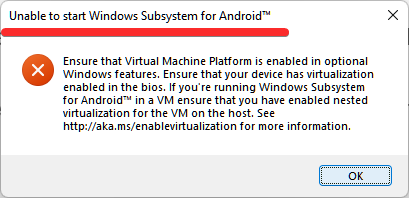
Virtualization is a native Windows 11 feature, meaning all supported computers should be able to use it to run Android applications natively on Windows 11. However, many users have been getting the “Ensure that Virtual Machine Platform is enabled” error under the Unable to start Windows Subsystem for Android pop-up window while trying to open the Windows Subsystem for Android on Windows 11. It simply means you either have not enabled Virtualization in BIOS or have not enabled it through Control Panel.
Unless you fix that issue, you will not be able to run Android apps on your Windows 11 computer. Check out the section below to learn about enabling Virtualization on Windows 11.
How to fix “Virtualization not enabled” error on Windows 11
Before you apply the solution we are providing today, make sure you have enabled Virtualization through BIOS. Click on this link to learn more about enabling Virtualization through BIOS on Windows 10 or 11.
With that out of the way, open Control Panel. Hit the Windows key and then type Control Panel. Then, click Control Panel.

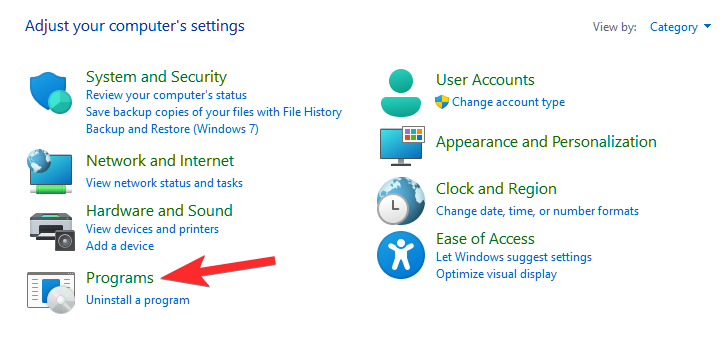
Click Programs.
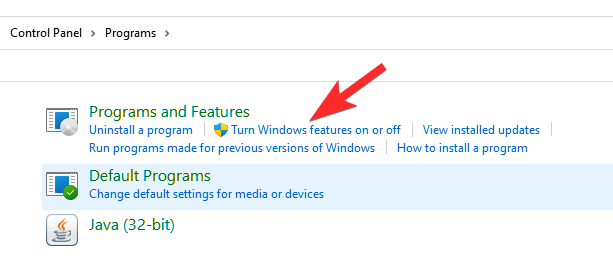
Now, click on ‘Turn Windows features on or off’ under ‘Programs and Features.’
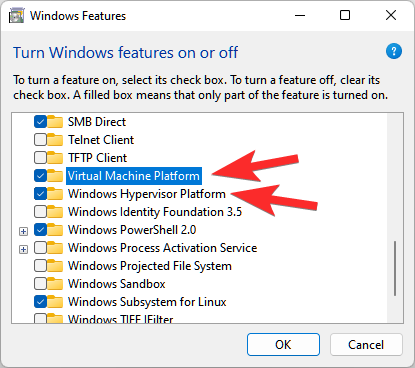
Now, enable ‘Virtual Machine Platform’ and ‘Windows Hypervisor Platform’ features here and then click ‘OK.’
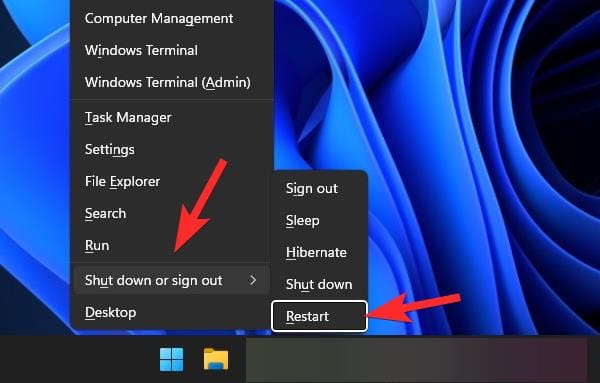
Restart the computer now. Press Windows + X, and then select Shut down or sign out > Restart.
When done, virtualization should now be enabled on your Windows 11 computer. You should no longer get the error anymore.
If you were getting the error while trying to run Windows Subsystem for Android on Windows 11, then try it again now.
You can use our guide to install an Android app on Windows 11 by sideloading an APK.
RELATED





Discussion