The snipping tool has been a long-standing important addition to Windows that has managed to survive a lot of versions that weren’t very well received by the public at first. If you’re someone who takes a lot of screenshots, then you are probably familiar with the Windows + Shift + S keyboard shortcut.
Sadly, the snipping tool hasn’t been working for a lot of users lately, especially those who recently updated to Windows 11 from Windows 10 as they are getting this long error: ‘This app can’t open. A problem with Windows is preventing Screen Snipping from opening. Refreshing your PC might help fix it.’
If you are in the same boat then here are some fixes that should help you get the Snipping Tool back up and running again on your system.
Snipping Tool Broken Issue: How to fix Windows+Shift+S shortcut not working

Here’s how you can fix Snipping Tool on your Windows 11 PC. You can use the first two community-found fixes or use the last method suggested by Microsoft. Let’s get started.
Fix 1: Install Windows Update KB5008295 (released on Nov 04, 2021)
Microsoft Teams has officially fixed the issue that caused Snipping Tool to stop working after October 31st for Windows 11 users on beta and release preview channels. All you need to do to fix the Widnows+Shift+S keyboard shortcut not working issue is check for updates under Settings and install the updates available for you. FYI, KB5008295 is the particular update that fixes the issue with Snipping Tool, among other issues. Read Microsoft’s announcement here.
To install the KB5008295 update, open the Settings app by pressing Windows + i together. Next, click Windows Update on the left and then Windows Update at the top, again.

Click the “Check updates” button to check for updates available for your PC. Once the update is downloaded, Restart your PC to install the update.

If an update is not available, then try Fix #2 as that will also fix the issue permanently.
Fix 2: Change the date and revert back
Finally, a proper working fix is available — all thanks to Microsoft Tech Community member, Ged_Donovan. Apparently, to fix the Windows+ Shift+S shortcut not working issue, you need to change the date under Settings on your PC to October 30, use Windows+ Shift+S to take a screenshot, and then revert back the date to the latest date. Here’s how:
Press Windows+i on your keyboard to open the Settings app. Or click the Settings icon in the Start menu.

Click Time & language and then Date & time.

Under the ‘Set time automatically’ option, click the toggle button on the right to turn it off.

Click Change under ‘Set the date and time manually’.

Change the date to “30 October 2021”. You don’t need to change the time.

Click Change to save the date as “30 October 2021”.

You will now see that the date displayed at the top under Settings is now “30 October 2021”.

Try Windows+Shift+S to take a screenshot now. It should work.
You can change the date back to be set as automatically. Open the Settings app again and go to Time & language > Date & time.
Under the ‘Set time automatically’ option, click the toggle button on the right to turn it on.

You will see that the date is now back to today’s date.

Try the Windows+Shift+S shortcut now, it should still keep working.
Let us know in the comments below how this goes for you.
Fix 3: Use the older version of the app
If you recently updated from Windows 10 then you can use the old version of the Snipping Tool which will be available in your Boot Driver. Windows stores your previous installation for the first 10 days from the date of your update. You can use this to your advantage to use the older version of the Snipping Tool on your PC.
Navigate to the following path to get you started.
C:/Windows.old/Windows/System32/

Find ‘SnippingTool.exe’ in the current folder and copy it to your clipboard.
Navigate to the following path now.
C:/Windows/System32/

Paste the file you had copied to your clipboard earlier.
Subsequently, copy the file named SnippingTool.exe.mui from the path given below.
C:\Windows.old\Windows\System32\en-US\
Paste the copied file in the following folder.
C:\Windows\System32\en-US\
Replace any and all files if you are prompted.
Try using the Windows + Shift + S keyboard shortcut now and click on +New. The Snipping Tool should now be working as intended and you should no longer get the ‘This app can’t open. A problem with Windows is preventing Screen Snipping from opening. Refreshing your PC might help fix it.’ error.
Fix 4: Uninstall Security Update KB5006674
Security Update KB5006674 might not be the culprit for your malfunctioning Snipping Tool, but removing it surely reverts some major changes and apps which seems to fix Snipping Tool on all systems. However, this has a couple of disadvantages as you will lose out on specific Windows 11 features which might be a dealbreaker for some users. Here’s what you will lose out on when uninstalling Security Update KB6006674.
- Windows 11 right-click context menu
- Windows 11 File Explorer
- Windows 11 Display & Personalization menus
In case you are comfortable with using the older versions of these features for a while or manually updating them, then you can use the guide below to uninstall the Security Update from your system.
Uninstall Security Update:
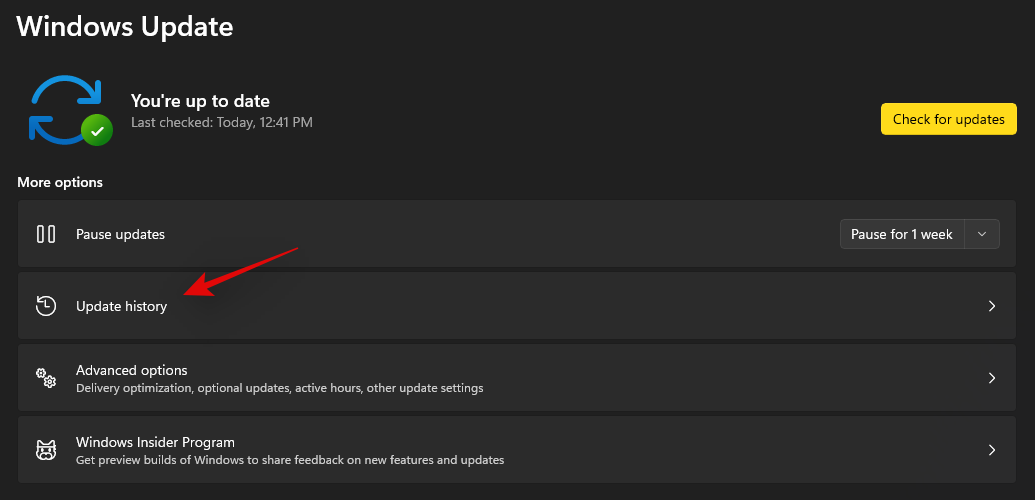
Press Windows + i and click on Windows Update on your left.

Now click on ‘Update history’.
Scroll to the bottom and click on ‘Uninstall updates’.

Find Security Update KB5006674 in this list and click and select it.
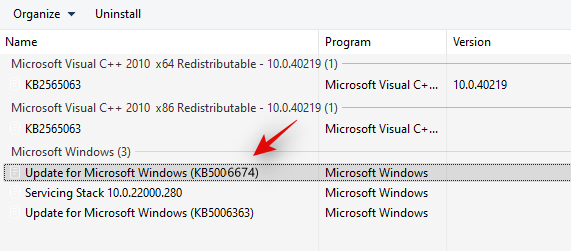
Click on ‘Uninstall’ at the top.

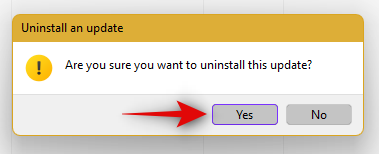
Confirm your choice and the selected security update will now be removed from your PC.
We recommend you restart your PC at this point and try using the Snipping Tool again. You should no longer face any issues while using the Snipping tool in Windows 11.
Fix 5: Ensure clipboard history is enabled
This is an older solution but worth a try nonetheless as Snipping Tool too is about to be deprecated soon. Clipboard history allows Windows to remember all elements, images, and text copied to your clipboard which proves beneficial when you are trying to move or copy multiple things at once.
As Snipping Tool relies on its keyboard shortcut to copy screenshots to your clipboard, having history disabled can sometimes interfere with this process. Hence you can try enabling clipboard history to get Snipping Tool working again.
Press Windows + i and click on ‘Clipboard’ on your right.
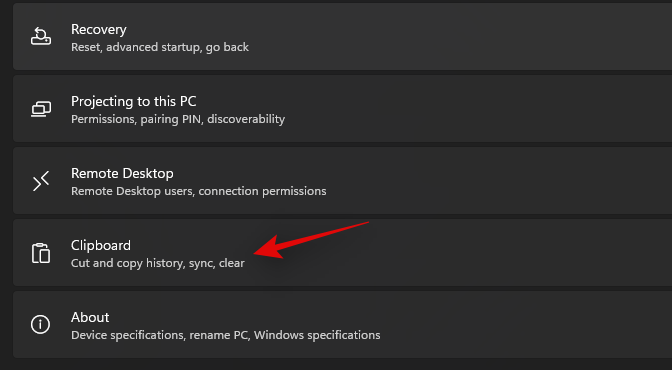
Enable the toggle for ‘Clipboard history’ at the top of your screen.

Once enabled, we recommend you restart your PC and use Snipping Tool as intended. The app should now be working on your PC if Clipboard history was the cause of your issue.
Fix 6: Reset and repair the app
You can also try to reset and repair the Snipping Tool from within Windows 11. If the app is properly installed and you are facing issues using certain features of it, then you can use the guide below to first repair the app, and if that does not work, then reset it to start from scratch.
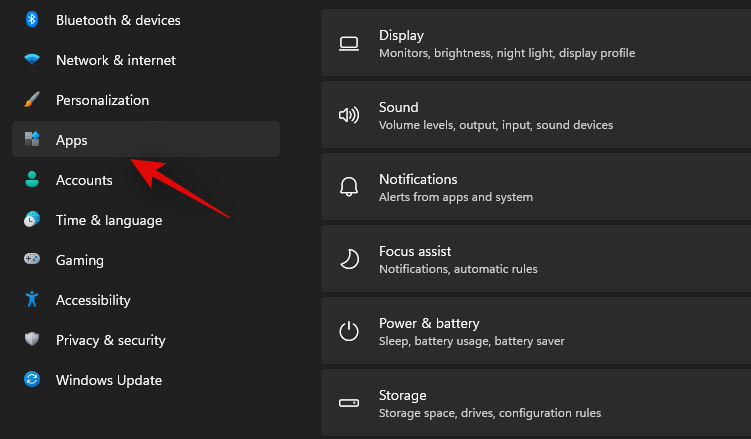
Press Windows + i on your keyboard and click on ‘Apps’ on your left.
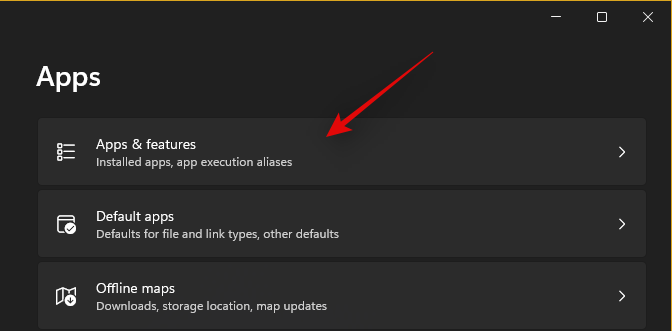
Click on ‘Apps & features’.
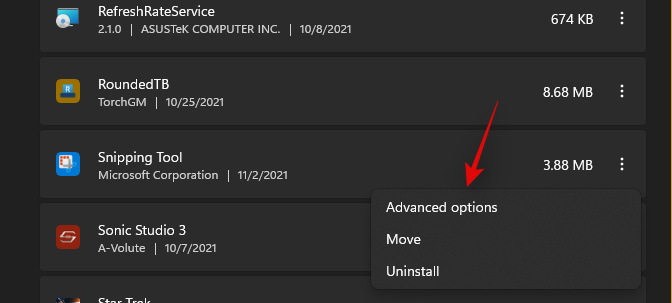
Find Snipping Tool in the current list and click on the 3-dot menu icon beside it.

Select ‘Advanced options’.
Scroll down and click on ‘Terminate’ to terminate any currently running instances of the app.

Click on ‘Repair’.
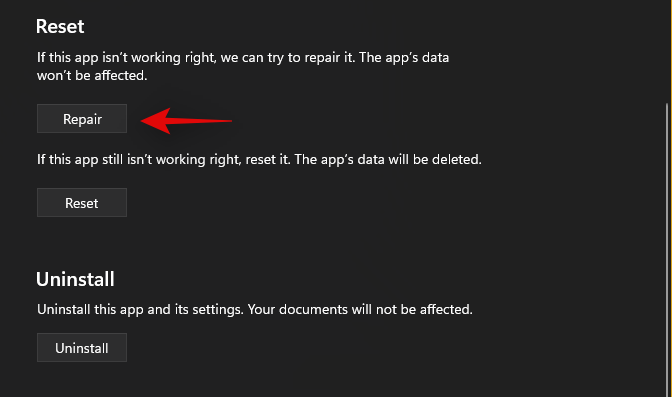
Once the process finishes, try launching the Snipping Tool again.

If the app works as intended then the issue has been fixed for you, if not, then click on ‘Reset’ to start from scratch.

Confirm your choice by clicking on the same again.
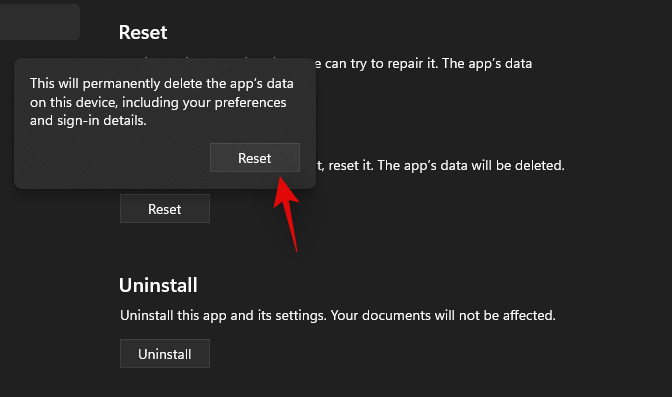
The app will now be reset. Once the process completes, launch the app again and try using the Snipping Tool as intended. The app should be fixed for most users that had a proper installation on their PCs.
Fix 7: Reinstall Snipping Tool
If the above fix did not work for you then you can try reinstalling the Snipping Tool. Follow the guide below to get you started.
Press Windows + S on your keyboard, search for PowerShell and click on ‘Run as administrator’.

Now type in the following command and press Enter on your keyboard.
get-appxpackage *Microsoft.ScreenSketch* | remove-appxpackage

Snipping Tool will now be removed from your PC. We recommend you restart your PC at this point. Once restarted, launch PowerShell as an administrator again and execute the following command.
Get-AppXPackage *Microsoft.ScreenSketch* -AllUsers | Foreach {Add-AppxPackage -DisableDevelopmentMode -Register "$($_.InstallLocation)\AppXManifest.xml"}

Once the app is installed, you can close PowerShell and use Snipping Tool as intended. The app should now work as intended on your PC.
Fix 8: SFC scan and DISM check
You should also run an SFC scan and DISM check on your system to ensure that all your system files have been properly configured and installed on your system. Corrupted system files and programs identified by these scans will be automatically replaced which should help fix most issues on your system. Use the guide below to run an SFC scan and DISM check on your system.
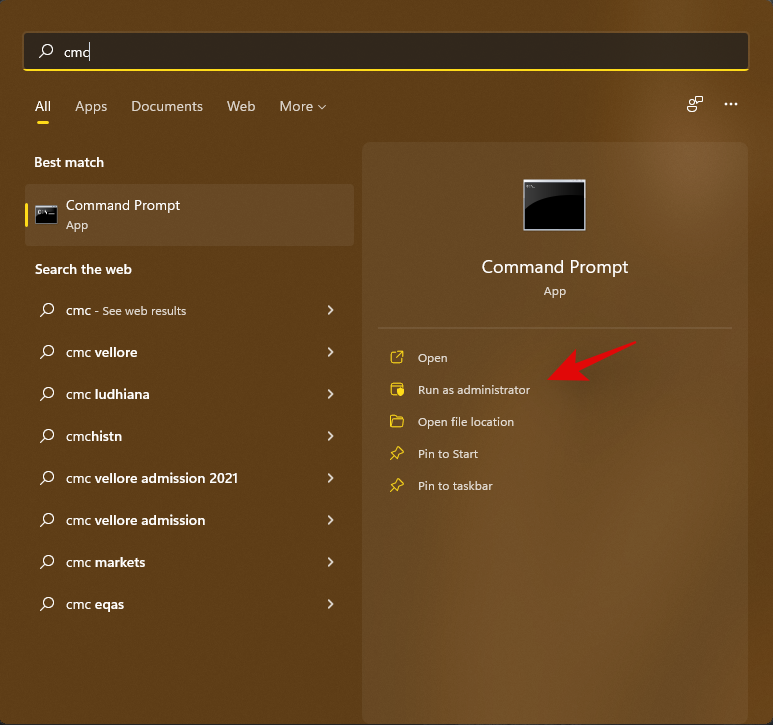
Press Windows + S, search for CMD and click on ‘Run as administrator’ once it shows up in your search results.
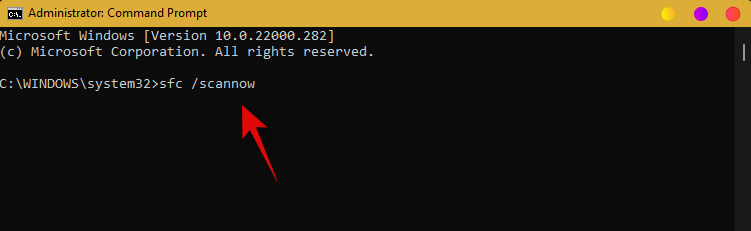
Now type in the following command to run the SFC scan.
sfc /scannow
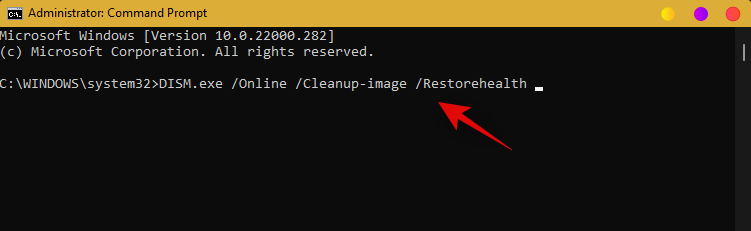
Subsequently, run the following command to perform a DISM check on your system.
DISM.exe /Online /Cleanup-image /Restorehealth
Fix 9: Use another tool to take screenshots
If by this time Snipping Tool isn’t working for you then we recommend you opt for an alternative. We recommend you give the Xbox Game bar a try as it is already installed on most systems. This way you won’t have to opt for a third-party app.
However, if you are looking for fleshed-out utilities with the ability to automate tasks, upload captures, capture videos, and more, then third-party apps might be a better alternative for you. Follow the guide below to use the Xbox Game bar or skip to the next section if you wish to use a third-party app instead.
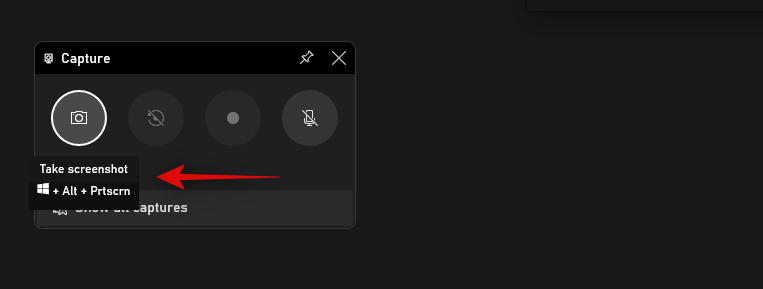
9.1 Use Xbox Game bar
Press Windows + G on your keyboard to launch the Xbox Game bar. If the Game Bar isn’t available for you, then you can use this link to download it to your PC. Now simply click the Camera icon in the top left to take a screenshot.

You can also use the other icons to capture your screen and you can also use the Windows + Alt + PrtSc shortcut to take a screenshot instantly using the Xbox Game Bar.
9.2 Use a third-party Alternative
- ShareX | Download Link
- Greenshot | Download Link
- SnagIt (paid) | Download Link
- Screenpresso | Download Link
- Snipaste | Download Link
Fix 10: Last Resort: Reset your PC
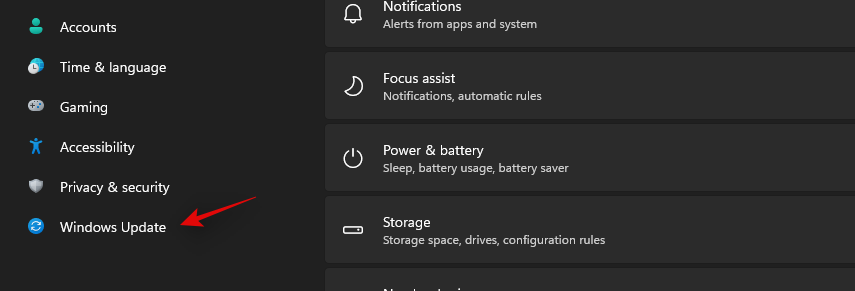
Surprisingly this is the official fix issued by Microsoft to get Snipping Tool back up and running again on your system. Follow the guide below to refresh your PC.
Press Windows + i, and click on ‘Windows Update’.
Click on ‘Advanced Options’.

Now click on ‘Recovery’.
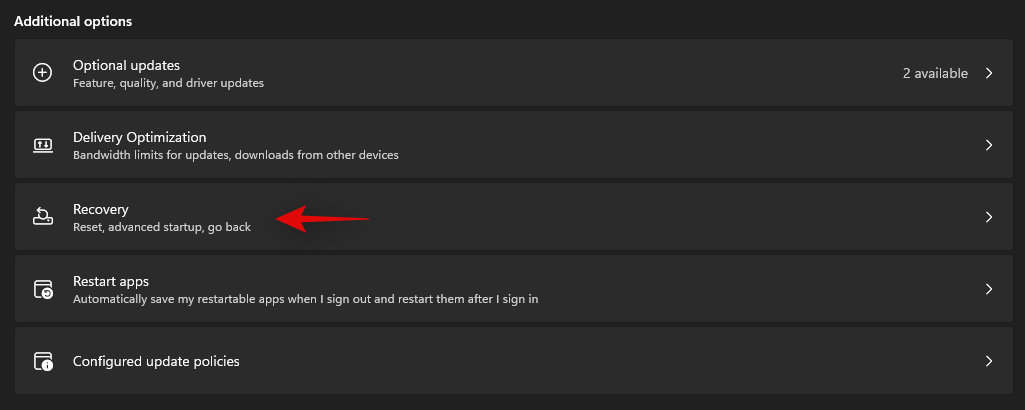
Click on ‘Reset PC.

Select ‘Keep my files’ and follow the on-screen instructions to refresh your PC.

We hope this guide helped you get Snipping Tool back up and running again on your PC. If you face any issues or have any questions, feel free to drop them in the comments section below.
Related:
- How to Get Google Play Store and Gapps on Windows 11 With Windows Subsystem for Android
- How to Install and Use WSA Toolbox on Windows 11
- Windows 11: How to Sideload APK Using Windows Subsystem for Android and ADB
- How to Check and Change Refresh Rate on Windows 11
- How to Get Classic Shell on Windows 11 Via Open Shell


64 responses to “[Update: Nov 8] Snipping Tool Not Working on Windows 11? How to Fix ‘This app can’t open’ Error or Shortcut Issues”
I tried all three. Nothing works.
use chrome extension lightshot, it does the same job
Fix #1 worked for me.
After trying lots of other fixes, changing the date worked for me.
Don’t even bother wasting your time resetting your PC for nothing.
Resetting your computer could erase applications. If you have windows OneNote, it has its own screen clipper. Avoid the hassle and just use it.
Reinstalling the new one through powershell did not work.
Copying the old snipper exe to the new system32 folder and executing form there led to a blank error message so that didn’t work.
I’m not going to waste my time refshing my pc. That’s a crappy solution MS.
>>> What did work for me was to just go into the windows.old sys32 snipping tool and creating a shortcut to that.
Yes, this method worked for me, thanks. The only thing I haven’t yet got to work is pinning the shortcut to the Start Menu or Taskbar. I use Snipping Tool many times a day so this is a must for me.
That will work until Windows 11 deletes the windows.old folder. Create a shortcut to C:/Windows/System32/SnippingTool.exe instead after copying it from windows.old/system32. I just tried and it works!
hi there can u explain how to do it?
Follow the steps of the first solution first and then go to Windows.old/System32 and ctrl+ f and search for the snippingtool.exe file . Copy that , and then go to windows/system32 and paste it there .If you open,then right click to the exe -> show more options and create a shortcut !
after the “if you open” I wanted to say that ” the file , you will see the old version of snipping tool”* , but I forgot it for some weird reason ahaha
None of these methods worked for me. Brand new Windows 11 upgrade over a brand new Windows 10 installation on a clean hard drive.
Cheers – hit this today, found your site, and used the PowerShell commands to fix snipping tool. Took less than 10 min, even with the restarts.
That’s fix #2, fwiw
Why fight it. Just uninstall and use Sniptool. Wait until MS gets it straightened out unless you enjoy being a beta guinea pig.
Refresh one’s PC just to get one app working? Leave it out. I found this problem with this app even when running Windows 10.
This is the incentive I need to make the excellent PicPick part of my regular workflow – and the highly recommended Flameshot on Linux. Even if you just use the free version of PicPick you’ll find it way better than Snip and Sketch. The one thing going for Snip was its simplicity. But if an upgrade prompts you to ‘refresh your PC’ I don’t ever see myself want to use this again any time soon.
Follow the instructions about copying the old SnippingTool.exe from windows.old/system32 to windows/system32. Then create a shortcut to C:/Windows/System32/SnippingTool.exe. I just tried and it works!
Thank you so much – fix number 5 worked for me, uninstall and reinstall the snipping tool using the Powershell app.
I teach online using Zoom, and use the snip tool all the time to send class notes to my students without having to send them a copy of the entire screen. I’m not very tech-savvy, and had a horrible feeling I would have to go back to Windows 10 just to keep my snip tool, but you’ve fixed the problem for me. Thank god for nerds, eh? Cheers, guys ?
Aargh!! Just installed updates, and now it doesn’t work again!! I’ll try the same fix (uninstalling and reinstalling) and post again if it doesn’t work…?
use chrome extension lightshot, it does the same job
Thanks for the wonderful explanation & steps, I tried with the 1st option of copying old to new, and though the Windows+Shift+new is still a mirage, I could create a shortcut and use the SnippingTool.exe directly and it works (though it shows a warning it’s moving to snip&sketch)
Use Tinytake. Works better.
where do i find this? I couldn’t get my snip to work at all. and I couldn’t find anything under Tiny Takes in the Microsoft store
Close snipping tool. Go to the time setting on your computer and change it to Oct. 31. Open snipping tool and it will work. Change the date back to automatic and it still works. Have no clue why but this fixed it for me!!!
I did everything and nothing worked. Now i can’t even find snipping tool on the computer anymore.
This is the fix
Go to Settings > Time & language > Date & time > Turn off “Set time automatically”
Click on Change on Set the date and time manually
Change date to 30/10/2021
Now snipping should work
After test, move the date and time back to Set time automatically
Thank you very much! Fix 1 worked!
fix #1 worked for me! so simple and easy
Me too. I had tried everything else on multiple sites, and fix
#1 was fast and easy
Wow, the crazy option #1 of resetting a time clock worked. Mysterious. I tried the other options of resetting/repairing/re-installing the snip to no avail. But the ol’ reset the clock routine was a winner.
Thank you @Ged_Donovan!
FIX 1 worked perfect
fix 1 worked! Thank you so much!
Changing the date works. Thanks.
thank you, really helped me today<3
Thank you the first fix worked for me!
Fix 1 worked on me, thank you!!!
Bro… amazing.. number 1 trick worked for me. Thanks
Fix 1 worked. Thanks for this !
Date and Time Option Fix worked like a charm, thank you:)
Fix #1 worked a treat, thanks!
This is the weirdest fix ever! … But it works
Yessss FIX #1 worked. Thank you!
Yeeeeey! Fix 1 worked. Thanks alot!
Amazingly changing the date somehow fixes it, thanks!
Hi, tried all of that and could not fix then found the craziest way to repair on YouTube by britec09
Set the pc time to manual and date to 31st oct and all works fine.
Thanks though for clear instructions
Fix No. 1 worked — unbelievably. Absolutely unreal that A) someone discovered that and B) it worked.
Fix # 1 Worked! Thank You So Much!
Someone tell me how fix 1 actually worked
Setting the time back worked for me. Thanks for publishing this. Amazing that I could not find this on the MS website….not really amazing. Thanks for your help.
Fix #1 with the temporary date change worked. Good job and thank you.
Fix #1 worked Dude! Thanks much!
Fix #1 worked for me. My snipping tool now works. Thanks,
The date change and screenshot worked for me! Updated today to Windows 11.
Fix 1 worked for me liked it said. Awesome.
changing date to Oct 30 worked. Ged_Donovan is a miracle. Thank you.
Fix No. 1 worked! My snipping tool is now up and running! Thank you!
Wow, changing the date works for me. Thanks
The first Fix worked for me.
Fix #5 worked after PC restart!!!!!!
I love you! it worked for me
Fix #2 worked perfectly, thank you. I was wondering how I would live without the snipping too.!
Fix#8 worked for me and I’m actually amazed that it worked. Snipping tool hasn’t worked for me, since I upgraded to Win11 from Win10. Thank you very much !
Changing the date manually actually worked. I didn’t expect it to at all. Thanks so much!