Airpods have become the staple of True Wireless Airbuds since they were introduced by Apple back in 2016. Unlike many Apple features and accessories, Airpods do indeed work with Windows and Android devices.
There are a few caveats though and these can be pronounced if you are looking to get their true functionality and features working on either of the platforms.
Windows got a recent upgrade with the release of Windows 11 which has brought up many questions about Airpods’ compatibility with the new OS. If you own a pair and would like to connect them to Windows, then here is all you need to know about it.
- Are Airpods compatible with Windows?
- The truth about Airpods on Windows
- How to connect AirPods to Windows 11
- How to get better Audio quality from Airpods on Windows 11
- How to reconnect Airpods
- Improving AirPods experience on Windows: What to know
- How to view the battery status for Airpods
- Can you control playback in Windows 11?
- How to get the best possible audio quality
- Problem connecting Airpods to Windows? Reset your Airpods first!
- How to use AirPods in video conferencing apps?
- Why am I unable to control the volume in some apps?
Are Airpods compatible with Windows?
The true answer would be no, but can you get them working? Yes! Airpods are essentially Bluetooth wireless earbuds and Windows recognizes them as exactly that. This can be a problem or a huge benefit depending on how you see it. You get all the basic functionalities of any generic earbuds but that is as far as it goes.
If you’re looking for your Airpods to be fully compatible with Windows where you can control playback, trigger Cortana, and get the best possible audio input and output quality then sadly you’re out of luck. However, there are many workarounds to overcome these issues and you can refer to them in the guide below when setting up AirPods.
Related: Unknown Accessory Detected iPhone: What does it mean?
The truth about Airpods on Windows
As discussed above, Airpods do not have feature-specific drivers that can help provide further compatibility and functionality with Windows 11. This means that they are recognized as a pair of any other BlueTooth headset which brings along its fair share of issues. The first one would be the jank profile switching that Windows uses with Bluetooth headsets connected to any device. Whether you connect Airpods or any other pair of TWS, it will show up as two different devices: Headphones, and Headset.
These two profiles can be toggled and used based on your use but many Airpods features and mainly its high res audio input and output quality rely on smart switching between these profiles and using different protocols to communicate with the device. This in turn makes Airpods show up as a single device in Macs and other compatible devices where you can enjoy high res audio right out of the box.
This brings us to our next two drawbacks, which stem from this issue where you either have to choose between high audio quality but the loss of mic functionality or use the mic while getting manageable audio quality to say the best. There is a workaround to improve your audio quality with your mic active, but it works only occasionally and won’t give you the high res quality experience that you get with your mic disabled and using Stereo audio. Use the guide below to help you out through the entire process and set up your guide as it might be needed depending on your preferences.
Related: Can you use Airpods with Android? Is it worth it?
How to connect AirPods to Windows 11
You can use the guide below to pair your Airpods to Windows. Once paired, you can use the next section to customize your experience depending on what you plan to use them for. Let’s get started.
Pair Airpods to Windows
Press Windows + i on your keyboard to open the Settings app. Click and select ‘Bluetooth & devices’ from the left.

Now open your Airpods case, wait for the light to flash green or orange, and then press and hold the setup button on the back of your Airpods. Once the light starts flashing white it means you have entered the pairing mode.

Click on ‘Add device’ on your PC now.

Click on ‘Bluetooth’.

Wait for Airpods to show up in the list and click on them once they show up.

Windows will now automatically pair with Airpods. Click on ‘Done’ once the process finishes.

How to get better Audio quality from Airpods on Windows 11
We can now customize your experience depending on the feature you prefer the most. If you’re looking to use both, high res audio quality and mic, then you will need to invest in a Bluetooth adapter. You can find out more about the same in the section below. Let’s get started.
1. For high-quality audio-only (No Mic)
Now that you have paired Airpods with your PC, connect them and wear them for a while so that they appear connected in the Settings. Once done, launch the Start menu, search for ‘Control Panel’ and launch the same from your Search results.

Click on the drop-down menu in the top right corner of your screen and select ‘Large icons’.

Click on ‘Devices and printers’.

Click and select ‘Airpods’ from your devices and press Alt + Enter on your keyboard.

Switch to the ‘Services’ tab by clicking on the same at the top of your screen.

Uncheck the box for ‘Handsfree Telephony’.

Click on ‘Ok’ to save the changes.

The audio should now automatically switch and start using the Stereo audio which should help you get high-quality audio when using Airpods.
2. For Mic and audio (Bad audio)
You do not need to do much to get your mic and audio working in Windows. This is the default profile selected by Windows and if you haven’t disabled your mic within Windows settings then it should work by default. If not, you can use the guide below to set it as your default communications device which should get the mic working on your device.
Note: For some reason, the mic seems to fail the built-in test within Windows settings however it will work as intended in dedicated apps where you need the mic. The mic will also show up in apps like Google Meet and Microsoft Teams where you can select it as your input device.
Launch the Start menu, search for ‘Control Panel’ and launch the same from your search results.
Click on the drop-down menu in the top right corner and then select ‘Large icons’.
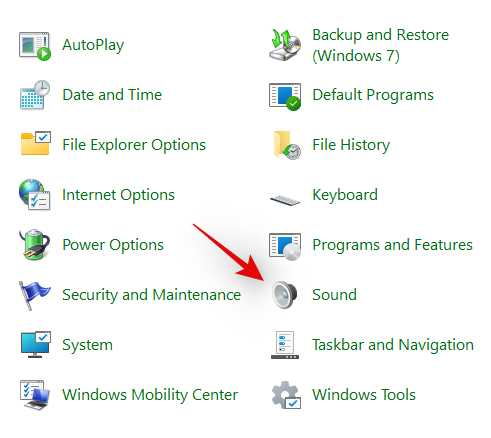
Click on ‘Sound’.
Now switch to the ‘Recording’ tab by clicking on the same at the top of your screen.

Click on ‘Airpods’ from the devices list.

Now click on ‘Set default’ at the bottom of the window.

Click on ‘Ok’ to save your changes. Your Airpods should now work as intended with the mic and audio output.
3. For both high res stereo audio and mic functionality
If you wish to have both, high res stereo audio and mic functionality then you will need to invest in a Bluetooth 4.0 or 5.0 adapter. There is a workaround but it doesn’t seem to work for everyone running Windows 11. This might be due to different Bluetooth adapters, and PC specifications but you can try it nonetheless before investing in a Bluetooth adapter.
3.1 Buy a Bluetooth adapter
Bluetooth adapters are external devices that connect with your PC to provide high res Bluetooth connectivity that otherwise isn’t possible with in-built adapters. These adapters show up as a single device when connected to headsets and support high bandwidth connections which helps deliver high res audio output while having enough bandwidth to get your Mic working as well.
We recommend you refer to a few reviews before investing in an adapter to make sure that Airpods work as intended with the adapter that you plan on buying.
3.2 Disable BT service and Wireless iAP functionality
Disabling these two services seems to provide enough bandwidth on some Bluetooth adapters that can get high res audio output and mic working for your Airpods. Use the guide below to get you started.
Launch the Start menu, search for ‘Network connections’ and launch the same from your search results.

Right-click on your BT adapter from the list and select ‘Disable’.

Close the network connections window now and open the control panel instead. Launch the Start menu and search for the same to get you started.
Click on the drop-down menu in the top right corner and select ‘Large icons’.
Click on ‘Devices and printers’.
Select ‘Airpods’ and hit Alt + Enter on your keyboard.
Switch to the ‘Services’ tab by clicking on the same at the top of the window.
Disable ‘Wireless iAP’ service by unchecking the same.

Click on ‘Ok’ once you are done.

And that’s it! Try testing the audio and mic now. If everything is working as intended then you managed to get both high res output and the mic working for Airpods with your PC.
Related: How to Turn Off Message Announce on Airpods [Announce Notifications]
How to reconnect Airpods

As you might have noticed, Airpods now efficiently reconnect to Windows 11 whenever the case is opened, however, this is only until you connect Airpods to another device. Once connected, Airpods will no longer connect with your Windows 11 device even if you have the case open and try to connect manually.
The trick here is that you need to enter pairing mode on your Airpods and then hit ‘Connect’ in the Settings app. Hold down the Setup button at the back of your Airpods with the lid open until you see a flashing white light. This means you have entered the pairing mode and you can now hit ‘Connect’ on your PC.
You won’t have to remove and re-pair Airpods every time on your PC when reconnecting, but you will have to enter pairing mode on Airpods to reconnect. In addition to this, if you do not connect Airpods to another device, then you can simply enjoy an automatic connection when you open the Airpods lid with Bluetooth turned on, on your PC.
Improving AirPods experience on Windows: What to know
Another way in which you can enhance your experience is by using third-party OEM EQs and in-built apps to boost the volume and dynamic space of your audio signal. If you bought a laptop or a pre-built in the past 3 years then you likely have a dedicated audio app to control your audio experience.
This is not the ideal solution by miles but it should help you at least get a manageable experience when using Airpods with their default configuration. For example, if you have an Asus device then you likely have access to Sonic Studio 3. The configuration below helps deliver a fairly decent experience without pushing the Airpods drivers too much.

How to view the battery status for Airpods

This is where you can use third-party apps to view the battery status of your Airpods. We recommend using Magicpods, a paid app that allows you to not only view your battery status but also avail ear detection, beautiful animations, and an onscreen windows tile. Magicpods also has a trial which can be availed at the Microsoft Store using this link.
Can you control playback in Windows 11?
Yes! This is one thing that seems to work right out of the box with Windows 11. We tried to control the playback in Spotify and YouTube (Microsoft Edge) and both seemed to work flawlessly with our pair of Airpods (Gen 1).
However, there is currently no way to customize the behavior of your taps and presses within Windows itself. You can, however, customize your pair of Airpods on an iOS or Mac device and the customizations should work within Windows 11 as well.
How to get the best possible audio quality
If you wish to get the maximum audio quality out of your Airpods, then we recommend you disable the following services using the guide below. You will lose the functionality to use your mic but get the best possible audio quality on your PC. Let’s get started.
Launch the Start menu, search for ‘Control Panel’ and launch the same from your search results.
Click on the drop-down menu in the top right corner and select ‘Large icons’.
Click on ‘Devices and printers’.
Click and select your pair of Airpods from the list and press Alt + Enter on your keyboard.
Click and switch to the ‘Services’ tab at the top of your screen.
Now disable the following services by unchecking the same from the list on your screen.
- Handsfree Telephony
- Wireless iAP

Click on ‘Ok’ to save your changes.

We now recommend you restart your PC. Once restarted, you should be able to enjoy 44Khz – 48KHz audio on your PC.
Problem connecting Airpods to Windows? Reset your Airpods first!
This can be inconvenient as you will have to re-pair your Airpods with every device you own however, this is a known fix for most issues that you might be having with Audio or Connection on Windows. Resetting your Airpods will allow you to start afresh and pairing them first with Windows should help get everything working as intended. Use the guide below to reset your pair and then connect it to Windows using the guide above.
Note: Make sure you remove Airpods from your PC as a device. We recommend you use the guides in this post to remove it from the Control Panel first and then subsequently from the Device Manager (if it shows up).
Resetting Airpods is a fairly simple process, place your Airpods in the case and leave it alone for a few minutes. Now come back, open the lid and hold down the Setup button at the back of your Airpods for around 15 seconds. You should then see the light flash Amber and then white in color. Now close the lid, enter pairing mode and try connecting them to your Windows 11 PC as a fresh device.
If everything goes correctly, you should have audio and connection working on your device. You can now use the guide above to configure your Airpods as intended.
How to use AirPods in video conferencing apps?
This depends on your BT driver version and whether you are using Windows 11 or Windows 10. If you are using Windows 10 then Airpods will show up as two different devices, one called ‘Airpods hands-free’ and the other called ‘Airpods stereo’. If you have the latest PC compatible with Windows 11 running the same, then in most cases Airpods will now show up as one device with smart switching already enabled. However, if you have an older BT adapter or older BT drivers then it will indeed show up as two devices on your system as well.
The trick here is to select ‘Airpods hands-free calling’ when trying to use Airpods in video conferencing apps if you have two devices. If you have one, then you re-enable the Telephony service if you had disabled it earlier. Subsequently, you will have to increase your Mic levels to get manageable audio quality on your system.
Lastly, some apps are notorious for having Audio issues with Airpods, namely, Microsoft Teams. Unfortunately, the only way to get the mic working in Microsoft Teams and other affected apps is to enable ‘Listening’ on the device in Audio properties. This however has the drawback of getting to hear your voice with listening enabled.
Why am I unable to control the volume in some apps?
Some apps that take exclusive control of audio output devices, will prevent you from adjusting your audio or volume when using the app. This is another issue that mainly plagues video conferencing services, especially when using their web apps.
If you are facing this issue then we recommend you either close the app, adjust your volume to the appropriate levels and restart it on your PC. If that is not an option, then you can use the desktop app instead of the web app to control your volume output as intended during the video calls.
We hope this guide helped you get familiar with Airpods on Windows 11. While not completely there, Windows 11 does bring some default connectivity and audio improvements when pairing with Airpods now. How was your experience? Did you face any issues? Feel free to share your thoughts in the comments section below.
RELATED:


One response to “Connect Airpods to Windows 11: Step-By-Step Guide and Tips to Improve Experience”
omg thank you so much i had problems with my headphones when i upgraded to windows 11 for months you dont know how much this has helped me thank you so much