What to know
- Find your VRAM from Task Manager > Performance > GPU 1 > Dedicated GPU memory.
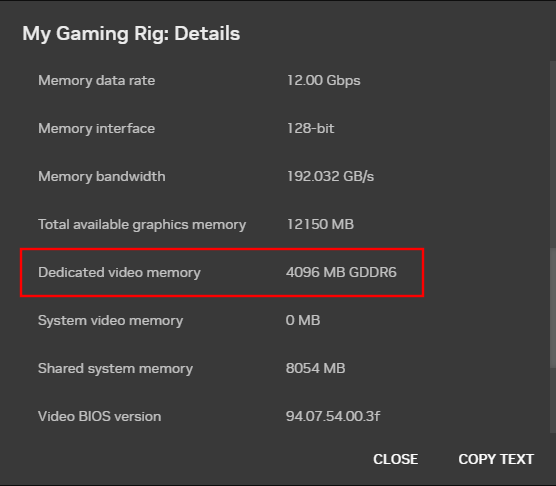
- Use the Nvidia Control Panel and find VRAM from ‘System Information’. Those using the new Nvidia app, go to Settings > View details (next to My Gaming Rig) to find your VRAM.
- For AMD Radeon users, find VRAM from Settings > System. For AMD Catalyst Center users, find VRAM from Information > Hardware > Memory Size.
- Use the DirectX Diagnostics (dxdiag) in RUN and find VRAM from the ‘Display’ tab.
Memory has always been an integral part of computing be it RAM or VRAM. While RAM helps your system manage most CPU-bound resources, VRAM is high-bandwidth memory reserved for GPU-intensive tasks.
If you’re looking to get into editing or gaming then VRAM is of the utmost priority. So how much VRAM does your PC have? Let’s find out!
How to check VRAM on Windows 11
You can check your VRAM on Windows 11 in 5 different ways depending on the GPUs installed in your system.
Use the methods below to help you find the VRAM currently available on your PC.
Related: How to Use Emojis in Windows 11 Using Keyboard Shortucts
Method 1: Using the Task Manager (dedicated GPU only)
- Press
Ctrl + Shift + Escto launch the Task Manager. Click Performance once it launches on your PC.

- Now click GPU 1.

Note: GPU 0 will be your integrated GPU however, Task Manager won’t show its dedicated memory but only the shared memory. You can use one of the methods below instead to check the dedicated memory supported by your iGPU. - You will now be shown the performance stats for your dedicated GPU. Check the stats below. You will find your current VRAM capacity under Dedicated GPU memory.

And that’s how you can find out your VRAM using the Task Manager.
Related: 3 Ways to Hide Taskbar on Windows 11
Method 2: Using your OEM control panel (dGPU only)
All dedicated GPUs come with an OEM control panel to help you manage their behavior and performance. This utility also helps display detailed information about all of your GPU specifications including its VRAM capacity. Use either of the guides below depending on your OEM.
For Nvidia
There are a couple of Nvidia apps to help you gain insight into your dedicated GPU’s VRAM.
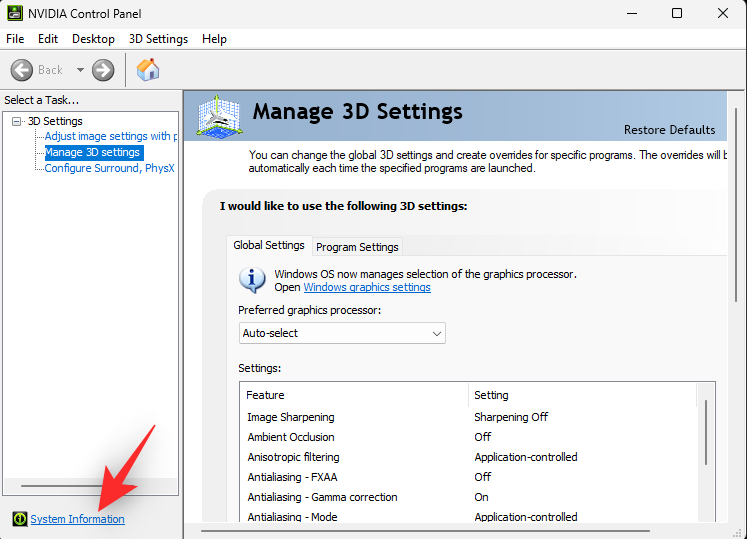
Using the NVIDIA Control Panel
Shift + Right-clickon your desktop and select Nvidia Control Panel.

- Click System Information.
- Scroll down the Details section to find Dedicated video memory. This is the current VRAM capacity of your dedicated GPU.
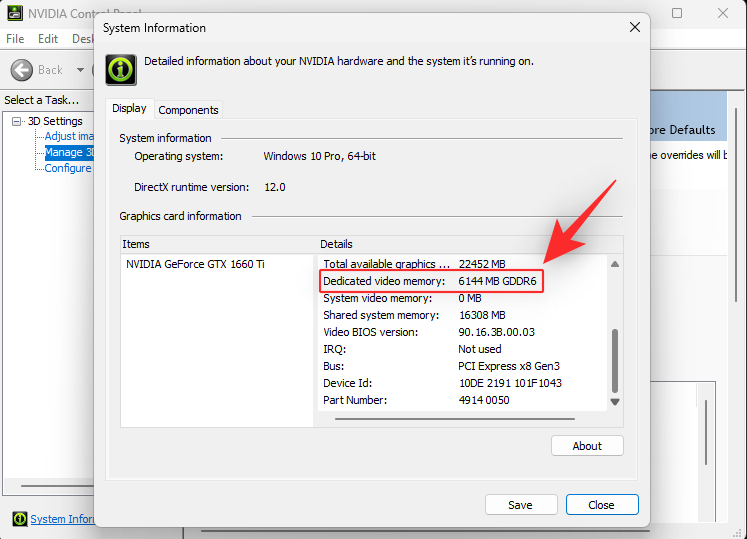
And that’s how you can find the VRAM for your Nvidia card.
Using the new Nvidia app
Nvidia recently launched an all-in-one Nvidia app. If you’re using this new AIO Nvidia app, here’s how to check your VRAM:
- Launch the Nvidia app and click on Settings.

- Under the ‘System’ tab, click on View Details next to ‘My Gaming Rig’.

- Find your GPU’s VRAM next to Dedicated video memory.
For AMD
AMD cards have two different utilities depending on their models. Choose either one of the guides below depending on the current software installed on your PC.
For Radeon Software
Shift + Right-clickon your desktop and select AMD Radeon Software.- Click the Gear (
) icon in the top right corner and then click System.
- You will now be shown your GPU model as well as its VRAM capacity beside it.
- You can click More Details to view more information about the card.
And that’s how you can view your VRAM size using AMD Radeon Software.
For AMD Catalyst Center
Shift + Right-clickon an empty area on your desktop and click AMD Catalyst Control Center.- Now, click Information in the left sidebar and then select Hardware.
- You will be presented with all the details of the currently installed graphics card on your system.
- Look for Memory Size. This is your GPU’s VRAM capacity.
And that’s how you can view VRAM size using the AMD catalyst center.
Related: Top 8 Ways to Disable Notifications on Windows 11
Method 3: Using display settings
You can also use Windows display adapter settings to view your current VRAM capacity. This method works for both iGPUs and dGPUs. Let’s take a quick look at it.
- Press
Windows + iand click Display.

- Now click Advanced display.

- Click Display adapter properties for Display 1.
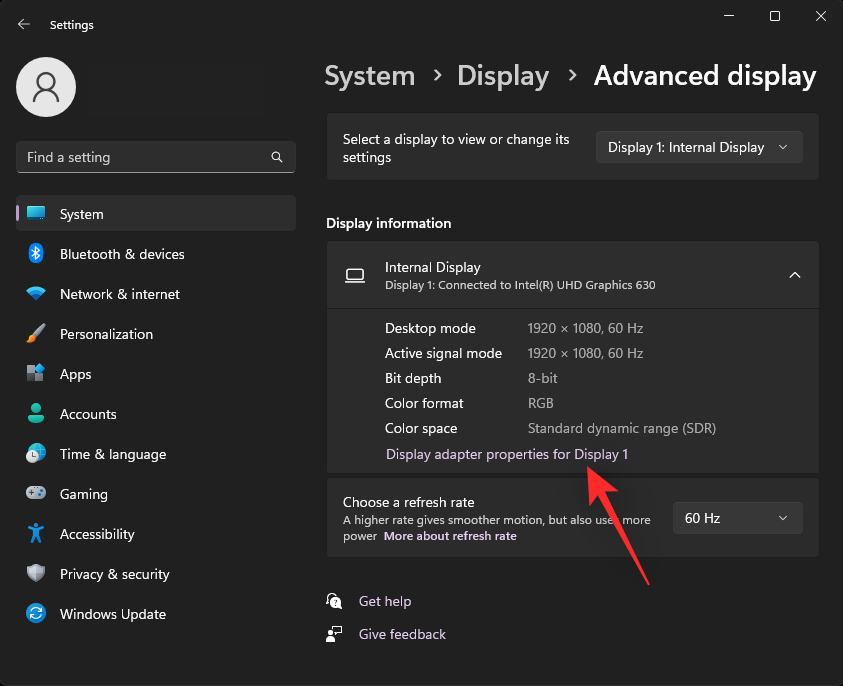
Note: If you have a laptop then you will only be able to view VRAM for iGPU using this method. This is because almost all laptop displays are designed to be powered by the iGPU by default. Your laptop will switch to the dGPU only when necessary under graphically intensive tasks. - Now look for the value named Dedicated Video Memory. This is the current VRAM capacity of your selected GPU.

And that’s how you can view your VRAM using Display settings.
Method 4: Using DirectX Diagnostic Tool
- Press
Windows + Rto launch Run. Type dxdiag and hit Enter.
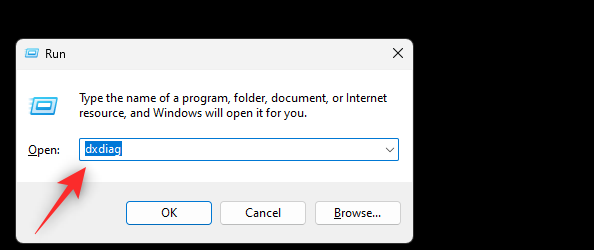
- The DirectX Diagnostic tool will now open on your PC. Click Display 1 at the top.
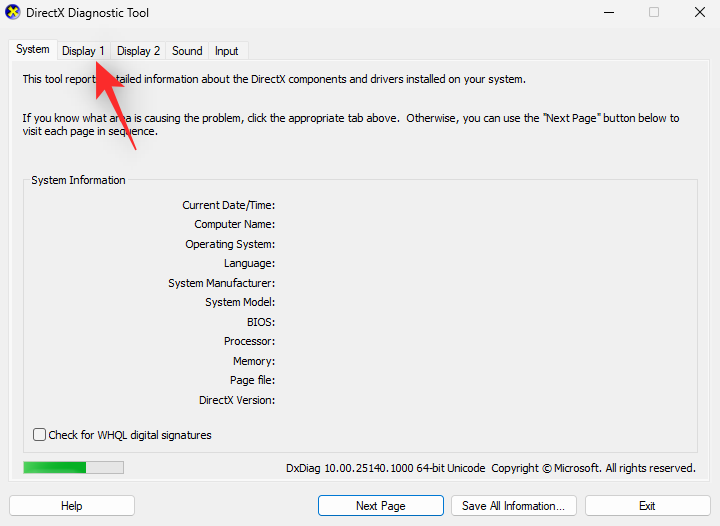
- This is your iGPU and you will find its VRAM capacity beside Display Memory (VRAM).

- Click Display 2.
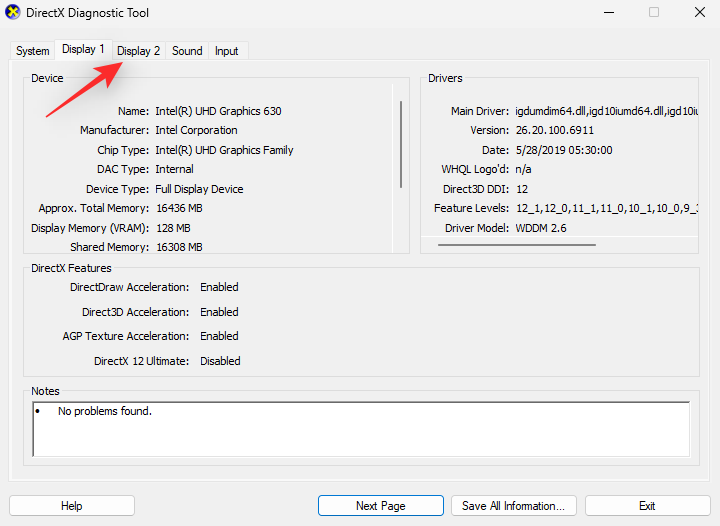
Note: This applies only to systems with a dedicated GPU. - You will find your dGPU’s VRAM capacity beside Display Memory (VRAM).

And that’s how you can check your VRAM using the DirectX diagnostic tool in Windows 11.
Method 5: Using a third-party app
You can also use third-party apps to check your VRAM capacity. We recommend using HWinfo for a detailed analysis of all your hardware components. Follow the steps below to help you along with the process.
- HWinfo | Download Link
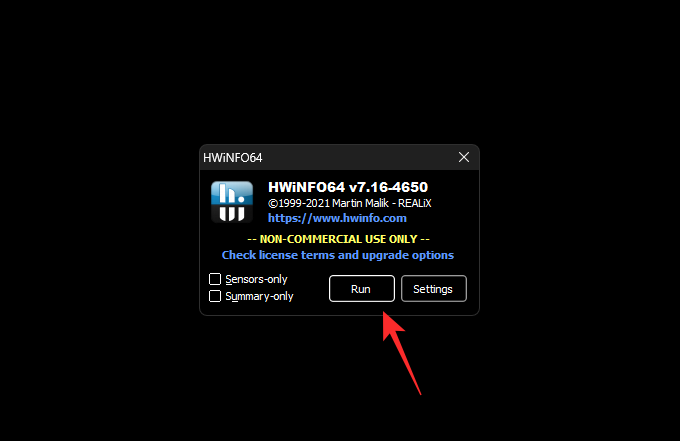
- Download HWinfo using the link above. We recommend you opt for the portable version for ease of access. Once downloaded, unzip the same and launch HWinfo from the same using the .exe file relevant to your system.

- Click Run.
- Double click the Video Adapter in the left sidebar.

- Click and select the desired GPU.

- Look for the Video Memory value on your right. This is the size of your VRAM capacity for the current GPU.
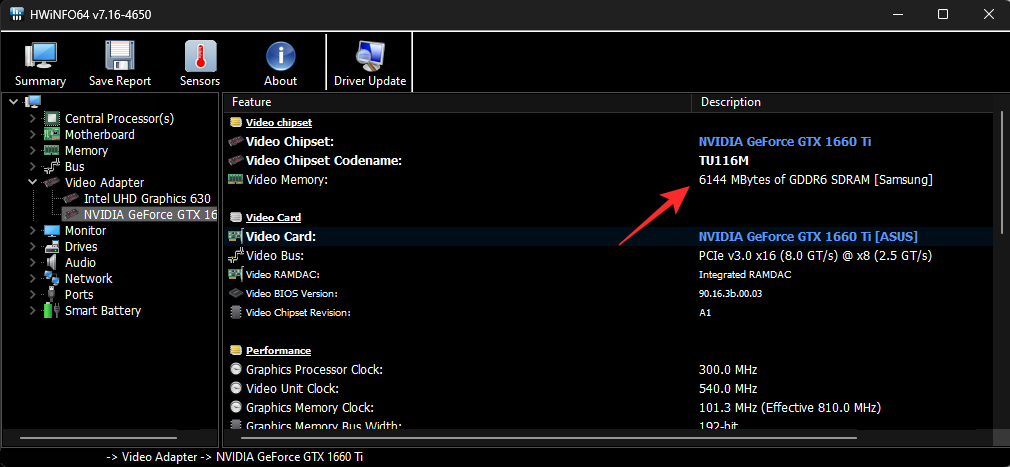
Note: Your iGPU might be using shared memory from your RAM depending on your Windows settings. The same will be reflected in iGPU readings. If your VRAM capacity seems off in HWinfo, we recommend you use advanced display settings using the method above to verify the same. You can also use DirectX diagnostic tool for a more detailed analysis.
And that’s how you can find your VRAM size using HWinfo.
We hope this post helped you easily check your VRAM on Windows 11. If you face any issues, feel free to reach out using the comments below.
RELATED:
- How to Use File Explorer Tabs on Windows 11
- Windows 11 Spotlight Not Working? 9 Fixes and 3 Checks To Do
- How to Use System-Wide Live Captions on Windows 11
- How to turn on or off the Efficiency Mode in Windows 11 for an App or Process
- 2 Easy Ways to Install Windows 11 22H2 Update Right Away


