
As a daily Windows user, you need certain apps and programs to start as soon as you log in so that you don’t have to go through the trouble of doing so yourself. Windows offers a quick and easy way for this with startup apps.
During the installation of most apps, you can choose from the setup itself whether the app should start at login. But you may not always get this option. Fortunately, Windows lets you add more programs to startup anytime you wish to do so. There are more than half a dozen ways of adding programs to the Startup folder.
In this article, we show you all the available ways and means to add a program to startup on Windows 11 as well as how to access the startup folders independently. Let’s begin with the smaller things first.
How to add programs to startup
Here are the different methods through which you can add programs to startup.
Method 1: From the Settings App
The traditional way to make any such changes is to do so from the Settings app. Here’s how:
- Press
Win+Ito open the Settings app. Then click on Apps.

- Scroll down on the right and select Startup.

- You will find here a list of apps to enable or add to startup. Simply flick on the switch next to the ones that you want to start at startup.

If there are some installed apps that are not listed here, move on to other methods to add them to startup.
Related: How to Change a File Type on Windows 11: Basic and Advanced Ways to Do So!
Method 2: Create a shortcut in the Startup folder
The apps that have their shortcuts in the Startup folder open up when you start your PC. You can add a program to the startup yourself by creating a shortcut for them in the folder. Here’s how to go about it:
- Navigate to the Startup folder –
C:\Users\(username)\AppData\Roaming\Microsoft\Windows\Start Menu\Programs\Startup
We’ll be using the current user’s Startup folder for our example, but know that it works the same for the all-user Startup folder as well. - Once inside the Startup folder, click on New.

- Then select Shortcut.

- In the “Create Shortcut” window, click on Browse.

- Now navigate to the executable file of the app that you want running on startup and select it.
Note: The default drive for installed apps is the ‘C’ system drive. Within it, classic or legacy 32-bit programs will be installed inside the “Program Files (x86)” folder while most 64-bit programs are inside the “Program Files” folder. - Once you have found your application’s folder and executable file, select it. Then click OK.

- The location of the app will now be in the field. An alternate way to add the file location is to navigate to it using File Explorer, right-click on the executable, and select Copy as path.

- Paste the copied path in the location field.

- Click Next.

- Click Finish.

Your program app will now be inside the Startup folder.
Related: How to Install and Use VirtualBox on Windows 11: A Definite Step-by-step Guide
Method 3: Create a program shortcut and move it to the Startup folder
Instead of creating a shortcut inside the Startup folder, you can create the app’s shortcut anywhere else just as well and then move it to the Startup folder. Now, there are a couple of ways of creating a shortcut, one of which we’ve already seen in method 2.
- If you want to create a shortcut on the desktop, simply right-click on the desktop, select “New”, and then “Shortcut”.

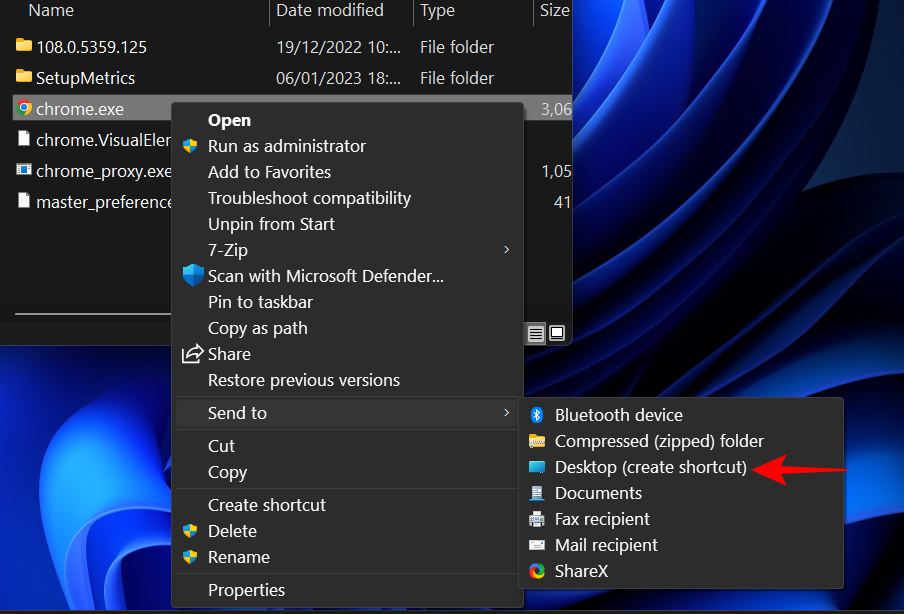
- Then use the Create Shortcut window as shown before. Alternatively, you can directly go to the app’s executable file and send its shortcut to the desktop. To do so, right-click on the application and select Show more options.

- Then select Send to and click on Desktop (create shortcut).
- The only thing left to do now is to copy this shortcut (
Ctrl+C) and then paste it (Ctrl+V) inside the Startup folder. - Or drag and drop it there.

Related: How to Run Old Games on Windows 11
Method 4: Copy Windows apps to the Startup folder
There are a few modern native apps like Calendar, Camera, Calculator, etc. whose shortcuts cannot be created using the methods given above. But they’re found inside an “Applications” folder where all other applications are also listed so you can easily move your apps from there to the Startup folder. Here’s how to do so:
- Press
Win+Rto open the RUN box, typeshell:appsfolderand hit Enter.

- This will open up the Applications folder.

- Now open the Startup folder as shown earlier (type
shell:startupin the RUN command box for the current user’s Startup folder).

- Arrange the two folders side by side. Then drag your application from the application window and drop it inside the Startup folder.

Your shortcut is now added to the Startup folder.
Method 5: From the app’s settings and preferences
- Some third-party apps also provide the option to enable “run at startup” or a similar setting from within the preference section of the app.

- Look for “General” settings or preferences within the app that you want to run at startup. Then look for an option similar to “run at startup” or “run when computer starts”. If it’s available, make sure it is enabled and “OK” or “Save” your settings.

If your app doesn’t have such an option, use other methods.
Method 6: Using Task Scheduler
The Task Scheduler app can be used to do a variety of things automatically based on a predefined schedule, such as running an app at startup. This is how:
- Press Start, type task scheduler, and hit Enter.

- Then right-click on Task Scheduler Library in the left pane, and select Create Basic Task…

- Give this task a name and then click on Next.

- Choose When I log on.

- Then click Next.

- With Start a program selected, click on Next.

- Click on Browse

- Navigate to your application’s executable file, select it, and click Open.

- Then click Next.

- Review your configuration, and click on Finish.

Your application will now be up and running at the next startup.
Method 7: Using the Registry Editor
The registry editor provides yet another avenue to add a program to startup. The steps will differ slightly depending on whether you are adding them for a single user or all users.
For Current User
- Click the Start button on the taskbar or press the Windows key on your keyboard.

- Type regedit, and hit Enter.

- Navigate to the following address:
HKEY_CURRENT_USER\Software\Microsoft\Windows\CurrentVersion\Run
Alternatively, copy the above and paste it into the registry editor’s address bar.

- And hit Enter. With “Run” selected in the left pane, right-click on the empty space on the right, select New, and then String Value.

- Give this string a name and then double-click to modify it.

- In the “Value data” field, we’ll be adding the path to the application file. For convenience’s sake, navigate to the application file in File Explorer, right-click on it and select Copy as path.

- Then paste it in the value field.

- Click OK.

The next time you restart and log in, your newly added application will start automatically.
For All Users
If you want an app to start for all users on your system at startup, the location where the string value needs to be created is different.
- In the registry editor, navigate to the following address:
HKEY_LOCAL_MACHINE\SOFTWARE\Microsoft\Windows\CurrentVersion\Run

- Now, as before, right-click on the right side, select New, and String Value.

- Give the string value a name, enter the application’s file location and save.

Method 8: Enable startup apps in the Task Manager
The Task Manager also lets you enable certain applications. Here’s how to go about it:
- Right-click on the taskbar and select Task Manager.

- Or press
Ctrl+Shift+Escand open the Task Manager. Click on the hamburger icon in the top left corner.

- Select Startup apps.

- Here, you will find a list of apps, the same one as in the Settings app (shown in method 1), that you can enable or disable. Check for their current status under “Status”.

- To enable an app to run at startup, simply select it and click on Enable at the top.

Method 9: Manage startup apps with a third-party application (Sysinternals Autorun)
Besides native solutions, you can also look into programs that are built to manage startup apps exclusively, especially if you have to manage startup apps and services regularly. The Autorun tool by Microsoft is a good option for this.
But it only lets you manage apps that are already set to startup at logon, not add any new ones. Nevertheless, it can be helpful in more ways than one and make managing programs a one – or two-click affair. Use the link given above to download and run the application.
Be advised that this application is an advanced tool and will show you information about every single thing set to run at startup, including important services and registry items that we have no business meddling with. So, if you do not understand what a particular entry is for, it’s best to leave it alone.
- Under the “Everything” tab, you will find a host of things, from discrete programs to background services and tasks that trigger other tasks.

- However, we only have to deal with the Logon section. Click on it to switch over to it.

- Here, all that you have to do is enable or disable the startup programs with a tick.

Related: How To Remove or Replace appraiserres.dll in Windows 11 Setup
How to find and open the Startup folder in Windows 11
Let’s see where the Startup folder is located in Windows 11. There are two separate startup folders – one for the current user (your username) and another that is common to all users on your system.
1. For current user
The location for the current user is as follows:
C:\Users\(username)\AppData\Roaming\Microsoft\Windows\Start Menu\Programs\Startup
To access it, you can simply open File Explorer by pressing Win+E and navigate to the folder yourself. Or you could copy the address given above and paste it into the File Explorer’s address bar, and hit Enter.

An even faster way is to simply use the direct shell command. To do so, press Win+R to open the RUN box. Then type:
shell:startup

And hit Enter. And voila! You have reached the Startup folder for your user.
2. For all users
The location for the common Startup folder is as follows:
C:\ProgramData\Microsoft\Windows\Start Menu\Programs\Startup

While the shell command for the same is:
shell:common startup

Note: If you’re using File Explorer to access the Startup folder, you will have to have File Explorer’s view options set to show “Hidden items” to access some of the hidden folders in the file path location.
Related: How to Uninstall McAfee on Windows 11 [5 Ways]
FAQs
Let us take a look at a few commonly asked questions about adding programs to startup on Windows 11.
Why can’t I find my installed app in the startup list?
The startup list in the Settings app doesn’t show all the installed apps on your computer. If you want to add a program to startup that isn’t on the startup list, you will have to make use of other, equally simple methods. Refer to our guide above to know more.
Where are Windows 11 startup folders located?
Windows has two startup folders – one for the current user, and one that is common to all users. Here are their locations:
User startup Folder: C:\Users\(username)\AppData\Roaming\Microsoft\Windows\Start Menu\Programs\Startup
All Users startup Folder: C:\ProgramData\Microsoft\Windows\Start Menu\Programs\Startup
How to access startup folders with a command?
The fastest way to access your startup folders is by using the RUN command. Open the RUN box with the Win+R shortcut. Then type shell:startup for your Startup folder, or type shell:common startup for the common Startup folder, and hit Enter.
We hope you were able to add your programs to the Startup folder and save yourself the trouble of opening them manually at every logon.
RELATED
- How to Add WinRAR or 7-Zip to Right-Click Menu on Windows 11
- What Windows 11 Services to Disable Safely and How?
- How to Install Git on Windows 11
- ‘Windows 11 Memory Integrity is off’ fix
- How to Ungroup Icons on Windows 11 Taskbar With a Registry Hack (and 2 More Ways)
- How to Find ‘This PC’ on Windows 11


One response to “Add a program to startup on Windows 11: Step-by-step guide”
Awesome article! Thanks a lot my friend for all this glorious information!
I’ve made a lot of times only copying the Thunderbird shortcut to the Startup Folder, but I found out that Thunderbird was starting up to all users in my laptop.
Now I chose create a task. I’ll try to finish this puzzle.