
The screenshot or print-screen key comes in quite handy in everyday use for gamers, technophiles, and anyone wanting to capture the contents of their screen. It is one of those functions which, over the years, we have come to take for granted, and whose true worth is only understood when it stops working.
There could be a variety of reasons why you are not able to capture screenshots on your system. From missing registry keys to outdated keyboard drivers to extraneous software taking over the print screen function – there’s a lot that could go wrong. But before you relegate the task to a third-party application, try out these simple fixes for all your screenshots-not-working woes.
Related: How to Reset Taskbar in Windows 10
Screenshots not working on Windows 11? Here are 7 ways to fix this!
On most laptops and desktop computers, you are bound to have a “Prt scr” key that captures the contents of your screen. On Windows 11, this key is by default associated with the Snipping Tool – Windows’ built-in screen capture app. But if you’re not using When this key is pressed, the image of the screen is copied to the clipboard.
It’s important to note that Windows doesn’t give you any confirmation that your screen has been captured which does confuse many as to whether their Prt Scr key is even working. You have to open a program like Paint, Photoshop, Word, etc. (those that support images) and paste it there to see the screenshot.
But if you don’t anything, you can be sure that you’re either not using the right hotkeys, or there’s something wrong with the screenshot function. Here are a few ways that you can fix this problem for good.
1. Make sure you’re using the right key(s)
Other than simply pressing the Prt Scr button, there are a few hotkey combinations that you can use to capture screenshots. Here they are:
- Prt Scr – Captures the entire screen.
- Ctrl + Prt Scr – Also captures the entire screen
- Alt + Prt Scr – Captures the active window.
- Fn + Prt Screen – On some keyboards, Print Screen shares the same key as another function. So you may have to press the
FnandPrt Screenkeys together.
For the above hotkey combinations, the screenshot will be captured and copied to the clipboard. You will still be required to paste it into a program that supports images. If you want to bypass this, use the following hotkey combination.
Winkey + Prt Scr – captures the entire screen and saves the screenshot to the default Screenshot folder (C:\Users\(username)\Pictures\Screenshots).
Related: How To Play a Sound Every Few Minutes on Windows 10
2. Check ‘write’ permissions of the Screenshot folder
If you’re using the Win + Prt Scr hotkey but don’t see your screenshot saved in the default Screenshots folder, it is possible that you may not have permission to write to that folder. Here’s how you can check if that is the problem:
- Press
Win+Eto open File Explorer, then open the Pictures folder. - Right-click the Screenshots folder and select Properties. Go to the Security tab and check if there is a tick next to ‘Write’ for SYSTEM permissions.
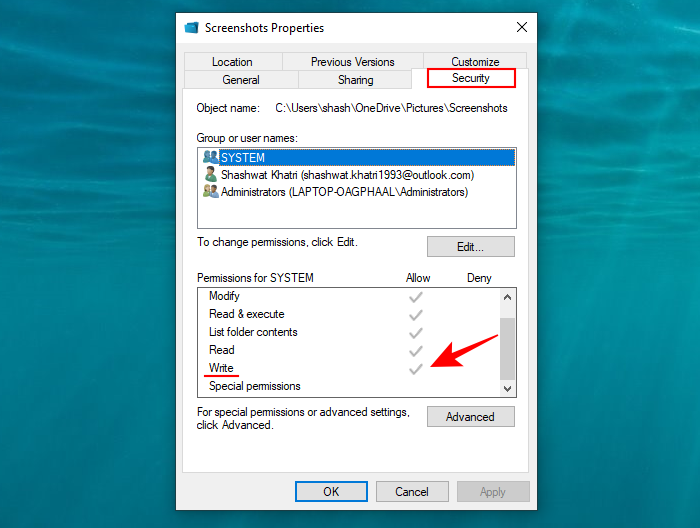
- If you don’t see a tick next to Write, then you don’t have permission to save screenshots using the “Winkey + Prt Scr” hotkeys. But this is something that can easily be fixed. Use the steps starting from the one linked here.
Related: How To Uninstall µTorrent on Windows 10
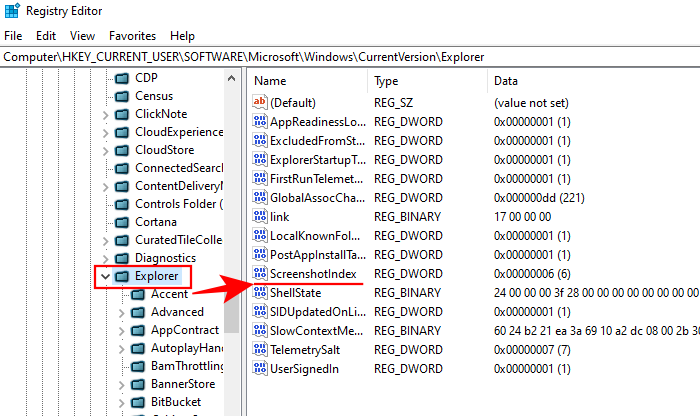
3. Registry Fix
Another problem could be that your system is missing an important Registry file. But fret not, it is easy to fix this. Here’s how you can do so:
- Press
Win+Rto open the RUN box, type “regedit”, then hit Enter. - Once the Registry Editor opens, navigate to the following location:
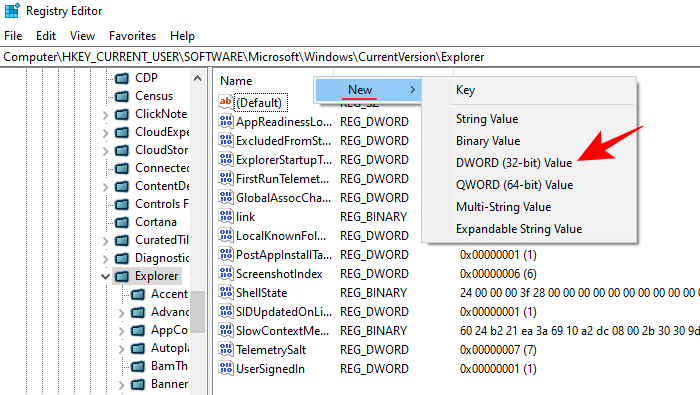
HKEY_CURRENT_USER\SOFTWARE\Microsoft\Windows\CurrentVersion\Explorer. - With the Explorer folder selected in the left pane, see if there is a ScreenshotIndex DWORD file in the right pane.
- If there isn’t, then you can create one yourself. To do this, right-click in the empty space in the right pane, select New, then click on DWORD (32-bit) Value.
- Name this “ScreenshotIndex” and double-click it to modify it. Then, for “Value data”, enter 1. Click OK.
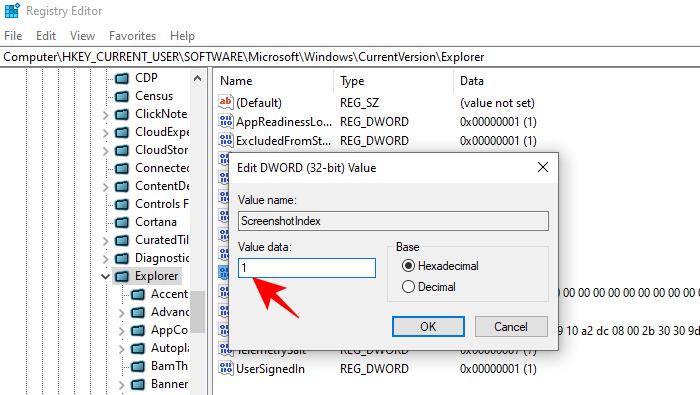
- Now, check to see if your screenshots are being saved to the Pictures > Screenshots folder.
Related: How to Change Mouse Polling Rate on Windows 10
4. Use the Snipping tool
If the aforementioned methods don’t work, you can use the built-in Windows 11 screenshot tool – Snipping Tool. Here’s how you can open and use it.
- Open the Settings app, go to Accessibility > Keyboard, and toggle on Use the Print screen key to open screen capture to open Snipping Tool whenever you press the
Print Screenkey.

- Alternatively, press Start, type “snipping tool”, and open it. Click on New.

- Mark the area to capture and then view it on the app’s canvas. Click on the floppy icon to Save.

- To quickly capture a screenshot, press
Win+Shift+S. The file will be saved in the Pictures > Screenshots folder.
5. Close background programs
Sometimes, a few background programs can interfere with the screenshot functions and keep you from capturing your screen’s content. Some of these programs include the likes of OneDrive, Dropbox, and Snipper tool, etc. Here’s how you can close them and wrest back control of your “Prt Scr” key.
- Right-click on the taskbar and open Task Manager.

- Now, under the “Processes” tab, select the interfering program and select End Task.

- Do this for all such programs and check if the screenshot function is working.
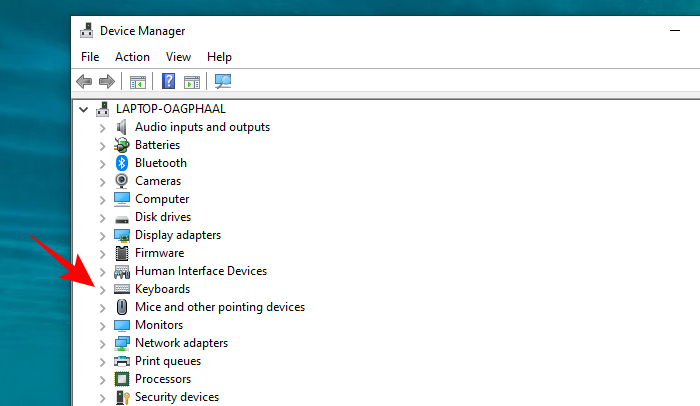
6. Update keyboard drivers
An outdated or incorrect keyboard driver can also be the culprit preventing your Print Screen key from doing its job. So, updating your keyboard drivers might just fix the problem for you. Here’s how to do so:
- Press
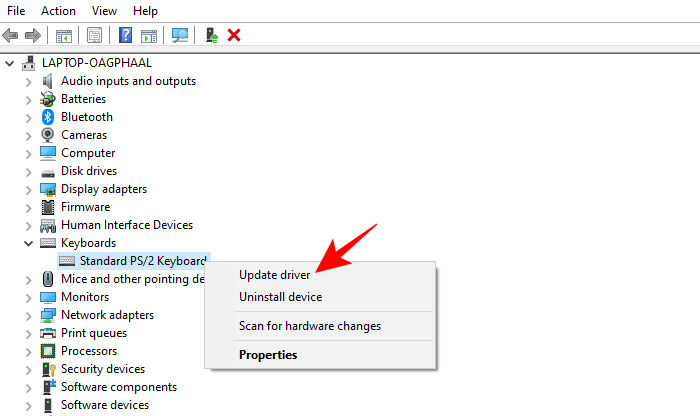
Win+Xand click on Device Manager. - Click on Keyboards to expand it.
- Then right-click on Standard PS/2 Keyboard and select Update driver.
- Now, you will get two options – to search for drivers automatically or to browse the computer for drivers. If you don’t have the keyboard drivers on your computer, select Search automatically for drivers.
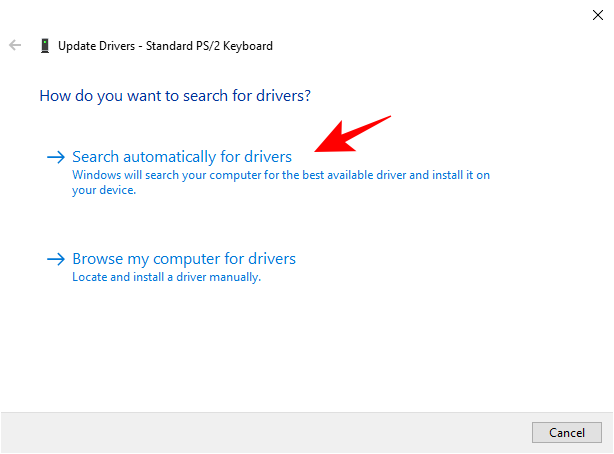
- Wait for the latest drivers to be installed automatically, then reboot your PC.
- Or, you can go to your keyboard (or laptop) manufacturer’s website and download the drivers. Once you have the drivers, go back to the same “Update driver” option, and this time click on Browse my computer for driver software.
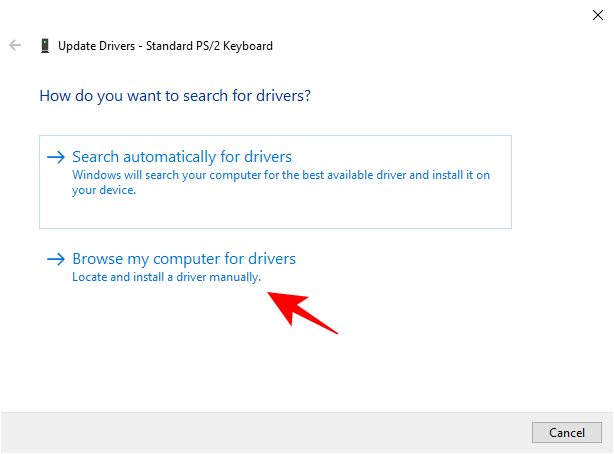
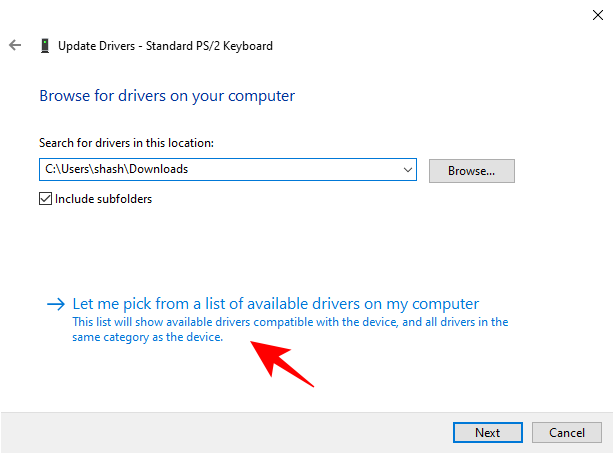
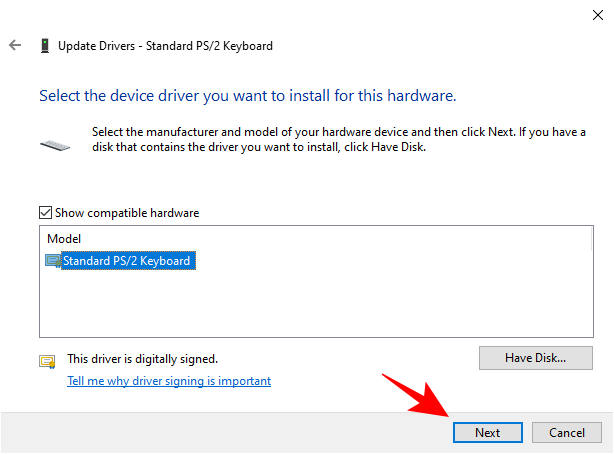
- Then click on Let me pick from a list of available drivers…
- Now, select from the available drivers and click Next.
- Once the keyboard drivers are updated, reboot your PC and check if the problem is fixed.
7. Use third-party applications
When all screenshot-capturing functions fail, you’re left with the option of using third-party applications. But that is not a consolation; third-party applications far exceed Window’s bare-bones screenshot function. In fact, folks who have to regularly take screenshots know that these applications provide useful additional options that streamline the screen-capturing process and make it much more convenient on the whole. Here are a few that you may want to check out.
We at NerdsChalk are a big of the ShareX software, so we totally recommend you to check it out for all your screenshot needs.
So these were all the fixes that you could get your screenshot function to start working again on Windows 11. If you’re still experiencing trouble with taking screenshots, we highly recommend you get a third-party application for the same.
RELATED


One response to “7 Ways to Fix the Screenshots Not Working Issue on Windows 11”
None of these work.
But to correct some misinformation (I Know because I have had two windows 10 laptops, n 1 windows 7 ) -on Windows 10, the screenshots automatically save in the Pictures/Screenshots folder…It’s in W/7 that they have to be coped to ‘paint’ or the like!
But half-an-hour ai, it just stopped going dark(when a ‘picture’ is being ‘taken’) & no screenshots are saved!