If you have become fluent with all of what Mac offers and you’re now ready to make the most out of it, then we believe it’s time you get started with Terminal and learn how to use macOS’s command line. With the right set of commands, you can have full control of your Mac computer using just your keyboard.
In the following post, we’ll explain what Terminal is, how you can access it, the basics and some rules you should follow, and how to use Terminal to get things done on macOS.
What is Terminal and what can you do with it?
Terminal is a native program that comes preinstalled on a Mac and allows you to perform functions on your operating system directly using text-based communication. Known otherwise as a command-line interface (CLI), Terminal helps those of you who don’t wish to go through a bunch of menus and move your mouse to them. In many ways, it can be compared to Windows’ Command Prompt as it uses commands to accomplish some tasks more efficiently.
When you use Terminal as your Mac’s system administrator, you will be able to tweak the most complex of things on macOS. Terminal can be utilized to open files, make files hidden on Mac, tweak your Mac’s performance, remove files, keep your Mac from going to sleep, and more.
Related: How to Record Your Voice on a Mac
How to open Terminal on a Mac [4 methods]
There are several ways you can access Terminal on your Mac.
Method 1: Using the Launchpad key
The simplest way to do it is using the Launchpad function on macOS.
- Press the Launchpad key on your keyboard.
- When Launchpad shows up, click on the Other folder.
- Inside this folder, click on the Terminal app from the available options.

Method 2: Using the Finder app
You can also get to the Terminal application from the Finder app.
- Launch the Finder app from the dock.
- Inside Finder, click on Applications from the left sidebar.
- On the Applications folder, double-click on Utilities.
- Inside this folder, you can double-click the Terminal app to open it.

Method 3: Using macOS Spotlight
You can also make use of the Spotlight feature on your Mac to gain access to Terminal.
- Press the Command + Spacebar keyboard shortcut on macOS.
- When the Spotlight screen pops up, type “Terminal”.
- Double-click on the Terminal app when the results appear. You can also press the Return key on the keyboard to open the selected result from Spotlight.

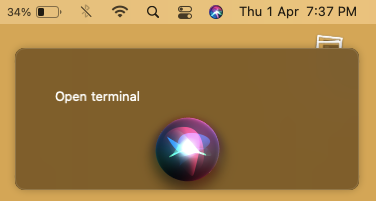
Method 4: Using Siri
Terminal can also be launched using Siri on your Mac.
- Click the Siri icon from the Menu bar.
- When the Siri interface shows up, say “Open Terminal”.
- The Terminal app will now launch on your Mac.
Keep Terminal app on Dock
Once the Terminal app is open on Mac, you can choose to keep it on the dock so that it’s easily accessible at a later time for convenience.
- Right-click or Control-click the Terminal icon on the dock.
- From the overflow menu, go to Options > Keep in Dock.

- The Terminal app would now remain available on the Dock at all times.
Related: How to Force Quit Safari on Mac [2 Ways]
Terminal on Mac: Getting started
Before you start using Terminal and its commands, it’s important to know that learning Terminal is essentially like learning a new language and there are a handful of basic rules you should know. You will be able to get your desired output only if you’re precise and careful about the commands you enter; so be wary of the characters and spaces in between.
Basic elements
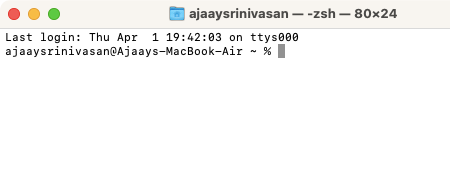
When you open Terminal for the first time, you will see a window with a white background pop up on your screen and you can resize it however you want. At the top of this window, you should be able to see your Mac username, the dimensions of the window, and “bash” or “zsh”.
“bash” stands for “Bourne again shell” which is the default shell for macOS Mojave and earlier versions. “zsh” labeled as Z shell is the default shell for all user accounts from macOS Catalina.
But the things you mostly deal with inside Terminal are – Command, Argument, and Modifier.
Command: These are the skeleton of the Terminal app and determine what happens with the code that you typed. You can use a slew of commands to achieve the results you want within macOS. Be aware of the commands you use as some of them might even harm your Mac or delete files from it.
Argument: This is the resource or location where you tell your Mac to apply your preferred command to.
Output: This part of the code is where you want Terminal to show you the output.
To explain the above elements, let’s show you a sample code below:
cp ~/Documents/sample.pdf ~/Desktop
We can break this code into three parts. “cp” is the command that executes a particular function which, in this case, copies a file from one location to the other. Here, “cp” (Command) is used to copy a file named sample.pdf (Argument) from the Documents folder to the Desktop (Output) on your Mac.
Basic rules
Once you have an idea of these three elements, we can move on to understanding some rules when it comes to using Terminal.
- For a command to get executed, you must press the “Return” key on your keyboard.
- You cannot interact with any Terminal using your mouse except for moving or closing the Terminal window.
- Make sure the capitalization of alphabets, spaces you leave, and punctuations you enter are precise because syntax plays a huge part in how commands work.
- You can execute a command inside a particular folder by dragging the folder inside the Terminal. This way, the selected folder’s path is copied onto the Terminal so that you can use it with your preferred command.
- If you fail to mention the location with a command, the command will be executed where it was the last run.
- Files or folders with empty spaces in their names should be written next to the command as “<file name>”. For instance, if you’re dealing with a folder named “Sample Folder”, the command to list its contents should be ls /Documents/”Sample Folder” and not ls /Documents/Sample Folder.
Mac Terminal Keyboard shortcuts
Once you have familiarized yourself with how Terminal works, you can go ahead and start using the macOS command-line interface.
Since everything on Terminal is done using your keyboard as the primary source of input, here are some keyboard shortcuts that you may use to perform specific tasks. Make sure you have your Terminal window open on the screen before trying any of these shortcuts.
| Keyboard Shortcut | Purpose |
| Ctrl + A | Move the cursor to the start of the line |
| Ctrl + B | Move the cursor one space backward |
| Ctrl + C | Kill the current Terminal process |
| Ctrl + D | Exit current shell |
| Ctrl + E | Move the cursor to the end of the line |
| Ctrl + F | Move the cursor one space forward |
| Ctrl + L | Clear Terminal screen |
| Ctrl + R | Search previous commands |
| Ctrl + T | Swap two characters before the cursor |
| Ctrl + W | Delete one word before the cursor |
| Ctrl + Y | Paste a previously cut element |
| Ctrl + _ | Undo the last command |
| Esc + T | Swap two words before the cursor |
| Option + → | Move the cursor forward by one word |
| Option + ← | Move the cursor backward by one word |
Mac Terminal Commands
Here are some basic commands you can use to get things done when dealing with files on your Mac:
| Command | Purpose |
| cd | Reveal home directory on Mac |
| cd <folder> | Go to a specific directory |
| cd ~ | Go to a folder’s home directory |
| cd / | Go to the root of the drive |
| cd ../../ | Go 2 levels before the current directory |
| q | Exit |
| top | Shows you an active process on Terminal |
| clear | Clear the screen |
| touch <file> | Create a file with no established extension |
| cp <file> <newfile> | Copy a file into a new file |
| cp <file> <dir> | Copy a file into another directory |
| cp <file>~/<dir>/<newfile> | Copy a file to a directory and rename the file |
| cp -R <dir> <“new dir”> | Copy a file to a directory and rename the file with spaces in the name |
| cp -i <file><dir> | Copy a file with a prompt before the copying process |
| cp <file1> <file2> <file3>/Users/<dir> | Copy several files to the same directory |
| mv <file> <dir> | Move a file to a specific folder |
| mv <file> <new filename> | Rename a file |
| mv *.png ~/<dir> | Move all PNG files from the current folder to another |
| rm <file> | Remove a file |
| rm -i <file> | Remove a file after confirmation |
| rm -r <dir> | Remove a directory and all files in it |
| rm -f <file> | Remove a file without confirmation |
| rm -i <file> | Remove a file with a prompt before |
| rmdir <dir> | Remove a directory |
| mkdir <dir> | Create a new directory with the name “dir” |
| mkdir <dir> <dir2> <dir3> | Create multiple directories at once with names “dir”, “dir2”, “dir3” |
| mkdir -p <dir>/<dir> | Create nested directories |
| pwd | Show the full path to the current directory |
| .. | Go to the parent directory |
| . | Go to the current folder |
| cat | Show current folder |
| ls | Show all files in the current directory in list format |
| ls -C | Show a list of files sorted by size |
| ls -lt | Show a list of files sorted by modified time |
| ls -l | Show a list of files in the current directory |
| ls -a | Show a list including hidden files |
| ls -lh | Show a list with file sizes mentioned in KB, MB, or GB |
| ls -R | Show a list of files in a folder recursively |
| ls -l .. | Show a list of files in the parent directory |
| find <dir> -name <“file”> | Find a file named “file” inside the “dir” directory |
| grep “<text>” <file> | Find all occurrences of <text> inside <file> |
| grep -rl “<text>” <dir> | Look for all files in the “dir” directory containing <text> |
| open <file> | Open a specific file |
| nano <file> | Open the file inside the Terminal |
| sudo <command> | Execute a command with super user privileges |
| <command> -h | Show help for a specific command |
| man <command> | Show the command’s manual |
More Mac Terminal commands to get things done easily
While the aforementioned commands are some of the most basic ones you can learn, if you’re someone who doesn’t wish to learn them, you can check out these Terminal tricks that can accomplish specific tasks, some that even macOS doesn’t offer inside its System Preferences.
Some commands have different versions for which explanations are mentioned in brackets. Secondary commands (wherever they’re mentioned) need to be typed after pressing the Return key and also require you to type Return after you enter them.
| What you can achieve | Terminal command to use |
| Show/hide hidden files on your Mac | defaults write com.apple.finder AppleShowAllFiles TRUE (for showing files)/FALSE (for hiding files) killall Finder |
| Modify the location of screenshots on the Mac | defaults write com.apple.screencapture <location of the folder you want save screenshots to> killall SystemUIServer |
| Change screenshot file type | defaults write com.apple.screencapture type JPG (for outputting JPG files)/PNG (for outputting PNG files) killall SystemUIServer |
| Disable shadows from a screenshot | $ defaults write com.apple.screencapture disable-shadow -bool TRUE killall SystemUIServer |
| Rename how screenshots are saved | defaults write com.apple.screencapture name “Give it a new name here” killall SystemUIServer |
| Download files quickly without a browser | curl -O [type URL of file] |
| Enable charging sound for Mac when connected to power | defaults write com.apple.PowerChime ChimeOnAllHardware -bool true; open /System/Library/CoreServices/PowerChime.app |
| Check for updates on Mac every day | defaults write com.apple.SoftwareUpdate ScheduleFrequency -int 1 |
| Watch Star Wars but in ASCII | telnet towel.blinkenlights.nl |
| See your dock slide up/down more quickly | defaults write com.apple.dock autohide-delay -float 0 (you can change this to any numerical value to change the speed of dock)
killall Dock You can also follow the step below to change the speed of dock sliding defaults write com.apple.dock autohide-time-modifier -float 0 killall Dock |
| Make your Mac read something | Say “what you want your Mac to say” |
| Remove Dashboard from your Mac | defaults write com.apple.dashboard mcx-disabled -boolean TRUE (replace TRUE with FALSE if you want to see Dashboard again)
killall Dock |
| See how long your Mac has been up for | uptime |
| Prevent your Mac from sleeping | caffeinate
To close your Mac’s continuous awake state, use the CTRL + C shortcut. |
| Create an empty and transparent dock icon to be used as a separator | defaults write com.apple.dock persistent-apps -array-add ‘{“tile-type”=”spacer-tile”;}’ killall Dock |
| Play a game inside the Terminal | emacs |
That’s all there is to know about Terminal on Mac.
RELATED