
ShareX is a free, open-source productivity tool that makes the process of capturing your screen and editing and sharing the screenshots on your PC convenient. Being a lightweight software that’s stacked with features and can capture just about anything on your screen, ShareX is a great tool for anyone who needs to capture or edit screenshots on their Windows PC.
Here’s how you can set up and use ShareX on your PC for maximum efficiency.
- How to get ShareX
- Before you get started
- How to use ShareX
- How to set up or change Hotkeys on ShareX
- 8 Ways to capture your screen using ShareX
- How to use ShareX tools
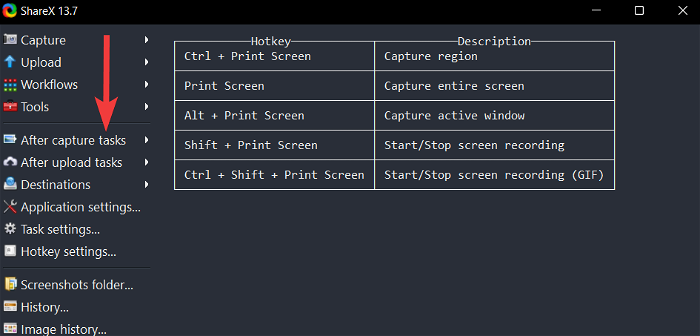
- How to set up and use after-capture tasks in ShareX
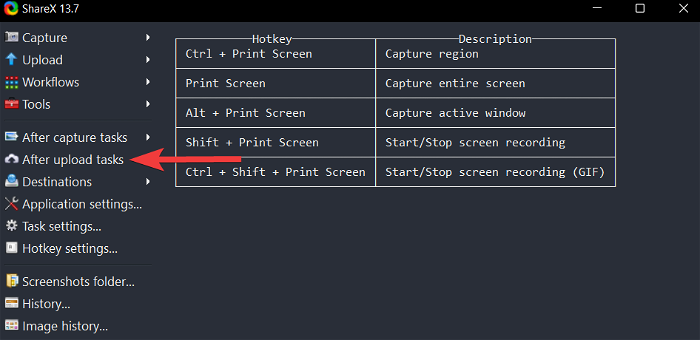
- How to set up and use after-upload tasks in ShareX
- How to record screen using ShareX
- How to record a GIF using ShareX
- How to upload screenshots using ShareX
- How to encode screenshots in QR codes using ShareX
- How to copy screenshots to the clipboard automatically using ShareX
- How to edit screenshots using ShareX
Here’s how you can get and install ShareX on your PC.
ShareX is available to download on the official ShareX website.
- ShareX | Download Link
To download ShareX, visit the above-mentioned link in a web browser on your PC and follow the following steps.

On the ShareX website, click on the Download option.

The ShareX setup file has now been downloaded to your PC. Open the newly downloaded ShareX setup file from your download location and confirm the UAC prompt to run this setup file as an administrator.

In the ShareX setup, make sure the I accept the agreement checkbox is selected and click on Next.

Choose the destination folder where you want to install ShareX and click on Next.

Select the additional options according to your preference and click on Next.

Click on Install to begin installing ShareX on your computer.

Once the installation is finished, click on Finish.

Before you get started
What separates ShareX from other similar screen capturing software is its accessibility and how it can help you speed up the tedious process of creating screenshots. However, ShareX is an endless pit of features and it can be hard to get a good grip on all of its options in the early days of using ShareX.
We recommend you configure the following features before taking screenshots so that you can find them and use them according to your needs. Let’s take a quick look at each one of them.
Tip 1: Hide your cursor
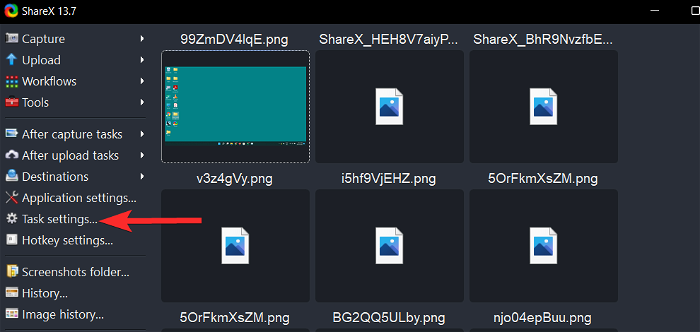
Open ShareX from your PC.

In ShareX, click on Task Settings.
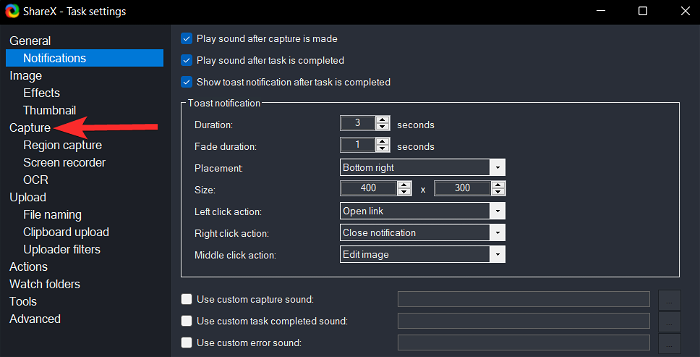
In the Task Settings, click on the Capture option.
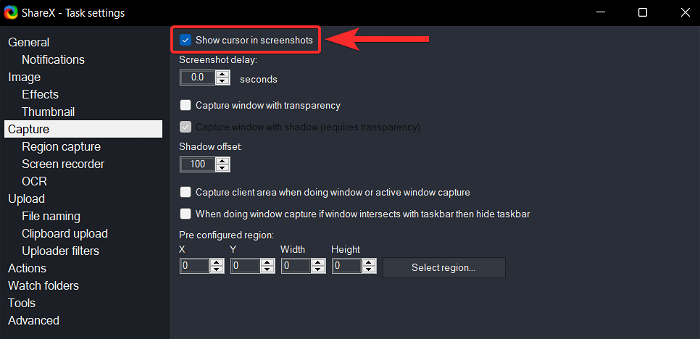
Click on the Show cursor in the screenshots checkbox to uncheck it.
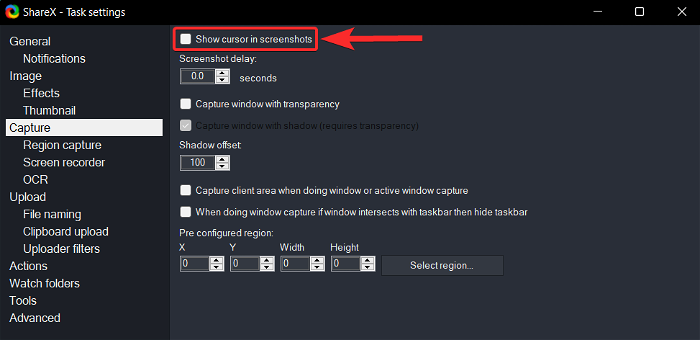
Make sure the Show cursor in the screenshots checkbox is unchecked.
Tip 2: Add ShareX editing to your context menu
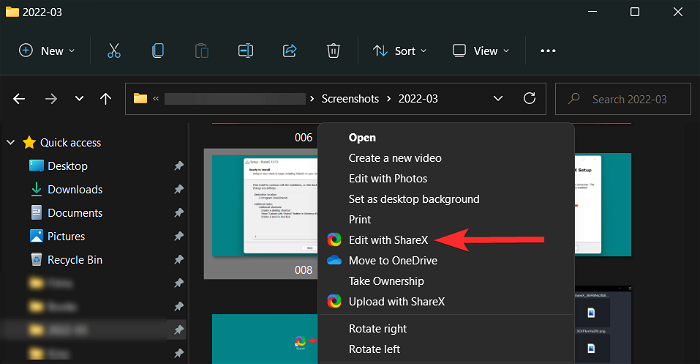
ShareX gives you the option to add a dedicated Edit with ShareX button in the Windows Explorer context menu (right-click menu). This button can then be used to open an image directly into the ShareX image editor without having to open the ShareX tool separately.
Let’s make sure this option is enabled in the ShareX tool on your PC.
Open ShareX from your PC.
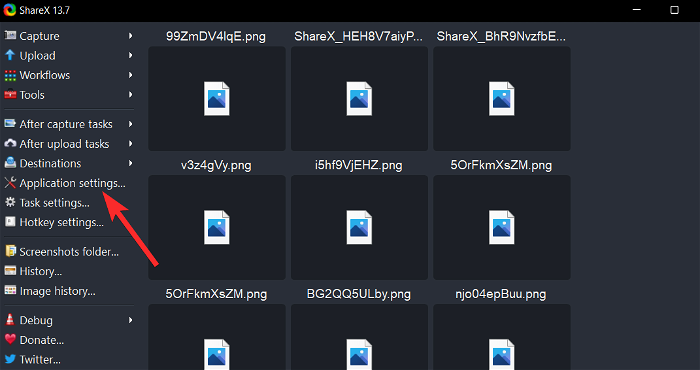
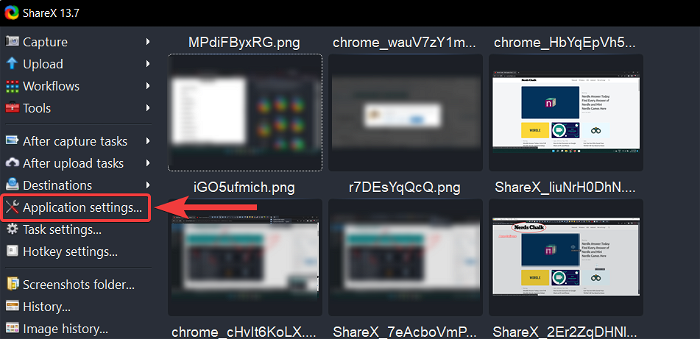
In ShareX, click on Application Settings.
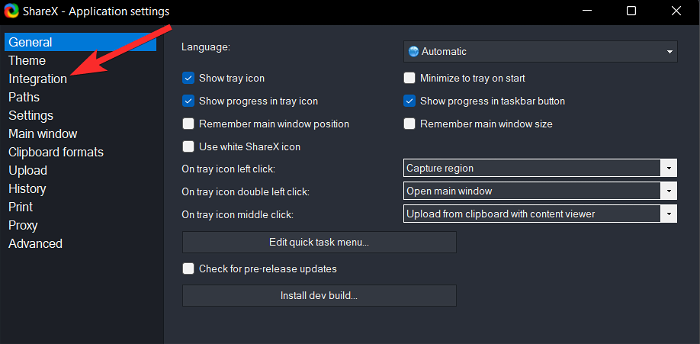
In the Application Settings, click on the Integration option.
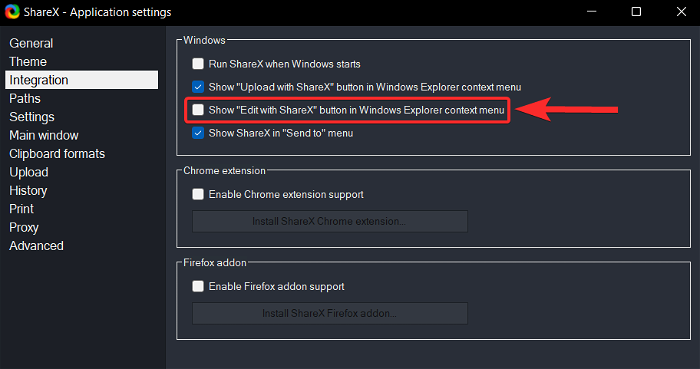
In the Integration settings, click on the Show “Edit with ShareX” button in Windows Explorer context menu checkbox to select it.
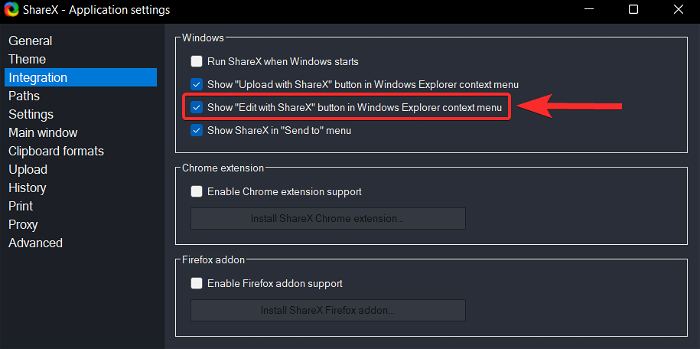
Make sure the Show Edit with ShareX button in the Windows Explorer context menu checkbox is selected.
To see this option, right-click on any image and click on the Show more option. You can then see this option in the context menu.
Tip 3: Set your destination folders
To set your local destination folder, click on the Application settings icon in the left panel.
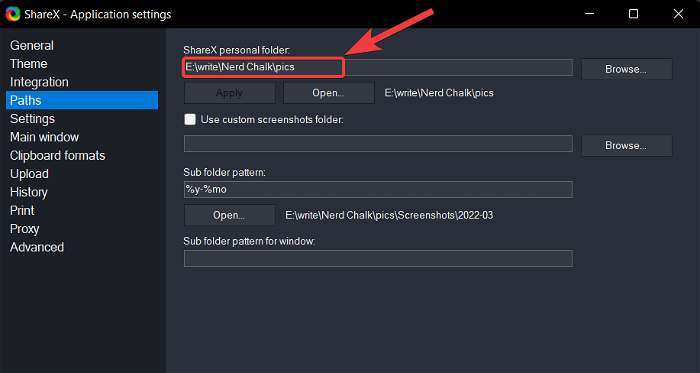
In the Application settings, click on the Paths option.

In the Paths section, you can see the address where all your screenshots captured using ShareX are stored.
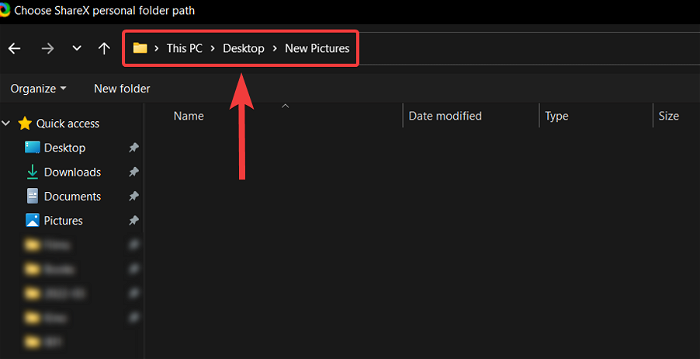
To change this address, click on Browse.
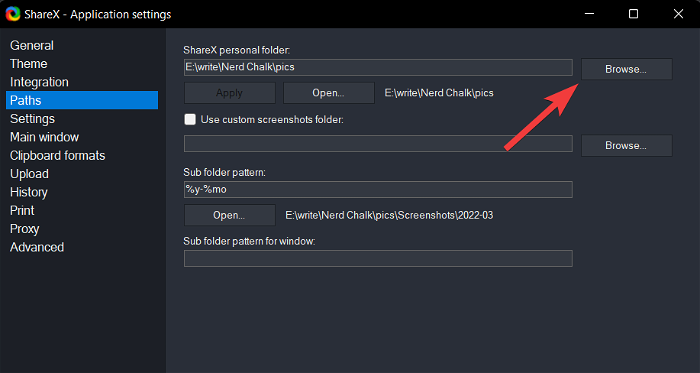
In the Choose ShareX personal folder path window, navigate to the new destination folder and click on the Select Folder option located in the lower right corner of your screen.
Now, click on Apply to save the changes made.
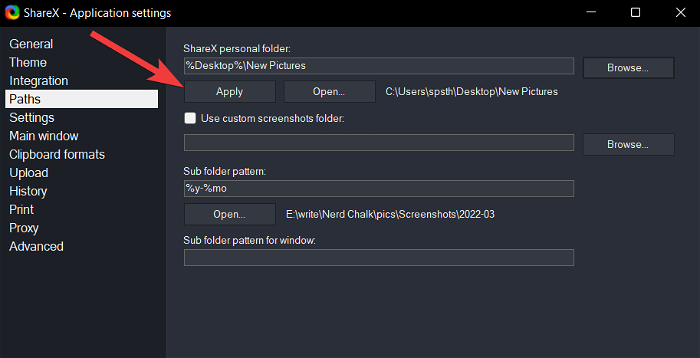
In the following prompt, click on Yes to restart your ShareX and finalize the new destination folder.

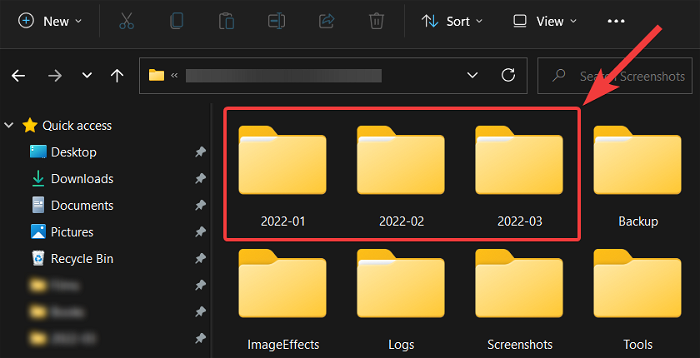
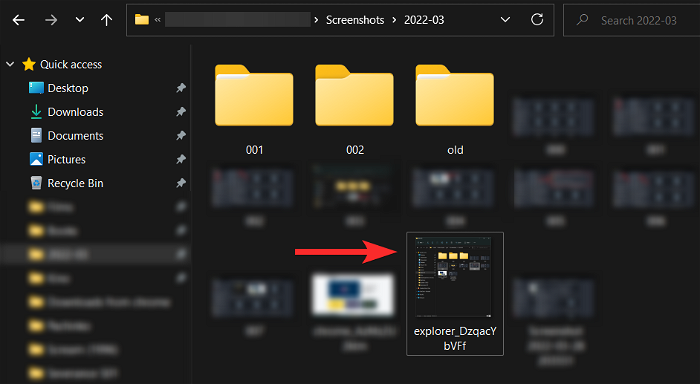
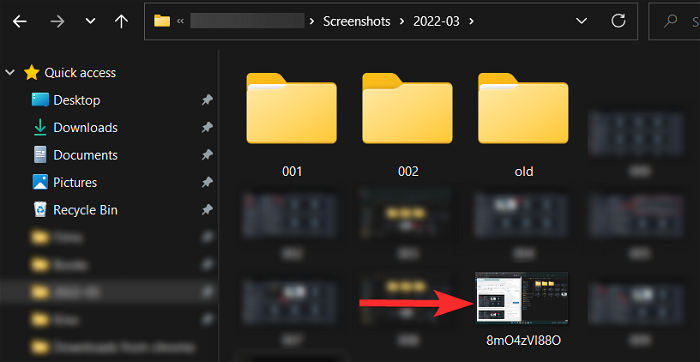
It should be noted that ShareX will further create subfolders in your destination folder. The default format of these subfolders is year-month. For example, 2022-03 and so on.
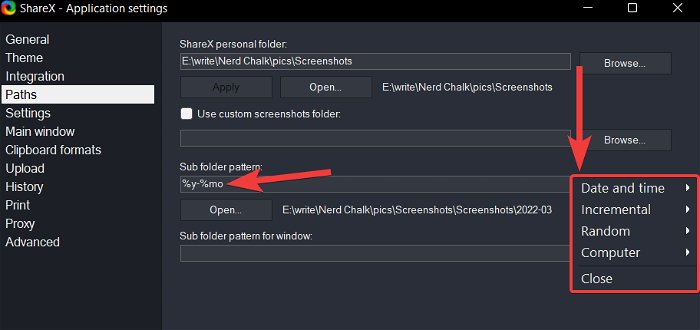
You can also change the subfolder format if you wish. To do so, simply click on the original subfolder pattern and select the parameter you want to include in the pattern.
You can now use the ShareX image editor to edit your screenshot.
To use ShareX to its full capabilities, you will need to set up hotkeys on your PC accordingly. As Windows 11 now has dedicated kernel maps for the PrtSc key, we can’t use the same as our hotkey for ShareX. Let’s first set up our hotkeys and then take a look at how you can capture your screen using the same.
Open ShareX and click Hotkey Settings on your left.

You will now be shown a new window to configure your Hotkeys. Let’s first start by adding Hotkeys for all the actions we will be setting up within ShareX. By default, the following hotkey options will already exist.
- Capture region
- Capture entire screen
- Start/Stop screen recording
- Start/Stop screen recording (GIF)
Click on Add at the top to add additional entries.

Click on the drop-down menu for Task: and select Screen Capture > Capture active window.

Hit the X to close the dialog box.

Similarly, add listings for all the following actions under Screen Capture.
- Capture last region
- Scrolling capture
- Text Capture (OCR)
- Auto capture
Similarly, add the following actions found under the Screen record.
- Start/Stop screen recording using active window
- Start/Stop screen recording using the last region
- Start/Stop screen recording (GIF) using an active window
- Start/Stop screen recording (GIF) using the last region
- Abort screen recording

Now add the following actions found under Tools.
- Color picker
- Screen color picker
- Image editor
- Image effects
- Ruler
- Image combiner
- Image thumbnailer
- Image Splitter
- Video converter
- Video Thumbnailer
Lastly, add these actions found under Other.
- Open screenshots folder
- Exit ShareX
Once you’ve added all these actions, you can configure their hotkeys all at once. Start by clicking None besides the first action we added, Capture active window.

You will now see the options turn green with the text Select a hotkey. Press the desired key combination on your keyboard to set your hotkey for this action.

Similarly set the hotkeys for all the actions we added earlier. If you received an error message during ShareX’s first startup stating that the software was unable to configure the hotkeys in its registry settings, then we recommend you change the default hotkeys for the default listings as well.

Once you are done, you can use these hotkeys and the guides below to help you capture screenshots efficiently on your PC.
You can capture screenshots in various ways depending on your current requirements using ShareX. Follow one of the relevant sections below depending on your current needs. Let’s get started.
Method 1: Fullscreen screenshots
To capture a full-screen screenshot, use the hotkey you dedicated to the same earlier. Your screen will blink once to denote that screenshots have been captured and you should now be able to find the same in your screenshots folder. You should have customized this folder’s location at the beginning of this guide.

In addition to this, you can also use the ShareX app itself to capture a fullscreen screenshot.
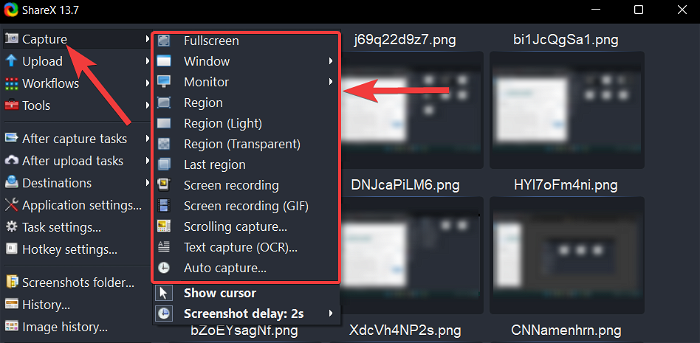
Alternatively, to capture your entire computer screen, click on Capture > Fullscreen from the ShareX tool.
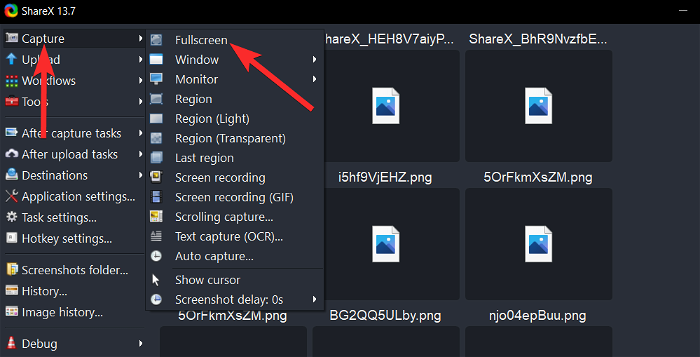
This will capture the entire screen as such and save it in your destination folder.
Method 2: Capturing active windows
Execute an active window capture by using the hotkey you set earlier. Ensure that the window you wish to capture is currently active on your monitor and not just visible on your screen.
The screenshot will now be saved in your dedicated folder. You can also capture an active window screenshot using ShareX.
Alternatively, to capture one of the active windows running on your PC, select Capture > Window from the ShareX tool.
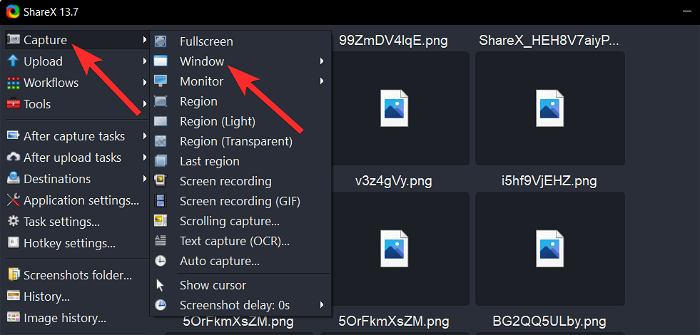
Choose the window you want to take a screenshot of and click on it.
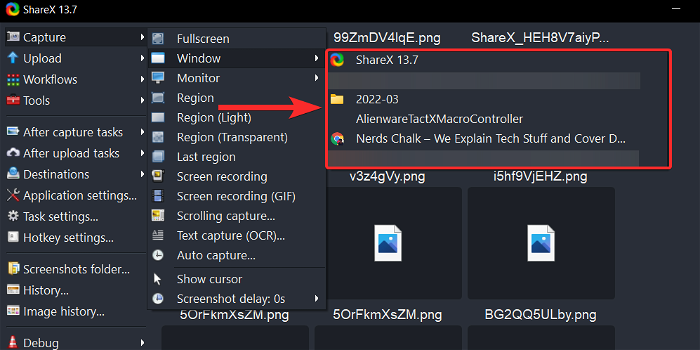
You can find the same in your destination folder.
You can also find this screenshot from the ShareX tool itself.
Method 3: Capturing monitors
Capturing monitors is a great feature in ShareX that is a huge advantage if you have a multi-monitor setup.
Start by using the dedicated hotkey on your keyboard and select the monitor you wish to capture by clicking on a region in the same.
The screenshot will now be captured and stored in your dedicated screenshots folder we configured earlier. You can also use the ShareX app to capture individual monitors in your setup.
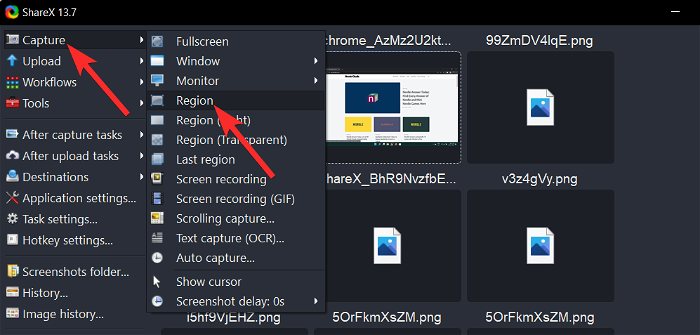
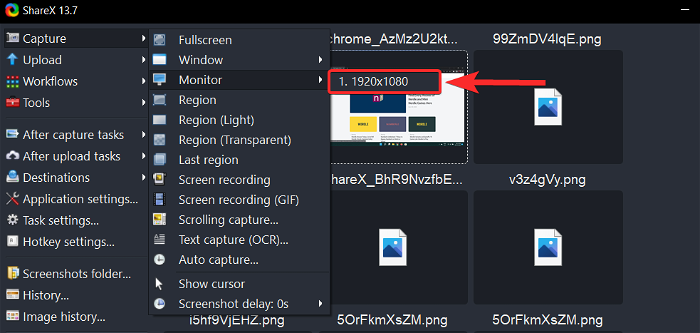
Alternatively, to choose which monitor you want to take the screenshot of, select Capture > Monitor from the ShareX tool.
Choose the monitor you want to take a screenshot of and click on it.
This will capture a screenshot of the selected monitor and save it in your destination folder.
Method 4: Capturing a region
Use the hotkey you set earlier to activate the region capture tool in ShareX. The tool uses an automatic capture feature to intelligently select the area you wish to capture based on its borders. You can use this to your advantage and click in it to capture it or click and drag on another part of your screen to capture a region manually.

Click and select on your screen to capture the desired region. Once you let go of the LMB, the selected region will be automatically captured and saved in your screenshots folder.
Here’s how you can alternatively use the ShareX app to capture a region on your screen.
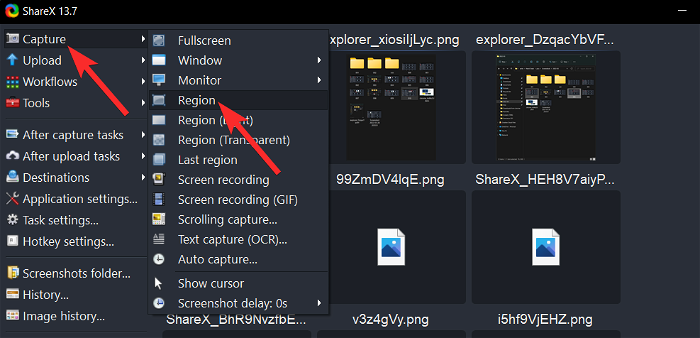
Alternatively, to capture a custom selection area, select Capture > Region from the ShareX tool.
Similar to the hotkey above, the tool will automatically try to select an active region. Either manually or automatically select the region you wish to capture and the selected region will be saved to your screenshots folder.

Method 5: Scrolling screen captures
Use the dedicated hotkey we set earlier to start a scrolling capture. This will launch the capture tool, and select the document or webpage you wish to capture by clicking on its region or selecting it manually.

You will now be shown the scrolling capture options. We wish to leave most of them as they are and focus on Maximum scroll count. Start by estimating the length of your document and entering a number accordingly.

Now configure the After capture options based on your current needs. We recommend unchecking them all in case you are unsure of what to do.

Click on Start scrolling capture once done.
Once the region has been captured, you will be shown a dialog box. Click Upload/save depending on after capture settings to save your captured region accordingly. You can find it in your destination folder.

Alternatively, you can also access this option by going to Capture > Scrolling Capture from the ShareX tool.

Method 6: Capturing on-screen text
This feature can help you copy and capture text from on-screen elements including non-interactive elements like PDFs, images, videos, screenshots, and more.
Use the hotkey we set earlier to activate the on-screen text capture tool or OCR (Optical Character Recognition). Once activated, click and select the region on your screen from where you wish to capture the text.

Click Yes to allow ShareX to use the online API to recognize on-screen characters. ShareX will now access its servers and display you a result of the recognized text accordingly.

You can now copy all the text from the text box below and use it how you wish on your PC. You can also click on the drop-down menu in the top right corner to change the translation service if you’re trying to capture a language unknown to you.

Method 7: Auto-capturing screenshots
Auto-captures can help you capture multiple screenshots for a region in a single go. This can also be used for full-screen screenshots and can be used to capture your actions on-screen. They can also be used to capture steps easily as a screenshot will be taken after a pre-determined set of time passes.
Use the hotkey we set earlier to activate the auto screen capture tool. Now click and select whether you wish to capture your entire screen or a custom-selected region. To select a custom region, click Select region and select the desired region on your screen.

Next, select your Repeat time. A screenshot will be taken each time this set period comes to an end.

Click Start once you are done.

You can now start performing the on-screen tasks you wish to capture. ShareX will automatically capture screenshots when the set period comes to an end each time.
Once you are done and would like to end the Auto capture task, then press the hotkey for the same again and click Stop.

And that’s how you can use Auto Capture within ShareX to your advantage.
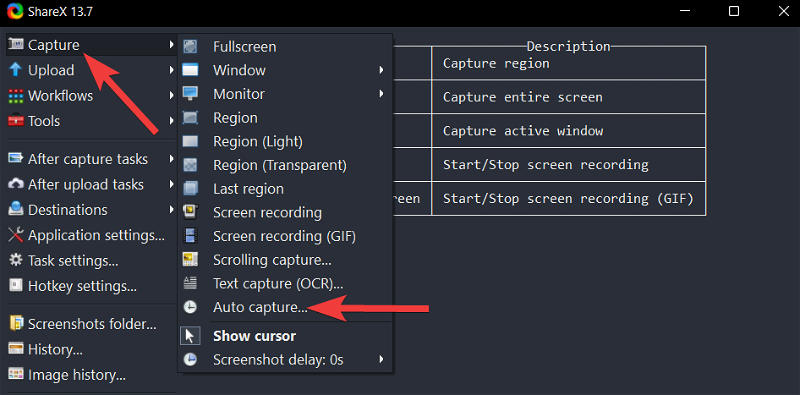
Alternatively, you can also click on Capture > Auto capture from the ShareX app to activate auto-capture.
Method 8: Capturing delayed screenshots
Delayed screenshots allow you to add a delay to your actions of taking a screenshot. This includes all the screen capturing options offered by ShareX. You can set a delay of up to 5 seconds which can help you capture OS elements that aren’t usually capturable through traditional means. This includes loading screens, lock screens, recovery screens, and more. As the tool is activated after a delay, you can trigger a screenshot when the tool is available to you and subsequently switch to the lock screen to take its screenshot. Here’s how you can use delayed screenshots to your advantage in ShareX.
Note: You can not set a hotkey for screenshot delay within ShareX unfortunately. You will have to use the app to set your delay and then activate the capture task using the appropriate hotkey on your PC.
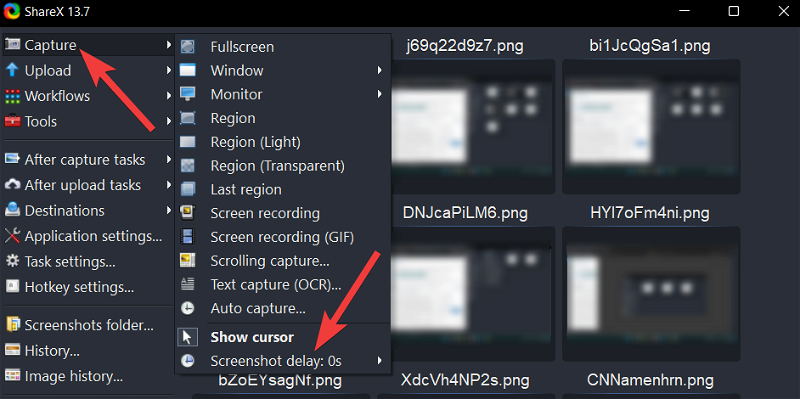
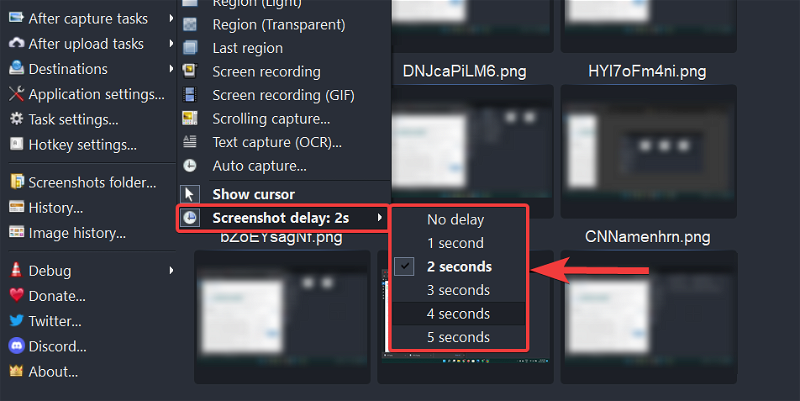
Alternatively, to capture screenshots automatically at set intervals, click on Capture > Screenshot delay from the ShareX tool.
Select a value of screenshot delay according to your preference and click on it.
Now, use one of the hotkeys we set earlier to capture your screen based on your preference.
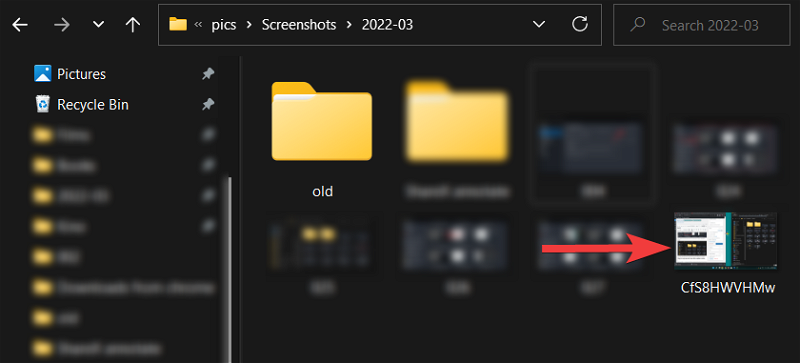
Once finished, you should be able to find the screenshot in your destination folder.
ShareX also comes with several in-built tools to help you increase your productivity. Let’s take a quick look at each one of them and how you can use them to your advantage.
1. Using Ruler in ShareX
A ruler can help you measure on-screen elements and then prepare and edit your canvas accordingly. This tool usually comes in handy when trying to composite images or when trying to compare on-screen elements. It can also help you keep your annotations consistent throughout your screen captures. Here’s how you can access the ruler within ShareX.
Start by activating the ruler by using the hotkey we had set earlier on your PC. You will now get a picker that will allow you to select the region on your screen that you wish to measure.

Once selected, you will find all the dimensions of the same at the top of the selected region.

You can also click and drag one of the corners of the selected region to manually select a region on your screen.

And that’s how you can use the Ruler in ShareX to measure on-screen elements.

You can also activate the ruler from within the ShareX app by going to Tools > Ruler.
2. Using Color Picker in ShareX
Color Picker is an especially useful tool for image editors. It allows you to get RGB, CMYK, and HEX values for any on-screen color on your screen by simply clicking on it. This can help you find custom colors, maintain a consistent color palette and even extract new colors that catch your eye. Follow the guide below to help you along with the process.
With ShareX setup on your PC, press the hotkey for Color Picker on your PC. This will activate the color picker on your PC. Now select a color by either entering its values in RGB, HEX, or CMYK. Click the picker icon if you wish to pick a color from your screen.

Point the picker to the desired color and click LMB on your mouse. The color will be automatically captured and added to the color picker tool.

Now click Copy to copy the picked color to your Clipboard. You can now paste the same into the desired image or video editor.

You can also choose to manually enter values from the options visible on your screen.

You can also access the color picker within ShareX by going to Tools > Color Picker.
3. Using Image Editor in ShareX
ShareX also has an in-built editor that can help you crop, resize and modify your images on the fly. Here’s how you can make the most of it on your PC.
Image Editor can help you crop, resize, annotate and edit your image according to your needs. Start by pressing the hotkey for Image Editor we set earlier on your keyboard.
You now have the following options on your screen. Choose the one that best fits your current needs and requirements to open an image in the Image Editor.

- Open image file…: This option will allow you to open an image manually by selecting it from your local storage.
- Load image from clipboard: This option will allow you to open a recent screen capture that has been copied to your clipboard.
- Create new image…: This option will allow you to create an image from scratch using a blank or transparent canvas depending on your preferences.
- Cancel: This option will cancel the Image Editor and allow you to return to the previous screen.
Once you have selected the image you wish to edit, it will be automatically opened in your image editor. You can now use the toolbar at the top to edit the image according to your needs.

Let’s take a quick look at all of the options currently at your disposal.
- Run after capture tasks: If you have after capture tasks configured for your images then this option can help you execute the same with a single click.
- Hotkey:
Enter
- Hotkey:
- Save Image: This option will allow you to save the current changes to the original image on your local storage.
- Hotkey:
Ctrl + S
- Hotkey:
- Save Image as: This option will allow you to save a copy of the current image with all the changes to your local storage in your desired folder.
- Hotkey:
Ctrl + Shift + S
- Hotkey:
- Copy Image to clipboard: This option will copy the current image with all the changes to your clipboard.
- Hotkey:
Ctrl + Shift + C
- Hotkey:
- Upload Image: This option will help you upload the current image with your edits to the selected online service.
- Hotkey:
Ctrl + U
- Hotkey:
- Print Image…: This option will help you print the currently edited image on your PC.
- Hotkey:
Ctrl + P
- Hotkey:
- Select and move: This option can help you select and move around additional elements added to your image including shapes, annotations, additional images, and more.
- Hotkey:
M
- Hotkey:
- Rectangle: This option will help you add rectangular shapes to your image.
- Hotkey:
R
- Hotkey:
- Elipse: This option will help you draw ellipses on your image.
- Hotkey:
E
- Hotkey:
- Freehand: If you wish to draw freehand images, shapes, and lines on your image then this option can help you do the same.
- Hotkey:
F
- Hotkey:
- Line: This tool will help you draw straight lines on your image.
- Hotkey:
L
- Hotkey:
- Arrow: This option will help you draw arrows and annotate your image as needed.
- Hotkey:
A
- Hotkey:
- Text outline: This option will allow you to add text to your image. The text added using this option will be in the outline format and the color won’t be filled in.
- Hotkey:
O
- Hotkey:
- Text background: This option will also help you add text to your image but this text will have its background making it more legible on chaotic backgrounds.
- Hotkey:
T
- Hotkey:
- Speech balloon: Speech balloon can help you add the same to your images. This can help you create comic strips and more.
- Hotkey:
S
- Hotkey:
- Step: If you’re annotating images then this is an especially useful tool. It can help you add steps to your image.
- Hotkey:
I
- Hotkey:
- Magnify: The magnifier tool can help you zoom and focus on certain elements within the image.
- Hotkey: N/A
- Image (File): This option will help you add an image to your current image from a file on your local storage.
- Hotkey: N/A
- Image (screen): This option will help you capture your screen and add the same to the image that you are currently editing.
- Hotkey: N/A
- Sticker: If you wish to add stickers to your image then you can use this option to enhance your image.
- Hotkey: N/A
- Cursor: If you wish to manually add mouse cursors to your image to point to certain elements then you can use this option.
- Hotkey: N/A
- Smart Eraser: This tool can help you smartly erase and remove on-screen elements from your image. This tool takes into account nearby areas to smartly determine the region that needs to be erased.
- Hotkey: N/A
- Blur: The Blur tool can help you add blur to your image to hide certain on-screen elements.
- Hotkey:
B
- Hotkey:
- Pixelate: Just like Blur, you can also Pixelate areas of your image using this option.
- Hotkey:
P
- Hotkey:
- Highlight: You can highlight on-screen elements in the image using this tool.
- Hotkey:
H
- Hotkey:
- Crop Image: As the name suggests this tool can help you crop selected areas of your image.
- Hotkey:
C
- Hotkey:
- Edit: This option will help you access additional Edit settings for the image including options like Delete all and more.
- Hotkey: N/A
- Image: This option will help you edit your canvas, resize, crop, skew, and more the current image. You can also use this option to open additional images or to flip your current image.
- Hotkey: N/A
- Options: This option will help you edit the settings for your Image Editor within ShareX.
- Hotkey: N/A
Once you have edited your image according to your needs, use the Save or Save as option to save the image to your local storage. If you select Save then the changes will be saved to your original image. Save as on the other hand will allow you to save a copy of the current image with the changes made to the image.

Additionally, you can also access the Image Editor within the ShareX app by going to Tools > Image Editor.
4. Using Image Effects in ShareX
ShareX also has a dedicated tool to add effects to your images. Use the hotkey we set earlier to activate the Image Effects within ShareX. Select the image you wish to edit from your local storage.

The image will now be opened in the Image Effects editor. You can now click on the + icon below Effects to add an effect.

Select and add the desired effect to your image. You mainly have these 4 options at your disposal.
- Drawings: This option will help you add drawings with various effects and texts to your image.
- Manipulations: This option will help you manipulate your image including modifying aspects like canvas, scale, crop, resize, and more.
- Adjustments: This option will help you adjust the exposure, contrast, and colors of your image.
- Filters: Use this option to apply pre-determined filters to your image.
Once you have edited your image, click on Save Image to save your changes. You can also click Upload Image to upload it to a chosen service.

You can also access Image Effects by going to Tools > Image Effects within ShareX.
5. Using Image Joiner in ShareX
Image combiner in ShareX can help you create composite images easily. Use the hotkey we set earlier to launch the Image Combiner on your PC.
Once launched, click Add… and select the images you wish to combine from your local storage.

You can now change the order of the images by clicking on Move up or Move down.

Select the way you wish to combine your images by selecting the orientation beside Combine orientation.

Additionally, choose your alignment by clicking on the next drop-down menu.

If you wish to add space between the images, you can dictate the same in terms of pixels using the Space between images option.

Check the box for Autofill background if you wish for your background to be non-transparent.

Once you are done, click Combine images and save/upload depending on after capture settings.

And that’s it! The combined image will now be saved to your destination folder as well as uploaded to the cloud depending on your current configuration.
You can also access the Image Combiner from the ShareX app by going to Tools > Image Combiner.
6. Using Image Splitter in ShareX
Image Splitter can help you split images from your local storage into columns and rows. This can come in handy if you wish to separately show different sections of an image. Start by using the hotkey we set earlier to activate the Image Splitter.
Now click … beside Image file path: to select the image from your local storage that you wish to split.

Click … beside the Output folder and select your destination folder for the split images.

Now choose the number of columns and rows from the next menus.

Click Split image once you are done.

And that’s it! The selected image will now be split and stored in the destination folder you configured earlier.
You can also access the splitter within the ShareX app by going to Tools > Image Splitter.
7. Using Image Thumbnailer in ShareX
If you’re a content creator then creating the right thumbnails is the key to success. While finding the right thumbnail can be easy, producing multiple of them in a single click can be a tough task. Use the Image thumbnailer in ShareX to help you with the same.
Use the hotkey on your keyboard to activate the thumbnailer. Now click Add and select all the images you wish to use to create thumbnails.

Once selected, use the dimensions at the bottom to determine your thumbnail dimensions. Select the quality of your thumbnails as well.

Now select your Output folder by clicking on … besides the same.

Select a filename format for your thumbnails. Use the following format where $filename_ denotes the original filename of the thumbnail.
$filenmae_YOURNAME

Click Generate thumbnails once you are done.

And that’s it! The selected thumbnails will now be generated and stored in the Output folder set by you earlier.
You can also access the Image Thumbnailer by going to Tools > Image Thumbnailer.
8. Using Video Converter in ShareX
Want to convert videos? Use the video converter in ShareX to help you do the same on your PC.
Start by activating the converter using the hotkey we had set up earlier. You will now be prompted to download ffmpeg on your PC. Click Yes to automatically download and set up the same. Once downloaded, click OK.

The converter will now automatically launch on your PC. Click … beside Input file path to select the file you wish to convert.

Select your Output folder by clicking on … besides the same.

Enter a name for your output file once you are done.

Click the next drop-down menu and select the desired video codec. We recommend leaving this at default if you are unsure of what to select at this point.

Use the next slider to determine your output video quality.

Click Start encoding to convert your video once you are done.

And that’s it! Once the video has been converted, the folder containing the video will be automatically opened on your PC.
You can also access the converter by going to Tools > Video converter within the ShareX app.
9. Using Video Thumbnailer in ShareX
Video thumbnailer can help you create thumbnails for videos based on a set of pre-defined parameters. Thumbnails created by ShareX are the more traditional ones that combine different frames from your video to create a thumbnail. Use the guide below to help you create thumbnails for all your videos.
Start by activating the Video thumbnailer by using the hotkey we set earlier. Click … and select the video you wish to use from your local storage.

Now configure the following options based on your current preferences.

- OuputLocation: Use this option to change the output location for your thumbnails.
- CustomOutputDirectory: Use this option to temporarily define a custom output directory for the current video.
- ImageFormat: Choose the format for your thumbnail
- ThumbnailCount: The number of screenshots that will be taken to composite your final thumbnail.
- FilenameSuffix: This suffix will be added to the end of each file, thumbnail, or screenshot created by the video thumbnailer.
- RandomFrame: If you wish to capture frames randomly from the current video then you can use this option.
- UploadThumbnails: You can activate this option to directly upload your creations to your default image hosting site.
- KeepScreenshots: If you wish to keep the screenshots used for creating your thumbnail then you can enable this option.
- OpenDirectory: If you wish for the folder containing your thumbnail to open as soon as the process finishes, then you can enable this option.
- MaxThumbnailWidth: This option will dictate the maximum width of all your captured thumbnails.
Similarly, configure the following options under Thumbnails/Combined.

- CombineScreenshots: This option will automatically combine all captured screenshots set by you into a single composite image.
- Padding: You can set custom padding between images using this option. This affects the space between your images and the border.
- Spacing: This option will help you set the spacing between images themselves.
- ColumnCount: Your images will be arranged in a grid pattern when creating a default thumbnail. Use this option to increase or decrease the number of columns in that grid.
- AddVideoInfo: If you wish metadata from the video to be included in the thumbnail, then you can enable this option.
- AddTimestamp: This option will add a timestamp for each captured thumbnail in the top right corner.
- DrawShadow: Use this option to emboss a rectangular shadow behind your thumbnails.
- DrawBorder: Use this option to add a border to your thumbnails.
Once you are happy with your settings, click Take screenshots.

ShareX will now process the selected video and output a thumbnail file based on your settings. You can find this file in the default destination folder in case you did not modify your settings.
You can also access the video thumbnailer by going to Tools > Video Thumbnailer.
After capture tasks can help you perform automated tasks in ShareX as soon as you capture your screen. This can help you with efficiency. You can choose to directly edit your image, add effects to it, upload it to a website, and more. Use the guide below to help you along with the process.
In the ShareX tool, click on the After capture tasks option in the left panel.
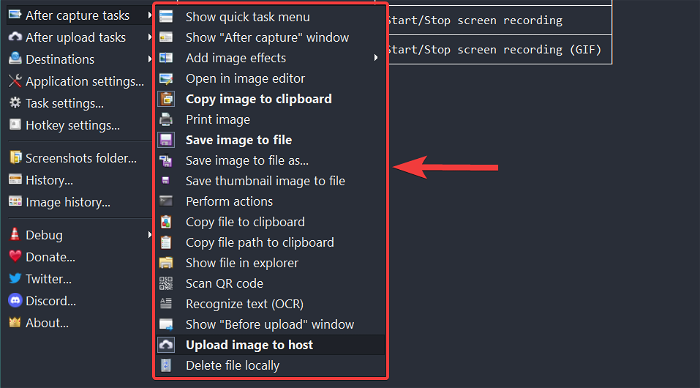
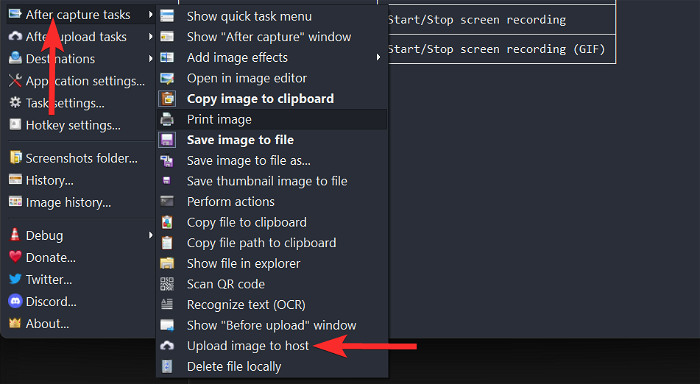
In the list of after-capture tasks, click on the tasks that you want ShareX to execute immediately after capturing a screenshot.
For example, in the picture below the tasks Copy image to clipboard, Save image to file, and Upload image to host are selected.
To execute the selected after-capture tasks, simply use one of the capture options available in ShareX to take a screenshot.
After capturing, ShareX will automatically execute the selected after-capture tasks one by one.
For example, in our case, the captured screenshot will be saved to the local destination folder, copied to the clipboard, and uploaded to an image hosting service.
After-upload tasks as the name suggests, perform automated tasks as soon as your images are uploaded to a particular website. This is mainly used by users to edit their images after backing them up to the cloud but you can use it for other scenarios as well. Follow the steps below to help you along with the process.
Open ShareX and click the After-upload tasks option in the left panel.
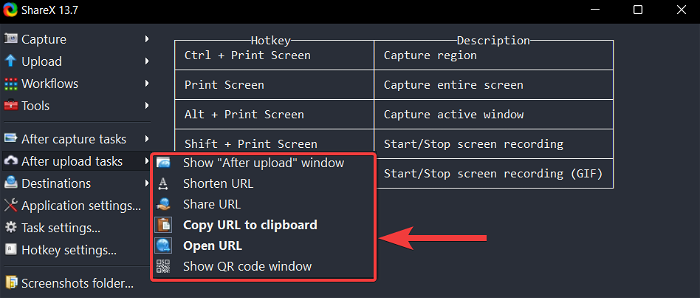
In the list of After-upload tasks, click on the tasks that you want ShareX to execute immediately after uploading a screenshot.
For example, in the picture below the tasks Copy URL to clipboard and Open URL are selected.
To execute the selected After-upload tasks, select one of the capture options available in ShareX.
After capturing, ShareX will automatically execute the selected After-upload tasks, one by one.
For example, in our case, ShareX will copy the URL of the uploaded screenshot to your clipboard and open the same URL in your default web browser.
ShareX uses ffmpeg.exe to record your screen which is free and open source. Use the guide below to help you record your screen using ShareX.
Start by activating the ShareX screen record tool using the hotkey we had set earlier. Once activated, you will be prompted to download ffmpeg.exe. Click on Yes to continue with the same.
Click on OK once you are done.
The tool will be automatically launched once ffmpeg.exe is set up on your device. Click and select a region that you wish to capture.

ShareX will now automatically record the selected region. Click Stop once you are done recording your screen.

Tip: You can use Abort in case you wish to start over and discard the current recording.
The recording will now be saved to your destination folder.
You can also access the screen recording option by going to Capture > Screen recording.
The normal screen recording tool will record videos but in case you wish to record GIFs then you can use this tool instead. Activate the same by using the hotkey for Recording GIFs that we had set earlier.
You will now be shown a region selection tool. Select the region you wish to capture by clicking on the same.
ShareX will now automatically start recording the selected region. Once you are done click Stop.
Tip: You can also click Abort if you wish to start over and abandon the current recording.
The selected recording will now be saved to your destination folder.
You can also activate this tool by going to Capture > Screen recording (GIF).
ShareX is a comprehensive tool and thus comes with in-built upload tools that can help you upload your screenshots directly to the cloud or image hosting websites. Use either of the guides below depending on your preferences to help you along with the process.
Method 1: Automatically
To set up ShareX so that it uploads the screenshots automatically after capturing, select Destinations > Image uploader from the ShareX tool.
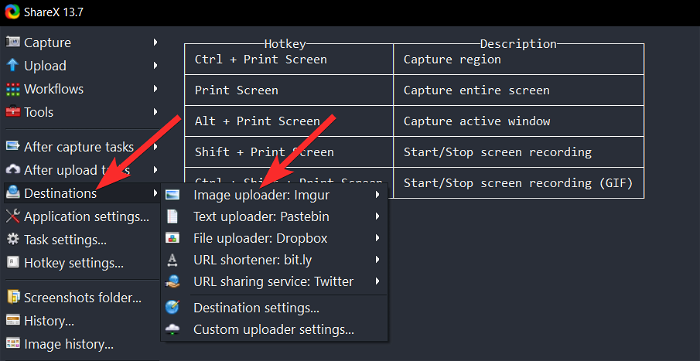
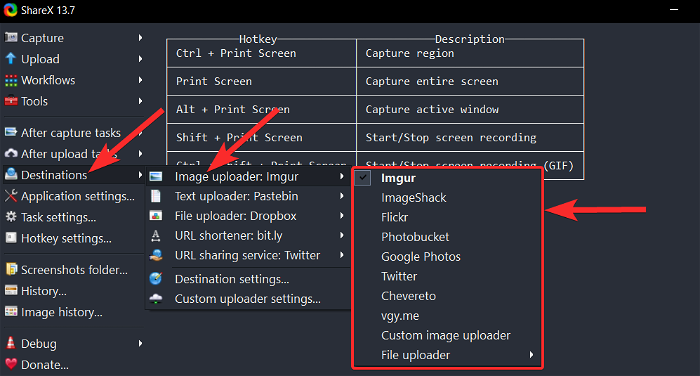
In the Image uploader options, select the host website where you want to upload your screenshots. For this guide, we will choose Imgur.
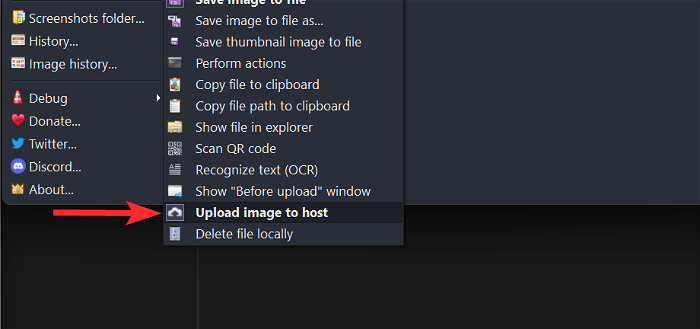
Now, in the ShareX tool, click on the Upload image to host option located in After capture tasks.
Once selected, the Upload image to host option will look similar to the picture below.
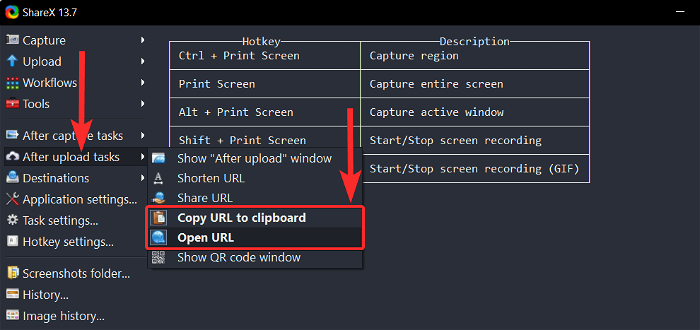
Then, click on After-upload tasks and make sure the Copy URL to clipboard and Open URL options are selected.
That’s it. Now, every time a screenshot is taken, ShareX will open the Imgur upload link for that particular screenshot in a new tab in your default browser.
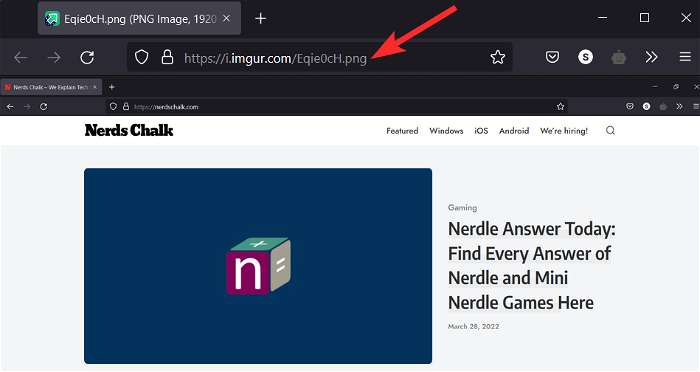
Additionally, the link to this uploaded picture has also been copied to your clipboard. You can then share this Imgur link by pasting it in a messaging app of your choice by using CTRL + V shortcut from your keyboard.
Method 2: Manually
You can also configure After-upload tasks so that you can upload screenshots manually with a single click. Follow the steps below to help you along with the process.
To do that, select Destinations > Image uploader from the ShareX tool.
In the Image uploader options, select the host website where you want to upload your screenshots. For this guide, we will choose Imgur.
Now, take the screenshot using ShareX or locate the screenshot you want to upload.
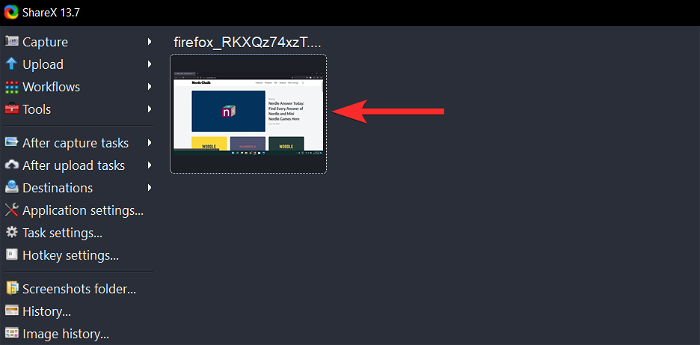
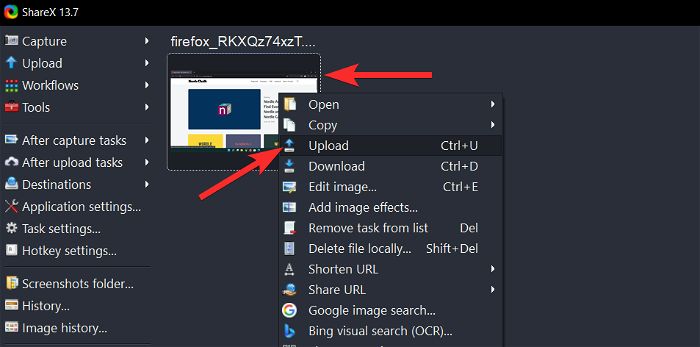
Right-click on this screenshot and select Upload. This will upload the screenshot to your chosen host and create a new thumbnail in ShareX.
Now, to visit the upload link, right-click on the new thumbnail and select Open > URL.
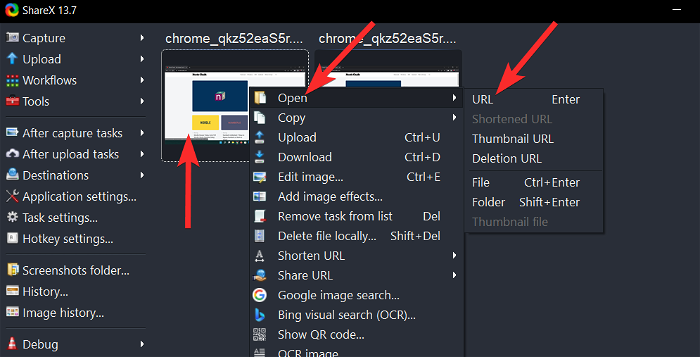
This will open the Imgur upload link for that particular screenshot in a new tab in your default browser.
Sharing screenshots can be a bit difficult if you’re low on data or want a permanent solution. ShareX offers you the ability to create QR codes for cloud-hosted screenshots which can then be scanned and opened from any device. Follow the guide below to help you along with the process.
Choose a screenshot that you wish to use for a QR code. Capture your screen, go to your destination folder, and right-click on the screenshot to select Upload.
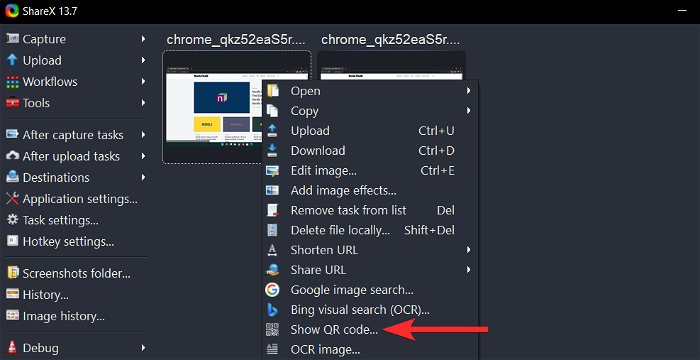
Now, right-click on the new thumbnail and select Show QR code.
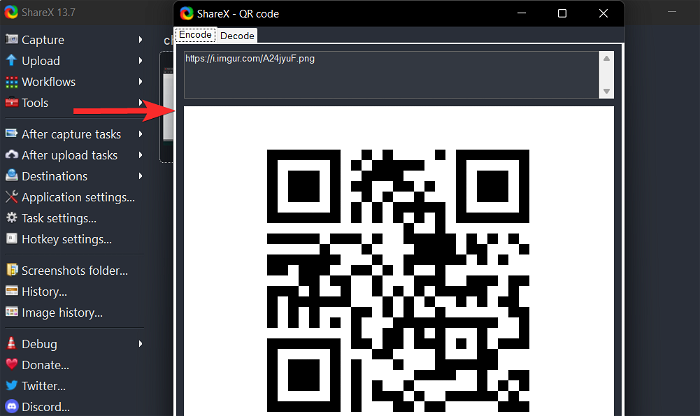
You will be presented with the QR code for the Imgur upload link of your screenshot.
Right-click on the QR code and select one of the options depending on your preference. 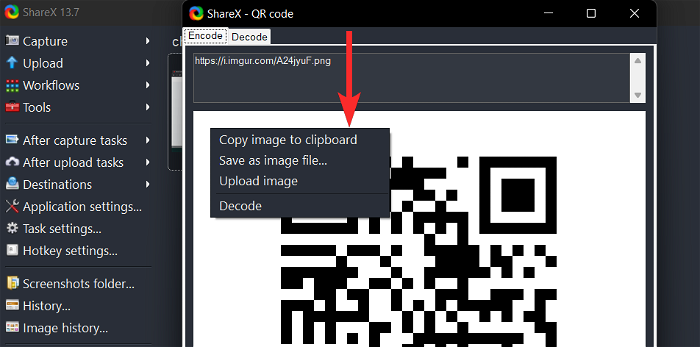
- Copy image to clipboard
- Save as image file…
- Upload Image
- Decode
First, manually upload the screenshot from ShareX to an online host. To do that, select Destinations > Image uploader from the ShareX tool.
In the Image uploader options, select the host website where you want to upload your screenshots. For this guide, we will choose Imgur.
Now, take the screenshot using ShareX or locate the screenshot you want to upload.
Right-click on this screenshot and select Upload. This will upload the screenshot to your chosen host and create a new thumbnail in ShareX.
Now, right-click on the new thumbnail and select Show QR code.
You will be presented with the QR code for the Imgur upload link of your screenshot.
To see the following 3 options for dealing with the QR code, simply right-click on the QR code.
You can now choose one of the above 3 options to handle the QR code the way you desire.
As discussed above, ShareX has a dedicated image editor that you can use to your advantage to annotate and edit your screenshots as needed. Use the steps below to help you along with the process.
Method 1: Accessing the screenshots within the ShareX app
Open ShareX and navigate to your destination folder. Now click on the desired image and hit Ctrl + E on your keyboard.

The image will now be opened in the ShareX editor and you can edit and save the same to your local storage as needed.

Method 2: Accessing the screenshots from File Explorer using the ShareX context menu
As we had configured ShareX to use the context menu option, we can also directly edit images from the File Browser itself.
Navigate to the desired image in the File Browser and right-click on the same. Select Edit with ShareX.

The selected image will now be automatically opened in the ShareX editor. You can now edit and save the image to your local storage as intended.
We hope this post helped you get familiar with ShareX. If you face any issues or have any more questions for us, feel free to reach out to us using the comments section below.
RELATED:
One response to “How to Use ShareX to Take Screenshots and Record Screen on Windows 11 or 10”
I downloaded this excellent program, ShareX, but it is nor working as it could be. It shows an error (Could not create directory):
System.IO.FileNotFoundException: Could not find file ., Please refer to the log attached below:
‘C:\Users\MyName\OneDrive\Documents\ShareX\Logs’.
File name: ‘C:\Users\MyName\OneDrive\Documents\ShareX\Logs’
at System.IO.__Error.WinIOError(Int32 errorCode, String maybeFullPath)
at System.IO.Directory.InternalCreateDirectory(String fullPath, String path, Object dirSecurityObj, Boolean checkHost)
at System.IO.Directory.InternalCreateDirectoryHelper(String path, Boolean checkHost)
at ShareX.HelpersLib.FileHelpers.CreateDirectory(String directoryPath)
2022-07-24 16:14:19.097 – Exception:
System.IO.FileNotFoundException: Could not find file ‘C:\Users\MyName\OneDrive\Documents\ShareX\Screenshots’.
File name: ‘C:\Users\MyName\OneDrive\Documents\ShareX\Screenshots’
at System.IO.__Error.WinIOError(Int32 errorCode, String maybeFullPath)
at System.IO.Directory.InternalCreateDirectory(String fullPath, String path, Object dirSecurityObj, Boolean checkHost)
at System.IO.Directory.InternalCreateDirectoryHelper(String path, Boolean checkHost)
at ShareX.HelpersLib.FileHelpers.CreateDirectory(String directoryPath)
Any way for you to help?
Thanks in advance.
Carlos E. Crespo