
Whether it’s sharing a simple post or managing multiple social media pages, knowing how to share a repost on Facebook is one of the more simple and basic things that may seem easy, but tends to get complicated when one is trying to navigate so many other things on Social Media. But sharing a post is not a complicated as you think and there are different ways in which you can go about it. Before we dive into this tutorial, let’s understand what is reposting in the first place!
- What does it mean to repost something?
- How to repost on the Facebook website on PC
- How to repost on the Facebook app on iPhone and Android
- How to repost to another group
- How to repost posts without Share button on Facebook on PC
- How to repost posts without Share button on Facebook app on iPhone and Android
- How to share posts from your Facebook to Instagram account
- How to repost to your Facebook account using a 3rd-party called Hootsuite
What does it mean to repost something?
In its essence, the very act of reposting is basically taking a piece of content and posting it again. Different social media platforms have different methods of reposting content, the most common one being the Share option if the platform has provisioned for it.
In the case of Facebook, there is a good reposting mechanism set in place to ensure that content is given the best chance to get anywhere and everywhere should users deign it shareable. We will explore how to use the Share button and different avenues that can be used for reposting as well.
How to repost on the Facebook website on PC
First, let’s take a look at how posts can be shared within Facebook itself. To do this, go to the Facebook login page (using either the phone, laptop, or desktop) and log in to your Facebook account.

Now, locate the post you want to repost or share, on the right side of the post just beside the Comment button you will see the Share option. Click on it.
 You will now see a drop-down menu, select an option before you proceed and modify the Share settings. In case you want to add extra content (like your own thoughts or a message), click on Write Post first.

Once you do this, the post will display in a pop-up window, allowing you to modify the audience with whom you want to share the post. This is also the point where you can fill your desired text in the What’s on your mind section if you want to make any additions of your own to the post.

Your changed privacy settings will reflect in the post as shown below. If you’re sharing the post on your own timeline the process ends once you click on the Post button.

Alternatively, if you want to share the post on one of your pages or on someone else’s timeline, click on that option in the menu instead.

You will now have to perform an additional step and select from a pre-existing page or friend list that Facebook with show you depending on what you selected in the earlier step.

After you’ve selected the destination, you will preview the post in a pop-up window. Here, you won’t be able to change the privacy settings but you can add specific text or message in the text box. Once you’re satisfied hit Share.

That’s it! you now know how to repost content on the Facebook website like a pro.
How to repost on the Facebook app on iPhone and Android
Similar to the website, first go to the post you want to share and click on the Share icon you will see under it (right next to comments).

When you do this, the post will pop-up with edit options. If you want to say something about what you’re sharing, add the text in the text box by tapping on it and allowing your phone’s keyboard to pop-up.

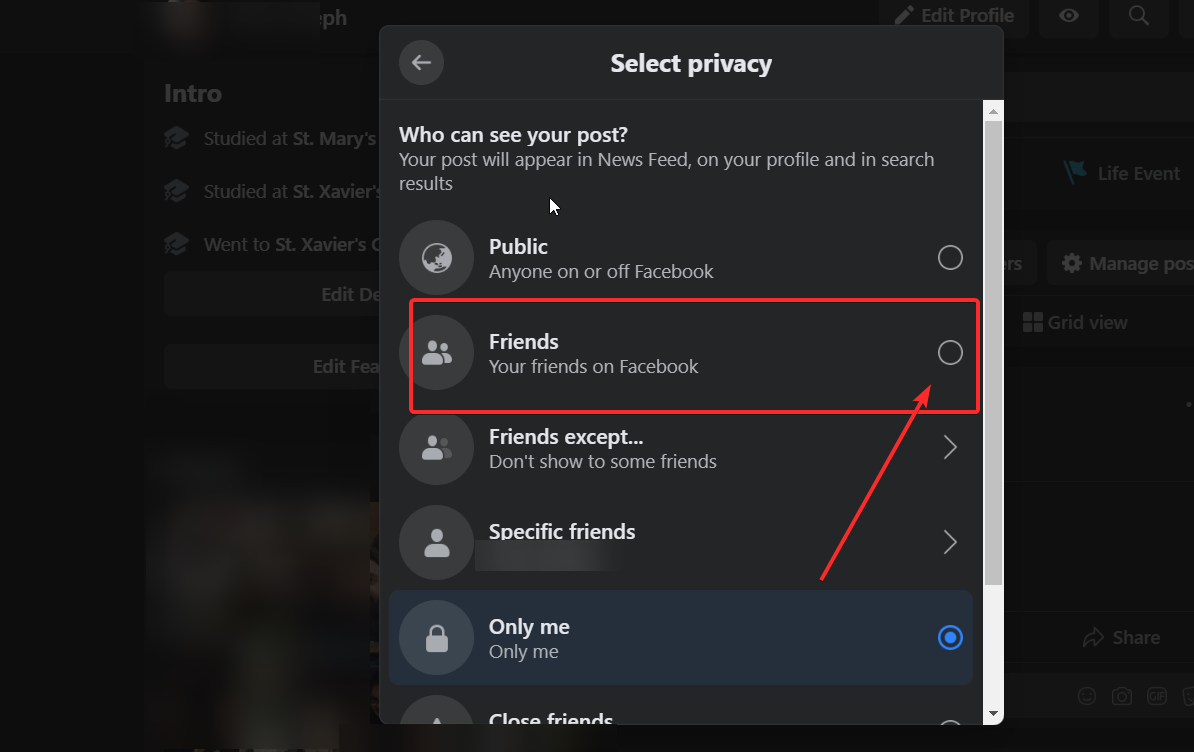
Once you’re happy with your text, choose the privacy settings for the post (set to ‘Only Me’ in the screenshot above). Tap the button with the lock above, and select the setting you want, as shown below.
 Right under your profile name are the destinations button that you have to tap to choose where you want your post to go. These options will be within Facebook itself like so:

If you’ve followed all the steps in the tutorial for the app so far, your post will look something like this and if you’re satisfied with the edits and want to share it on your own profile, then you can go ahead and tap on Share Now.
How to repost to another group
However, if you want to repost to another group, you will have to execute an additional step. For the purpose of this tutorial, we will show you what sharing on a group will look like. So tap on Share to a group option.

As in the case of the website, here too, you will be asked to choose from a list that Facebook will present to you. Tap on the option you want.

The preview of your post will now be ready. You can give it a final check and then tap on Post (top right of the page)

And there you go. That’s how you share posts using the Facebook App.
How to repost posts without Share button
Well, this can happen when users choose to keep their posts private or restrict it to a specific audience. There is a way around this, however, we will caution against sharing posts that have not been approved to be shared. Let’s see how you can repost without the Share button.
First, open the FB post you want to repost but doesn’t have the share button. Now, copy the permalink of the post you want to share from the address bar (as shown below) by using the Ctrl+C command or the mouse:

Now, go to your own profile or page or wherever it is that you intend to share the post and paste the permalink by using the Ctrl+V command or your mouse in the status update bar. Edit it as we showed above in the website tutorial and then click on Post.

Open the post without the share button that you want to repost. Tap on the menu button (3-dots) which you will see on the top right of the post you want to share.

A side menu will open and right at the very bottom, you will see a Copy Link option. Tap on it.

Once you’ve copied the link, go to the page or timeline where you wish to share the post and paste the link by long-pressing on the status bar till your see Paste. Tap on Paste and the permalink will appear in the text box.

Now, you can either keep the text of the permalink or remove it and edit the post with a message or text of your own. Then click on Post.
 This is how you repost without using the Share button.
Most of us have accounts across different platforms, whether it’s Facebook, Twitter, Instagram, and LinkedIn among others. However, since Instagram is a subsidiary of Facebook, it allows the option of cross-reposting and sharing of content. This is a great trick for those of you who want to make sure that whatever is getting posted on Facebook is shared on Instagram as well.
From the Instagram settings, you can also link other social media accounts like Twitter, Tumblr, Ameba, and OK.ru. Once you do this, anything that you post on Instagram can be shared with Facebook and vice versa. Here’s how you can go about it.
For Android and iPhone
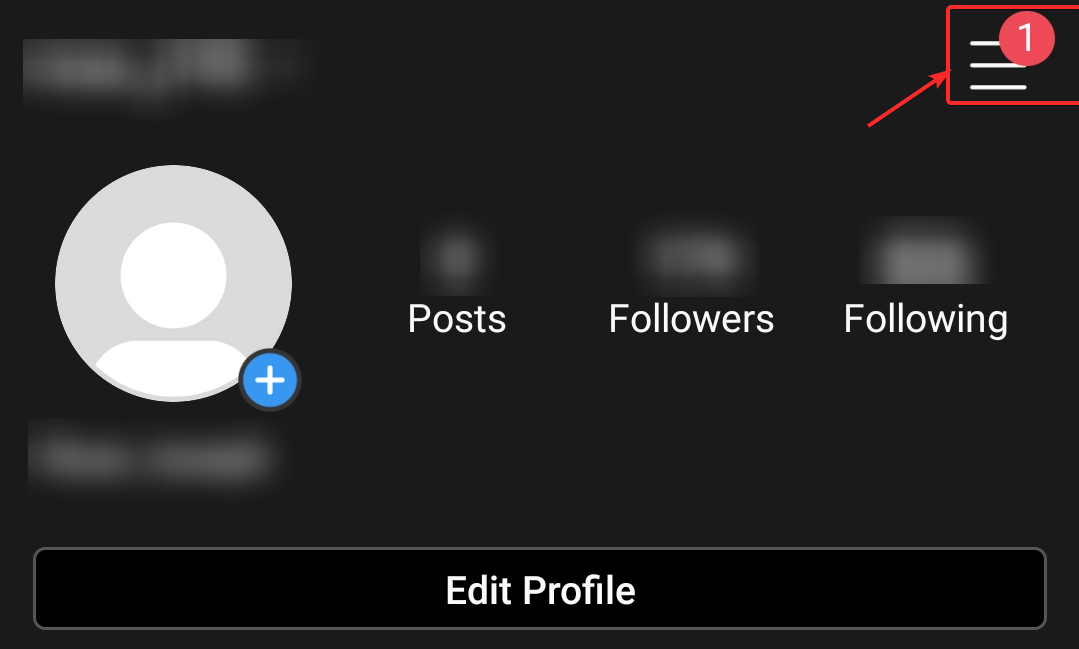
First, make sure that you open your Instagram app and log in to your account. Once you’ve done that, tap on your profile icon in the bottom right, and then tap on the hamburger menu on the top right.
Now, tap on the Settings menu which you will see at right at the bottom.

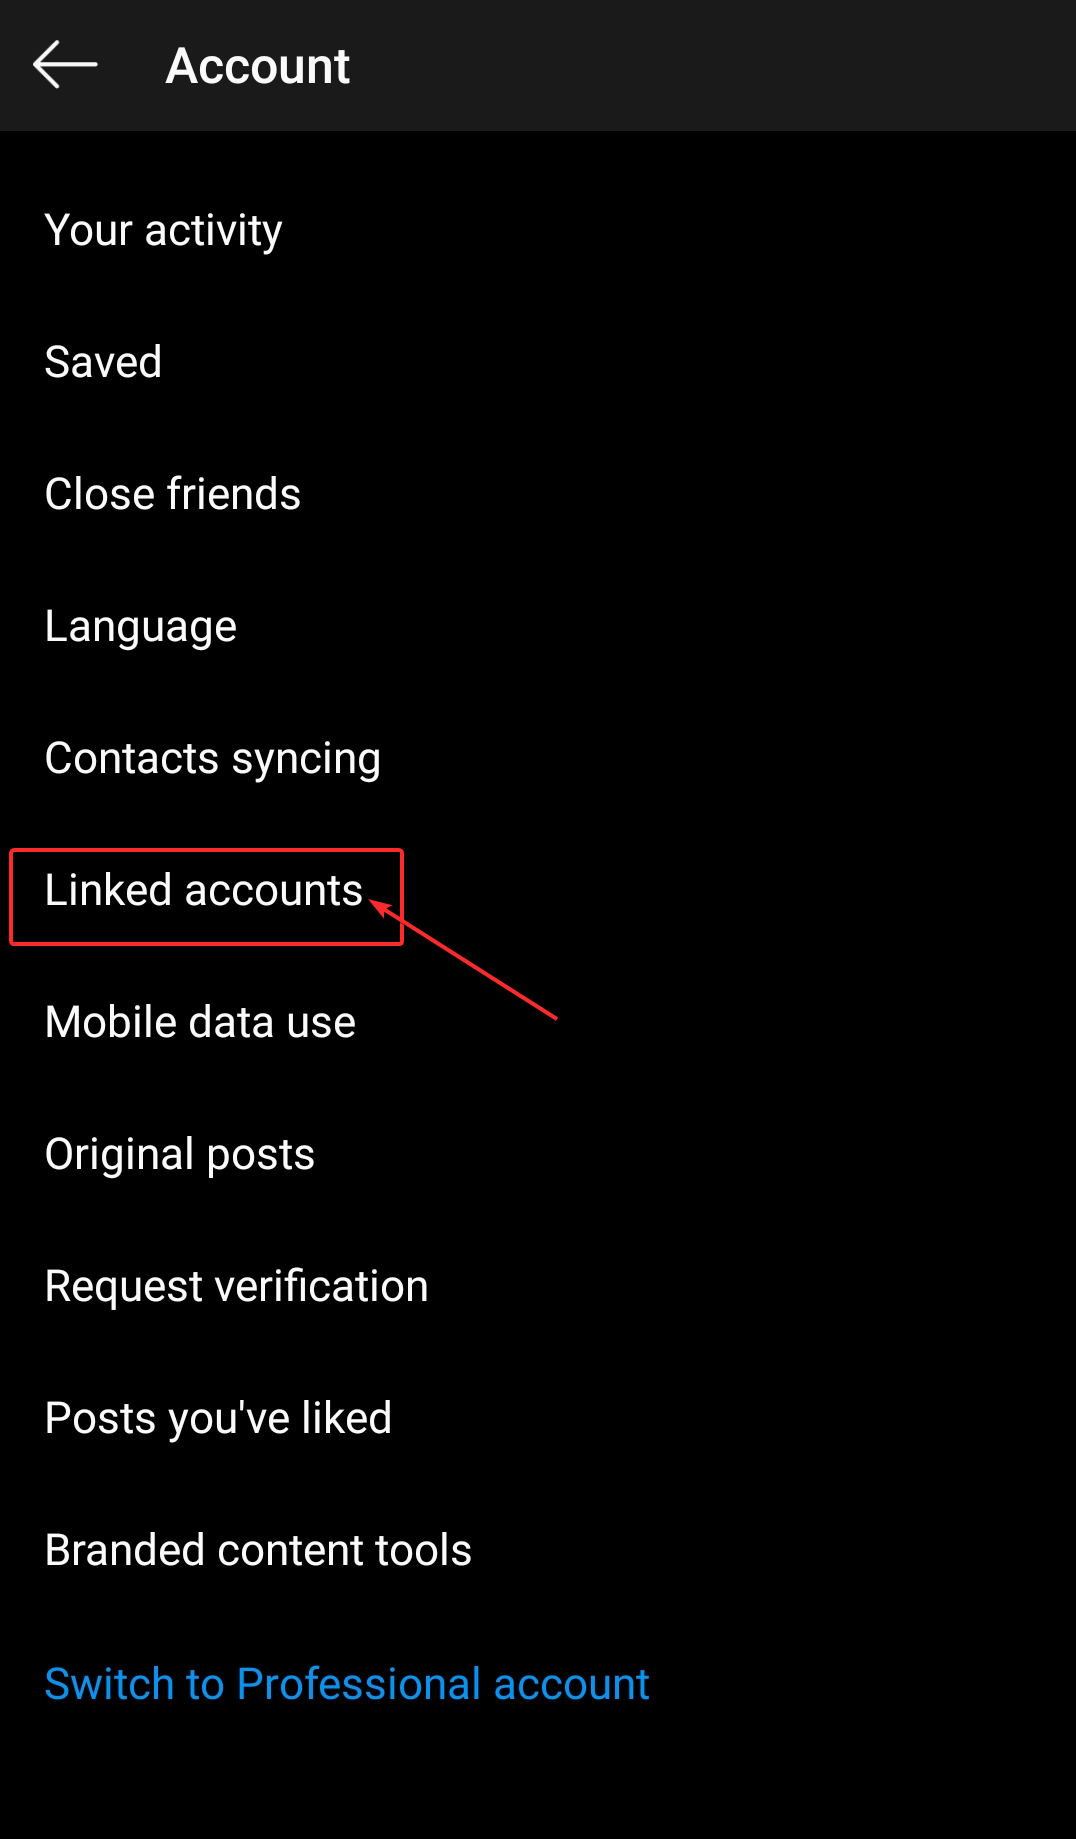
In the Settings menu go to Account > Linked Accounts and then select Facebook.

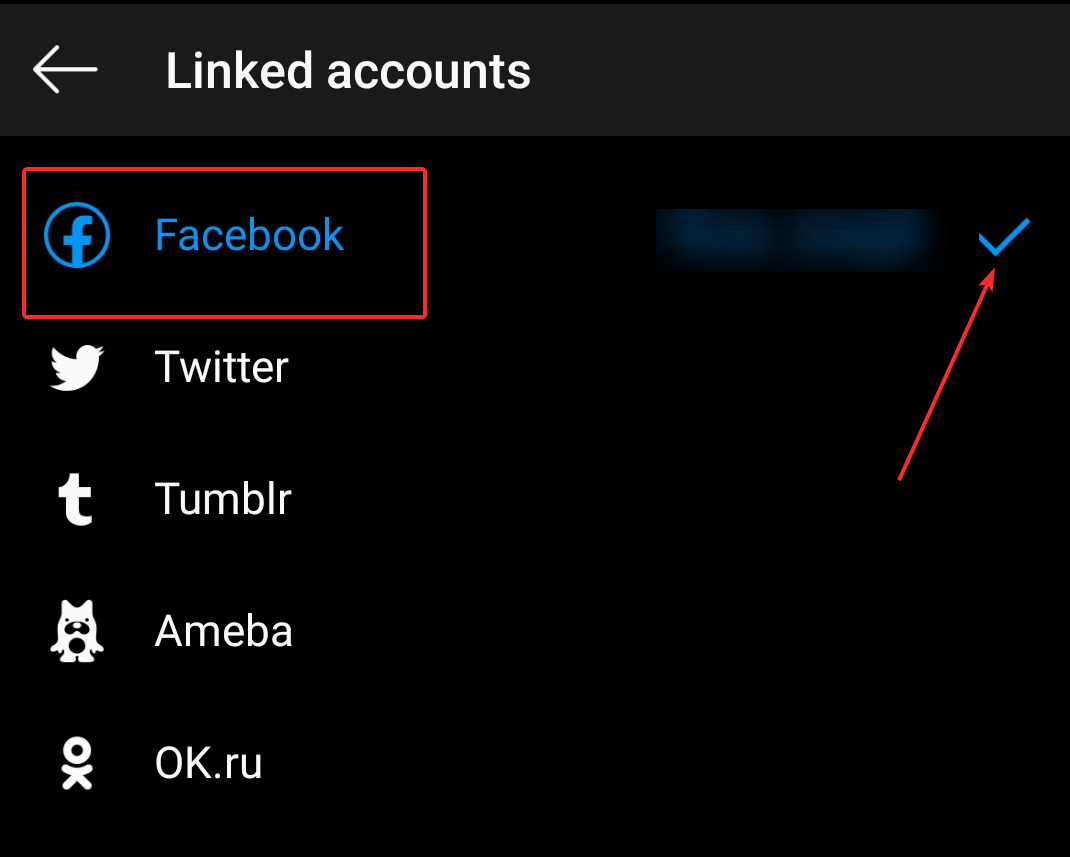
If you haven’t already done this, enter your Facebook login information. By default, your Instagram account will share with your personal Facebook profile. However, you can set your preferences to restrict the type of content as well.

How to repost to your Facebook account using a 3rd-party called Hootsuite
Hootsuite is a Social Media Marketing and Management Dashboard that is used by professionals to manage multiple Social Media platforms and profiles. If you, say, don’t have Instagram and want to cross-repost content from different platforms to Facebook or vice-versa and generally manage/monitor how the content is displayed with or without ads, we recommend Hootsuite.
Keep in mind though, that Hootsuite has a 30-day free trial period but after that, you’ll have to pay a marginal fee to get unlimited access to all its features.
Here’s a guide on how to use Hootsuite to repost content on your FB profile and pages.
First, you need to register your Facebook account on Hootsuite. (Keep in mind that you can follow this same process for up to nine other social media accounts and once you’ve registered your desired social media accounts, you can cross-post across them all).
Sign up for Hootsuite using your email ID. (Use the same one that you’ve been using for all your Social Media accounts for utmost convenience). Once you’ve signed in, click on the New Post button that you will see on the top right of your profile’s dashboard.

Now, a pop-up window will open on the screen, prompting you to create a post. Click on the Post to text box and you will see a drop-down window requesting you to Add a social network. Click on it.

The window will now show you Social Media platform options to choose from. Select Facebook > Connect with Facebook.

Now, click on OK to give permission to Hootsuite to post on your behalf.

Then checkbox the pages and accounts that you want to add to your Hootsuite profile.

In the next step, add your personal profile to ensure that you can post on your own account as well.

Now you need to add a Facebook stream on your Hootsuite Dashboard. To do this, click on Get Started.

Select Facebook along with the kind of stream you want to create. Once you do this, the stream will appear on your dashboard and you will be able to see all your Facebook posts.

Select the post you want to share and click on the share icon that you will see under it.

Once you do, the preview of the post will generate, along with edit options that are similar to what you see on Facebook itself.

You can also choose to say something about the post before clicking the Share button. The number of times a post is shared will display below the post; the number updates upon browser refresh.
If you’re not entirely comfortable with Hootsuite, you can also look at options like Buffer.
We hope you found this article helpful! Take care and stay safe.
Related:
- How To Temporarily Disable Facebook
- How To Stop Thug Life Game In Messenger And Facebook
- What Does The Green Dot Mean on Facebook or Messenger?
- Why can’t I sign into Facebook using Google
- How to crop your photos for Facebook
- How to turn off Quiet Mode in the Facebook app and why you don’t have it
- Do you need a Facebook account for Messenger Rooms?


One response to “How To Repost On Facebook On PC And Phone: Various Tips And Tricks Can Put To Use!”
Please so sorry on me face book I’d on please I m very so sorry