What to know
- To fix issues with wireless displays, first ensure your device’s wireless protocol is compatible with Windows, that Wi-Fi is turned on, and that every component is updated.
- Start with basic fixes such as reconnecting the device, reinstalling network adapters, and using Windows troubleshooter.
- You might also want to disable power saving for your Network Adapter, reset Network settings, and ensure that the Wireless Display feature is installed on your PC.
- Additionally, try using the 60Hz display refresh rate, reinstalling graphics drivers, and checking if the Wireless Adapter is allowed by the firewall.
Wireless displays are a technological marvel. But sadly, these connections can sometimes face issues that can prevent you from connecting to the desired devices. If you’re having issues with your wireless displays then here’s how you can fix the same on your PC.
Related: What Windows 11 Services to Disable Safely and How?
5 Checks to do first!
A few checks are recommended to ensure everything is set up and working as intended. Follow the first section and make your way through the list to check your setup.
Check 1: Ensure compatibility
Miracast is the standard wireless display protocol used by most devices currently on the market. While Windows supports Miracast, your display might be using another protocol. In addition to Miracast, Windows also supports projection over an existing Wi-Fi network which should help you circumvent the limitation.
If you’re using Apple devices we recommend you check compatibility for Airplay which is a wireless projection protocol exclusive to Apple devices.
Check 2: Ensure wifi is on
Whether using Miracast or direct display, ensure that your display and PC are both connected to the same Wi-Fi network.
Related: How To Cast Phone to PC: 5 Ways Explained
Check 3: Ensure wireless display enabled for display
Check your display settings and turn on wireless receiving if it’s not already turned on. Depending on your OEM this setting could be named along the lines of Wireless Display, Miracast, etc. Refer to the product manual or your OEM support site for more information on the same.
Check 4: Ensure everything is updated
Regular updates help provide bug fixes, feature compatibility, improvement optimizations, and more. You could be missing a driver or software update that could be preventing you from wireless projection. So check for any driver updates for the following components.
- Bluetooth
- Wi-Fi
- Network adapter
- GPUs
- Other software and system devices
Once you’ve updated all the necessary components, you can continue with the fixes mentioned below.
Check 5: Restart the devices
Restart or power cycle all your devices for good measure. This will include your PC, your TV/monitor, and the concerned Wi-Fi router. Start by turning off your device, then turn it back on past 15 seconds.
A restart on the problematic device in most cases will help fix wireless projection issues. Try using the concerned device again and see if the issue has been fixed. If not, use the fixes below.
Related: How to Increase Download Speed Windows 10
Windows 11 wireless displays connection issues: 12 fixes to try
Here are all the fixes you can try to get Wireless projection on your device working again.
Fix 1: Remove and re-connect the device
Start by removing the saved device and reconnecting it to your PC.
- Press
Win+Ito open the Settings app. Click Bluetooth & devices > Devices.
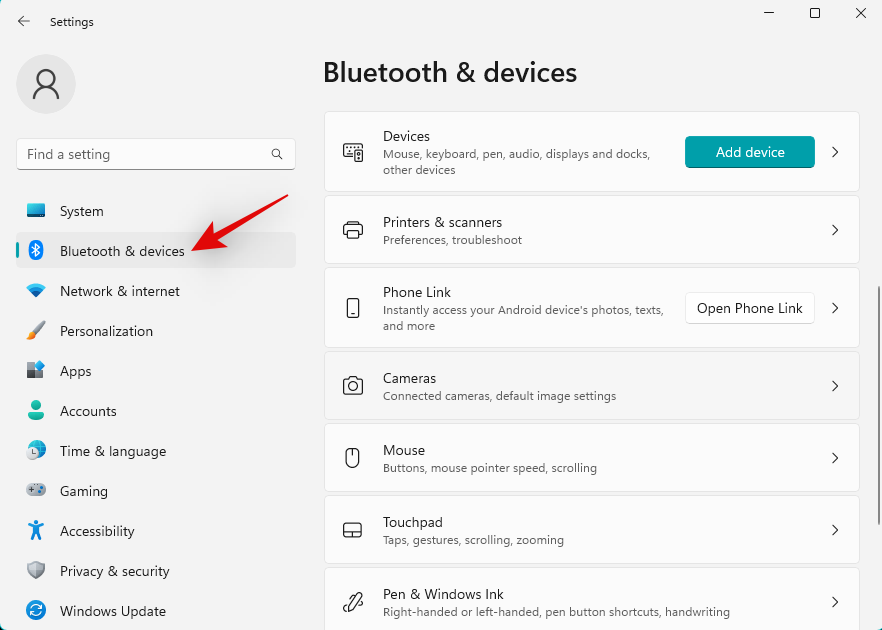
- Now find your wireless display in the list on your screen and click the 3-dot menu icon beside it and select Remove device.

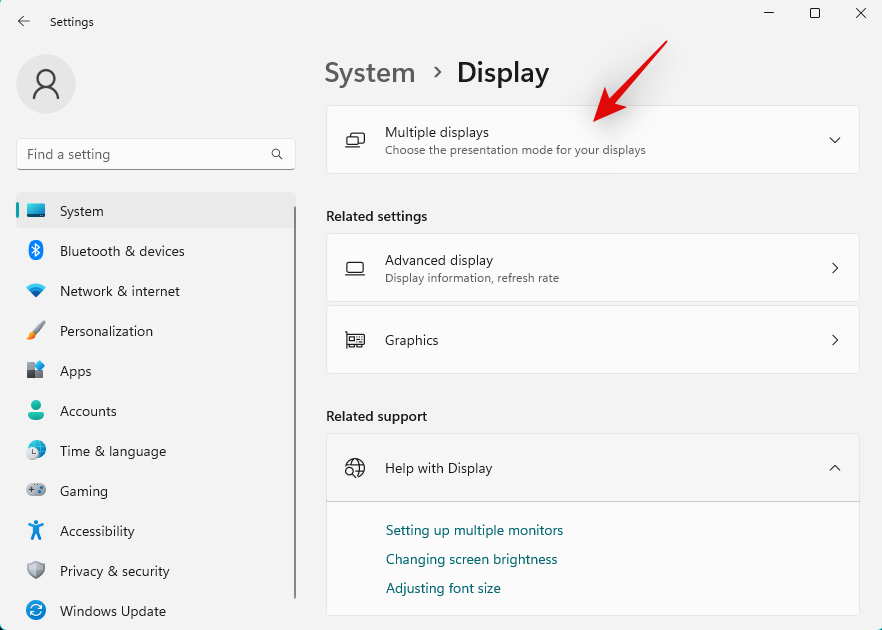
- Restart your PC and display for good measure at this point. Once done, open the Settings app > Display. Then expand Multiple displays.
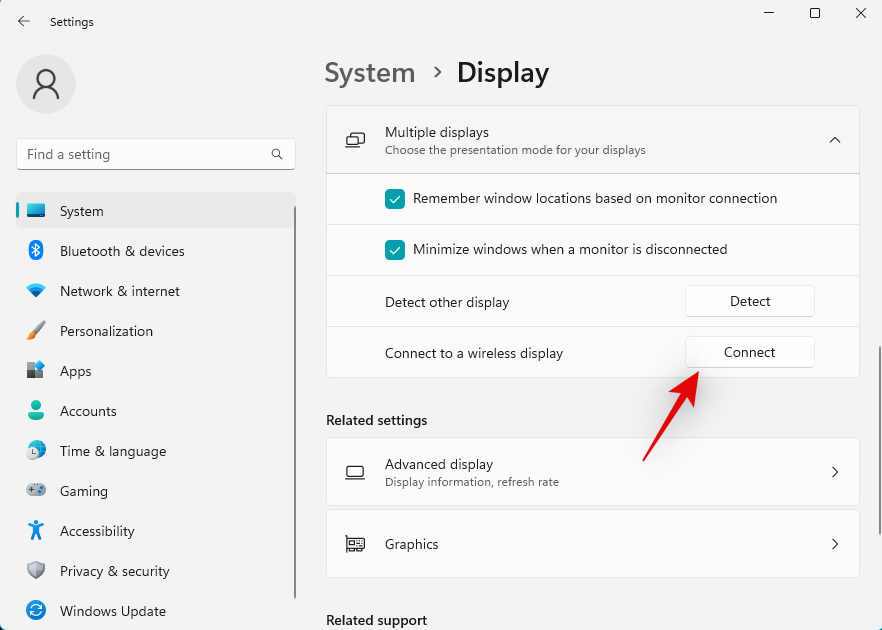
- Now click Connect beside Connect to a wireless display.
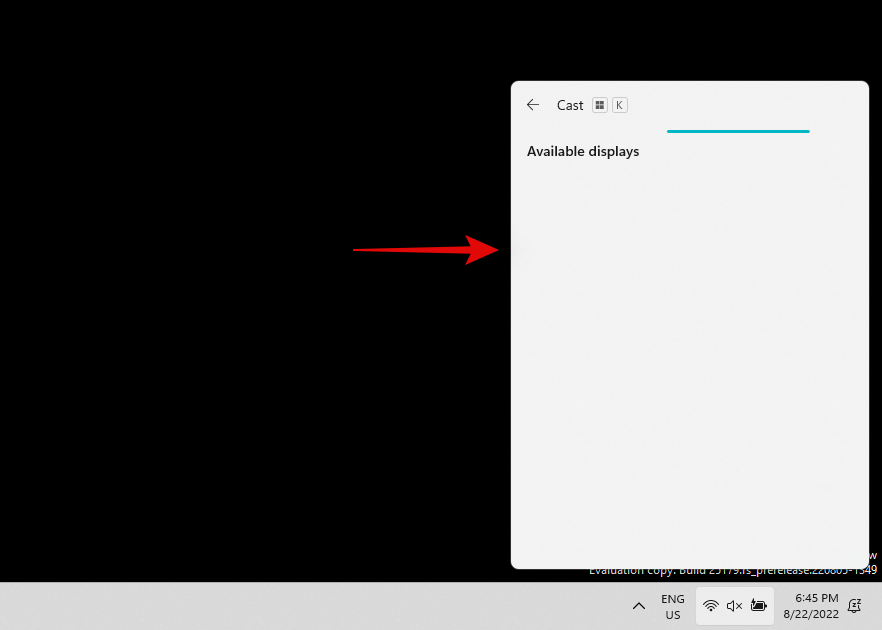
- Available displays within range will now show up in your action center. Click and select your display once it shows up in the list.
Related: How to Forget a Network on Windows 11
Fix 2: Reinstall Network Adapter drivers
- Press
Win+Xand click Device Manager.

- Expand the Network adapters branch.
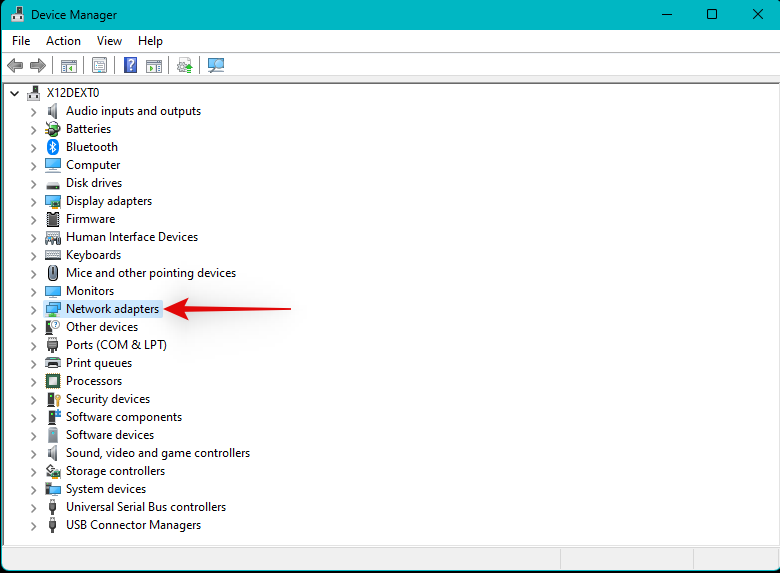
- Right-click your Network adapter from the list and select Uninstall device.

- Check the box for Attempt to remove the driver for this device.
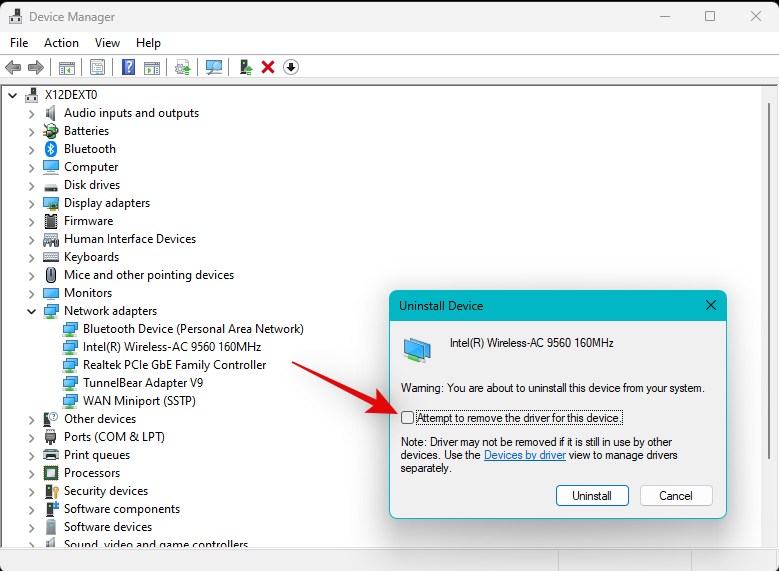
- Click Uninstall.
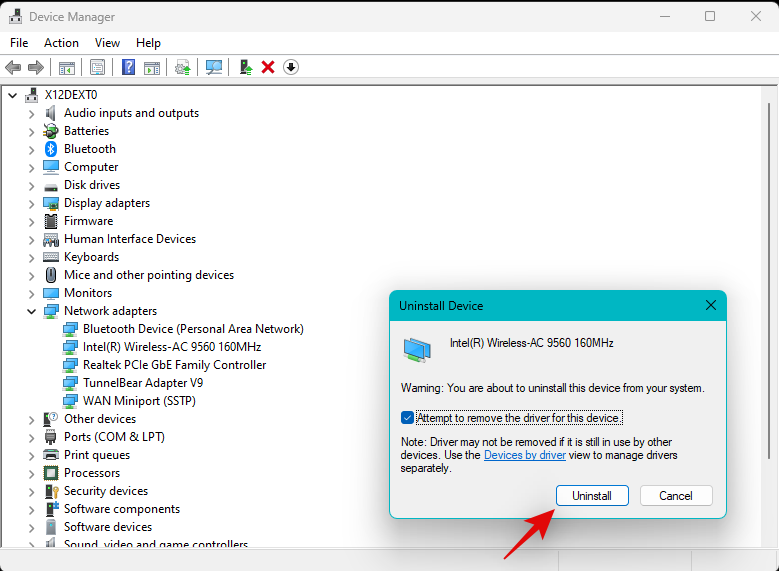
- The network adapter and its drivers will now be removed from your PC. Now click the Scan for hardware changes icon at the top.
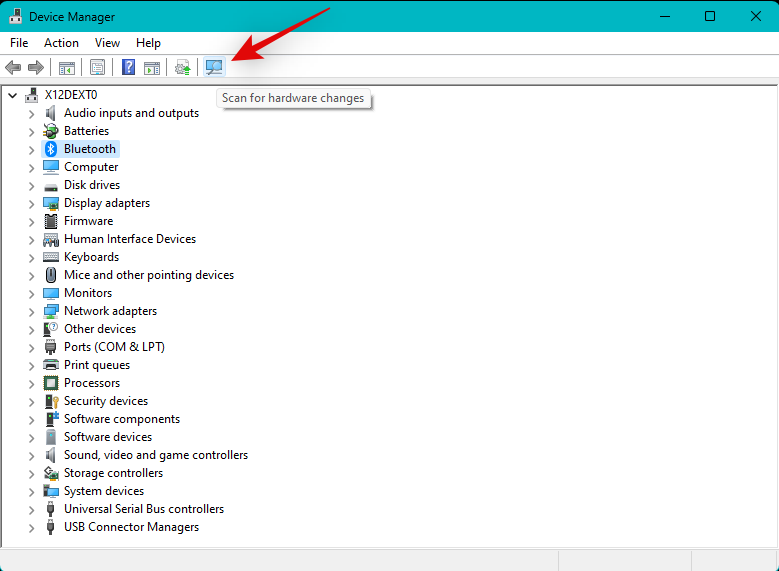
- Windows will now scan and detect your network adapter. Once detected, Windows will automatically install the appropriate drivers on your system.
- If you still face problems, install the specific drivers available on your OEM’s support site.
Related: Setup Automatic Wireless Sync between Android and PC
Fix 3: Use a Windows troubleshooter
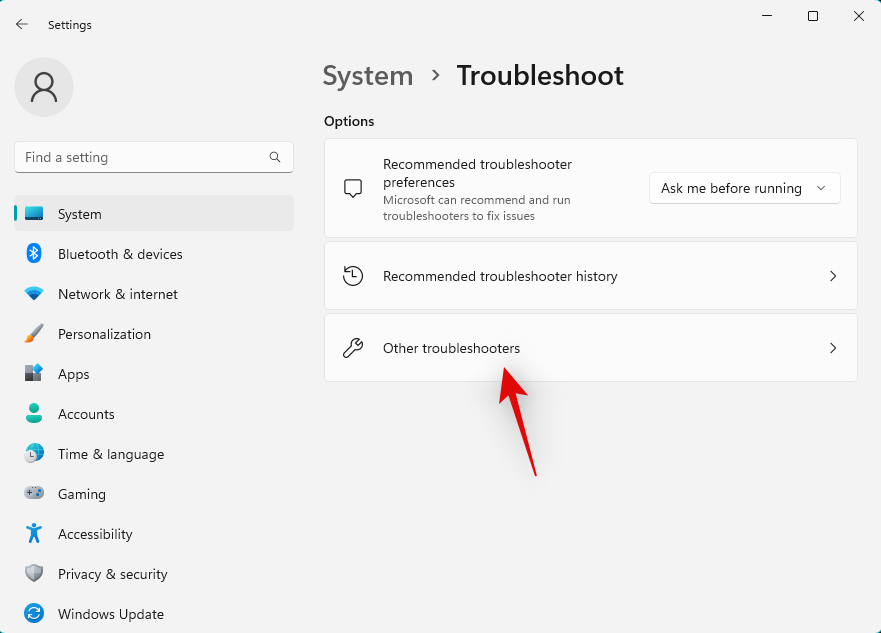
- Open the Settings app, then select System > Troubleshoot.
- Click Other troubleshooters.
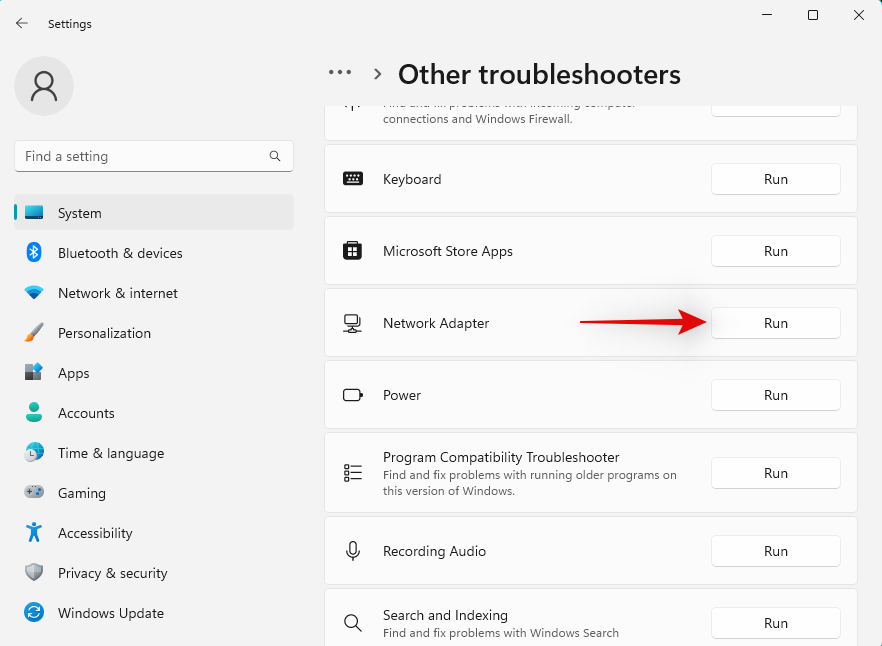
- Now click Run beside Network Adapter at the top.
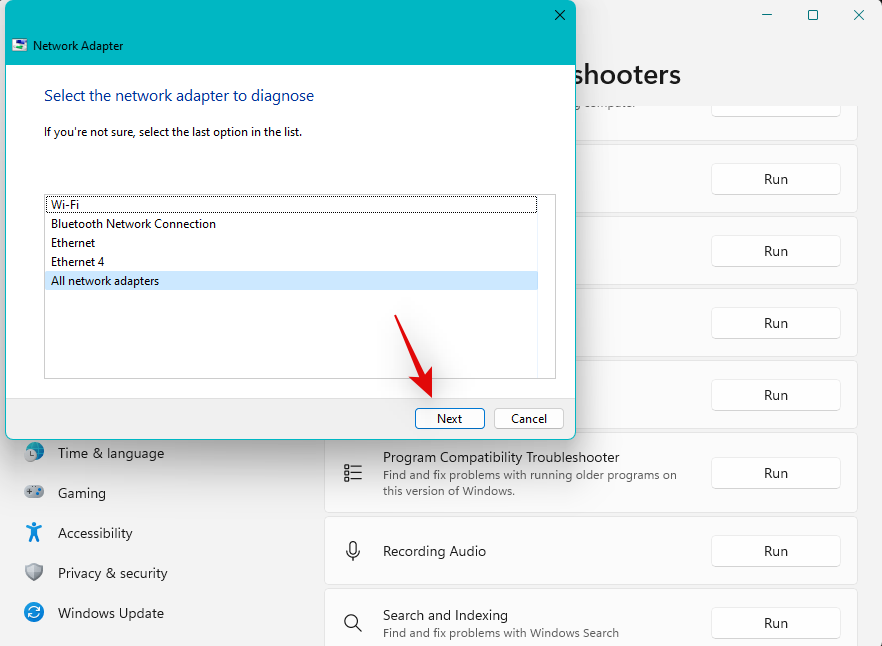
- Follow the on-screen instructions to apply the necessary suggested fix for your system.
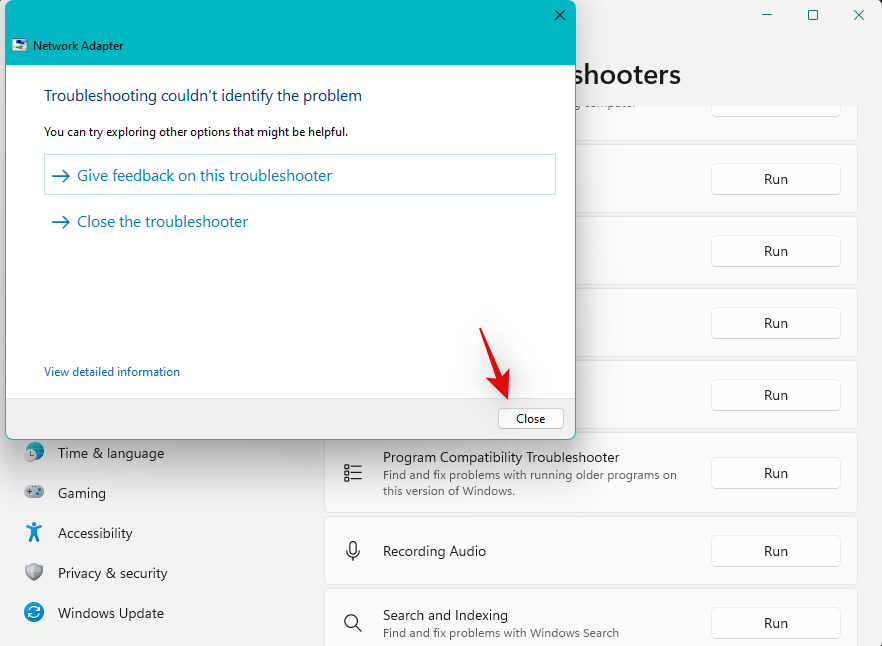
- Click Close once done.
- Repeat the steps above to run the troubleshooter for Video Playback as well.
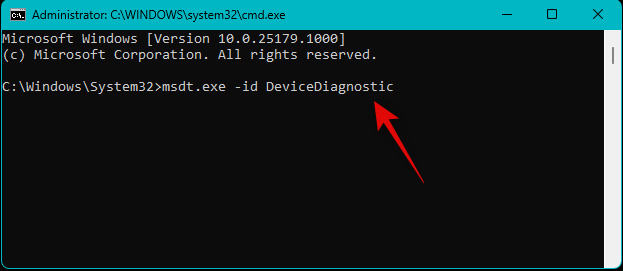
- Once you’re done, run the Hardware and Devices troubleshooter via the Command Prompt (open it from Start).
- Type in the following and press Enter:
msdt.exe -id DeviceDiagnostic
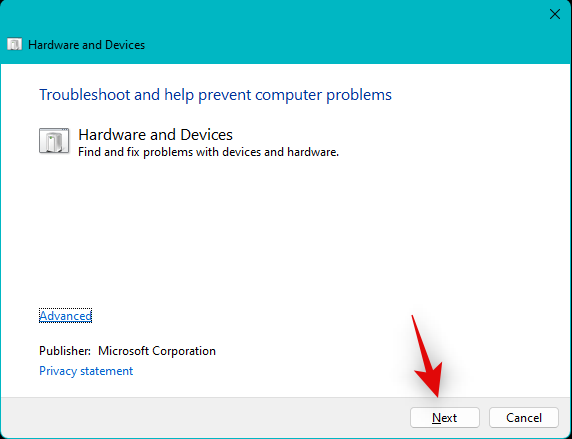
- The ‘Hardware and Devices’ troubleshooter will now launch on your system. Click Next.
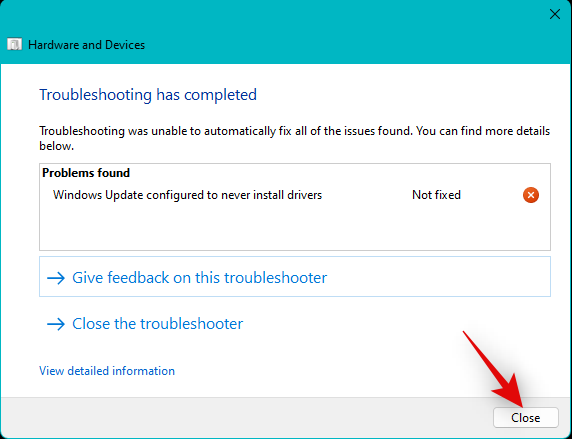
- The troubleshooter will now scan your device for any issues and fix the same on your system. Click Close once the process finishes.
Try using your wireless display again.
Fix 4: Install any pending updates
Follow the steps to check and install any pending drivers and Windows updates for your system:
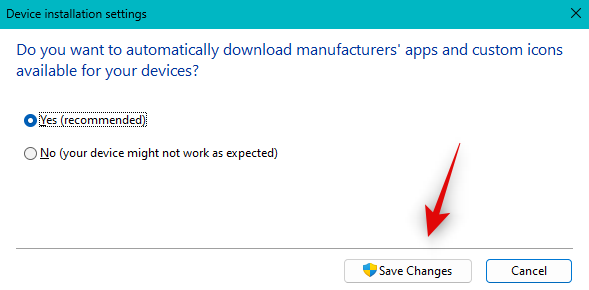
- Open the Start menu, search for Device installation settings, and launch it.
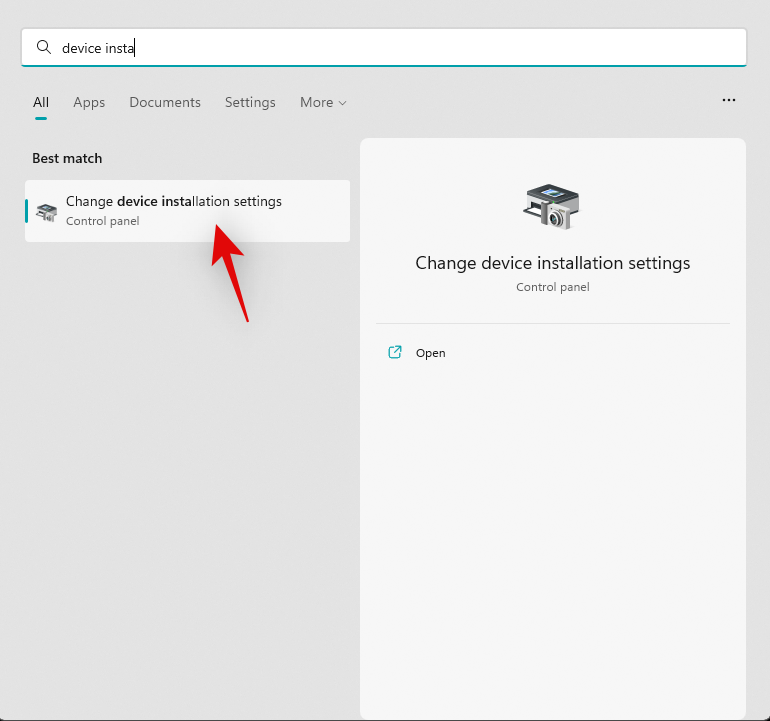
- Click and select Yes if not already selected and click Save changes.
- Open the Settings app and click Windows Update > Check for updates.
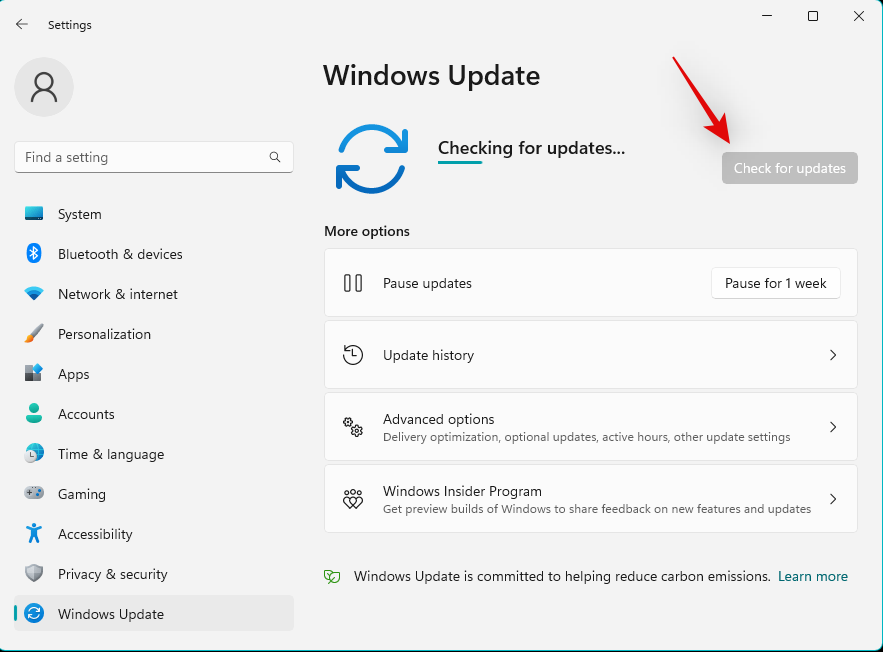
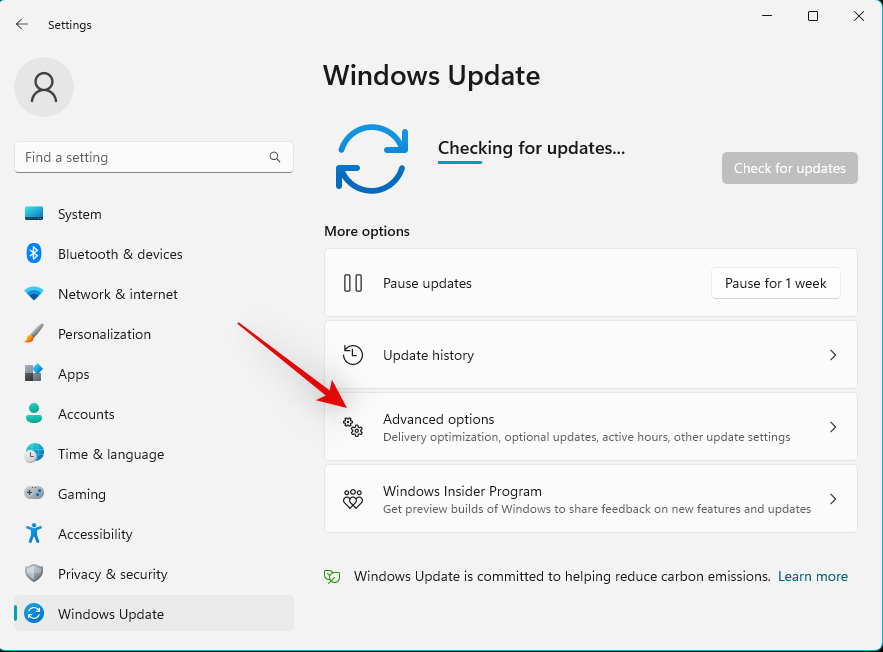
- Install any updates available for your PC and hardware components. Once done, click Advanced options.
- Click Optional updates.
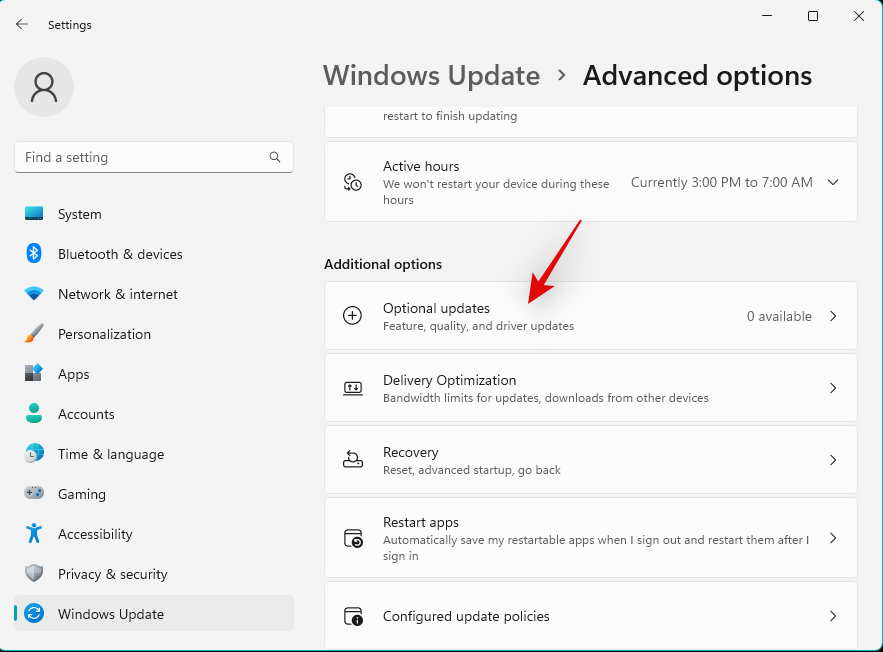
- If any driver updates are available for your network card, Download & install them. Restart your PC once you’re done installing updates.
Fix 5: Turn off power saving for the Network adapter
Windows has an in-built feature to turn off your Network Adapter when not in use. Though this helps reduce power consumption on your system, it can cause connectivity issues if it’s buggy. Turning off the same can help improve connectivity and fix Wireless projection for your PC.
- Press
Win+Xand click Device Manager. - Right-click your Network adapter and select Properties.
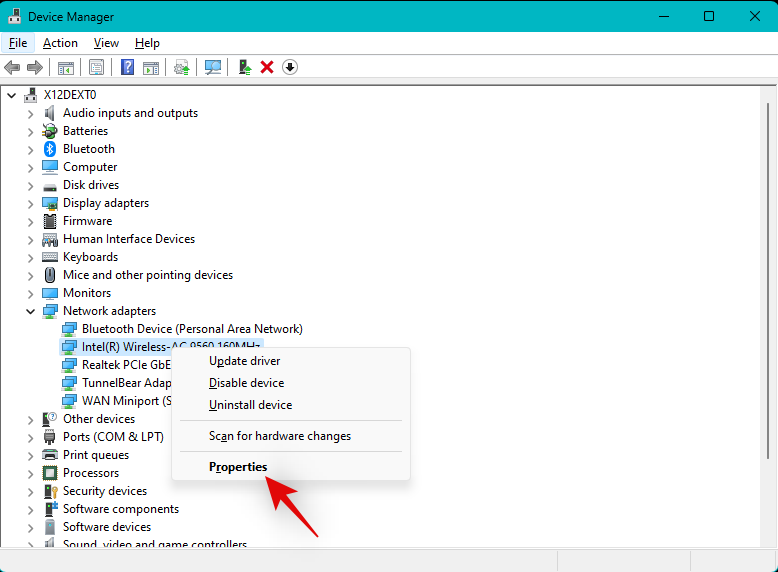
- Switch to the Power Management tab.
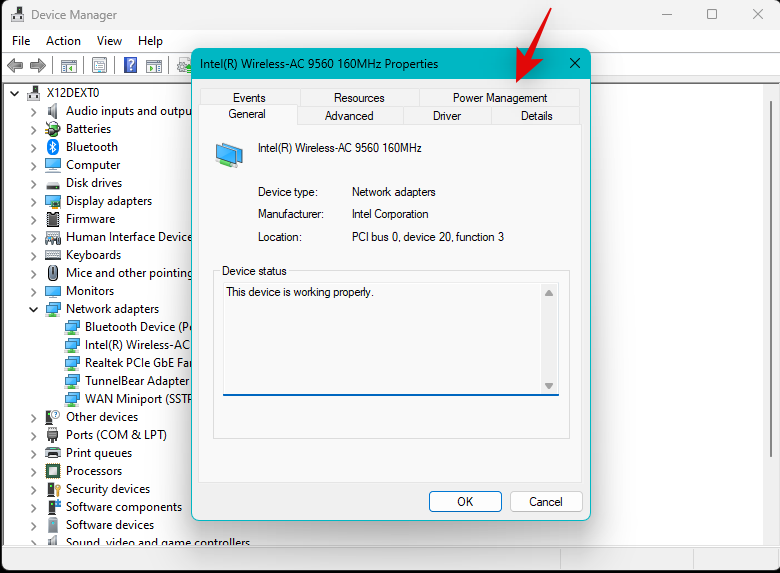
- Uncheck the box for Allow the computer to turn off this device to save power and click OK.
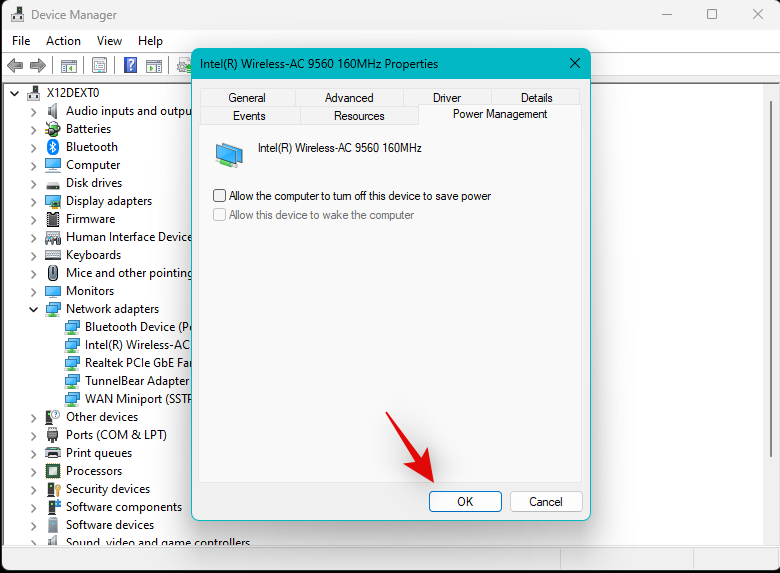
- Restart your PC for good measure and try connecting to the concerned device again.
If you were facing issues due to power savings for your adapters then the issue should now have been fixed on your system.
Fix 6: Reset Network settings
Resetting network settings will help you start from scratch which should help fix cache and issues due to previous connections on your system.
- Open the Settings app, then select Network & internet > Advanced network settings > Network reset.
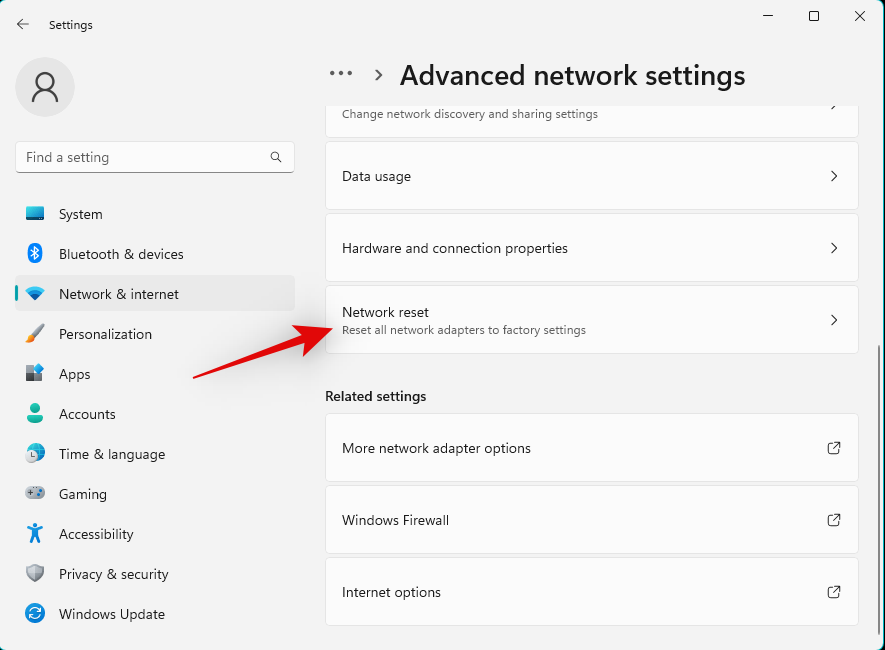
- Click Reset now.
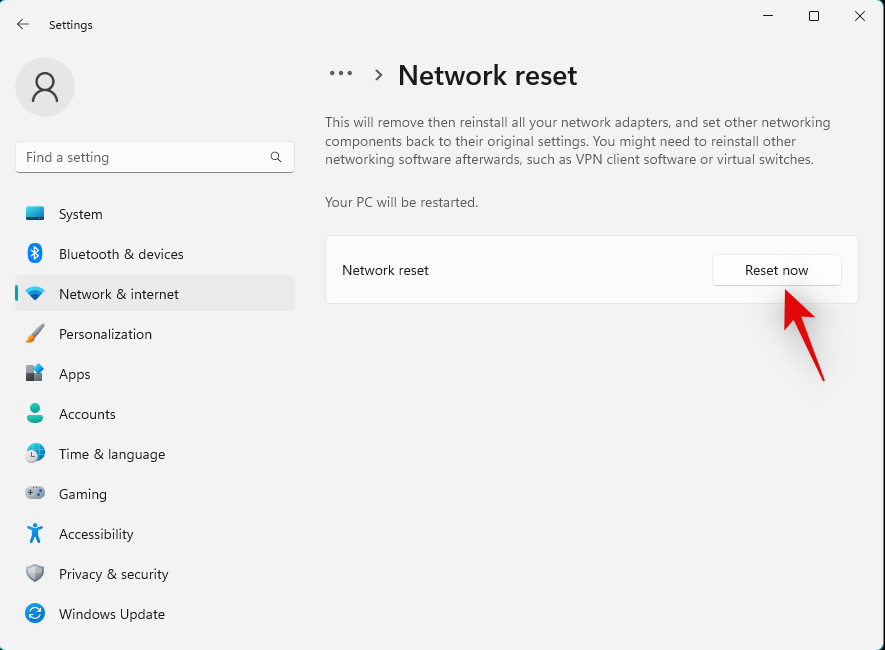
Your adapters will now reset to their factory default settings.
Fix 7: Add Wireless Display feature
Wireless Display is an optional feature on Windows 11. If it is missing from your PC or hasn’t been pre-installed by your OEM, this could be the cause of the problem. Here’s how to fix it:
- Open the Settings app, then click select Apps > Optional features. Now click View features at the top.

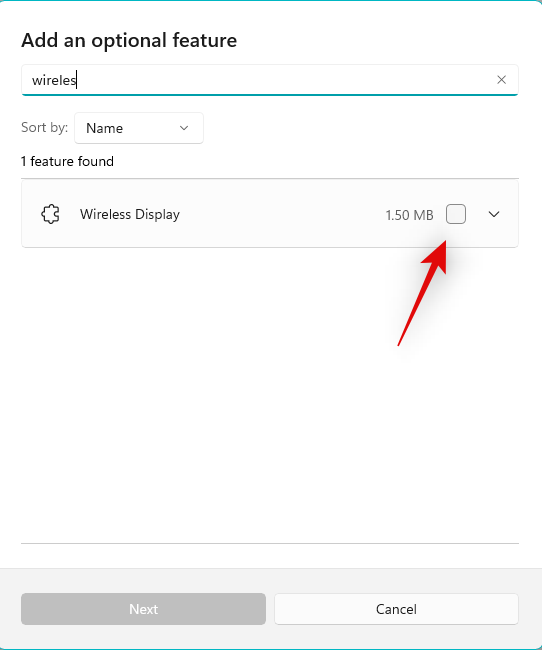
- Use the search bar at the top to search for Wireless Display.
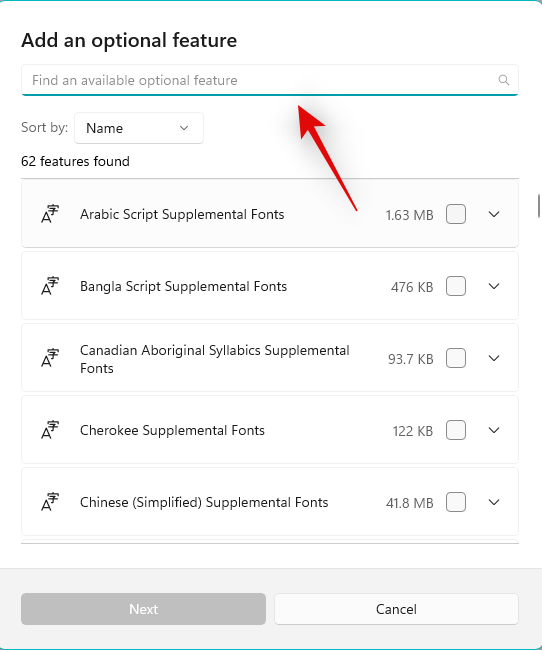
- Check the box for the same once it shows up in the search results.
- Click Next.
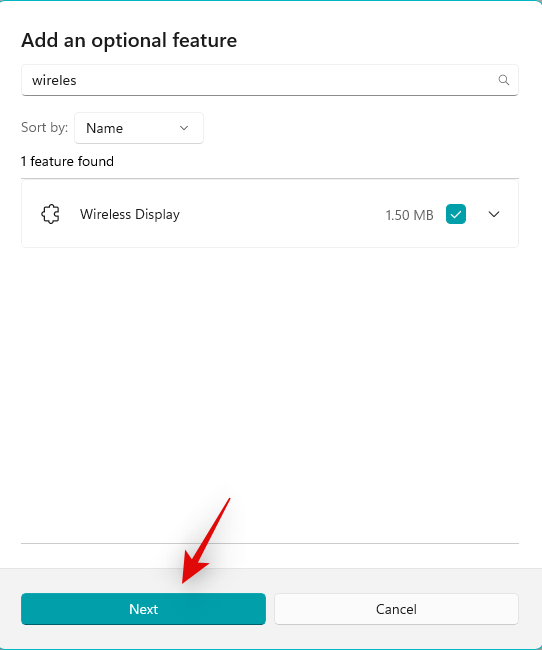
- Now click Install.
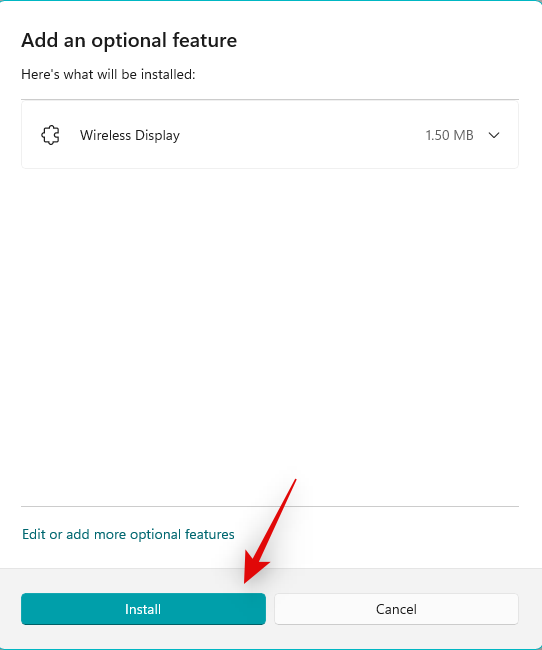
The optional Wireless Display feature will now be installed on your PC. Restart your PC for good measure once done even if you’re not prompted. If the missing Wireless display feature was preventing you from projecting your screen then it should now be fixed on your system.
Fix 8: Enable 2.4GHz & 5GHz Wi-Fi band
We now recommend you try enabling both 2.4GHz and 5GHz bands for your Network adapter. You can also try switching between the two to see which one works the best for you when projecting your display.
- Press
Win+Xand open Device Manager. - Then expand the Network adapters branch, right-click your network adapter and select Properties.

- Switch to the Advanced tab.
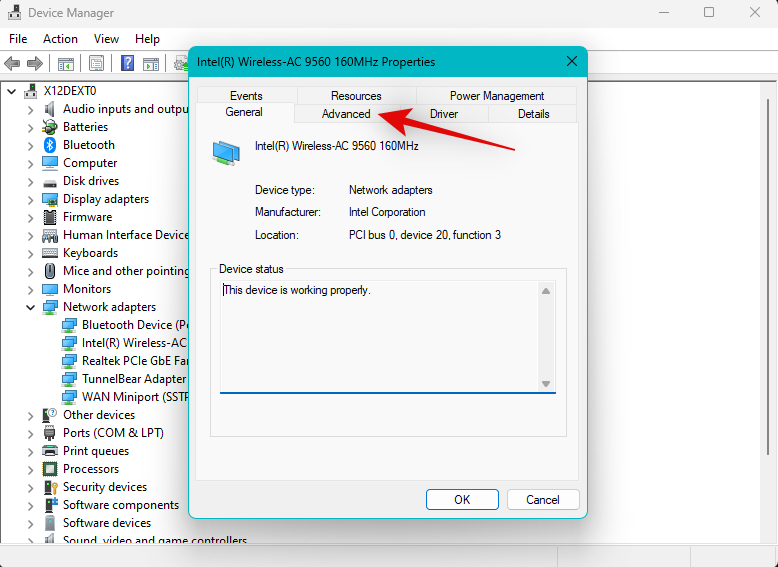
- Click the drop-down menu for the first listing and select Dual Band 802.11 a/b/g.
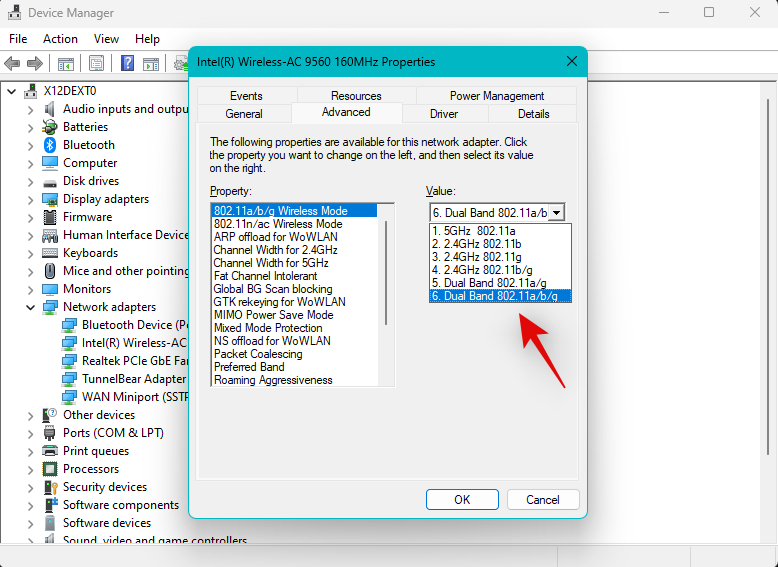
- Scroll down and set the following values to Auto using the drop-down menu: Channel Width for 2.4GHz and Channel Width for 5GHz.
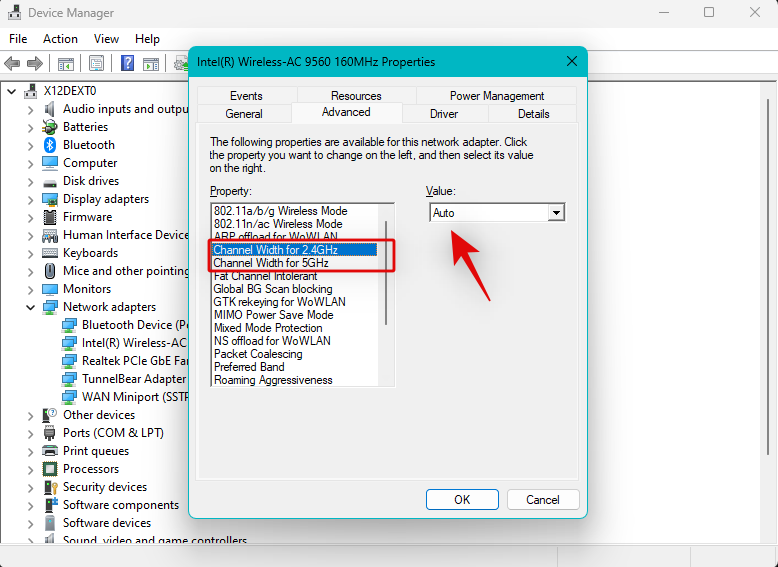
- Select Preferred Band on your left.
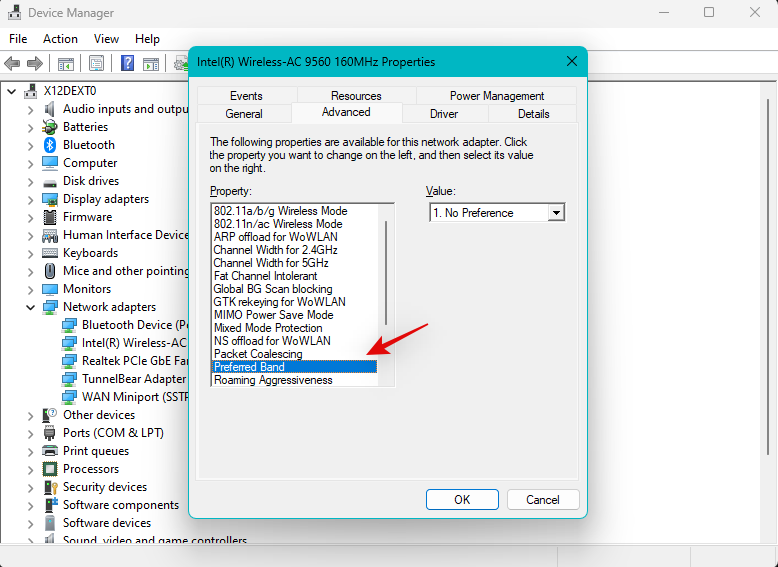
- Click the drop-down menu and select your preferred band. Try both 2.4GHz and 5GHz to see which one works the best for you when projecting your screen on the current network.
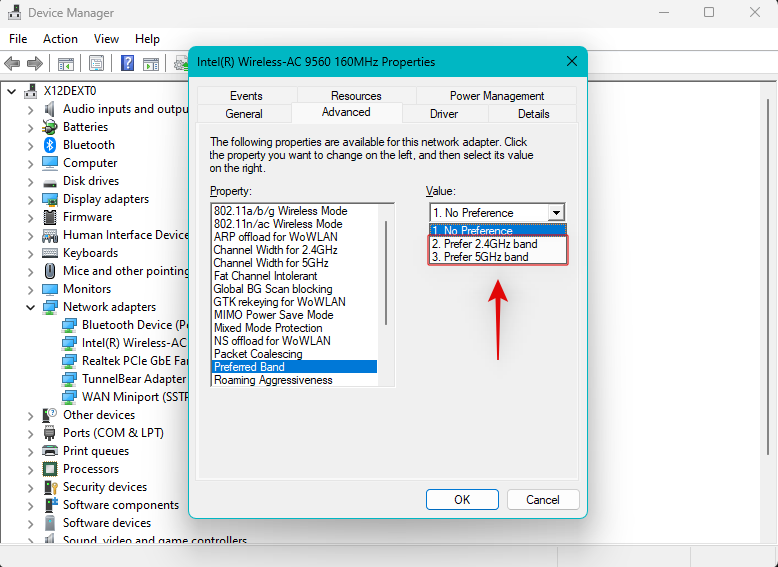
If your network adapter settings were preventing you from projecting your screen then the issue should now have been fixed.
Fix 9: Try a different refresh rate
Inconsistent and mismatched refresh rates can also cause issues when projecting your screen to certain displays, especially if they are old or run at a lower refresh rate than your PC. We recommend you try reverting to the default 60Hz refresh rate on your PC and display and try projecting your screen again.
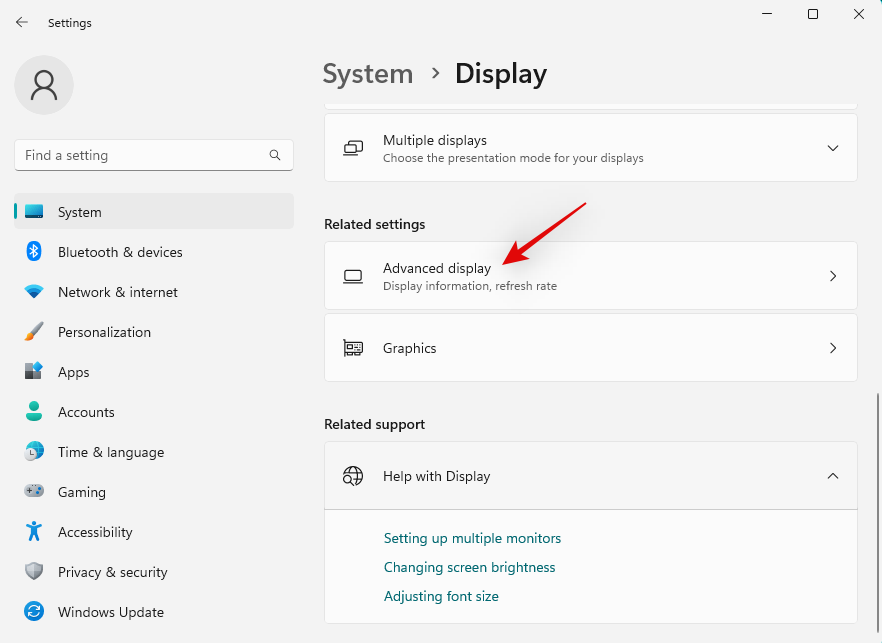
- Open the Settings app and select System > Display > Advanced display.
- Now click the drop-down menu at the bottom and choose 60Hz.
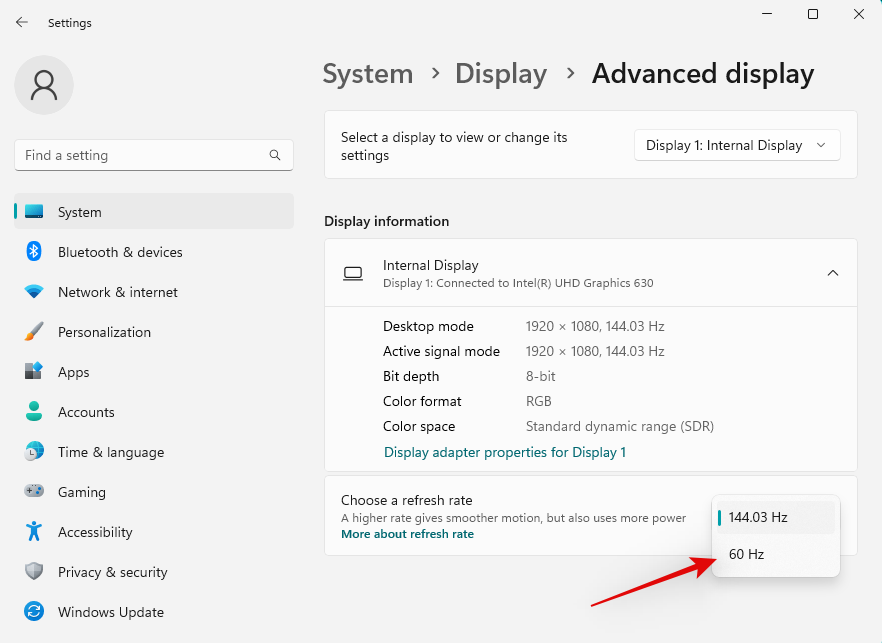
- Also disable any display overclocks applicable to your PC and display. Once done, you should be able to project your screen as intended.
Fix 10: Re-install the Graphics driver
Try re-installing your graphics card drivers, which include your dGPU driver or iGPU driver depending on the one powering your display. If you have a laptop, re-install your iGPU drivers even if you have a dedicated GPU.
- DriverStoreExplorer | Download Link
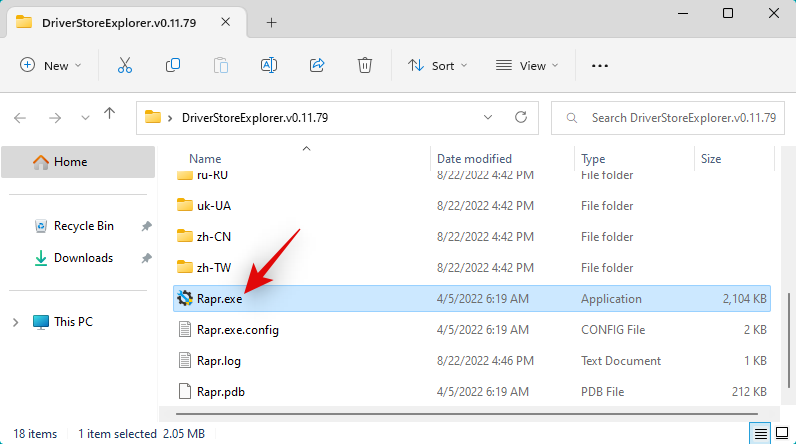
- Download and extract DriverStoreExplorer using the link above. Launch the same using the .exe file once done.
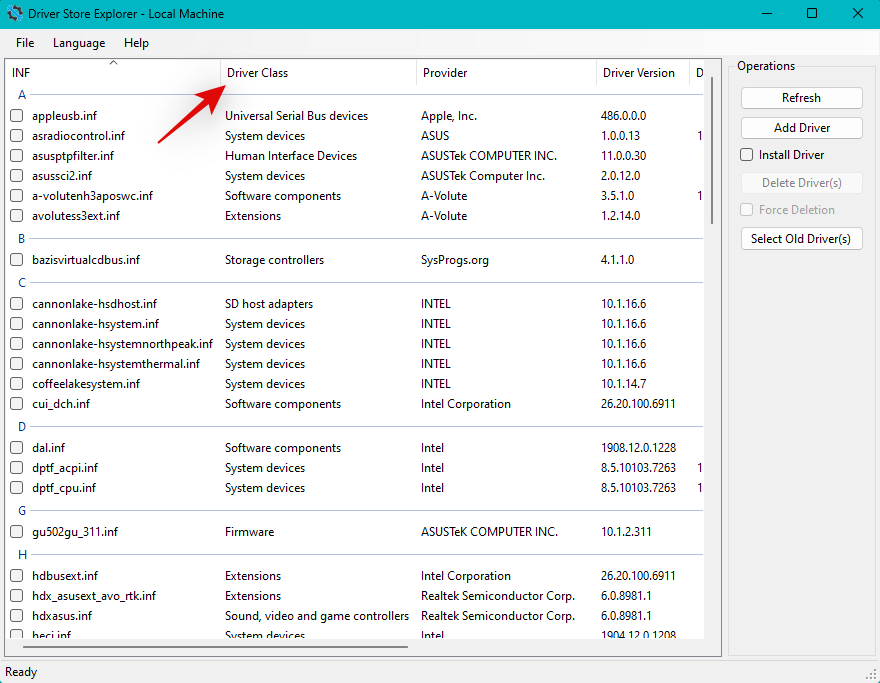
- Click Driver Class at the top to sort all your drivers by device type.
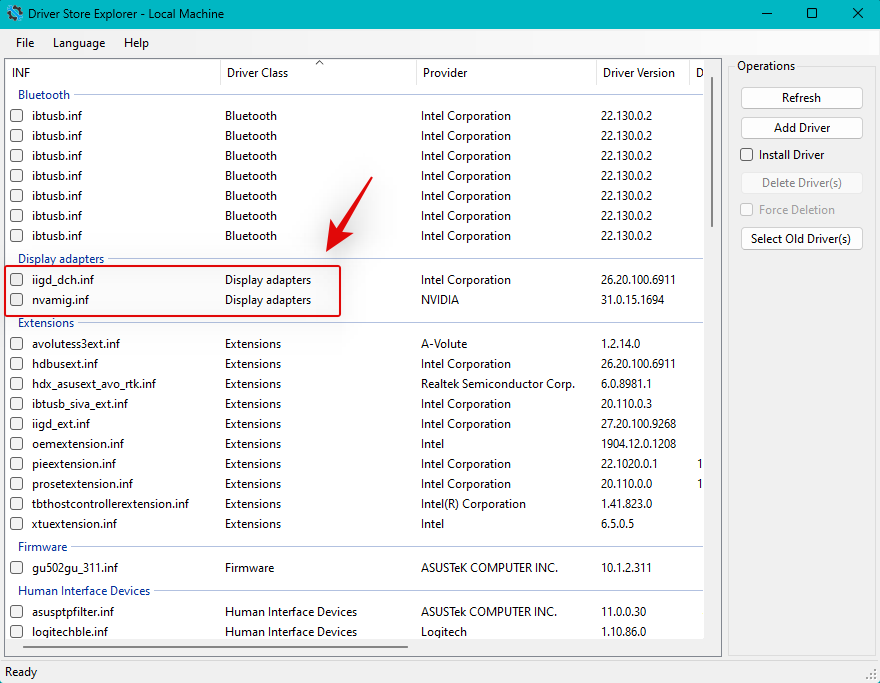
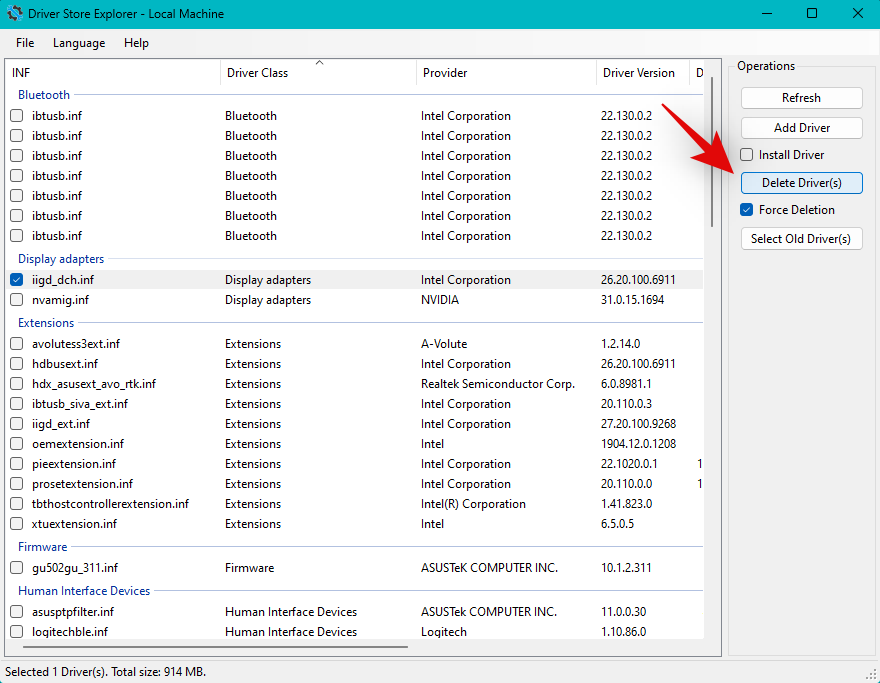
- Now look for drivers for Display adapters. Check the box for the driver used by the GPU powering your display.
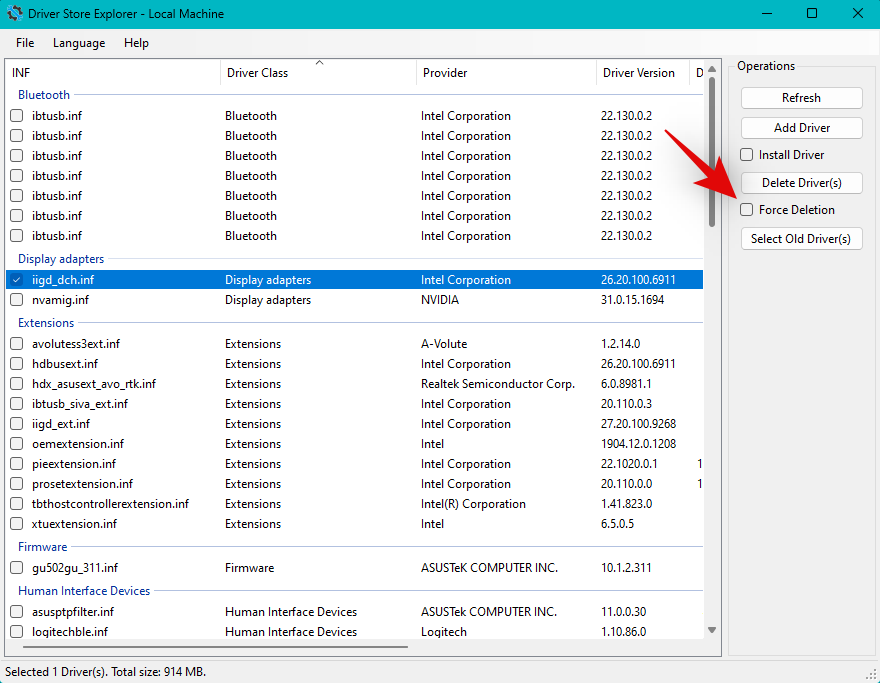
- Now check the box for Force Deletion.
- Click Delete Driver(s).
- Confirm your choice by clicking Yes.
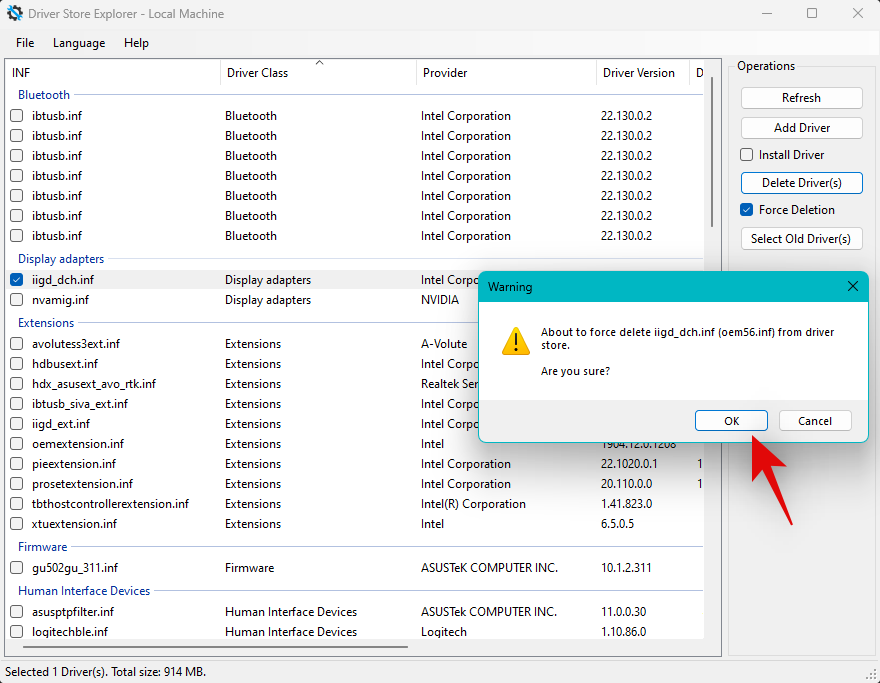
- The selected driver will now be deleted from your PC. Your display might flicker or go black during this process. This is completely normal. Once done, close DriverStoreExplorer and reinstall the latest drivers for your GPU. You can use the links below to download the latest driver for your GPU.
Fix 11: Allow your Wireless Adapter through Firewall
Your wireless adapter could also be blocking your Windows Firewall settings. Here’s how to fix that:
- Open the Start menu, search for Windows Security, and launch it.
- Now click Firewall & network protection.

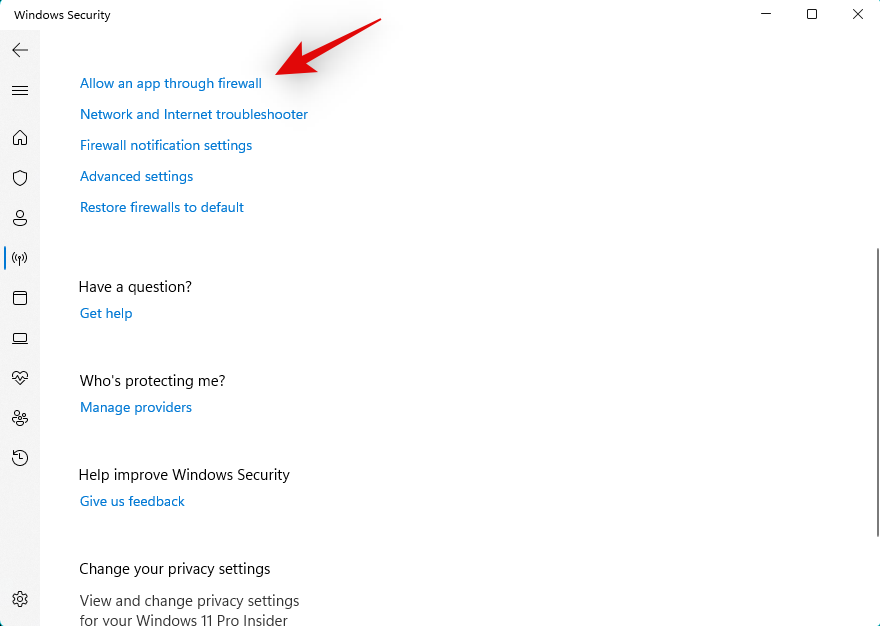
- Click Allow an app through the firewall.
- Click Change settings at the top.
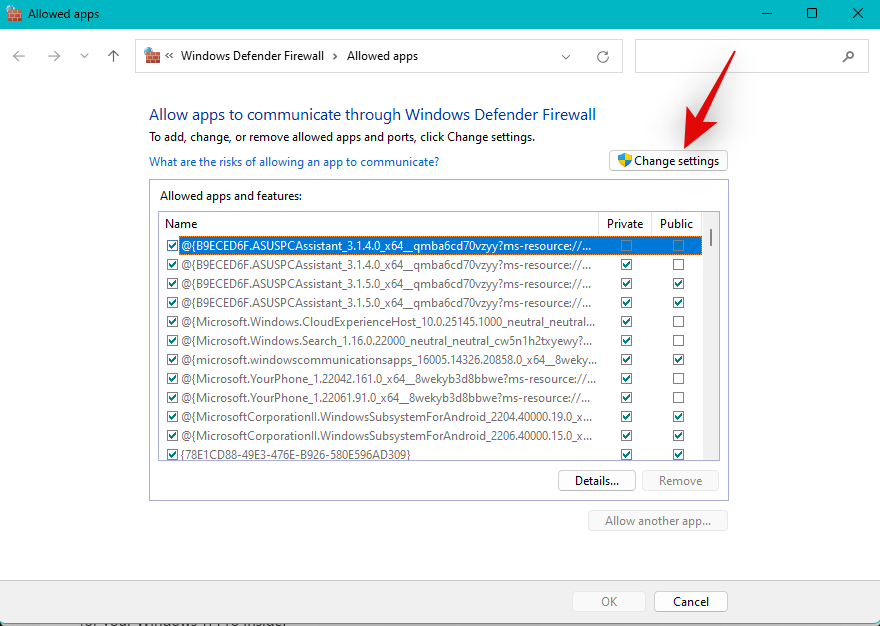
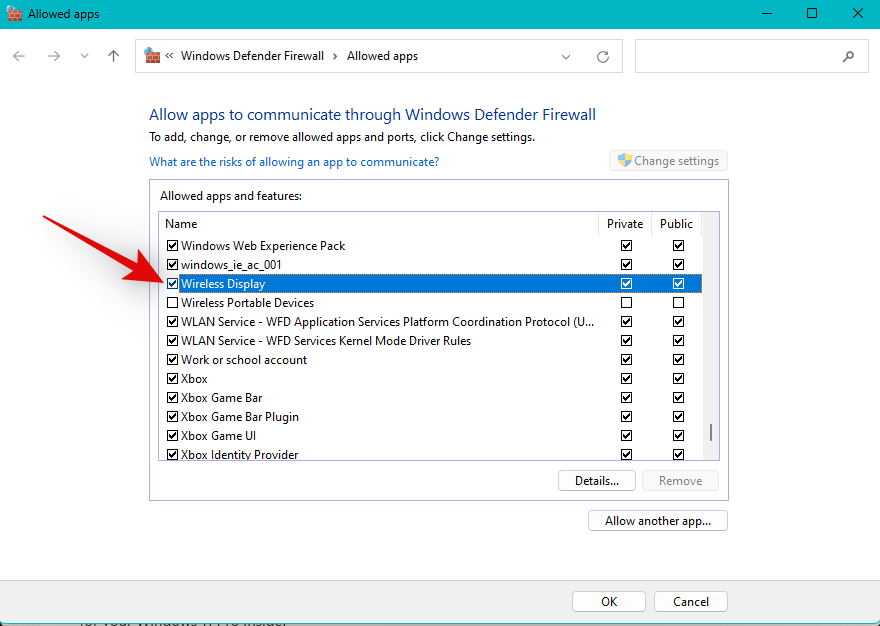
- Scroll the list and find Wireless Display. Check the box for the same if not already checked.
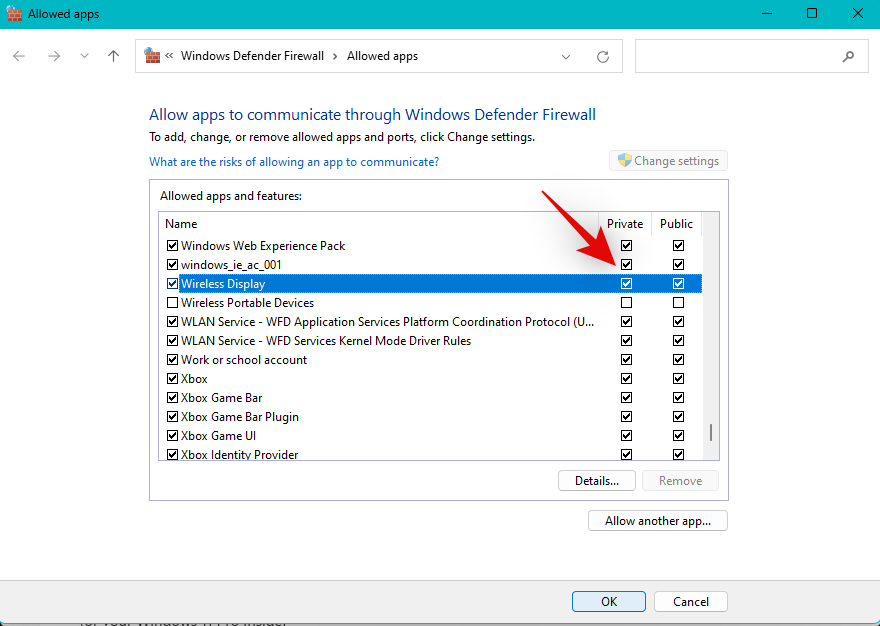
- Check the boxes for Public and Private as well.
- Click OK once you’re done.
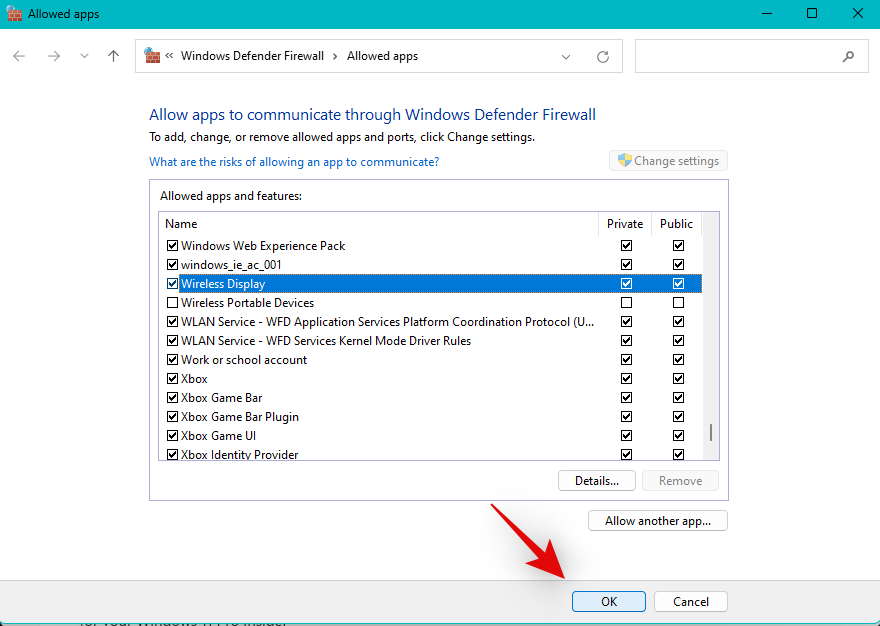
And that’s it! You will now have allowed wireless display through your firewall and you should now be able to project your screen as intended.
Fix 12: Disable any active VPN
VPN connections can sometimes interfere with wireless connectivity and prevent you from projecting your screen when using Windows 11. So disable any active VPNs on your PC and try projecting your screen again. If you’re able to project your screen then the VPN was likely causing issues on your system.
Note: This does not apply to VPN extensions for your browser.
We hope this post helped you fix issues with Wireless Displays on Windows 11. If you face any issues or have any more questions, feel free to reach out using the comments below.
RELATED



Removal avatar user owner in youtube studio removal