
What to know
- The Killer Wireless 1535 driver issue can be caused by network bugs on Windows 11.
- To fix the issue, disable the Prioritization Engine under ‘Quick Settings’ from the Killer Wireless Control Center.
- Select a different driver for your Network Adapter from Device Manager, preferably the Qualcomm driver.
- Other fixes include updating Windows, updating drivers, disabling Killer Wireless Control Center, and, if nothing works, using an ethernet cable to get back online.
Windows 11 is not without its issues, especially when it comes to network adapters. Several users face issues with their network adapters, specifically the Killer Wireless line from Intel. If you too have been facing driver issues or are unable to get your Killer Wireless card working at all, then here’s all you need to know about it.
What is Killer Wireless 1535?
Developed by Rivet Technologies and later bought by Intel, Killer Wireless 1535 is a WLAN or network card developed for gaming-oriented systems. The Killer Wireless list of cards boasts a long list of features including Bluetooth 4.1 along with dual-band support for both 2.4GHz and 5GHz.
Based on a Qualcomm chip, the Killer Wireless sports ExtremeRange technology for achieving a wide range of connections, minimal packet loss, and minimized latency when playing multiplayer games.
Why is Killer Wireless causing driver issues on my PC?
The problems with Killer Wireless are not new. For the last few years, it has been causing issues for multiple users on Windows 10, and the switch to Windows 11 seems to have made things worse. According to the Killer Wireless website, their drivers didn’t support Windows 11 when it was launched, which caused driver issues for many users who switched to Windows 11.
Microsoft also mentioned that it could be caused because of a network bug on Windows 11 that affected UDP. Outdated drivers and the absence of compatibility patches between the Killer Wireless software and Windows 11 could have resulted in major driver issues.
How to fix issues with Killer Wireless 1535 Driver
Here is a list of solutions that are known to fix Killer Wireless 1535 driver issues on most systems.
Method 1: Disable Prioritization
If you can access the Killer Wireless Control Center then this is the recommended fix for you. Wi-Fi prioritization is a feature in the Killer Wireless Control Center that uses Intel’s prioritization engine to identify ongoing network requests and prioritize them according to your current needs and requirements. This helps your network adapter automatically serve your multiplayer gaming connection needs first and address background network tasks later.
However, with outdated drivers and limited support, most Killer network cards seem to face issues with this feature on Windows 11. Hence we recommend disabling the same and restarting your system.
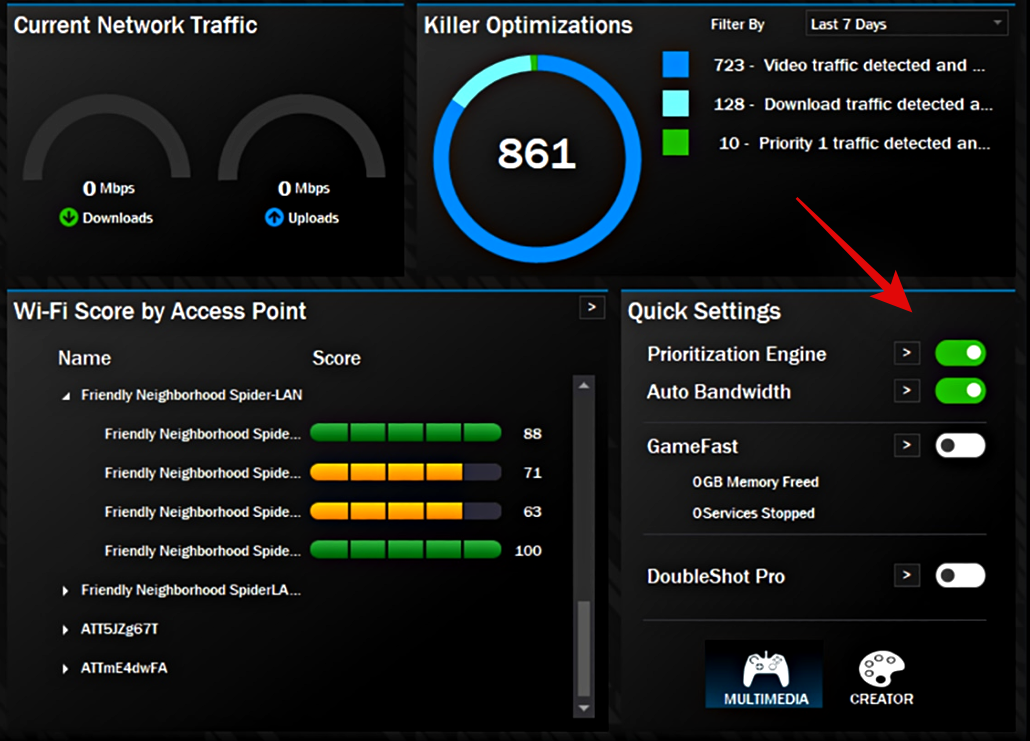
Launch the Killer Wireless Control Center and simply turn off the toggle for ‘Prioritization Engine’ in the Quick Settings widget. You can also turn off the same by clicking on Prioritization Engine at the top. Once turned off, restart your system, and Wi-Fi should be back up and running on your system again.
Method 2: Manually select a different driver for your Network Adapter
This is the next recommended fix, especially if you are facing driver issues with your Killer Wireless Network Adapter.
- Press
Win+Xand select ‘Device Manager’. - Find your Killer Wireless Network Adapter under ‘Network Adapters’ and click and select it. Press
Alt+Enterto open the Properties window.

- Switch to the ‘Driver’ tab by clicking on the same at the top.

- Now click on ‘Update Driver’.

- Click on ‘Browse my computer for drivers’.

- Now click on ‘Let me pick from a list of available drivers on my computer’.

- Click and select a new driver from the list. We highly recommend you give the Qualcomm drivers a shot as they seem to fix Wi-Fi issues on most systems. However, you can try all of them until you find the one that works the best for you.

- Click ‘Next’.

- Click ‘Close’.

- When prompted, click on ‘Yes’ to restart your PC.
Once your PC restarts, try connecting to a network again. In most cases, your Killer Wireless Network Adapter should now be back up and running again as intended on your system.
Method 3: Update Windows
Update Windows 11 to the latest Cumilitavie updates that bring official fixes from Microsoft to fix Killer Wireless driver issues on most systems.
Simply head to Settings > Windows Update > Check for updates to update your Windows 11 to its latest available version.

Note: If you haven’t updated your system in a while then you might need to install certain incremental updates before and then subsequently update again to get the latest version of Windows 11 running on your system.
Method 4: Update Wireless Drivers manually
The most obvious solution to fix a Driver issue is to simply update the drivers, so follow the steps below and see if it fixes the problem for you.
- Download the latest Qualcomm Drivers from this link.

- Open Device Manager again, click on your Killer Wireless Adapter, and hit
Alt+Enteron your keyboard.
- Click and switch to the ‘Driver’ tab at the top and then click on ‘Update Driver’.
- Choose the option to Manually look for drivers.

- Select the Qualcomm Drivers from the list and finish the installation.
Method 5: Update Wireless Drivers Automatically
If manually updating your drivers using the guide above did not fix this issue then we recommend you use one of the tools below.
Warning: We highly recommend you use third-party software to get driver updates as a last resort. Third-party software usually have questionable privacy policies, and although the tool linked below is open source, you can still end up installing incompatible drivers due to misidentified components which can seriously break your system and in the worst cases, brick your network card altogether.
5.1 Using Intel Driver & Support Assistant
- Visit the link above and click on ‘Download now’. Save the file being downloaded to a convenient location.

- Launch the .exe file we downloaded in the step above and click on ‘Run’ when prompted.

- Accept the license terms and conditions and click on ‘Install’.

- The installer will now download and install all the necessary files on your system. Once done, click on ‘Restart’ to restart your system.

- Once your system restarts, launch the ‘Intel Driver & Support Assistant’ from your Start menu.

- You will now be automatically redirected to a webpage where you can see compatible driver updates currently available for your system. Look for Wireless and Network adapter updates available for your PC and click on ‘Download’ beside it.

- The update will now start downloading and it should now be automatically installed on your system.
The latest update for Windows 11 Killer Wireless Network adapter should fix your Wi-Fi issues after a restart.
5.2 Using a third-party software
Windows update provides automatic updates for your drivers, but it won’t always provide you with the updates that you need. This is where third-party software can get automatic updates for the drivers on your PC/Laptop.
- Snappy Driver Installer | Download Link
- Visit the link above and click on ‘Download Latest Version’.

- A .zip file will now be downloaded to your local storage. Download it to a convenient location and extract the archive using your preferred utility. Once extracted, double click and launch the x64 .exe file.

Note: If you have a 32-bit system then you can use the other .exe file instead. - If prompted, allow the program to access your network.
- Now click on ‘Updates are available: SDI NNNNN and NN driverpacks’ at the top.

- You will now be shown a list of all the currently known driver updates available for your system. Click on ‘Check only needed for this PC’.

- The tool will now automatically detect your components and select the appropriate driver updates for your system. Once selected, look for any Network Adapter-related updates checked in the list. In case any are found, uncheck all the rest of the selections and click on ‘Ok’ at the bottom.

- SDI will now automatically download and install the selected drivers on your PC. Once done, close the program, and restart your PC.
Method 6: Disable Killer Wireless Control Center from Task Manager
- Press
Ctrl+Shift+Escto open the Task Manager. - Click on Startup from the top bar.

- Find and select Killer Wireless, and click on Disable.

- Follow the same process to disable any other Killer Wireless driver or software.
Method 7: Use Ethernet Cable to connect to the Internet
If none of the above-mentioned steps worked for you, there is still a last resort to help you get back on the internet. Though it may not seem very convenient, you can get the same speed out of your router if you are ready to connect your computer to your router via an Ethernet cable and get good internet speed without any hassle. Being a simple wired connection, it won’t have any dependency on the Killer Wireless Drivers and will provide you with the best possible speed without any throttling.
Method 8: Force Remove and Reinstall your drivers
Windows tends to hold and keep basic .inf files for components hidden in the background even if you uninstall them from the device manager. These driver files are used to provide basic functionality when you have no driver files installed or available for your system.
However, if you haven’t cleared your Driver Store in a while then you could have multiple Killer Wireless network adapter drivers on your system which could be conflicting in the background. As a last resort, we will now force remove them from your system, reset the CMOS battery, and then install the latest Killer Wireless Network Adapter drivers currently available for your system. Follow the guide below to get you started.
What you need
Make sure your PC meets the following criteria before proceeding:
- An Ethernet connection: This is the recommended option in case you have a LAN cable lying around. This way you can use the internet to get the latest available network drivers for your system.
- Latest Driver files for your Killer Wireless Network Adapter: You will need offline driver files and installation packages for your system if you do not have an Ethernet cable. We recommend you download the same from your OEM beforehand.
- DriverStoreExplorer: This is a community-built tool that allows you to force remove .inf files from your system. We will be using this to remove all your network adapter drivers.
Force Remove Drivers
- DriverStoreExplorer | Download Link
- Visit the link above and download the latest archive for DriverStoreExplorer linked on the page.

- Once downloaded, extract the archive and launch ‘Rapr.exe’ as an administrator.

- Click on ‘Driver Class’ column at the top to sort your drivers by their class.

- Now look for ‘Network adapters’ in this list and check the box for each driver that you find.

Warning: Ensure that you are only selecting drivers that you wish to remove. DriverStoreExplorer is quite a thorough tool that manages to bypass most failsafes when removing drivers, hence if you end up removing the wrong drivers then you can face serious hardware failure issues with your system. - Check the box for ‘Force Deletion’ on your right.

- Subsequently, click on ‘Delete Driver(s)’.

- Click on ‘Ok’ to confirm your choice. The selected drivers will now be deleted from your PC. Once done, close the app and turn off your system at the earliest.
Reset CMOS Battery
This is a recommended step that requires you to open up your PC or laptop to reset the CMOS battery. As this is an advanced step and you might be hesitant to open up your PC then you can skip it and continue with reinstalling your drivers using the guide below.
A CMOS reset helps reset your system components as well as drain capacitors that could be malfunctioning on your board. A CMOS reset will help your network adapter get a fresh start which when combined with a fresh driver update should help get everything working again.
Reinstall latest drivers
Now it’s a matter of simply installing your latest Killer Wi-Fi drivers. If you have an installer package then simply double-click the file and follow the on-screen instructions from your OEM to install the latest drivers on your system. However, if you have .inf files then you can use the guide below to manually install your drivers.
- Open Device Manager and click on ‘Add drivers’ at the top.

- Click on ‘Browse’ and select the folder on your local storage containing your .inf files.
- Once selected, click on ‘Next’.

- The .inf files will now be installed on your system. Once done, click on ‘Close’.

Restart your system for the changes to take effect. Then try connecting to a wireless network. If everything is working as intended then we recommend you skip the optional section below. However, certain network adapters need you to select a different driver depending on your manufacturer. Use the guide below to help you with this process.
Manually select your driver (optional)
If you wish to manually select a different driver then we recommend you use the guide at the top of this post. Multiple drivers for the same network adapter can exist depending on its components, specifications, and skew. Selecting a different one will help you fix driver conflicts and help you get everything back up and running on your system.
FAQs
With so much to do and fix, you are bound to have a few questions. Here are some commonly asked ones, to help get you up to speed with the latest developments.
Killer Wireless won’t work on Windows 11. Can I fix it by switching back to Windows 10?
Yes, you should be able to fix it by switching back to Windows 10. But you should try the solutions mentioned above and see if it fixes the problem. If your problems are fixed, then you won’t need to go through the pain of downgrading back to Windows 10 and would be able to enjoy the fresh feel and latest features of Windows 11.
Is it safe to change network cards to fix Killer Wireless issues?
Yes, it is safe to change the network card to fix Killer Wireless issues. But make note that opening your PC or Laptop on your own can void its warranty and wrong handling of the components can give you a minor to major level shock and could also damage your PC/Laptop. It is always advised to get any such components replaced by trained professionals.
Would uninstalling all Killer drivers fix the slow internet speed?
Yes, uninstalling the Killer Drivers might reset your internet speed. But this will be a temporary fix, cause Windows will anyway install the drivers to make the services function correctly. Rather than uninstalling, you can disable the drivers from launching by following the steps mentioned in the guide above.
We hope this post helped you fix Killer Wireless Driver issues on your system. If you have any suggestions, feel free to drop them in the comments section below.
RELATED:
- Minecraft Error 0x803f8001 Fix: How to Solve ‘Minecraft Launcher Installer’ Not Working Problem Easily
- How to Turn Off Sticky Keys on Windows 11 easily
- Windows 11 Outlook Search not working? How to fix
- How to Turn Off Password Windows 11 After Sleep: Disable Password on Wake Up
- Windows 11 Taskbar Empty Space: How to Get Performance Stats and More


3 responses to “How to fix the Killer Wireless 1535 Driver Issue on Windows 11”
Thank you soooooo much. FINALLY have my wireless card up and running!! Also was able to fix Fallout 76 from causing my CPU from maxing out by shutting down the prioritizing. You are all AMAZING!!! Thanks again. ??
A huge thankyou. After switching from Windows 10 to Windows 11, could not see wifi in Network window………tried everything from multiple websites until i came across this one. Method #2 manually selecting a Qualcomm driver from the list worked for me. Thanks again!
Thank You so much for your help. I had a major problem with the Killer WiFi Network Adapter that would not work. Dell as usual wanted loads of Money for something that they wanted installed in the computer, The network driver from Microsoft sorted the problem in a minute flat. Thanks Again