AirPods ushered in a new era of truly wireless earbuds back when it was released in 2016. Since then, many users worldwide have adopted them and they’re now an inseparable part of their daily lives. Like any electric device, there have been some audio stutter issues that users have faced from time to time.
In the following post, we’ll explain all the ways you can fix the AirPods audio stutter issues on an iPhone.
How to fix the audio stuttering issue with AirPods [13 fixes]
Here is a comprehensive list of fixes that you can use to fix audio stutters when using your AirPods.
Fix 1: Turn off Require Attention for Face ID
The TrueDepth camera process, which projects tons of invisible dots on your face to create a depth map, requires significant processing power and attention to your locally stored security data. This tends to cut audio when the camera is being used, which could mean create stutters cause of audio stutters. You can follow the steps below to fix this issue.
- Open the Settings app on your iPhone and tap Face ID & Passcode.
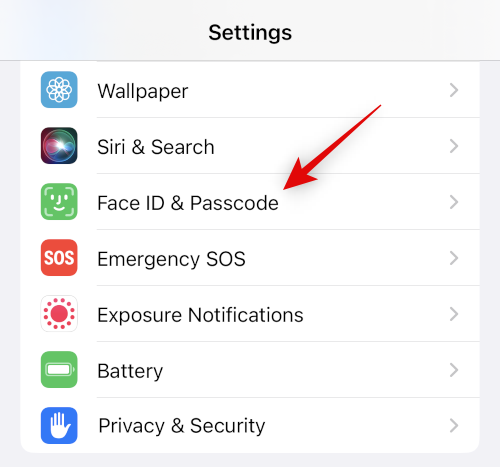
- Type in your passcode when you’re prompted. Now scroll down and turn off the toggle for Require Attention for Face ID.

- Tap OK to confirm your choice.

- Turn off the toggle for Attention-Aware Features.

- Now close the Settings app and restart your iPhone. Press and release the Volume Up button and then the Volume down button on your iPhone. Now press and hold the Sleep/Wake button and swipe on the slider at the top to restart your iPhone.

- Once your iPhone restarts, try using Face ID while playing media on your iPhone. Your audio should no longer stutter if the TrueDepth camera was the cause of your issue.
Related: How to turn off wallpaper on Always-on Display on iPhone
Fix 2: Re-pair your AirPods
You might face firmware bugs or a cache bug that is causing audio issues on your iPhone. Use the steps below to re-pair your AirPods with the iPhone.
- Open the Settings app while your AirPods are in use and tap Bluetooth.

- Tap the
 icon beside your AirPods.

- Now scroll to the bottom and tap Disconnect firstly.

- Once disconnected, tap
 again and tap Forget This Device.
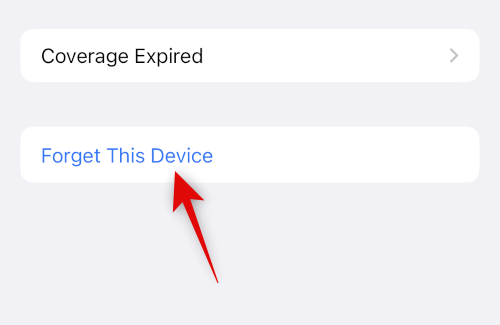
- Tap Forget This Device again to confirm your choice.

- We now recommend you restart your device. This will help register changes and help clear cache files to start afresh. Use these steps to force restart your iPhone.
Step 1: Press and release the Volume Up button
Step 2: Press and release the Volume Down button
Step 3: Press and hold the Sleep/Wake button till you see the Apple logo - Once your iPhone restarts, press and hold the back button on your AirPods till the charging indicator blinks white.
- Bring your AirPods near your iPhone, and you should get the option to Connect. Tap Connect and follow the on-screen instructions to customize your experience.
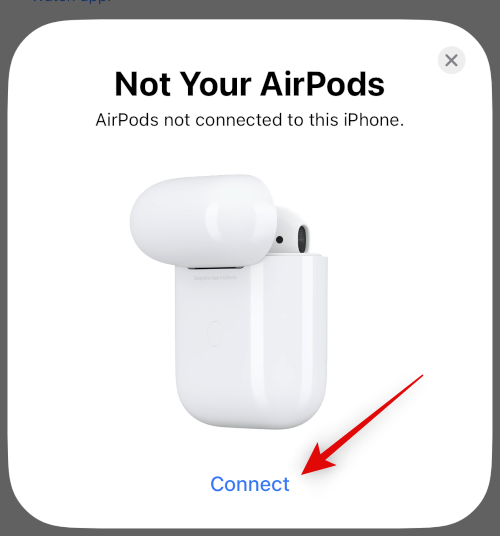
- Your AirPods will now have been re-paired to your device. You can now try playing media for a while to check for stutters. If you were facing issues due to cache files, bugs, or pairing issues, then stutters should now be fixed.
Related: How to automatically change wallpaper on iPhone
Fix 3: Use a wired connection if possible
Wired headphones might not be ideal if you love your AirPods, but they allow for high-fidelity audio, especially if you own a pair from a good third-party manufacturer. If you need to listen to something urgently or are desperate for some headphones, then a wired pair of headphones can definitely help you.
This can come in handy, especially if you’re experiencing a lot of stutters, as you might be facing a hardware issue with your AirPods. So if you’re desperate for some headphones urgently, a wired connection might just suit your needs better.
Fix 4: Try a Force Restart
A Force Restart for iPhones is the go-to way to troubleshoot and fix most device-specific bugs and errors you might be facing. A Force Restart helps clear cache files, restart background services, and re-register all your Apple ID services. This helps fix most issues and helps fix Bluetooth and Wi-Fi issues as well. If you’ve already force restart your iPhone when using the re-pair fix above, then you can choose to skip this step. Here’s how you can force restart your iPhone.
- Press and release the Volume Up button
- Press and release the Volume Down button
- Press and hold the Sleep/Wake button till you see the Apple logo
- Once you see the Apple logo, you can let go of the Sleep/Wake button and let your iPhone restart normally.
- Once your iPhone restarts, try using your AirPods again.
If you don’t experience stutters, then you are likely facing issues with the background Bluetooth service or cache files on your iPhone.
Fix 5: Reset network settings
You can now try resetting your network settings. This will reset your Bluetooth, Wi-Fi, and NFC settings which should hopefully fix audio stutters on your iPhone. Keep in mind that you will lose all your saved Bluetooth devices and Wi-Fi passwords once you reset your network settings. We recommend you back up the necessary passwords and other details before proceeding with the guide below. Let’s get started.
- Open the Settings app and tap General.

- Scroll down and tap Transfer or Reset iPhone.
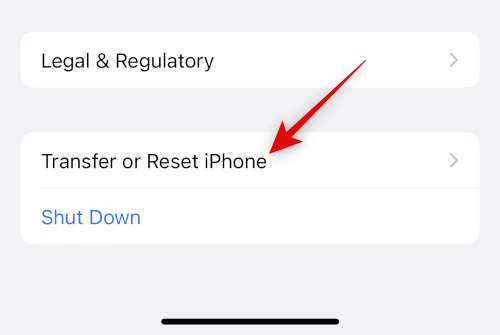
- Now tap and select Reset.
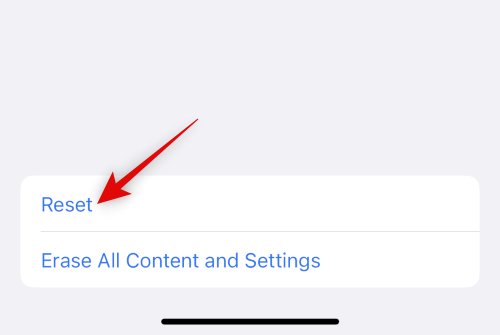
- Tap and select Reset Network Settings.
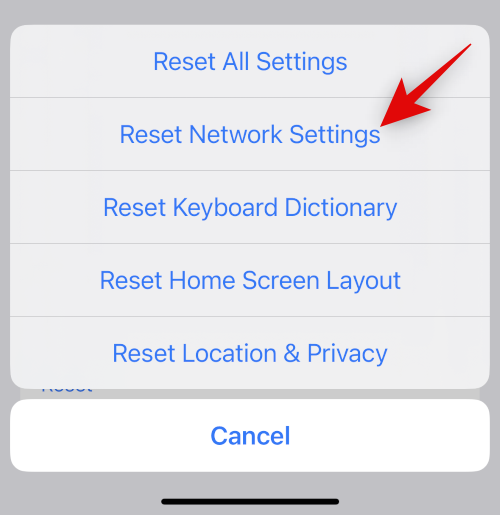
- Type in your passcode once you’re prompted by your device.

- Tap Reset Network Settings again to confirm your choice.
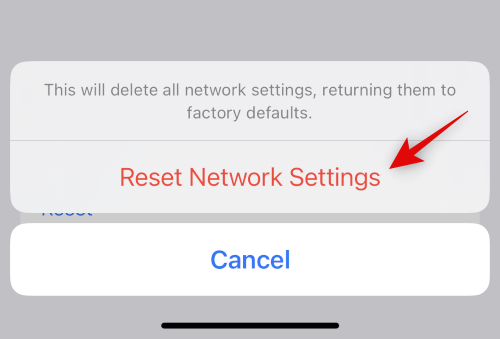
- Your iPhone will now restart, and all network settings will be reset. Once the process completes, pair your AirPods to your iPhone again and try listening for audio stutters. If you need help pairing your AirPods again, use Fix 2 to help you along with the process.
Fix 6: Reset all settings
If resetting your network settings did not help, we recommend you try resetting all settings on your device. You could be facing conflicts and bugs in the background, and resetting all settings should help you fix audio stutters. Use the steps below to help you with the process.
- Open the Settings app on your iPhone and tap General.

- Scroll down and tap Transfer or Reset iPhone.

- Now tap Reset.

- Tap and select Reset All Settings.
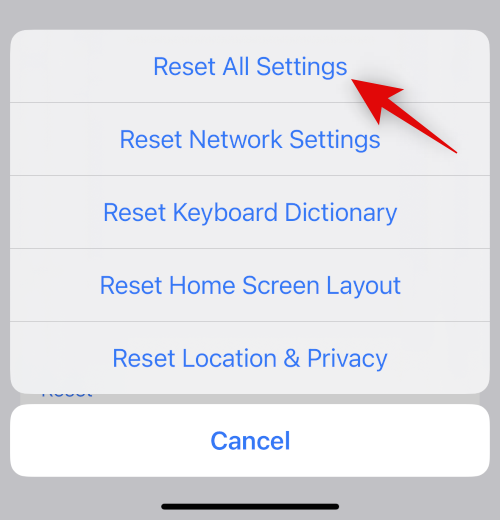
- Type in your passcode to confirm your identity.

- Tap Reset All Settings again to confirm your choice.
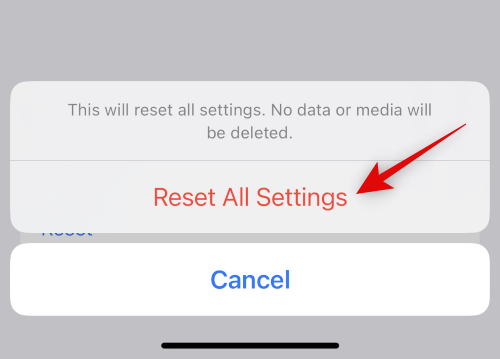
Your iPhone will now restart, and all your settings will now be reset. Once the process completes, re-pair your AirPods and try playing something. If you no longer experience stutters, then you are likely facing issues due to settings conflicts or background bugs.
Fix 7: Switch Airplay output devices
Airplay is a great way to switch between devices, share your audio with your friends, and much more. Sadly AirPods can sometimes face issues switching between each AirPod, especially if you own multiple devices. Simply switching between Airplay devices temporarily can help fix this issue. Here’s how you can do that.
- Open any audio or video streaming service and play a song or video to test Airplay. If you’re currently experiencing stutters, then switch to the currently playing media. Let’s take a look at a YouTube video for this example.
- Now, if you’re streaming audio, tap the Airplay icon, which is usually near the playback controls. If you’re watching a video, tap the Airplay icon in the bottom right corner.

- Tap and select iPhone.
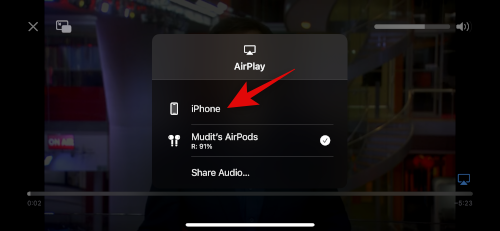
- Wait for the audio to switch to your iPhone’s speaker. Now tap and select your AirPods again.
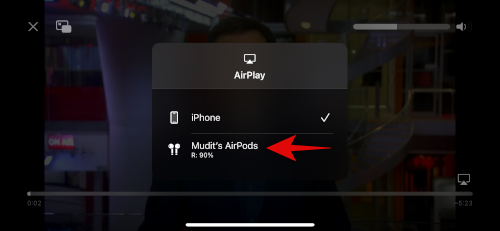
The audio will now switch back to your AirPods, and you should no longer experience stutters anymore.
Fix 8: Reset AirPods and then pair them again
Resetting AirPods can help fix firmware bugs and more that you might be facing. Here’s how you can reset and re-pair your AirPods.
- Start by placing your AirPods back in their case and closing the lid.
- Wait a minute or two (minimum 30 seconds), and then open the lid again.
- Bring your AirPods near your iPhone, and once they’re connected, wear the AirPods again. Do not close the lid just yet.
- With the lid open, head to the Settings app on your iPhone and tap Bluetooth.
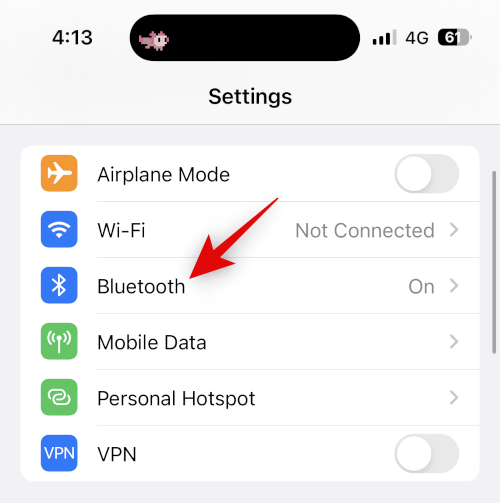
- Now tap the
 icon beside your AirPods.
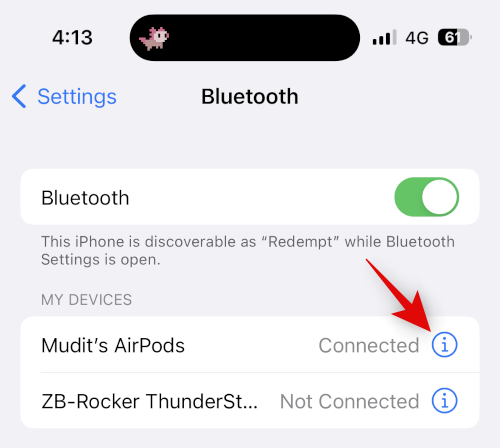
- Scroll down and tap Forget This Device.

- Tap Forget This Device again to confirm your choice.

- Once your AirPods have been unpaired, place them in the case while your device is near them and showing the battery levels.
- With the lid open, press and hold the setup button on your AirPods now till the status light first flashes amber and then flashes white.
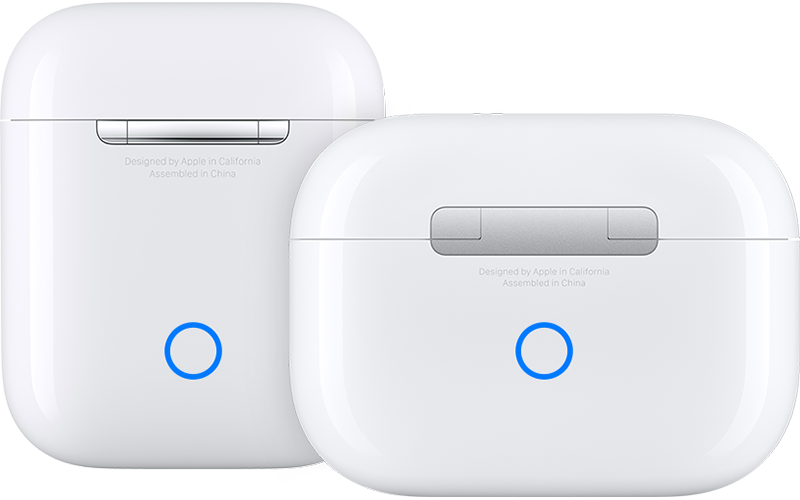
- Once the lights have changed, close the lid and wait a while and open the lid again. The AirPods will now show up with a generic name asking to pair with your device again.

And that’s it! You will now have reset your pair of AirPods, and you can now pair them with your device again and try checking audio playback. If you no longer experience stutters, then you are likely facing firmware bugs with your AirPods.
Fix 9: Turn off Bluetooth if you own multiple Apple devices
It could be that your AirPods are defaulting to a nearby Apple device you own associated with your Apple ID, regardless of manually trying to pair them with the current device. This can be caused due to settings conflicts, background bugs, and more. A good way to diagnose such issues is to turn off Bluetooth for all devices except the one where you’re facing connectivity and audio stuttering issues.
Now try connecting your AirPods and playing any media. If you do not experience stutters anymore, then another device you own is likely facing a bug and constantly trying to switch to your AirPods. If you suspect that you’re facing a similar issue, then we recommend you adjust your AirPod settings to not automatically connect to your nearby devices. Follow the steps below to help you along the process.
- Open the Settings app on your device and tap Bluetooth.

- Now tap the
 icon beside your AirPods. Ensure that they’re currently connected to your iPhone to be able to adjust your AirPod settings.

- Scroll down and tap Connect to This iPhone.

- Tap and select When Last Connect to This iPhone.

And that’s it! Your iPhone will now automatically connect to your last-used devices and not nearby devices. If, however, you still end up experiencing stutters, we recommend you try the fixes listed in this guide on all your other devices if this happens to be the case for you.
Fix 10: Try turning off Automatic Ear Detection
Automatic Ear Detection is a great feature for AirPods that helps detect when an AirPod is removed from your ear. This feature helps intelligently manage playback when using and switching between the left and right earpod, it helps switch between mics intelligently when on calls, and it helps your iPhone detect and pair to AirPods automatically.
In case the sensors used for Automatic Ear Detection face damage or hardware issues, your AirPods can incorrectly detect when they are being worn or not. This can play and pause your music playback, which can cause audio stutters and more. We recommend you temporarily turn off Automatic Ear Detection to try and fix audio stutters. Use the guide below to help you along the process.
- Open the Settings app on your iPhone and tap Bluetooth.

- Now connect your AirPods with your iPhone and tap the
 icon beside your AirPods.

- Turn off the toggle for Automatic Ear Detection.
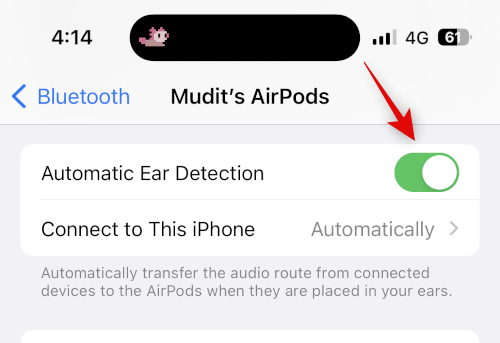
- Now close and reconnect your AirPods and try playing a song or video again. If you no longer experience stutters, then I recommend you get your AirPods checked, as you likely have a failing sensor on either bud.
Fix 11: Check your AirPods battery life
Do your AirPods lose charge easily? Do you experience diminished battery life since the first time you bought your AirPods? These all and more could be indications of a failing battery in either bud or your case. Diminishing batteries are known to cause connectivity issues, and you could likely be experiencing stutters due to the same.
We recommend you time how long your buds last on a full charge and then compare it to the official battery lifetimes published by Apple. You can refer to the claimed battery life for each AirPod generation mentioned below for your convenience.
- AirPods Gen 1: 5 hours of music playback and 2 hours of talk time on a single full charge.
- AirPods Gen 2: 5 hours of music playback and 3 hours of talk time on a single full charge.
- AirPods Gen 3: 6 hours of music playback and 4 hours of talk time on a single full charge.
- AirPods Pro Gen 1: 4.5 hours of music playback and 3.5 hours of talk time on a single full charge.
- AirPods Pro Gen 2: 6 hours of music playback and 4.5 hours of talk time on a single full charge.
Keep in mind these numbers are estimates and rely on various factors, including AirPod-specific features like Spatial Audio, Active Noise Cancellation, and more. We recommend you check the product pages linked above for more information.
Fix 12: Test AirPods with another device
We now recommend you test your AirPods with another device, preferably an iPhone. If your AirPods work as intended, then you are likely looking at issues with your iPhone’s Bluetooth capabilities. In such cases, we recommend troubleshooting your iPhone by resetting it to factory defaults and setting it up as new.
You can then test your AirPods by playing audio for a while. If you don’t experience any stutters, then you are likely facing issues due to leftover files and your previous iOS installation. We now recommend you selectively restore your backup while testing your audio to identify apps and services that might be causing stutters when playing audio over your AirPods.
Fix 13: Try another streaming service
Lastly, it could be an issue with the music streaming service you’re trying to use on your iPhone. App updates or recent iOS updates might have caused issues and glitches with the new app, which might be causing stutters on your iPhone. We recommend you try using a different service or, better yet, a video in your mobile browser to verify its functionality.
If you still face audio stutters when using AirPods, then it is likely an issue with your iPhone. In such cases, we recommend you try the last resorts mentioned below. However, if audio only seems to stutter in the app or service you regularly use, then we recommend you try switching to a different service for now. An upcoming app update will likely fix this issue. We recommend you fill in the appropriate feedback with the app developers to ensure that they are aware of this issue.
If nothing helps, contact Apple Support
We now recommend you try and contact Apple support. You could be facing an issue that might be affecting just your device due to your unique setup.
In such cases, an Apple support technician can help you diagnose and fix the issue on your device. They can also help you diagnose hardware issues and suggest re-pairs automatically. Use the guide below to help you contact the Apple Support service in your region.
We hope this post helped you fix audio stutters on your iPhone when using AirPods. If you face any more issues or have questions, feel free to reach out using the comments below.
RELATED
- 14 ways to fix Bluetooth audio not working on iPhone or iPad issue
- How to turn Ringer on iPhone with or without the Ring/Silent button
- Notification badges missing on iPhone? 7 ways to fix
- How to access files on iPhone


Can I please just say y’all are my heroes? I’ve had issues with stuttering across multiple phones and AirPods and could not figure it out. Came to your article, #1 seems to have fixed my problem. I knew it had to be a setting because it had happened across my previous iPhone and AirPods. But I could not figure out what it was. THANK YOU!