Like every other app, Gmail Android app has many cool features that are hidden in plain sight. Even if you spend a lot of time inside the app, you might not have explored everything it has to offer. With this in mind, I’d love to share Gmail Android app tips and tricks that will benefit you.
Let’s go!
- Get only Important notifications
- Get custom notifications
- Turn on Dark mode
- Delete email search history
- Change inbox categories
- Snooze an email
- Easily switch accounts
- Schedule your emails
- Recover deleted emails
- Bookmark an email
- Mark message as unread
- View all unread messages
- Use Gmail search operators
- Pull down to refresh
- Move to next message with a swipe gesture
- Change swipe action to delete in the conversation list
- Disable swipe action
- Use rich formatting in your emails
- Save attachments directly to Google Drive
- Insert files from Google Drive without leaving Gmail app
- Send money through Gmail Android app
- Shortcut to select multiple items
- Add action confirmations
- Keep a custom tone for each Gmail account
- Custom tone for the label
- View sender details
- Send a Hangouts message from Gmail app
- Enable vacation responder
- Add non-Gmail accounts to the Gmail app
- Using Widgets for a clean Inbox
- Create a multi-line Signature
- Saving the extra space
- Custom Swipe actions
- Reminders with Nudges
- Break down email Conversations
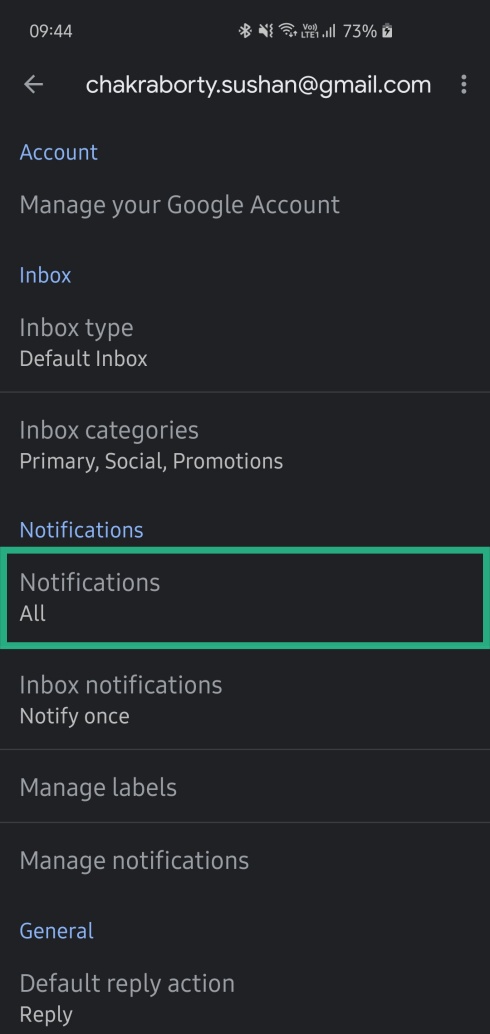
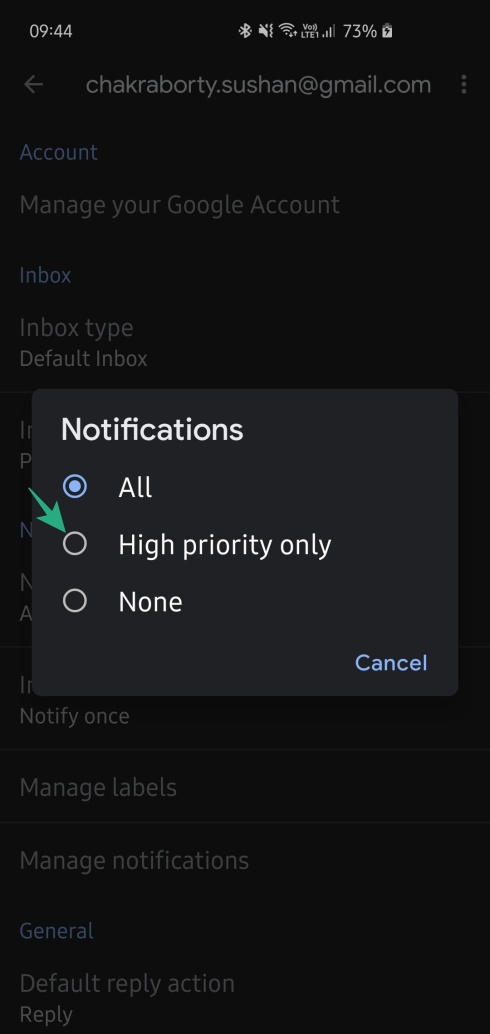
Get only Important notifications
Almost every other website asks us to log in with our email IDs, which they later use to send promotional emails or even spam. While some of these emails come in quite handy from time to time, others do nothing but generate unnecessary notifications. If you are tired of checking unnecessary emails from irrelevant merchants, you can try toggling on Gmail’s high priority notifications, which only notifies you of emails automatically marked as Important.
Here’s how to toggle it own:
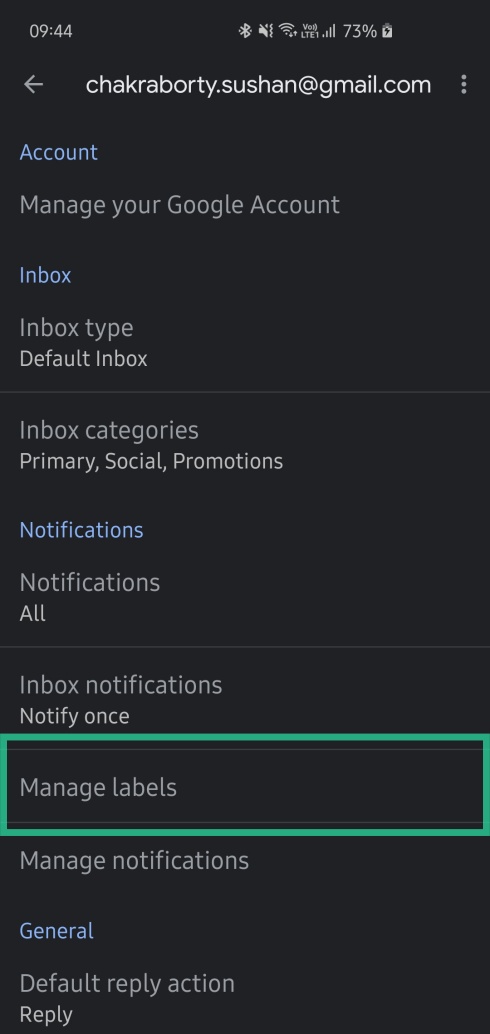
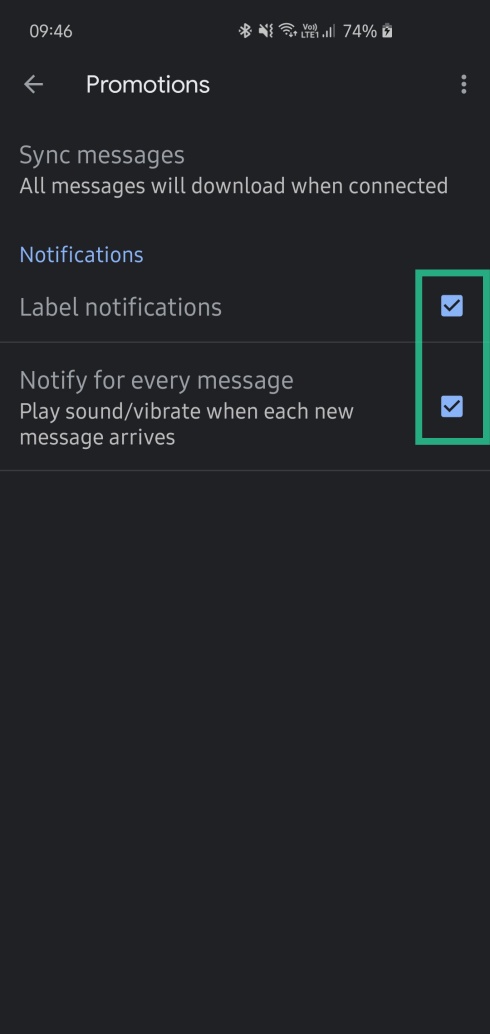
Get custom notifications
As mentioned in the section above, Gmail has a dedicated notification hotkey for all your important emails. However, if you want to be notified of emails belonging to other labels, you’ll have to do the dirty work yourself. Thankfully, this, too, is far from complicated. Follow these steps below to turn on notifications for other labels.
Turn on Dark mode
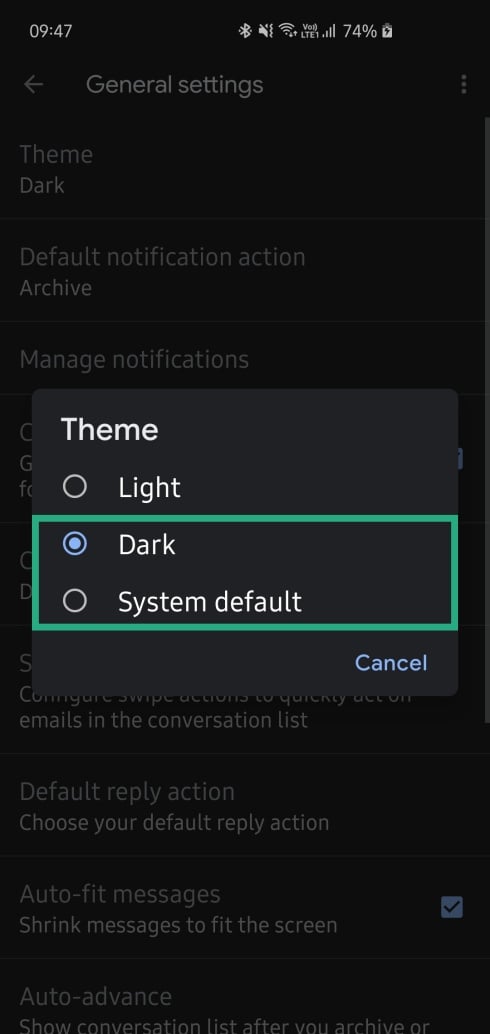
Google’s latest operating system for mobile devices, Android 10, has globally introduced the highly-anticipated Dark mode. For devices that came out in 2018 or later, the Android 10 update has been a blessing. However, there are many devices that aren’t scheduled to get the latest version of Android. Thankfully, instead of leaving them hanging, Google has released Dark mode individually for most of its leading applications. And Gmail was one of the first ones to receive it.
Follow these steps to turn on Dark mode in Gmail.

Delete email search history
All of us are pretty concerned with our browser search history and do pretty much everything in our power to keep it clean. When it comes to emails, however, we fail to follow the same routine. Email searches, too, can reveal a bunch of sensitive information, and we should, at the very least, know how to get rid of our search information whenever we need to.
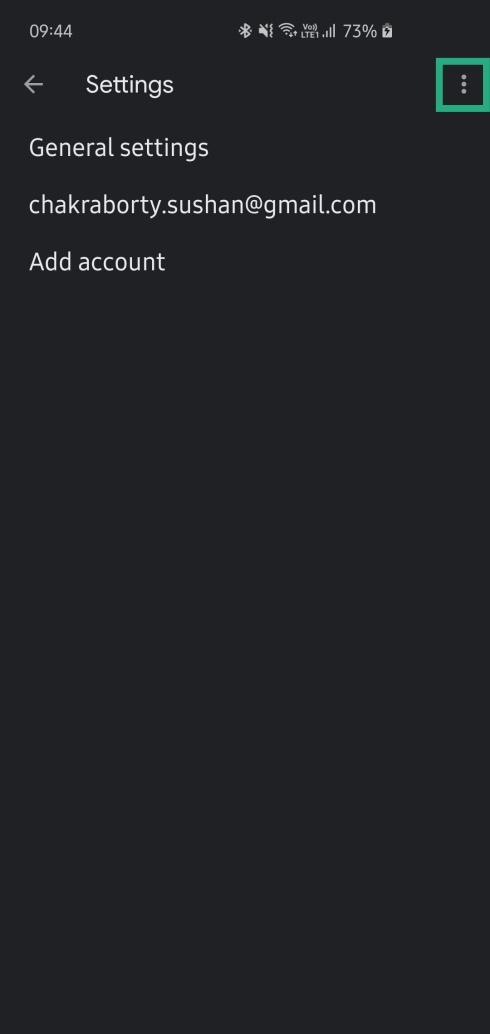
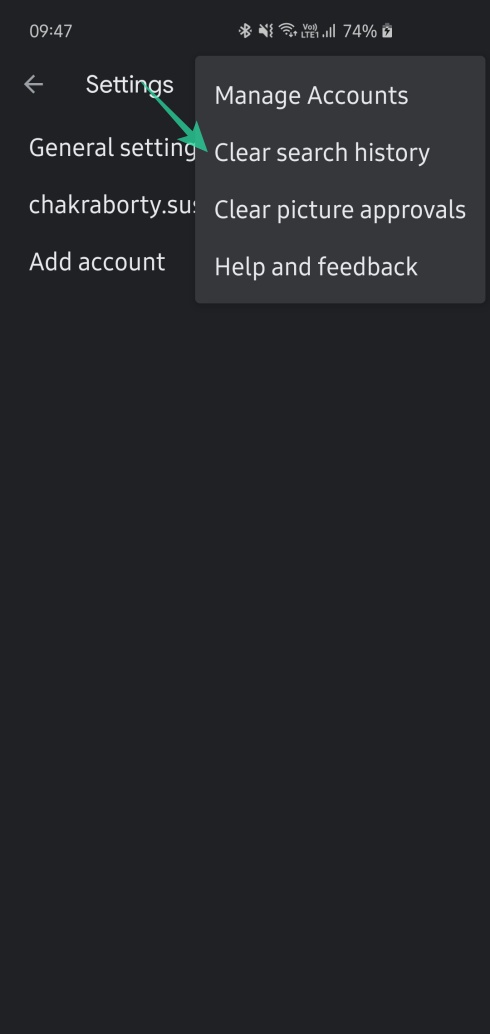
Here are the steps to follow if you want to get rid of your email search history.

Change inbox categories
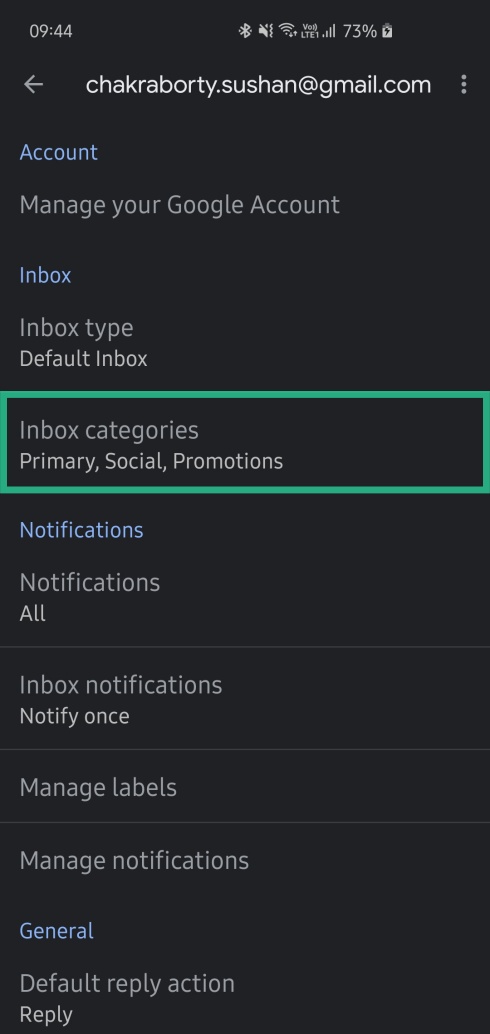
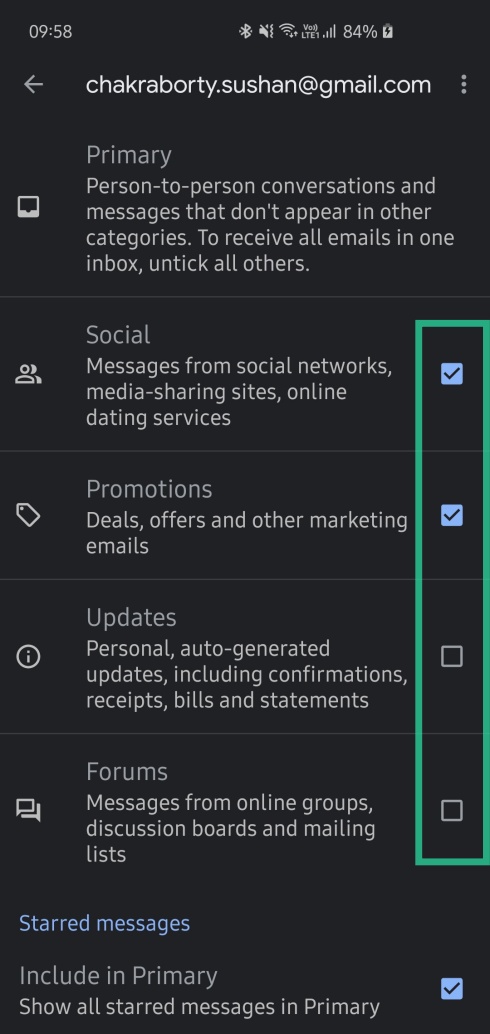
By default, Gmail sorts our emails in three spaces — Primary, Promotion, and Social. The first category is reserved for emails from people and relevant services, while the second and third are reserved from promotional offers and social media notifications, respectively. These three categories are generally the most useful, but Gmail also allows you to create your own platter by picking the segments that mean the most to you.
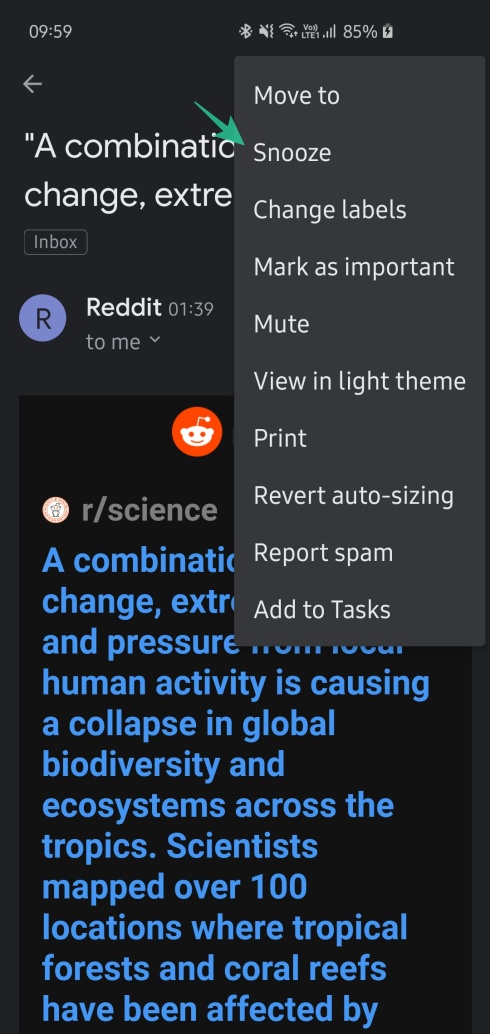
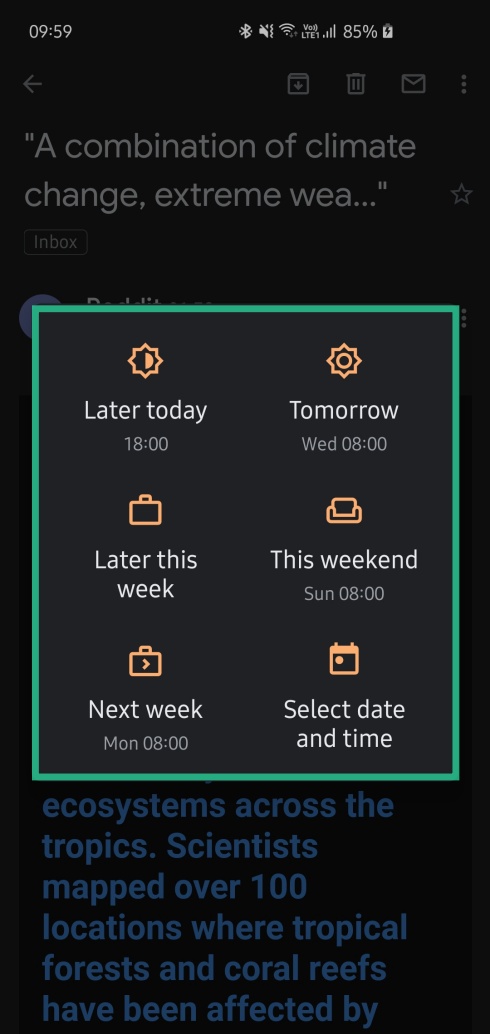
Snooze an email
If you’re forced to deal with a bunch of emails every day, keeping track of the important ones and responding to them can be a bit of a challenge. To remedy that, you can try to make use of Gmail’s snooze functionality. Just how you would snooze an alarm, you can instruct Gmail to notify you of an email at a later time or date. And when the time comes, Gmail will greet you with the notification, enabling you to take care of it as you see fit.

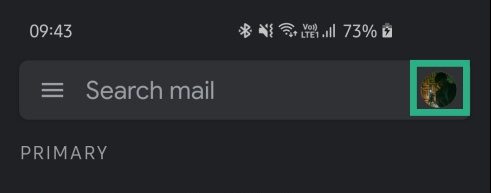
Easily switch accounts
As you might already know, Gmail allows you to add multiple accounts, even from clients other than Google. Not only does this feature makes it super easy to keep an eye on all your accounts, but you also get a quick toggle to shuffle between them.
To jump from one account to another, all you need is a simple swipe gesture. Yes, just locate your Google profile picture at the top-right corner and perform a swipe-down gesture. The Gmail inbox will now reflect one of your other accounts.
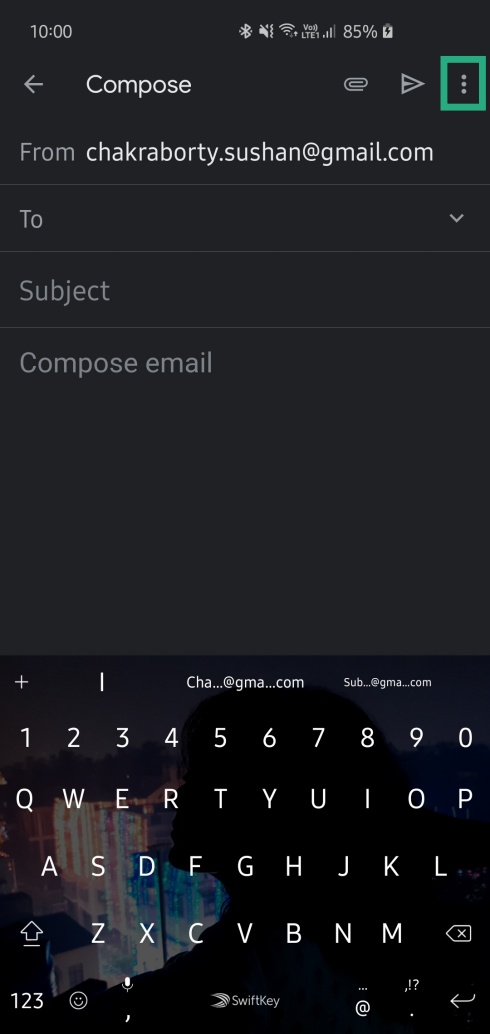
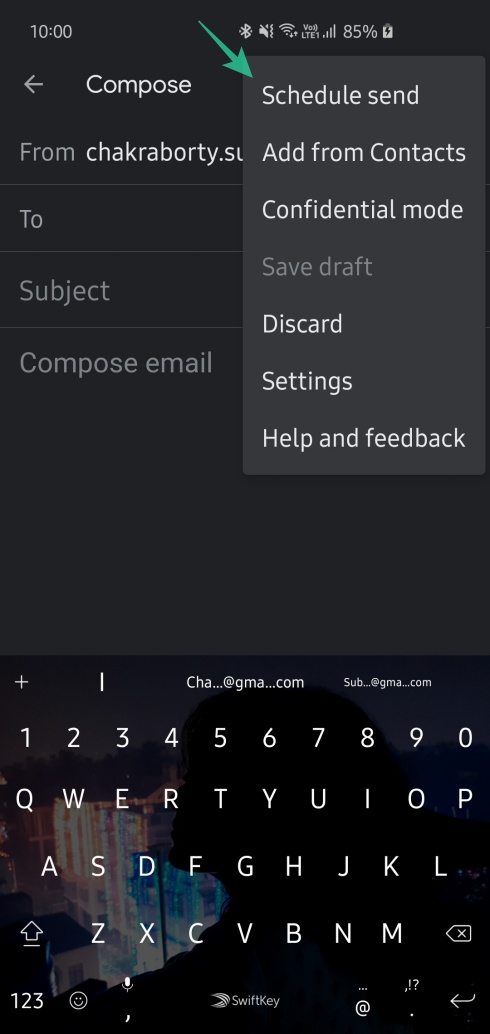
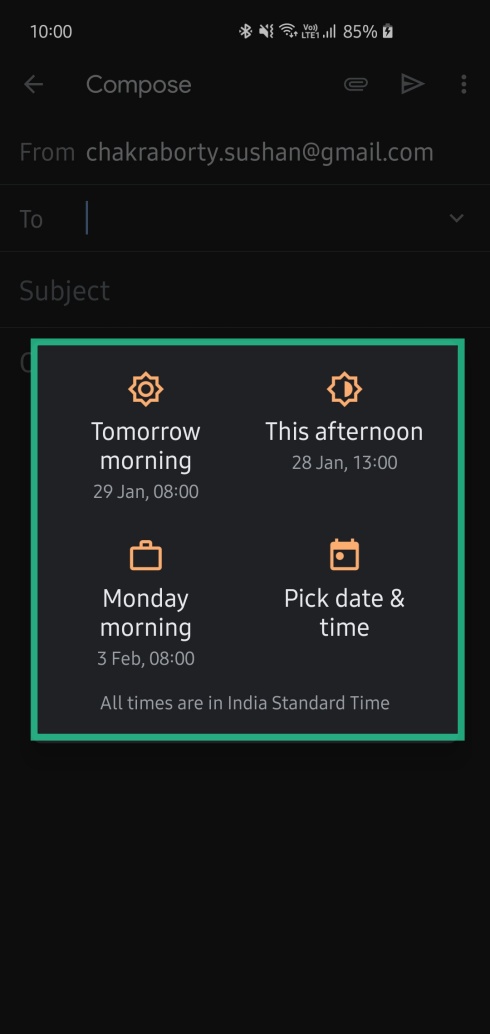
Schedule your emails
We’ve already dealt with the art of snoozing an email. Now, we are concentrating on something, which may very well be one of Gmail’s best features, ever. Yes, the leading email client in the world lets you schedule your emails and delivers them efficiently exactly when you need it.
Here’s how to schedule your emails with a couple of simple taps:
 Recover deleted emails
Uh-oh! So you accidentally deleted a very important email and don’t have its copy with you (Why would you? No one keeps a copy of an email). Anyway, what do you do? How do you save your life?
Well, after you delete an email it goes to the “Trash” folder where it is deleted after 30 days unless you manually remove it from the Trash. So, yes, your deleted email will be in the “Trash” folder of your Gmail account.
Also read: Google Assistant Tips and Tricks.
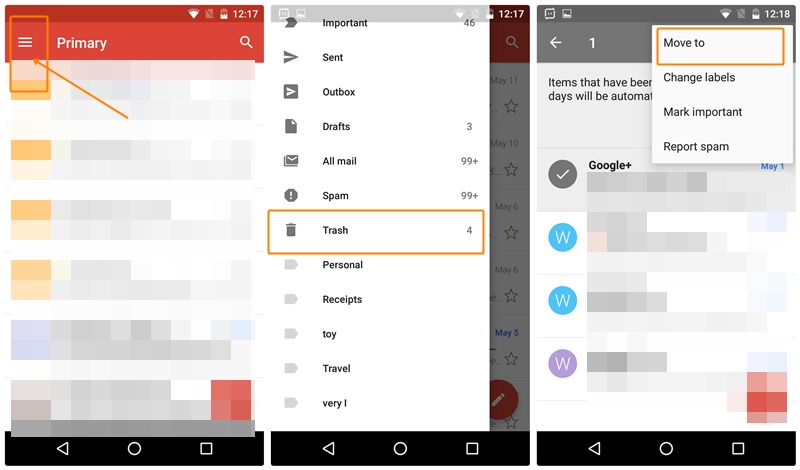
To access the trash folder and recover deleted emails, follow the steps:
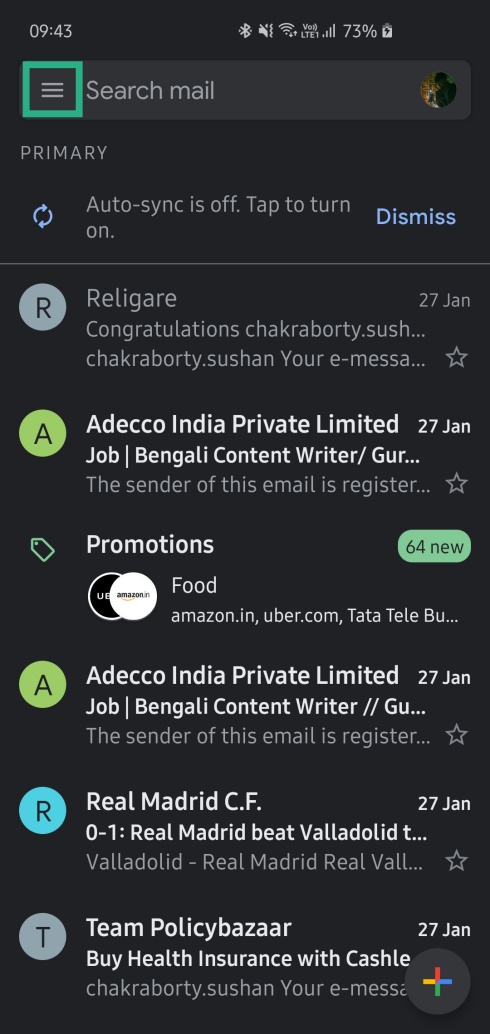
- Open Gmail app and tap the ≡ menu present in the top left corner to open navigation drawer.
- Scroll down and tap the Trash button.
- Long touch the mail that you want to send back to the inbox and tap the three dots present in the top right corner.
- Tap on the Move to button and select your preferred folder from the pop-up menu.
- Tap the OK button.
Once you tap OK, go to the folder that you selected above, you will find your deleted mail there.
Bookmark an email
Our inbox is flooded with emails. Notice how I said “our” because I know it’s not just me (I hope so). Even after having smart categories – one that organizes emails into primary, social and updates, it’s cumbersome to find an important email when you need it.
Also read: Cool hidden features of your Android device
So, how about bookmarking an email? The feature is not called “bookmark” in Gmail, rather it goes by the name “star” – starring an email. When you star an email, all your starred emails are present in a separate folder “Starred”. It’s easy to star a message and apparently, it’s right there next to every email, yet very few people use it.
To star an email, tap the star icon next to the email that you want to star or move to starred folder.
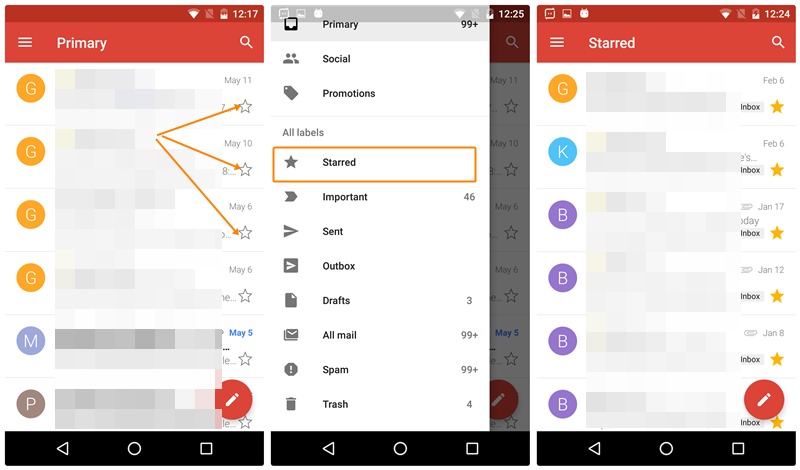
To access starred folder,
- Tap the ≡ menu present in the top left corner to open navigation drawer.
- Scroll down and tap ‘Starred’. You will find your starred emails there.
Mark message as unread
Many times when you get a new mail, it’s difficult to reply at that moment. To avoid the unfortunate incident of not replying, you can keep a visual reminder for yourself by marking the message as unread. Like all unread messages, this email will also appear in bold. So, next time when you open your email account to check email, you will see the unread email.
Also read: How to scan documents using Android phone and store them online for easy access.
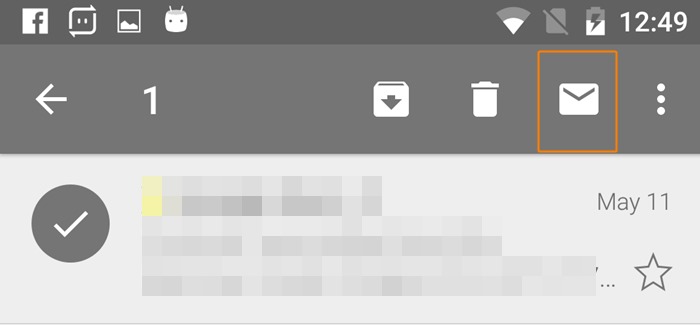
To mark an email as unread, follow the steps:
- Open Gmail mobile app.
- Press and hold the mail that you want to keep as unread.
- You will get multiple options in the top bar. Tap the third ’email’ icon from left to mark it as unread.
View all unread messages
Regardless of how easy it sounds to “view all unread messages”, there is no dedicated button to do it. If you have never felt the need to use it, you might not have noticed it, but folks who regularly use Gmail know how irksome it is to live without that button.
Also read: How to secretly record voice on your Android device
To make your life easy, we present to you a very simple tip to view just your unread items. To do so,
- Open the Gmail app and tap the search icon.
- Type is:unread and hit enter.

Woah! Gmail will then return all your unread messages.
If you want you can be more specific by adding search terms, which brings us to our next tip.
Use Gmail search operators
I’m presuming you already know that you can search for an email by sender’s email id, subject, or words that appear in the body, but if you want to narrow your Gmail search, you can use Gmail search operators. There are many search operators, which you can use in Gmail to create very specific searches.
Also read: How to do Google reverse image search on Android
The search term “is:unread” that we mentioned in the previous tip is also a search operator. If you want to find a particular email that is unread and has term “Android” in it, you can search for “in:unread Android”, where Android is the search term that you are looking for.
Similarly, if you want to find an email that is older than one year you can use the search operator like “older_than:1y”.
Here are some other useful search operators:
- From:
Example: from:SRK
- Subject:
Example: subject:dinner
- filename:
Example: filename: meeting.txt
You can check the full list of operators here.
Pull down to refresh
Like most of the Android apps, even Gmail supports pull down to refresh. Simply drag down from the top of your screen to refresh your feed. This tip comes handy when you are waiting for an email, and Gmail doesn’t refresh automatically.
Move to next message with a swipe gesture
Gmail for Android lacks next and previous button that allows you to move to the recent thread. Usually, we hit the back key when we want to move to the next or previous message. However, there is a simple way that allows you to move to the next message. All you need to do is a swipe.
Also read: How to find the version number of an app installed on your device
Yes, swipe. You can swipe from left to skip to a more recent thread or from right for an older one in the individual email thread.
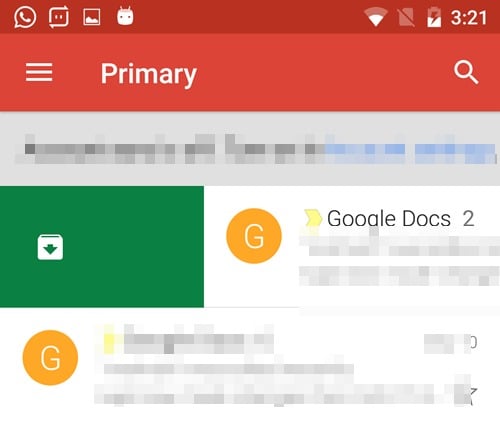
Change swipe action to delete in the conversation list
You might have noticed that when you swipe a message thread in conversation list, you get an option to archive it by default. You can change the swipe action to delete. This gesture makes it easy to keep your inbox clean (you wish).
To change the swipe action, follow the steps:
- Tap the ≡ menu present in the top left corner to open navigation drawer.
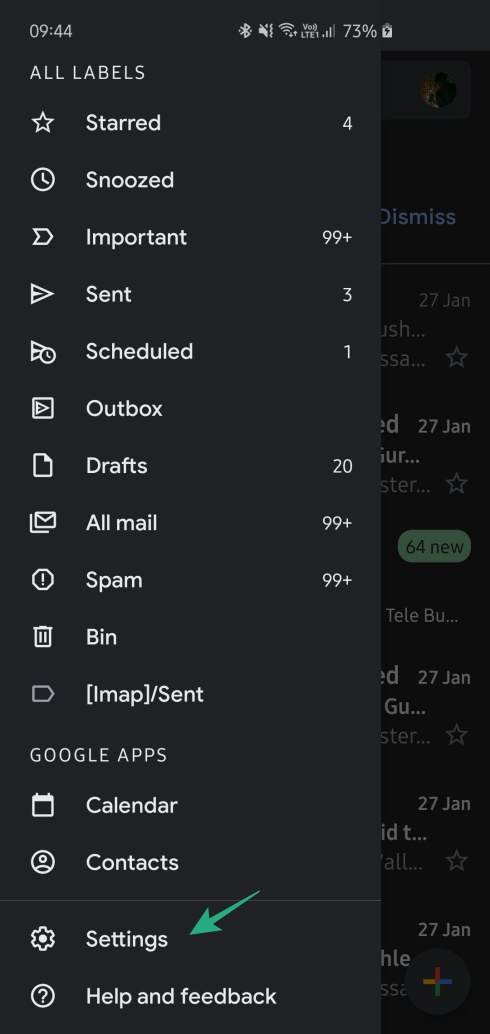
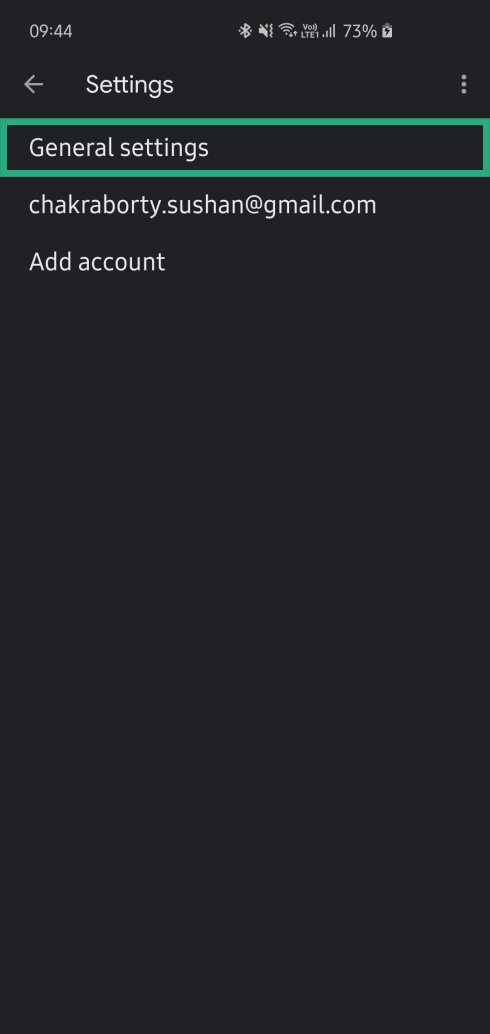
- Tap the Settings menu followed by General Settings.
- Tap ‘Gmail default action‘ and select ‘Delete‘ from the pop-up menu.

Disable swipe action
However, if you don’t trust your fingers and believe that you would accidentally swipe the email and delete it or archive it, you can disable the swipe action altogether. Meaning, when you disable swipe action, you no longer would be able to delete or archive an email using swipe gesture.
Also read: Useful WhatsApp tips and tricks that you should know
To disable swipe action, follow the steps:
- Tap the ≡ menu present in the top left corner to open navigation drawer.
- Tap Settings followed by General Settings.
- Unmark ‘Swipe actions‘ to disable swipe actions in conversation list.

Use rich formatting in your emails
Awww! So cute of you to think that Gmail Android app does not support rich formatting tools. It does my friend. It does. Although kind of tucked away, the formatting bar still exists.
Also read: What’s the difference between Facebook Stories and Messenger Stories
To access the formatting bar, long press the text that you want to format and select ‘Format‘ from the menu.

In case you are wondering, Gmail for Android supports following formatting options:
- Bold
- Italic
- Underline
- Text color
- Text background color
- Clear formatting
Save attachments directly to Google Drive
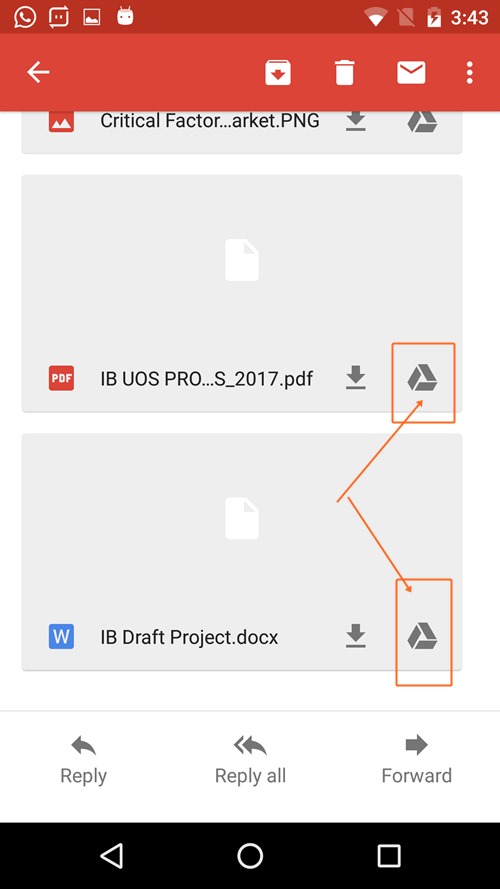
Google has integrated Google Drive in its Gmail Android app, which makes it easy-peasy to save incoming media files directly to Google Drive. All you need to do is tap a single button and boom, your file will be synced to your Google Drive.
Also read: How to sync a local folder with Google Drive on your Android device
To save a file to Google Drive account, follow the steps:
- Open the email on Gmail Android app whose attachment you want to download to Drive.
- On the attachment, you will find two icons, ‘Download‘ and ‘Google Drive‘ icon. Tap the Google Drive icon and it will be sent automatically to your Drive account.
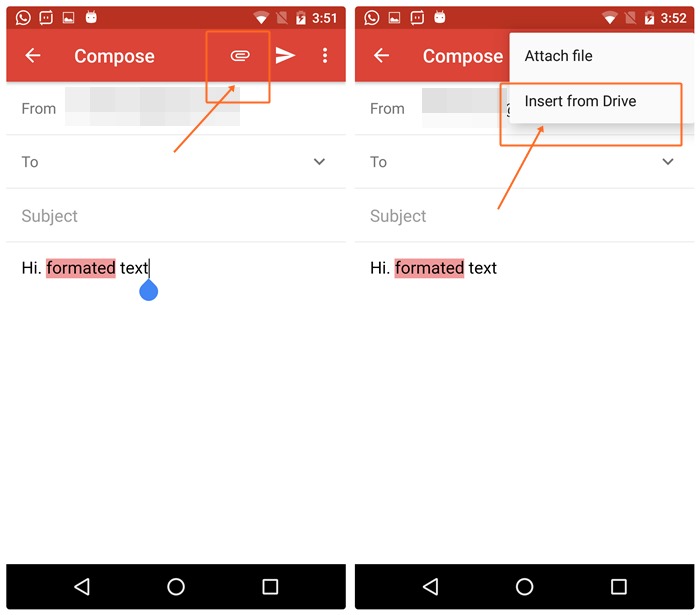
Insert files from Google Drive without leaving Gmail app
Similar to the above tip, you can insert a file present in Google drive from within the Gmail app. You don’t need to download files from your Google Drive and then upload them again, Gmail allows you to directly insert files from Google Drive, without leaving Gmail app.
Also read: Facebook app: Tips and tricks you should know
To do this, follow the steps:
- Compose your email.
- Tap the attachment icon present in the top bar and select “Insert from Drive” from the menu.
- Your Drive folders will be displayed. Tap the item that you want to send and hit “Select”.
That’s all you need to do, to insert a file from your Drive account.
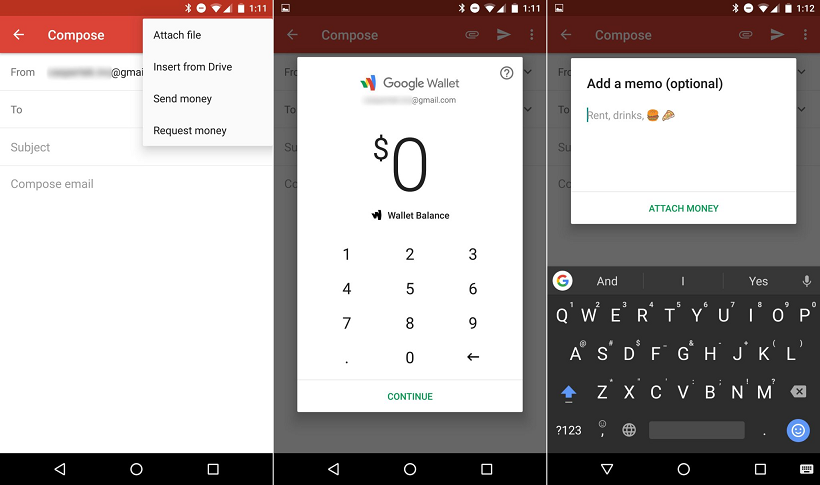
Send money through Gmail Android app
Accessible on the Gmail web for a while now, Google recently introduced payments feature to Gmail Android app as well. However, the feature is currently available only in the US. This feature lets you send and receive money through Gmail like you would send any other attachment.
Also read: Top 10 Snapchat tips and tricks
To send money, tap the attachment icon followed by “Send Money” option. Here is our detailed guide that explains how to send and receive money through the Gmail app.
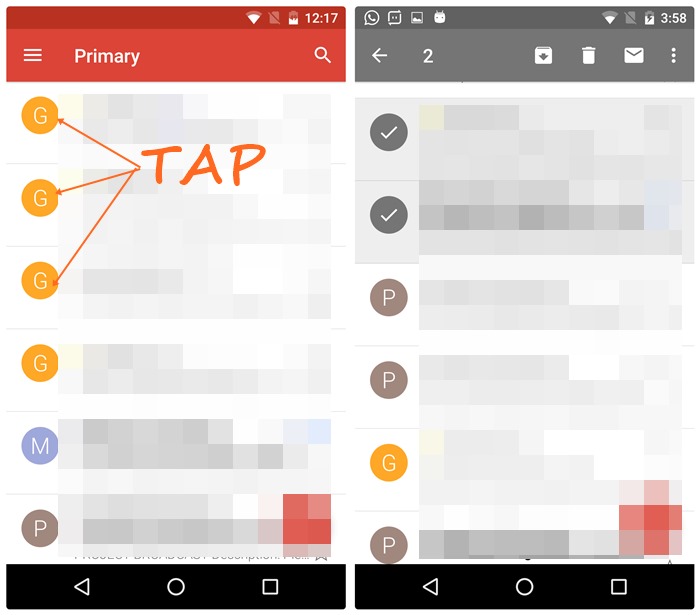
Shortcut to select multiple items
It would not be a tip if we suggested you to long press the individual emails to select multiple emails. Of course, you would know that. But there is another cute and simple method that allows you to select multiple emails without the need to long press each email to select them.
Also read: Instagram tips and tricks for beginners
All you need to do is tap the profile icon present on the extreme left corner of each email. Once you have selected multiple emails, you can then perform bulk operations on them such as move them, mark them as important, delete them or mark them as unread.
Add action confirmations
You know how sometimes when you are about to commit a stupid mistake and a friend stops you from doing it. Had it not been for that friend, your life would have been full of regrets (Okay, sorry for exaggerating that). But action confirmations for Gmail are like your friends that pop up when you are about to send an email or delete an email. You must have guessed it, we are talking about the “Are you sure you want to do this?” message.
Also read: Top 11 wallpaper and background apps for your Android device
Gmail supports three action confirmations, “confirm before deleting”, “confirm before archiving”, “confirm before sending”.
To enable one or all of them, follow the steps:
- Tap the ≡ menu present in the top left corner to open navigation drawer.
- Tap Settings followed by General Settings.
- Scroll down and enable action confirmations as per your need.

Keep a custom tone for each Gmail account
If you have multiple Gmail accounts added to the Gmail Android app or even just one account, you can change the default notification tone for incoming emails to any tone of your choice.
Also read: Best video players for Android
To do this, follow the steps:
- Tap the ≡ menu present in the top left corner to open navigation drawer.
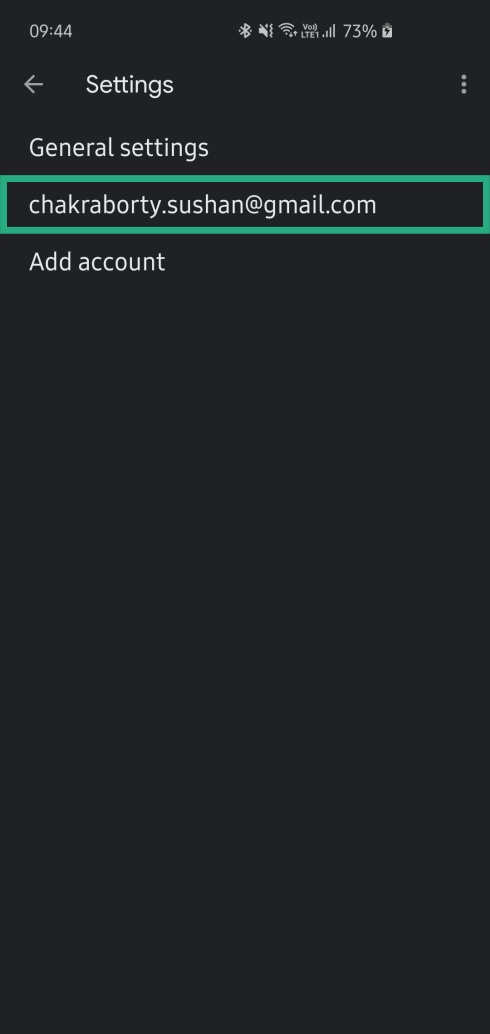
- Tap Settings, followed by selecting your account.
- Enable Notifications if it is disabled. Tap ‘Inbox sound and vibrate‘.
- On the next screen, enable Label notifications if it is disabled. Tap “sound” and select your favorite tone from the list.

Also read: Android Ringtones: How to edit, create and set custom tones
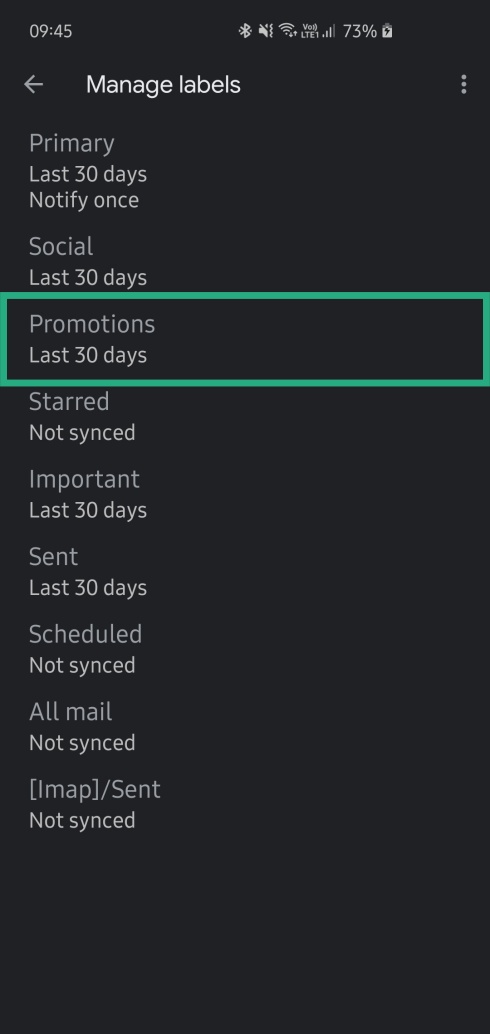
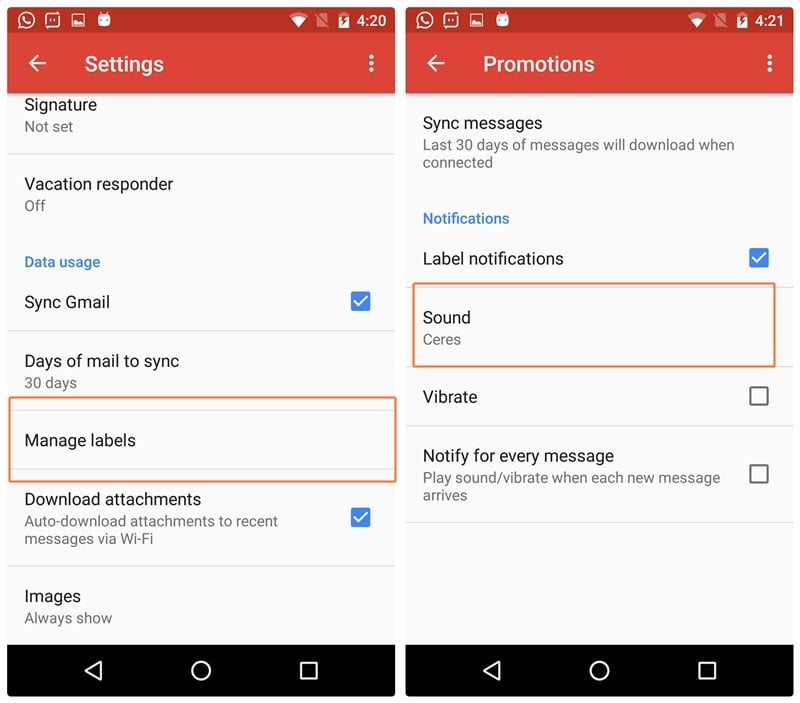
Custom tone for the label
If you want to go a step further, you can customize the tone for each label that you have created. You can keep a different tone for each set of the label.
To do this, follow the steps:
- Tap the ≡ menu present in the top left corner to open navigation drawer.
- Tap Settings followed by selecting your account.
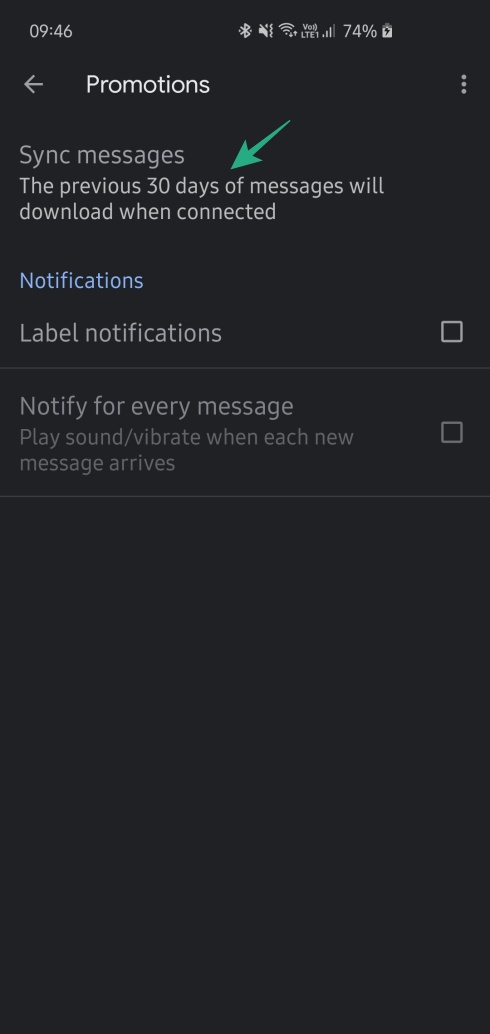
- Enable Notifications if it is disabled. Tap ‘Manage labels‘.
- Tap the label that you want to customize and change the tone in the ‘Sound‘ setting.
View sender details
If you thought, Gmail was naïve enough to show you only the sender email, you are wrong. When you get an email, you can view the sender’s Google + profile, your mutual contacts, duplicate/similar email ids and other information that is public. All of this is presented in a beautiful card layout.
Also read: How to find who tried to access your phone when you were away
To view sender details, follow the steps:
- Open the email from the sender in Gmail Android app.
- Tap the profile picture icon and voila. You will see the sender contact card.
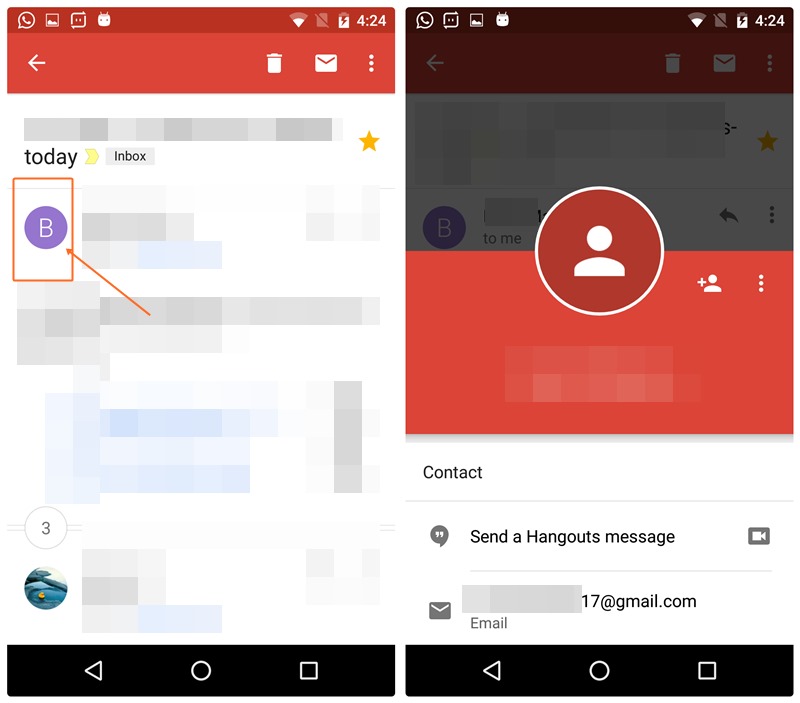
To view their Google + profile, tap the three dots present in the top right corner of the sender contact card and select “View Google + profile” from the menu.
Send a Hangouts message from Gmail app
Gmail Android app also allows you to initiate a hangout conversation from within the Gmail app. Of course, you will be redirected to the Hangout app, but it comes handy many times.
Also read: 8 cool new WhatsApp Status Tips and Tricks
To send a Hangouts message from Gmail, follow the steps:
- Open the email from the sender in Gmail Android app.
- Tap the profile picture icon and from the contacts card select “Send a Hangouts message”.
Enable vacation responder
Don’t worry if you don’t have a PC handy when you want to setup vacation responder, you can do that from Gmail Android app as well. When you set up a vacation responder, it sends an automated reply to every incoming mail (you can change it to My contacts only) during a pre-defined time span.
Also read: How to create a video slideshow of photos on Android
To enable the vacation responder, follow the steps:
- Tap the ≡ menu present in the top left corner to open navigation drawer.
- Tap Settings followed by selecting your account.
- Tap ‘Vacation responder‘ and enable it on the next screen.
- Then choose the desired timeframe and fill in the subject and message for an automated reply.
- Tap Done.

Add non-Gmail accounts to the Gmail app
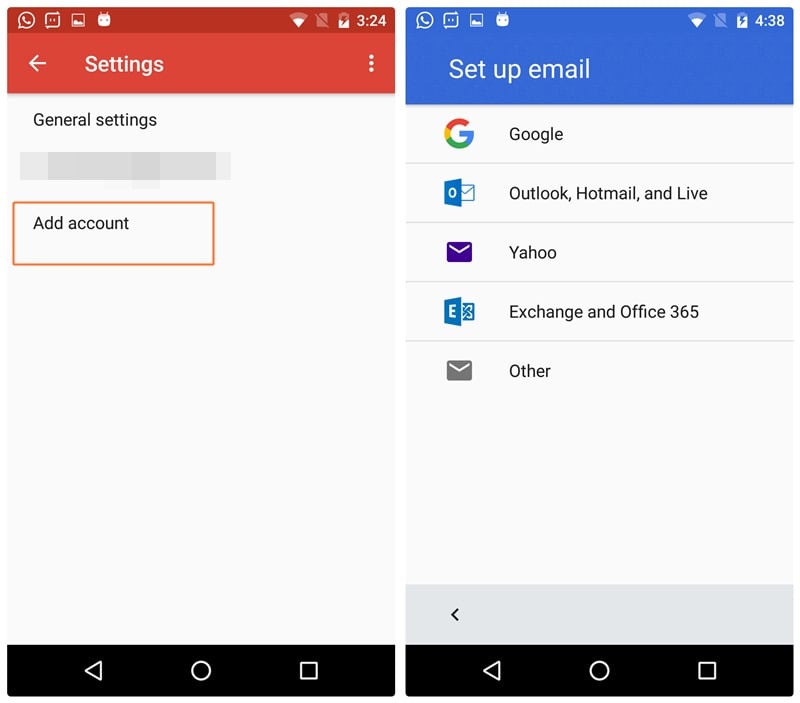
If you have non-Gmail accounts, you can skip individual apps for them and add them in Gmail app. You get all the benefits that a Gmail user gets in the Gmail app. Moreover, it is very easy to do so and Gmail comes preinstalled on all Android devices, so you could also save some space on your device.
Also read: How to Gmailify your Yahoo or Microsoft account
To add a non-Gmail account, follow the steps:
- Tap the ≡ menu present in the top left corner to open navigation drawer.
- Scroll down and tap ‘Settings‘ followed by ‘Add account‘.
- Select your Email provider and enter your login details. If your email provider is missing from the list, tap ‘Other‘ and follow the steps on the screen.
Was there anything, in particular, you picked up from this post? Let us know what tips you use!
Using Widgets for a clean Inbox
While the ability to use widgets may not be unique to the Gmail Android app, but it is certainly a lot more useful than the others out there. Not only a great way to stay on top of the incoming emails without even opening the app itself.
There are specifically two different Gmail widgets that you can use, the first of which allows you to directly add a specific section of the Inbox (Primary, Promotions, Updates, etc.) to the home screen, while the Label widget allows you to tag a specific section of the Gmail as a single shortcut icon.

- Press and hold the home screen to select the Widgets option.
- Scroll down to find the Gmail widgets.
- Press and hold to drag the widget to where you want to set them up on the home screen.
- If you have multiple Google accounts set up, the app will ask you to choose the Gmail account you want to display with the widget.
Create a multi-line Signature
Just as you real-life signature, the signature in your email address should be a unique reflection of you and your work. Gmail makes it possible to not only add your very own signature at the end of each email automatically but also allows you to customize it with multiple lines.

- Tap the ≡ menu present in the top left corner to open navigation drawer.
- Tap the Settings icon followed by selecting your Gmail account.
- Scroll down to find the Mobile signature tab.
- Enter your complete signature along with additional details that you’d like to mention and press OK to save.
Saving the extra space
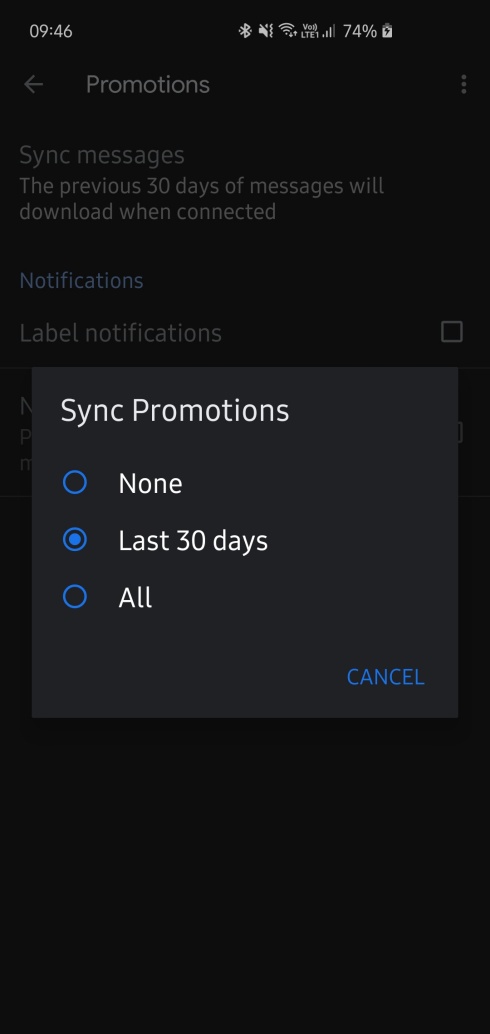
Having your past emails at your disposal in the Inbox is crucial, but the fact of the matter is that not all of the emails in your Gmail inbox are even worth syncing and take up useful storage space, especially the ones that come with large attachments.
This is why Google has added the ability for you to select the Days of emails to sync. This not only gives you control of the number of the number of emails that are automatically synced with your device but helps save up a significant amount of device storage space as well.
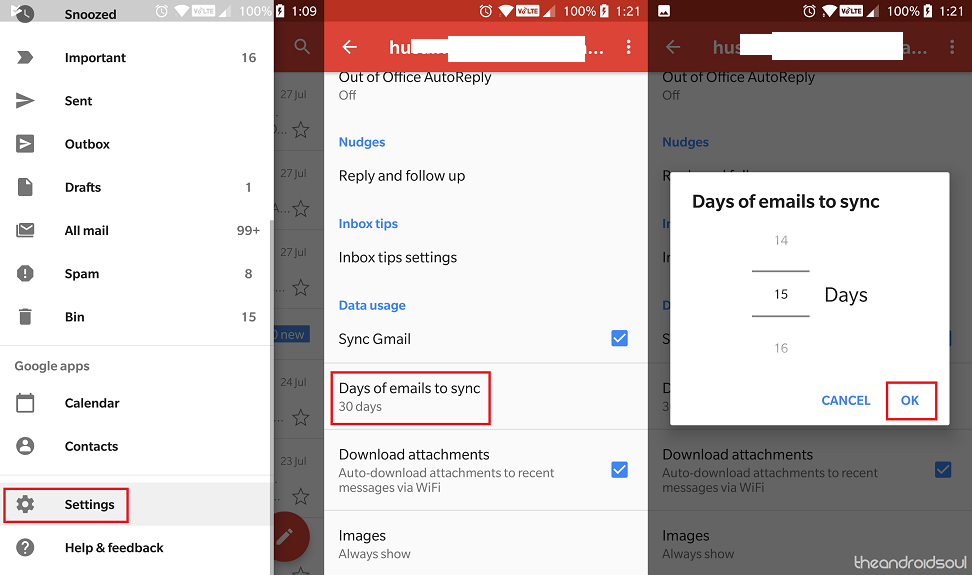
- Tap the ≡ menu present in the top left corner to open navigation drawer.
- Tap the Settings icon followed by selecting your Gmail account.
- Scroll down to find the Data usage section and tap on the Days of emails to sync option.
- Using the counter, select the number of days you’d like Gmail to sync the emails for and press the OK button.
- The value is set to 30 days by default, but you can count it down all the way to just 1 day.
Custom Swipe actions
There’s a good chance that most of you have archived a bunch of emails already by accidentally swiping them left or right, and Google has noticed this. That’s why the new Swipe actions feature allows you to choose what happens when you swipe an email – Archive, Delete, Mark as read/unread, Move to, Snooze, and None.
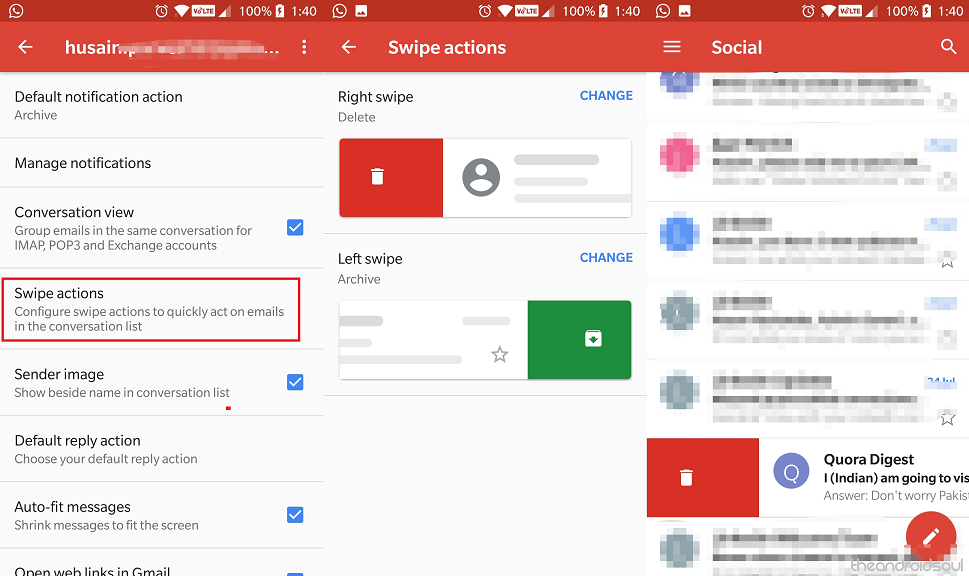
- Tap the ≡ menu present in the top left corner to open navigation drawer.
- Tap the Settings icon followed by selecting the General Settings tab.
- Scroll down to find the Swipe actions tab.
- Press CHANGE on the Right swipe and Left swipe to select the gesture.
Reminders with Nudges
Since you get a bunch of emails from all kinds of sources, the important ones can be equal to needles in a haystack. Gmail doesn’t want you to lose track of the necessary ones, which is why Google has come up with the Nudges feature.
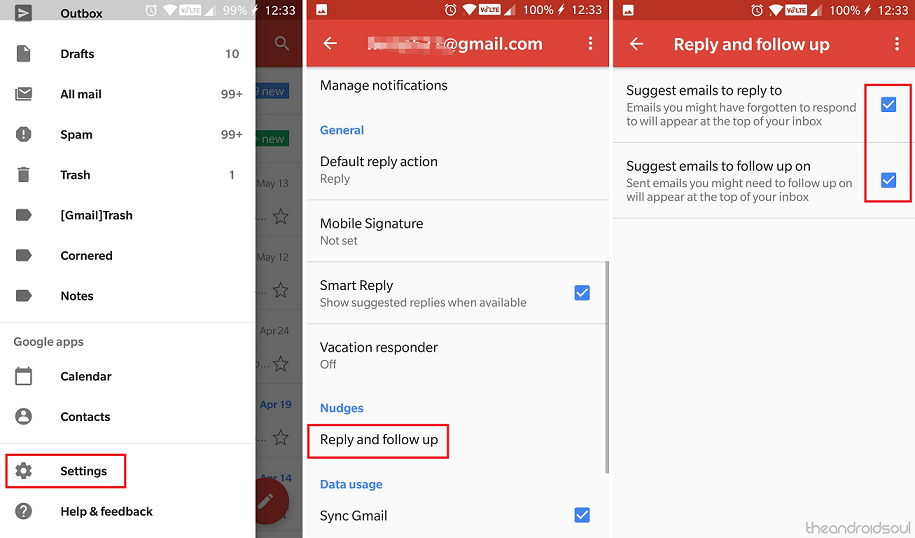
- Tap the ≡ menu present in the top left corner to open navigation drawer.
- Tap the Settings icon followed by selecting your Gmail account.
- Scroll down to find the Nudges section in the Settings and tap on the Reply and follow up tab.
- Enable the checkboxes right next to Suggest emails to reply to option and Suggest emails to follow up on option.
Break down email Conversations
In order to make emails far more manageable than they were before, Google introduced a feature in the Gmail web platform that complied emails from the same sender to create a ‘Conversations’ and streamline the inbox.
The same feature has been a part of the Gmail app for quite a while, but since not everyone appreciates their emails from the same sender to be conjoined. Thanks to a recent update, you can now disable the Conversation view feature of the Gmail app for Android easily.

- Tap the ≡ menu present in the top left corner to open navigation drawer.
- Tap the Settings icon followed by selecting the General Settings tab.
- Scroll down to find the Conversation view tab and tap the checkbox next to it to disable it.
- All of the emails you receive now from the same sender will no longer be compiled into conversations.