USB drives are a great way to transfer data easily and efficiently. However, over time your USB drive may degrade in its performance due to bad sectors or leftover data. If you’ve been facing performance issues with your USB drive then formatting it can help you improve the same.
NTFS is the widely supported format type in Windows that can help you transfer larger amounts of data when compared to FAT32. Here are all the ways to format your USB drive to NTFS on Windows 11.
How to format USB to NTFS in 5 easy ways
You can format your USB drive to NTFS using various methods in Windows 11. Pick either of the options mentioned below to help you along with the process.
Note: Formatting your USB drive will permanently delete all data contained on it. We recommend you back up your data before proceeding with either of the guides below.
Method 1: Using Format in Filer Explorer’s Context Menu
Make sure you have the USB drive plugged in properly.
Press Windows + E to launch File Explorer. Now, find your USB drive here and then right-click on it.
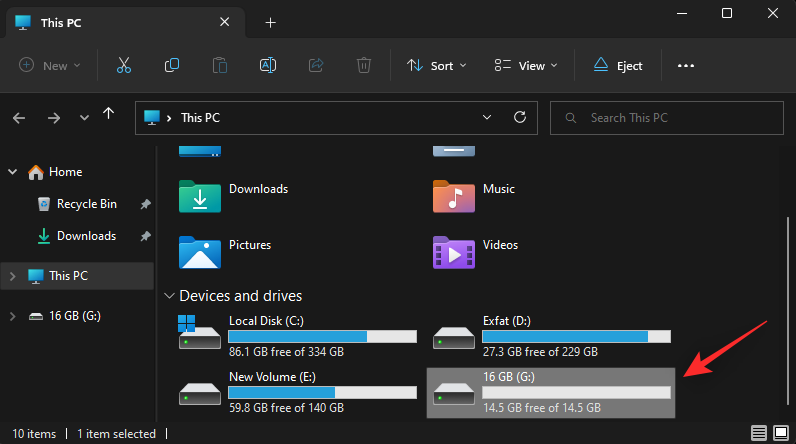
Click Format.

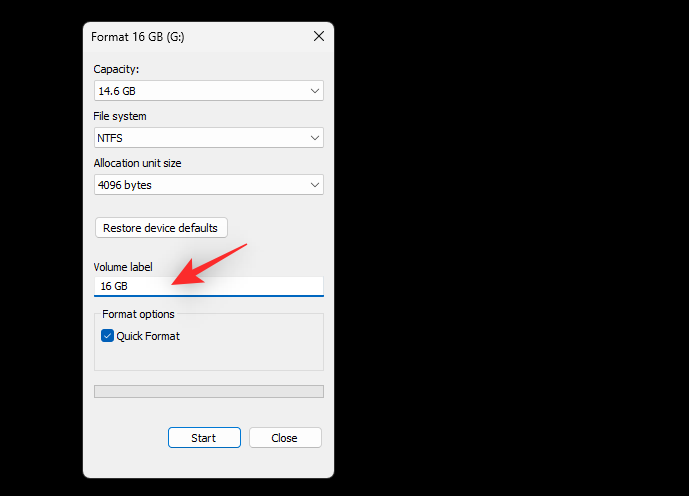
Click the drop-down menu for File system and select NTFS.

Select and type in a Volume label for your USB drive as needed.
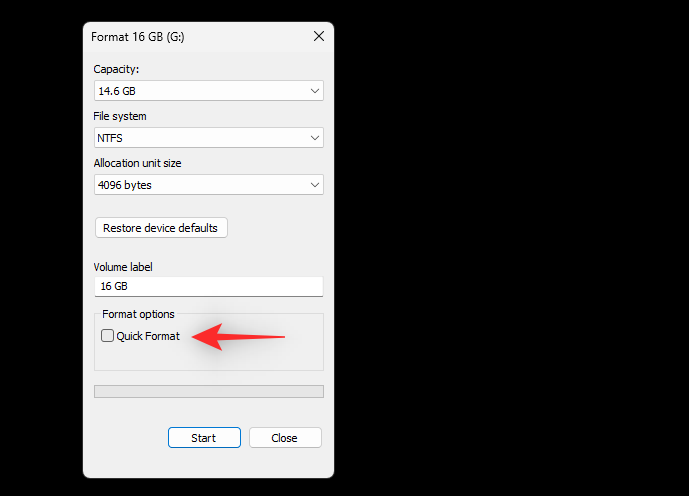
Check the box for Quick Format.
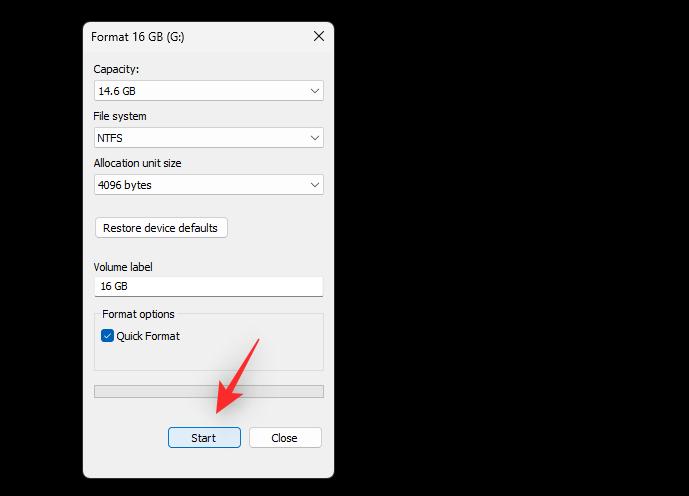
Click Start.
Click OK to confirm your choice.

And that’s it! You will now have formatted your USB drive to NTFS format on Windows 11.
Related: How to Create a Windows 11 Bootable USB Drive
Method 2: Using Diskpart
Press Windows + R to launch Run.

Type in the following and press Ctrl + Shift + Enter.
cmd

Execute the following command to launch Diskpart.
diskpart

Now use the following command to list current drives on your PC.
list disk

Find and identify your USB drive in this list. Use the following command to select your USB drive. Replace NUM with the disk number of your USB drive.
sel disk NUM

Use the following command to clean your USB drive.
clean

Type in the following command and press Enter.
create partition primary

Now use the following command to mark your new partition as Active.
active

Use the command below to format your cleaned USB drive. Replace NAME with a label you wish to give your USB drive.
format fs ntfs label "NAME" quick

Note: Do not remove quotes (“”) when executing this command.
Now use the command below to assign a letter to your USB drive. Replace X with a drive letter of your choice.
assign letter=X

Lastly use the command below to close Diskpart.
exit

Use the same command to close CMD.

And that’s it! You will now have formatted your USB drive using CMD on Windows 11.
Related: How to Edit ISO on Windows 11
Method 3: Using Disk Management
Disk Management is an in-built utility in Windows that you can also use to your advantage and format your USB drive to the NTFS format. Use the steps below to help you along with the process.
Press Windows + R to launch Run.
Type in the following and press Enter.
diskmgmt.msc

Scroll the bottom section to find your USB drive in the list. Right-click on it once found.

Select Format.

Click Yes to confirm your choice.

Choose a name for your USB drive beside Volume label.

Click the drop-down menu for File system and select NTFS.

Check the box for Perform a quick format.

Now click OK.

And that’s it! You will now have formatted your USB drive to NTFS format.
Method 4: Using PowerShell
Press Windows + R to launch Run.

Type in the following and press Ctrl + Shift + Enter.
powershell
Now use the following command to get a list of disks attached to your PC.
get-disk

Identify your USB drive from the list and note down its Number from the first column.

Once found, use the following command to clean your drive. Replace NUM with the disk number for your USB drive.
clear-disk -number NUM -RemoveData

Type in A to confirm your choice.

Your USB drive will now be cleared. We can now use the following command to create a new partition for your USB drive. Replace NUM with the disk number for your USB drive and replace LETTER with the letter you wish to assign to your USB drive.
new-partition -disknumber NUM -usemaximumsize -isactive -driveletter LETTER

Now that you have a new partition on your USB, we can format the same to USB. Use the command below and replace LETTER with the new drive letter for your USB drive. Similarly, replace USB Label with a name for your USB drive.
format-volume -driveletter LETTER -filesystem ntfs -newfilesystemlabel USB Label

Finally, use the following command to close PowerShell.
exit

And that’s it! You will now have formatted your USB drive to NTFS using PowerShell.
Method 5: Using a third-party app
Tons of third-party apps can help you format drives and disks depending on your current needs and requirements. We recommend using Rufus, as it’s free and easy to use and can even help you create bootable USB drives. Follow the guide below to format your USB drive using Rufus.
- Rufus | Download Link
Download Rufus to your PC using the link above and plug in your USB. Now launch Rufus using the .exe file.

Click the drop-down menu for Device and select your USB drive if not already selected.

Now click the drop-down menu for Boot selection and select Non bootable.

Set a name for your USB drive under Volume label.

Click the drop-down menu for File system and select NTFS.

Click Show advanced format options and uncheck the box for Quick format.

Finally, click START.

Click OK to confirm your choice.

And that’s it! You will now have formatted your USB drive using Rufus on Windows 11.
We hope this post helped you easily format your USB to NTFS on Windows 11. If you face any issues or have any more questions, feel free to reach out using the comments below.
RELATED
- How to Format Windows 11 With a USB
- How To Install Windows 11 From USB
- How to Create a Bootable USB Drive With Windows 11 ISO From Dev Channel Insider Program
- How to Disable TPM and Secure Boot in Rufus When Creating Windows 11 Bootable USB Drive
- How to Try and Install Chrome OS Flex: Step-By-Step Guide
- How to Use Android Flash Tool to Install an Update