Microsoft’s latest Windows release, called Windows 11 is turning a lot of heads right now. Wondering why? It’s because the update comes with a complete visual overhaul compared to its successor, Windows 10. Even more so, it comes with many new handy features that are set to give your productivity a massive boost.
So, how does one get their hands on Windows 11? Well, Microsoft hasn’t actually released the update for billions of Windows users throughout the globe as it’s still in its testing phase and is set to roll out to users sometime in early 2022.
Then why the buzz now? It’s because Microsoft just rolled out their first test build, known as an Insider Preview for the masses. And boy are people excited to take Windows 11 out for a spin!
Required
Before proceeding with this guide, you should probably check if your PC supports Windows 11 builds. Here’s a page by Microsoft explaining the Windows 11 system requirements.
Also, be sure to enable TPM 2.0 and Secure Boot on your PC too. You can check if TPM is already enabled or not on your PC — use this guide.
Step 1: Get the ISO files for Windows 11
If you are looking to install Windows 11 yourself — without using the Windows Insider program menu under Settings — then you will need an ISO first and foremost. Click the link below to learn how to download the ISO file of the Windows 11 Insider build.
- How to download Windows 11 ISO
- If the tool in the link above doesn’t work, search the web for this (including Reddit.com)
As of June 30, 2021, only the Dev channel build of Windows 11 has been released. So, that’s all you can download and install at the moment.
For a better, more reliable build that is easy to update too later on, including updating to Windows 11 stable release later on as you can’t update from Dev to Stable build, wait for the Windows 11 beta build which will be out in July 2021.
However, if the tool doesn’t work for you — as it does from time to time — then you will have to look on the web to grab a Windows 11 Insider build ISO (avoid leaked ISO). Yes, reddit.com can be of help.
Step 2: Create a bootable USB drive with Windows 11 ISO
Grab a Pen Drive (minimum 8 GB storage) and use Rufus software to create a bootable USB drive that will allow you to install Windows 11 from the UEFI. Yes, click the link below to find a guide for this.
- Step 2.1: How to create bootable Windows 11 USB Drive
- Step 2.2: Insert your Windows 11 bootable USB Drive into your PC. Next, see step 3 below.
The above will take you only some time, 15-30 minutes likely. Come back to this page to learn how to install Windows 11 using your bootable pen drive from above.
Okay, so you got your copy and set up your USB drive with Rufus, but what next? Don’t worry, we have you covered.
This guide below will cover all of the steps required to get your PC up and running with the latest Windows Insider Preview build.
Let’s get to it.
Step 3: Install Windows 11
With your bootable Windows 11 USB Drive now inserted into your PC, it is time to start the system using the pen drive so that we can install the Windows 11 using the pen drive.
We can do this from the boot menu, or the UEFI/BIOS menu if you prefer some GUI to guide you. Accessing BIOS/UEFI can itself be done in two ways, let’s explore them all here.
Method #3.1: Installing Windows 11 using pen drive from the boot menu
With the pen bootable Windows 11 USB Drive drive plugged in, power off the PC. Now, power it on — right after hitting the power on button, keep pressing Esc button (or F11 or F12) and you will see the boot menu.

It will show you the options you can boot from. For example, your SSD/hard disk and the bootable pen drive.
Move the selection to the bootable pen drive and hit the enter key to boot the system using the pen drive.
Soon, you will see the Windows logo, and then the Windows 11 setup screen. Meaning, all that is left now is to install Windows 11. Which is easy. Select the Windows 11 edition, the hard disk partition, and click Install. That’s it.
When the installation is done, your PC should now restart automatically, and you should be able to see the Windows 11 Insider Preview setup loading up.

With just a couple of clicks, your Windows 11 build should be up and running.
Method #3.2: Installing Windows 11 using pen drive from the UEFI/BIOS menu
There are two methods to access the UEFI/BIOS screen from where you can choose the pen drive to boot your system. One is using software, that is Advanced Startup menu, and the second is the hardware trick, where we press the required key when the device is starting. Let’s discuss both methods.
Method #3.2.1: Booting into BIOS with PC turned ON (Software trick)
Assuming that your PC is currently powered on, what you need to do is click on the “Start” button at the bottom left.
Then click on the “Power” icon.
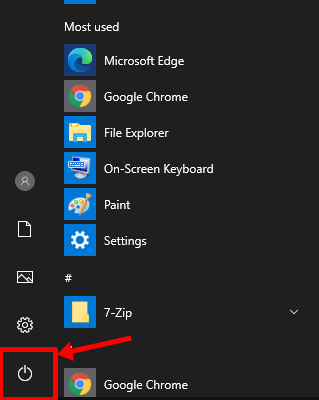
There, you’ll find the options for “Sleep”, “Shutdown” and “Restart”.

Hold down the Shift key on your keyboard and click on “Restart”. If done correctly, your PC should boot into a blue screen with a bunch of options, instead of your desktop.
(Alternatively, you can access advanced startup by going to Settings > Update & Security > Recovery > ‘Restart now’ under ‘Advanced Startup’.)
In Advanced Startup, click ‘Troubleshoot’.
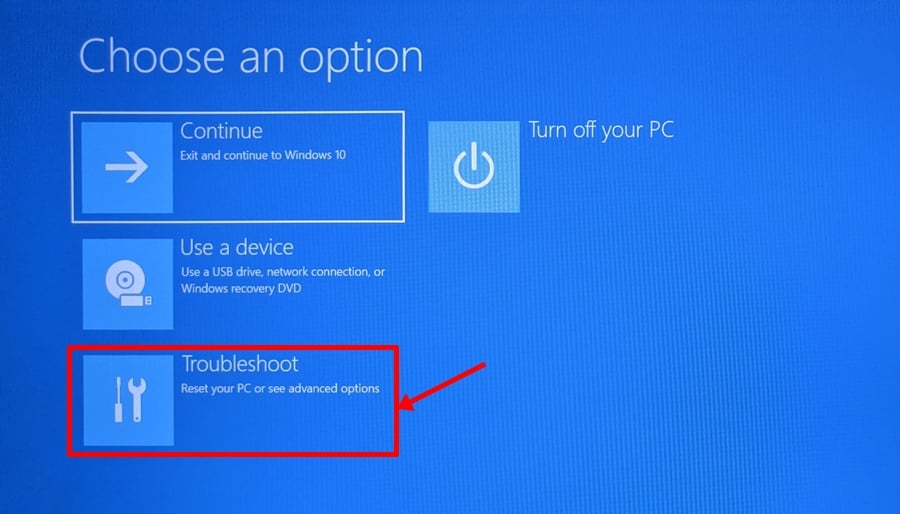
Now, click ‘Advanced Options’.

Click ‘UEFI Firmware Settings’.

And then click ‘Restart’.
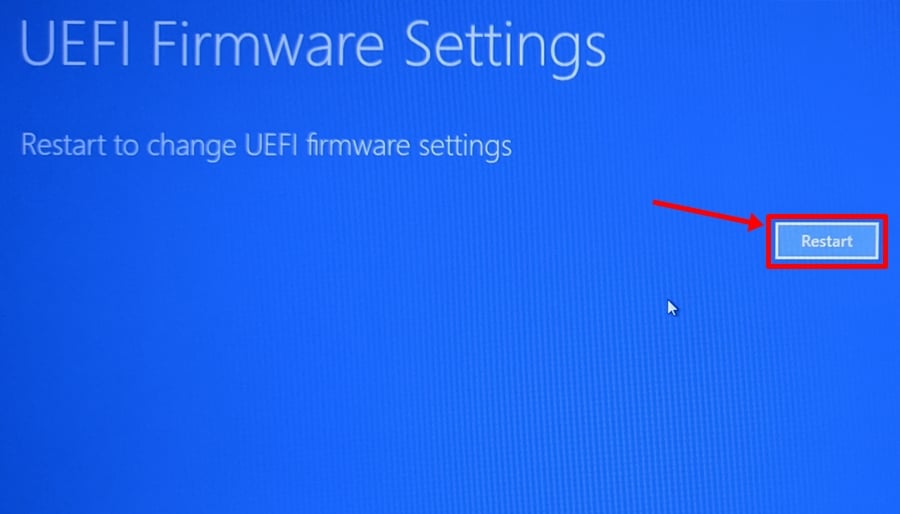
Once inside the UEFI/BIOS, jump below for installing from UEFI/BIOS.
Method #3.2.2: Booting into BIOS when the PC is powering on (Hardware trick)
By pressing the right key on your keyboard when the OEM logo shows up when your PC is powering on, you can easily access UEFI/BIOS screen.
What key do you have to press? Well, it depends from OEM to OEM. Here’s a handy list, though.
- Acer: Del or F2
- ASRock, Intel, Origin PC, Samsung, Toshiba: F2
- Asus: Del, F10 or F9
- Dell: F2 or F12
- Biostar, EVGA, Gigabyte, MSI: Del
- HP: F10
- Lenovo: F2, Fn + F2, F1 or Enter then F1
- Microsoft Surface: Press and hold volume up
- Zotac: Del
Once inside the UEFI/BIOS, jump below for installing from UEFI/BIOS.
How to install from Windows 11 UEFI/BIOS menu
After accessing the UEFI/BIOS screen using either of methods 3.2.1 and 3.2.2, follow this step.
In the UEFI menu on our Asus laptop, we have a many called “Boot Priority” on the Dashboard/EZ Mode of BIOS. Yours might be a little different, so look for something that says “Boot Menu/Priority”.
Here’s what our Boot Priority section looks like with the USB drive plugged in.
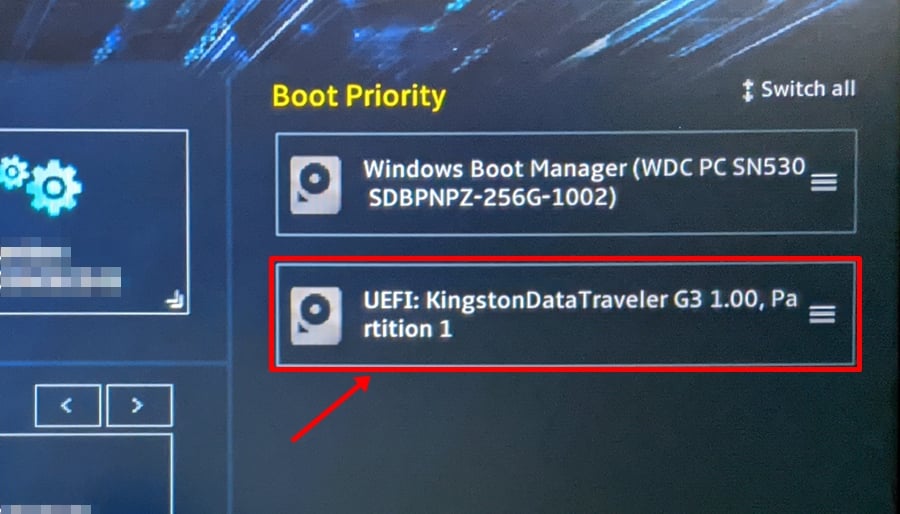
Now, all you have to do is drag your USB drive (ours is a Kingston Data Traveler G3) to the top of the list by clicking and holding on 3 horizontal lines icon and moving it up.
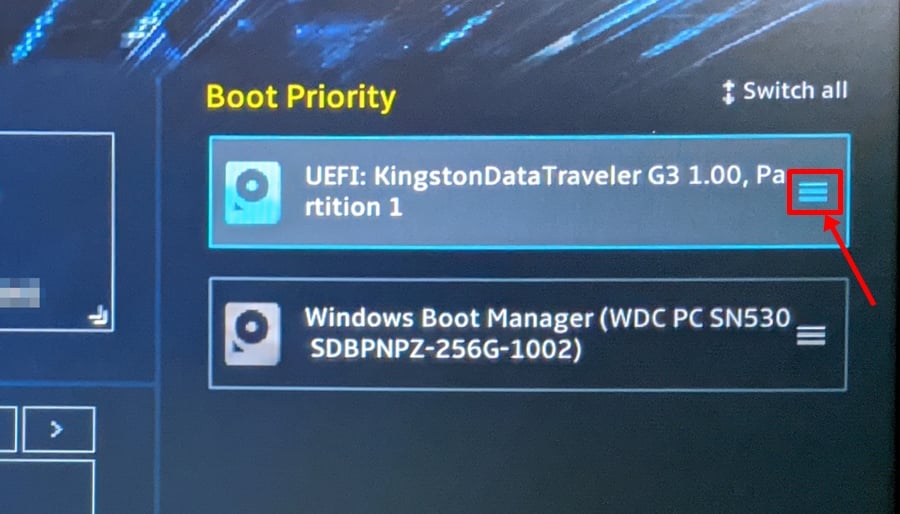
Again, you need to bring the USB drive entry to the top of the list. The correct boot priority order should now look like the screenshot above. (Our Kingston pen drive is now at the top of the Boot Priority list.)
After that, all that’s left is to save the changes that we just made to the BIOS boot priority menu by pressing the “F10” key.
Click Save and Exit to save the changes and restart the device.
Your PC should now restart automatically, and you should be able to see the Windows 11 Insider Preview setup loading up.

With just a couple of clicks, your Windows 11 build should be up and running.
More help on booting into UEFI and BIOS:
- If you still can’t find your OEM in the above list, we recommend trying different keys, as one of these will definitely work.
- While trying to boot into the Windows setup, you may see some text like “Press any key to boot from CD or DVD…” for a few seconds. As soon as you see this, just press any key to initiate setup.
- Some laptops/PCs boot in an instant, and it is highly likely you might miss your chance to get inside UEFI/BIOS. Solution? If your PC shows some kind of animation or a boot video, quickly tap either “Esc”, “Tab” or “Pause Break” key, and then start tapping your respective UEFI/BIOS hotkey. We recommend keeping an eye on the text on the screen as almost all of these PCs mention pressing a specific key on the screen to pause the boot sequence and get into UEFI/BIOS.
Why is my bootable Windows 11 pen drive not detected in BIOS or UEFI?
A PC with UEFI will have a hard time booting from a USB stick that contains either Windows or Linux in the MBR partition scheme as it simply won’t show up in the Boot Menu. You’d have to first manually switch to MBR/Legacy/SATA mode (depending on your PC) in BIOS to proceed with the install.
Also, make sure that you prepared the bootable install USB drive in the correct manner and that it’s working alright. You can write Windows 11 on to pen drive again if you think the data might have got corrupted or some other issue could have come into play when you were creating the bootable pen drive. Use Step 2 above again for this.
Installing Windows 11 without bootable USB Drive
But before we begin, see if you still have the Windows 11 ISO you just downloaded to prepare the USB drive. If you do, let’s take a look at how you can use that ISO to upgrade your current Windows installation to Windows 11. But keep in mind, you may not be able to dual boot Windows 11 with any other OS using this method as you can do that using a bootable drive only.
Let’s take a look at an easier way to install Windows 11.
Right-click the Windows 11 ISO and click “Mount” or just double-click if you’re on Windows.
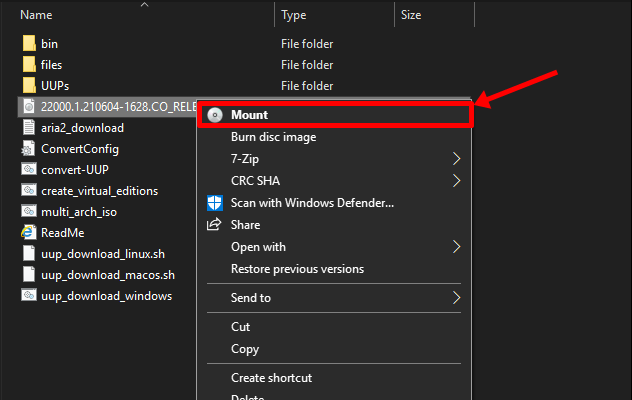
As soon as you do that, Windows will mount the ISO on a virtual drive and open the ISO in the same window. In the now opened ISO folder, there’ll be a file called “setup”. Double-click on it.

Wait for a few seconds and you’ll see the Windows 11 setup starting up.

Once the setup has done its initial processing, you’ll be greeted with a window similar to the image below. Click on “Next”.
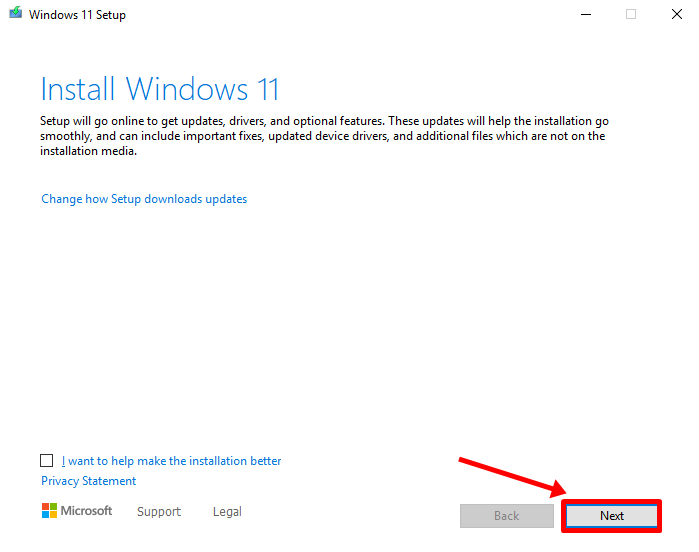
And from this point onwards, the setup will take over and upgrade a few things as needed.
After maybe some 15 minutes later, your own Windows 11 experience should be ready to roll.
Let us know how the installation process went for you.
NOTE: If you don’t have access to a spare PC, we suggest waiting for this release out as the current Insider Preview build is pre-Beta and should not be considered as a daily driver just yet. Even though things may be running just fine right now, no one really knows when or how badly things may break in the coming days.
You can get in touch with us anytime using the comments box below if you need any help in this regard.


