What to know
- Change icons from a file or a folder’s Properties > Customize tab > Change icon. You can also use custom or downloaded icons using the ‘Browse’ option.
- To change desktop icons, navigate to Settings > Personalization > Themes > Desktop icon settings.
- Various third-party apps, such as 7tsp, also let you customize and change icons.
Windows 11 brings along numerous UI changes that have been welcomed by users for the most part. However, you no longer get previews of the contents of a folder when viewing icons and some find the new quick access icons to be misaligned.
If you too are in the same boat and would like to change your icons then here’s all you need to know about it.
4 Ways to change your icons in Windows 11
When changing your icons natively, some items allow you to change your icons, and then some items don’t allow you to change your icons.
Follow the different methods below to change icons on Windows 11.
Method 1: Changing icons for supported apps
- Find the item whose icon you wish to change and right-click on the same. Select ‘Properties’ from the context menu. Alternatively, you can also select the item and hit
Alt + Enteron your keyboard.

- Switch to the ‘Customize’ tab.
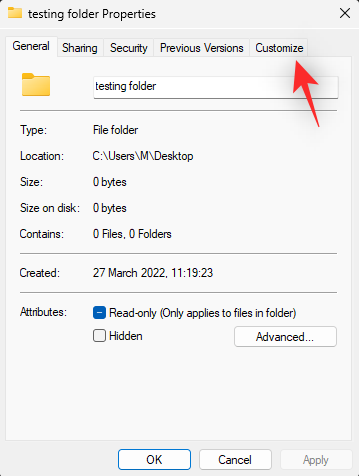
- Now click on ‘Change icon…’.

- Select an icon from the selection on your screen. If you wish to use a custom icon, then you can click on ‘Browse…’ and select the same from your local storage.
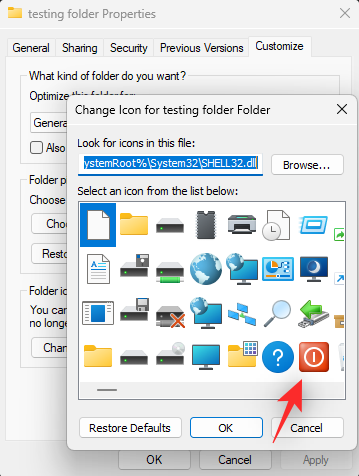
Note: Windows File Explorer only supports .ico format for icon files for now. - Click on ‘OK’ once you are done.

- Click on ‘OK’ again.
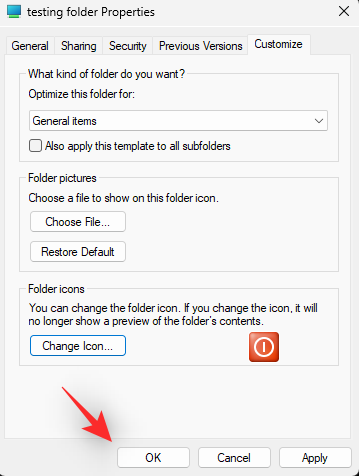
- And that’s it!

You will now have changed the icon for the selected item in File Explorer.
Note: You can only change the icon for such apps while they are in the File Explorer or added to your desktop. Pinning these items to your taskbar or Start menu will revert them to using their default icons.
Related: How to Create Start Menu Folders in Windows 11 and Rename Them
Method 2: Change system icons not supported natively
- Press
Windows + ion your keyboard and click on ‘Personalization’ on your left.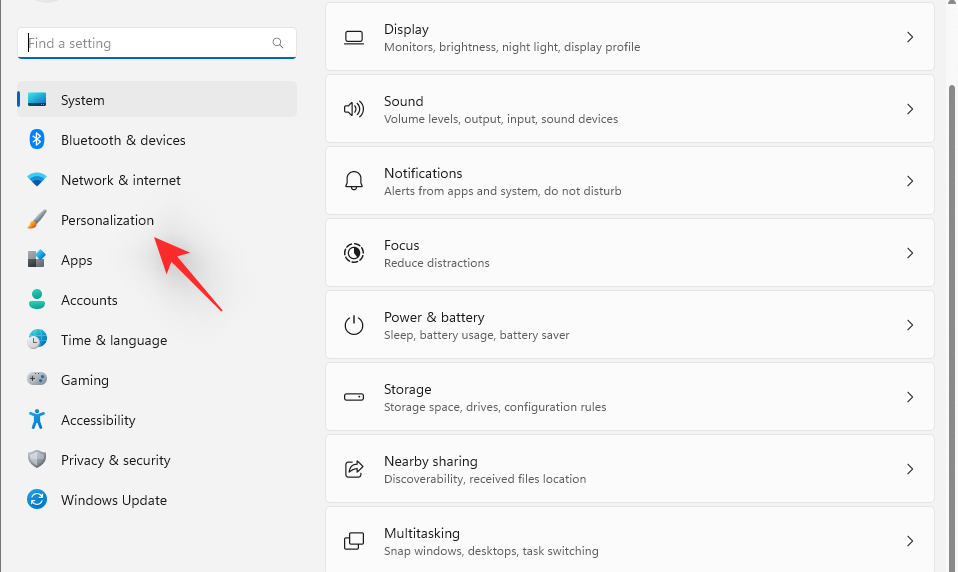
- Click on ‘Themes’.

- Scroll down and click on ‘Desktop icon settings’.
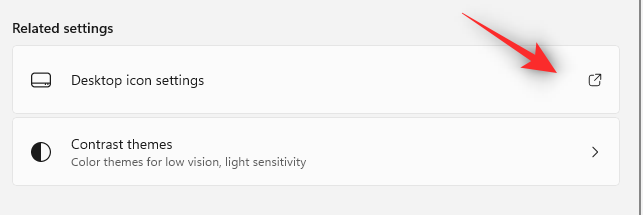
- Click and select the desired system icon from the list on your screen and click on ‘Change icon’.

Note: For system items unavailable in this panel, you can skip to the next section. - Select an icon from the list on your screen. If you wish to use a custom icon then you can click on ‘Browse…’ and select the same from your local storage.

- Once selected, click on ‘OK’.

- Click on ‘OK’ and you will have now changed the selected system icons on your PC.

Related: How to Search in Windows 11 [4 Ways Explained]
Method 3: Change other icons not supported natively
- Press
Windows + Ron your keyboard, type in the following, and pressEnteron your keyboard:shell:AppsFolder
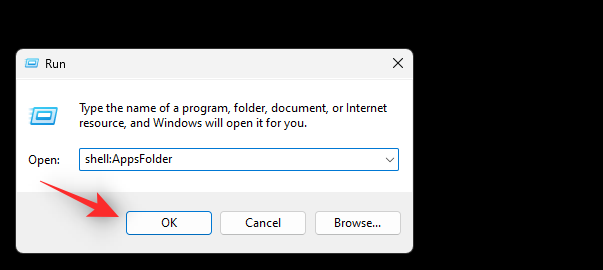
- You will now have a list of most system icons as well as user-installed apps on your PC. Find the one you wish to change and right-click on the same.
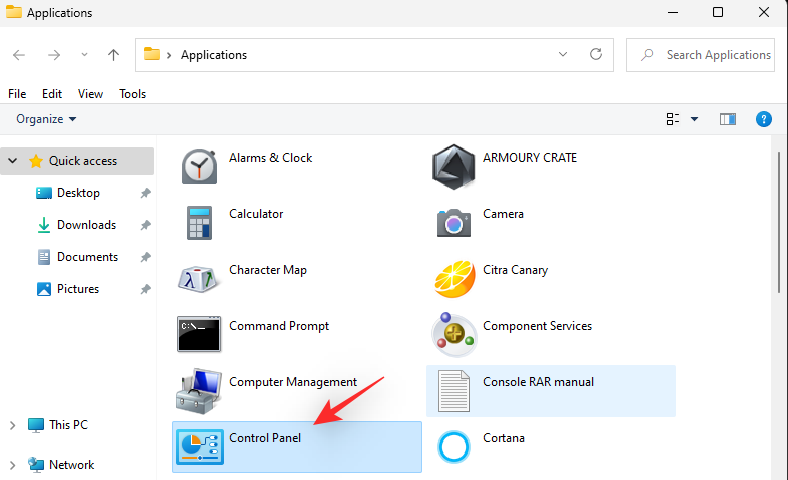
- Select ‘Create shortcut’.

- You will now be notified that a shortcut cannot be created in the same, location. Click on ‘Yes’ to create the shortcut on your desktop instead.

- Close the folder and select the new icon on your desktop. Press
Alt+ Enteron your keyboard once selected.

- Now click on ‘Change Icon…’.
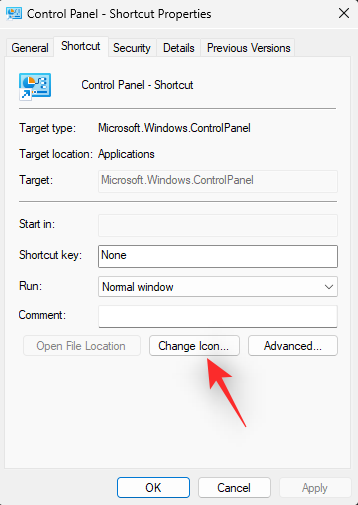
- Select the icon you wish to use from the list on your screen. You can click on ‘Browse…’ instead if you wish to use a custom icon.

- Now click on ‘OK’.

- Click on ‘OK’ again.

- The icon for the selected item should now have been changed.

Related: 6 Ways to Shutdown Windows 11 Without Updating [Works 100%]
Method 4: Using a third-party app called 7tsp
Third-party apps can help you change icons across your PC with a single click. Sadly most haven’t been updated in a while but 7tsp seems to work great on Windows 11. Follow the steps below to help you along with the process.
Warning: We highly recommend you backup sensitive data and close all running apps before following the guide below. Additionally, we highly recommend you create a system restore point on your PC in case anything goes wrong.
Note: You will need a DeviantArt account for this process. If you don’t already have one, you can use this link to sign up for one before proceeding with the steps below.
- 7tsp | Download Link
- Open the link above and click on the ‘Download icon’ to download 7tsp to your PC.

- Extract the archive to a convenient location and right-click on the file with the .ee extension.

- Rename the extension to ‘.exe’. You can select the icon from the context menu toolbar at the top.

- Once renamed launch the application and click on ‘Add a Custom Pack’.
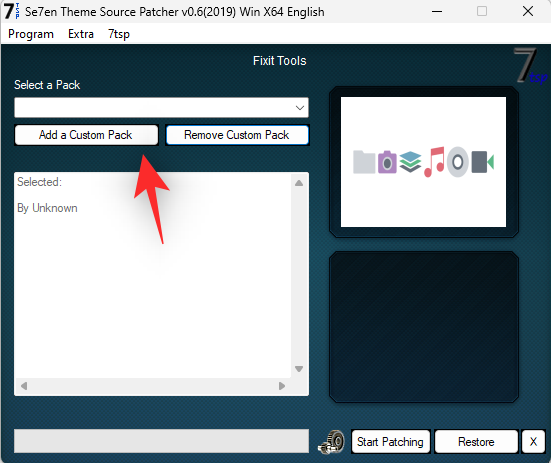
- Now select the desired icon pack you wish to use. We will be using the icon pack from ‘Proma’ for this guide.

- Now click on ‘Start Patching’.
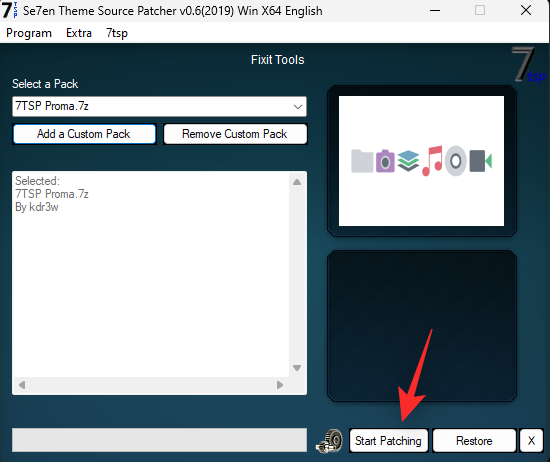
Note: While 7tsp does create a system restore point for you, it is known to not be available or readable in some cases. So make sure you create your own restore point beforehand. - Let 7tsp create a restore point on your PC. This will help you revert to your original icons in case something goes wrong.
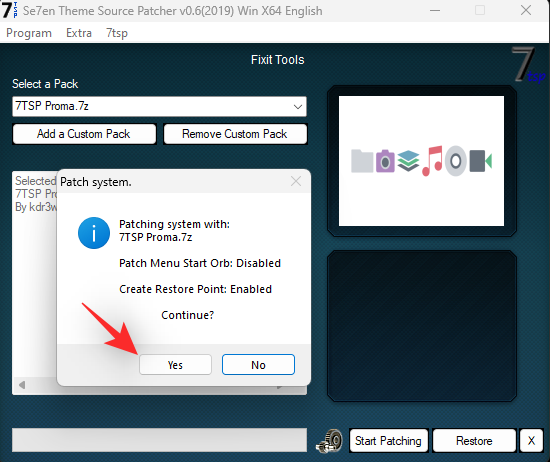
- Once your files are patched, you will be prompted to restart your system. We recommend you restart your system at the earliest.

- The icons in Windows 11 should now be changed as shown below.

Related: How to Stop Pop Ups on Windows 11
How to install updates after changing your icons
Updating Windows can be a bit finicky once you’ve changed your icons in File Explorer. Depending on your preferred method above, here’s how you can install updates after changing your icons in Windows 11.
Method 1: If you changed your icons natively
If you changed your icons natively then you do not need to worry about a thing.
Windows updates are always compatible with native icon changes. You can simply go ahead and update your Windows normally without facing any issues
Note: In some cases when receiving updates for Microsoft products or OEM apps that you have changed the icons for, the changes might be reset once the update is installed. In such cases, you will have to change the icons again for such items. This usually happens when the installation structure or the directories for a program get changed with an update.
Method 2: If you used a third-party app to change your icons
If you used a third-party app like 7tsp to change your icons in Windows 11 then it is highly recommended that you restore the default icon pack before applying a Windows update.
Windows stores its icons in .dll files instead of a .ico library. This forces 7tsp to patch these files to change icons across the File Explorer. However, these modified files can cause issues with future Windows updates that are yet to be configured. Thus when using such apps, it is highly recommended that you revert to default icons before updating Windows.
Once you have updated Windows, you can install the pack and patch your files again depending on the compatibility. Here’s how you can restore the default icon pack using 7tsp on your PC.
- Open 7tsp on your PC and the currently applied icon pack should already be listed on your left. Click on ‘Restore’ in the bottom right corner of your screen.

- Select ‘Restore modified system files to before 7tsp was used’.

- Now click on ‘Ok’.
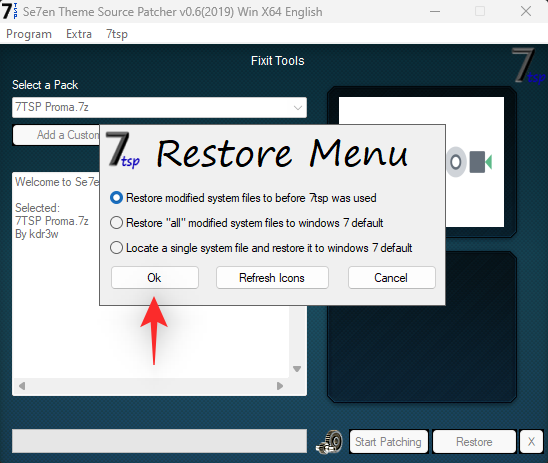
- Click on ‘Yes’ to confirm your choice.
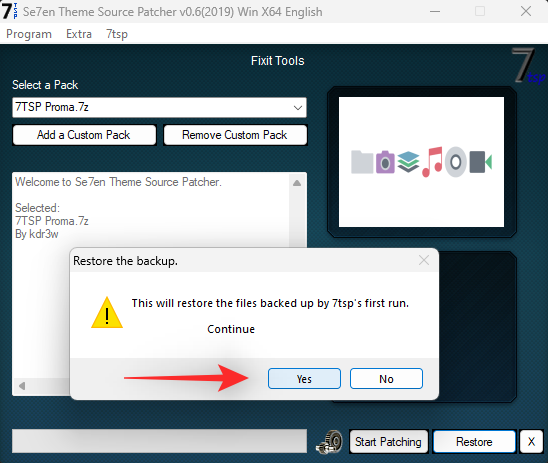
- Restart your PC once you are prompted.

- And that’s it! Changes should now be reverted on your PC.
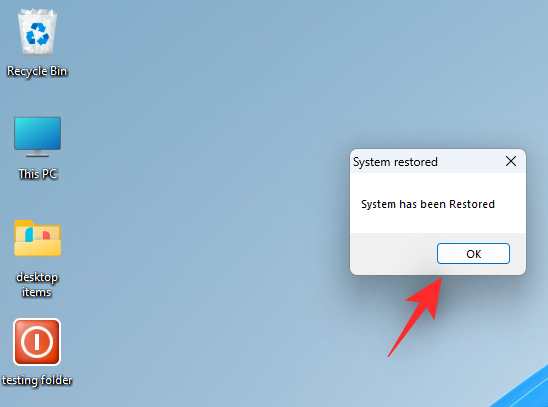
You can now install a Windows update on your PC as usual. Once the update has been installed, then you can patch your files again to add your custom icon pack to Windows 11.
Related: Switch Out of S Mode Not Working? How to Fix
How to clear your icon cache and restart Windows Explorer
Clearing the icon cache can help you apply custom icons to icons that refuse to show the necessary change. Additionally, this can help solve graphical issues and glitches when used in conjunction with restarting Windows Explorer on Windows 11. Here’s how you can do both on your device.
1. Clear your icon cache
Here’s how you can clear your icon cache in Windows 11, follow the guide below to help you along with the process.
- Press
Windows + Ron your keyboard, type cmd and then pressCtrl + Shift + Enteron your keyboard.

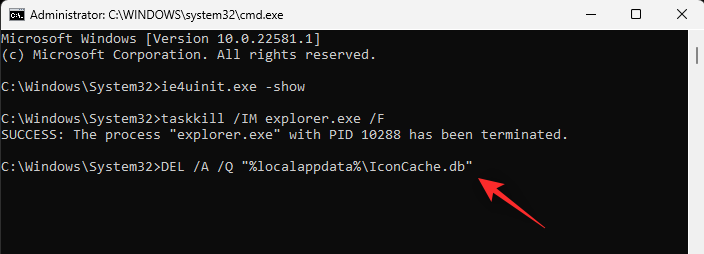
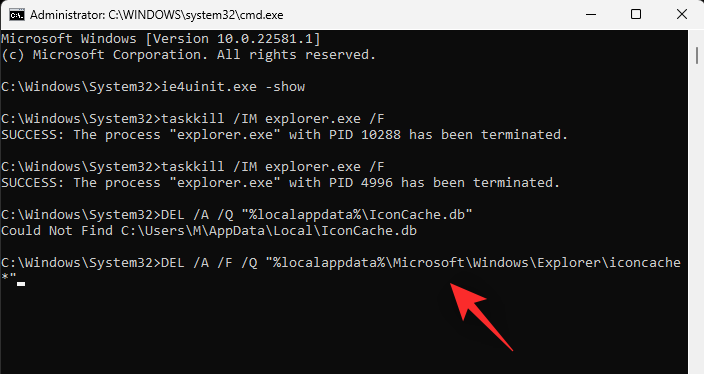
- This will launch the command prompt as an administrator on your PC. Enter and execute the commands below one by one on your PC.
ie4uinit.exe -show
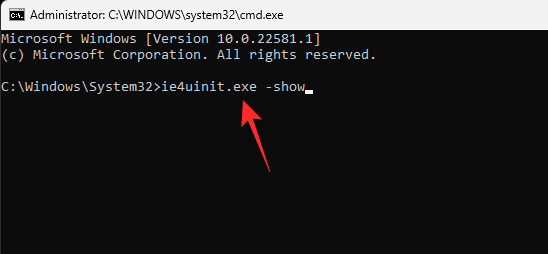
taskkill /IM explorer.exe /F

DEL /A /Q "%localappdata%\IconCache.db"
DEL /A /F /Q "%localappdata%\Microsoft\Windows\Explorer\iconcache*"
- shutdown /r /f /t 00
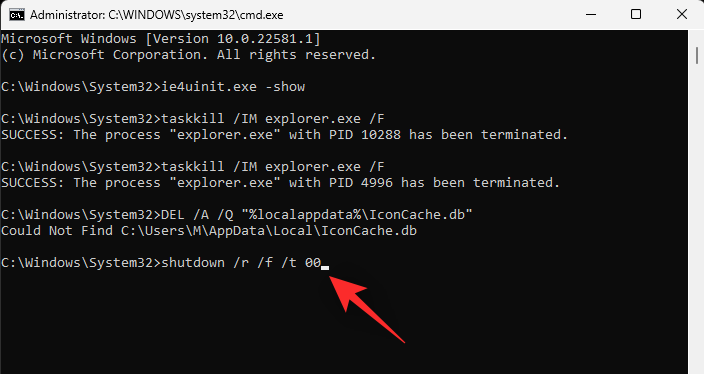
Your icons should be refreshed once restarted. And that’s how you can rebuild your icon cache in Windows 11.
2. Restart Windows File Explorer
Press Ctrl + Shift + Esc on your keyboard to open the task manager. Now find Windows Explorer in the list, select it, and click on ‘Restart task’ at the top.

And that’s it! Windows File Explorer should now be automatically restarted on your PC.
Related: How to Check Windows 11 Version
Bonus: Change Folder icons on Windows 11
Here are our various guides to changing the folder icons on Windows 11 in different ways.
- Method 1: Change the icon of a regular folder
- Method 2: Change a Desktop icon
- Method 3: Change the icon of a Shortcut
- Method 4: Change drive or disk icon using Registry
- Method 5: Change the icon using a third-party app
FAQs
Changing icons can be quite intimidating at first. Thus here are a few commonly asked questions that should help you get up to speed. Let’s get started.
What happens if my icon cache is messed up?
If your icons seem to be messed up or you’re facing bugs that hinder your productivity, then you can easily revert your changes using the System Restore point that we had created earlier.
In case you used 7tsp, you can also use the same to restore your original icons. Once your original icons have been restored we recommend you try using another icon pack or the latest version of 7tsp to help fix this issue.
Is it safe to clear your icon cache?
Yes, it’s completely safe to clear your icon cache and rebuild the same. Windows will automatically rebuild the cache once it detects the old files no longer exists. This usually happens once your PC restarts itself.
Will changing icons impact performance?
Yes, changing icons will impact your performance but this will be negligible when changing your icons natively. However, if you used 7tsp then the performance impact can be noticeable depending on the icon pack you use.
If you face high CPU usage, we recommend you switch to an icon pack compatible with your OS version. In case you can’t find one, we recommend trying one that is at least compatible with Windows 10 1909 or higher.
We hope this post helped you easily change and customize icons on Windows 11. If you face any issues or have any more questions, feel free to reach out to us using the comments section below.
RELATED
- Windows 11 Update Not Showing? Reasons and Fixes Explained
- How to Remove the Evaluation Copy Watermark on Windows 11
- Where is ‘My Computer’ on Windows 11? How to Find ‘This PC’ Easily!
- How to Install and Use Git on Windows 11
- Microsoft Snipping Tool Download for Windows 11: How to Get It Working Back
- How to Check and Display CPU Temp on Windows 11
- If I Decline Windows 11 Upgrade, Can I Get It Later? [Explained]


