Zoom has done exceptionally well over the last year, banking on its plethora of exciting features and ease-of-use to emerge as the most popular video conferencing service. From bored students looking for a virtual hangout session to working professionals trying to get in touch with their colleagues — Zoom manages to serve all with equal competence.
For obvious reasons — especially in the education sector — video recording has been one of the most-used features of Zoom. And here, too, you get complete control over the recorded files. Today, we’ll check out how Zoom recording works and where you could access the files when you need to.
Related: How to Blur your Background on Zoom
What are the types of recording in Zoom?
Every Zoom user — irrespective of whether they have the paid or free version — get the ability to record live meetings. If you have a paid license — Pro and above — you get the option of cloud recording as well as local recording. Free users, on the other hand, are forced to remain happy with the local recording option.
No matter the type of license you have, the methodology of recording works the same way. After you launch the meeting, all you have to do is click on the ‘Record’ button at the bottom of the screen.

The recording would start right away.
Related: Can You Be On Two Zoom Calls At Once?
Where do the Zoom local recordings go on your computer?
Since most of us do not have access to a paid Zoom license, we have chosen to start with the local recording option. After you click on the record button, you’ll hear an announcement stating the recording has commenced. After you are satisfied with the recording, you can hit the stop button to end the session.
The recorded file goes to the Zoom folder, which happens to be a part of the ‘Documents’ folder.

The rule holds true for both Windows and Mac systems.
What is the format of the recording?
Zoom doesn’t use a fancy, unreadable file type to record the meetings. It uses the standard MP4 file format to store the video feed from meetings. However, it is to be noted that Zoom doesn’t record in MP4 format from the get-go. It starts off with an unknown file type and only converts it to MP4 after the end of the meeting.
So, if you were hoping to run the recording alongside your meeting, you are sadly out of luck.
Additionally, Zoom does not only record the video feed and throw the MP4 file at you. It also processes an M4A, an M3U, and a TXT file.
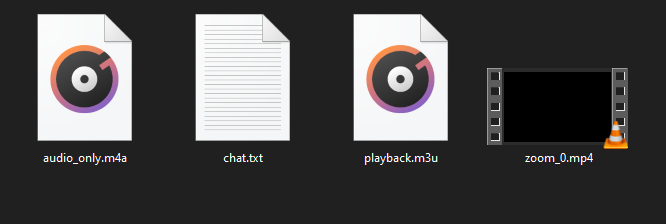
The M4A file only contains the audio of the meeting and is named ‘audio_only.M4A’ by default. The M3U is a Windows-only playlist file and is dubbed as ‘playback.m3u.’ Finally, the TXT file is where the in-meeting chat messages reside. The file is named ‘chat.txt,’ by default.
How to change the default file location on your computer?
Documents/Zoom is the default file location of all Zoom recordings. However, that doesn’t mean you cannot change it to a more suitable location. To change the default file location, you will need to have access to the Zoom desktop client. If you don’t have it, make sure to download it from the Zoom download page.
After you’ve done that, launch it and log in with your Zoom username and password. Now, click on the settings button at the top right portion of the Zoom window.
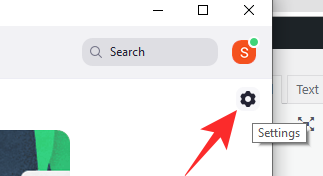
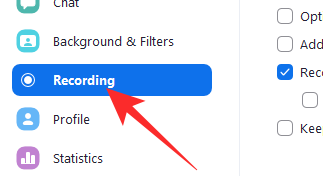
You’ll find the button right under the profile picture thumbnail. Now, click on the ‘Recording’ tab on the left-hand side panel.
At the top of the window, you’ll see a path right next to ‘Store my recording at.’ Click on the ‘Change’ button on the right of it.
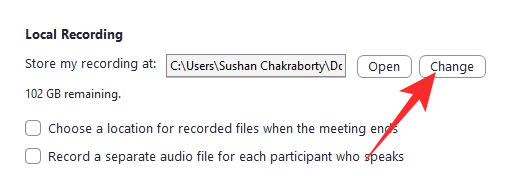
Navigate to the new destination folder and click on ‘Ok’ at the bottom right portions of the screen.
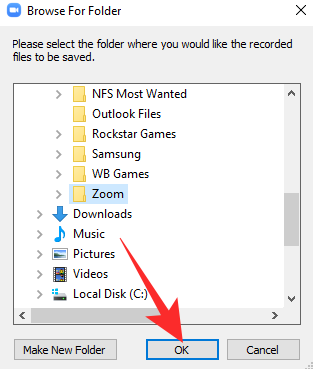
That’s all! The default recording location would be changed instantly.
Where do the Zoom local recordings go on your mobile?
Zoom’s mobile client does not allow you to record locally. The only option is cloud recording, and those aren’t very easy to access. So, if you do not have a paid Zoom license, you will not be able to record from the Zoom mobile app — period.
Where do the Zoom cloud recordings go?
Over the course of the article, we have checked out local recording and how you can tinker with it. Now, it’s time to focus on cloud recording.
Cloud recording, of course, is the more sophisticated solution for most, since it doesn’t involve dissolving your onboard storage. However, the level of sophistication also makes it pretty difficult for regular users to access the files on the go.
To access recordings as a user, first, you’ll have to log in to the Zoom web portal. Now, under the navigation menu, click on ‘Recordings.’ You’ll be able to find all the recordings associated with your Zoom account. Admins, on the other hand, are required to go to ‘Account management’ and then click on ‘Recording Management.’
After you get a hold of your Zoom cloud recordings, you can download the files, share with colleagues, and even delete them if you see fit. As you may have guessed already, cloud recordings are not as flexible as local recordings, meaning you will not be able to change the destination address of the recordings.
How to access Zoom cloud recordings from your phone
Zoom asks users to use a web browser from a computer to view and manipulate the Zoom recordings. However, if you are really desperate, you could give your phone’s browser a shot. Make sure to load the desktop version to get closer to your goal. To load the desktop version of a webpage on Google Chrome, go to the Zoom web portal, hit the vertical ellipsis button at the top-right corner of the screen and tap on ‘Desktop site.’
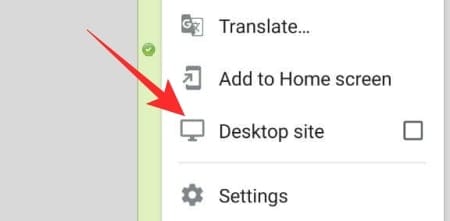
This would force the website to load its full-fledged version, not the mobile-only discounted one. Now, log in and go to either ‘Recordings’ or ‘Account Management’ > ‘Recording Management.’ You can download the recordings by clicking on ‘More’ and then ‘Download.’
RELATED





Discussion