
What to know
- Although Windows 11 doesn’t provide any easy way to disable the Caps Lock key, there are third-party apps such as PowerToys and AutoHotKey that let you disable it.
- Alternatively, you can alter a registry key to disable the Caps Lock key. Read the article below to know how to go about this.
Keyboard keys are not immune to damage, getting stuck, or registering unwanted inputs. This might be more prevalent especially if you have an old keyboard. This is where disabling a key might help you out.
The most affected key seems to be the Caps Lock due to its nature and function, that is, to change the character case. So if you’re stuck in the same boat, then here’s how you can disable the Caps Lock on Windows 11.
How to disable the Caps Lock on Windows 11 in 5 ways
Here are all the ways you can disable the Caps Lock key on Windows 11. Let’s get started.
Method 1: Using Registry Editor
You can either manually apply the registry hack or do this automatically using a registry script file given as option 2 below. We recommend using the manual method so that you’re aware of the changes made to your PC. This way, you can revert them or modify them anytime you need to. However, the files uploaded have been created in-house and apply the same changes automatically and are safe to use as well.
Option 1: Create a registry value manually
- Press
Windows + Rto launch Run, type regedit, and hit Enter.

- Navigate to the following key by pasting the path below in your address bar. You can also use the left sidebar to navigate to the same:
Computer\HKEY_LOCAL_MACHINE\SYSTEM\CurrentControlSet\Control\Keyboard Layout

- Right-click on your right and hover over New.

- Select Binary Value.

- Name the key ScanCode Map.

- Double-click the same and enter the following as its Value data:
00 00 00 00 00 00 00 00 02 00 00 00 00 00 3A 00 00 00 00 00

Note: Do not copy-paste this value. Simply type it in without spaces. - Click OK.

- Press
Ctrl + Alt + Delon your keyboard and select Sign out.

Log back into your PC and the Caps Lock key should now be disabled.
Option 2: Use a registry script file
- Download the file linked below to your PC and double-click the same.
DisableCapsLock.reg | Download Link

- Click Yes to add the new registry value.

- Click OK.

- Press
Ctrl + Alt + Delon your keyboard and click Sign out.
Log back into your PC and Caps Lock should now have been disabled on your keyboard.
Related: How to Ungroup Icons on Windows 11 Taskbar With Registry
Method 2: Using a batch file
- You can also use a batch or .bat file in case it is more convenient. Use the link below to download the same to your PC.
DisableCapsLock.bat | Download Link - Double click the batch file once downloaded and simply approve the UAC prompt if required.

- Press
Ctrl + Alt + Deland select Sign out.
Log back in and Caps Lock should now have been disabled on your PC.
Related: How to Install and Use Git on Windows 11
Method 3: If you have a third-party keyboard
Third-party keyboards often come with customization utilities that can help alter and change their behavior including the ability to disable keys. Use the links below to refer to common keyboard OEM websites and check out if your keyboard supports the same. You should be able to find information regarding disabling keys on the same page. In case your OEM is not listed below you can try searching for the same or refer to your keyboard package box.
OEM customization utility software:
You can also use 3rd-party apps to turn off the caps key on your keyboard on Windows 11. Third-party software like keyboard mappers can also help you disable the Caps Lock Key. We recommend using PowerToys by Microsoft and AutoHotKey. You can, however, opt for one of the alternatives mentioned below as well. Here’s how you can disable the Caps Lock using third-party software.
Related: How to Change Font in Windows 11
Method 4: Using PowerToys
- Download the latest version of PowerToys from the link below and install it on your PC.
PowerToys | Download Link - Once installed, right-click the PowerToys icon in your taskbar and select Settings.

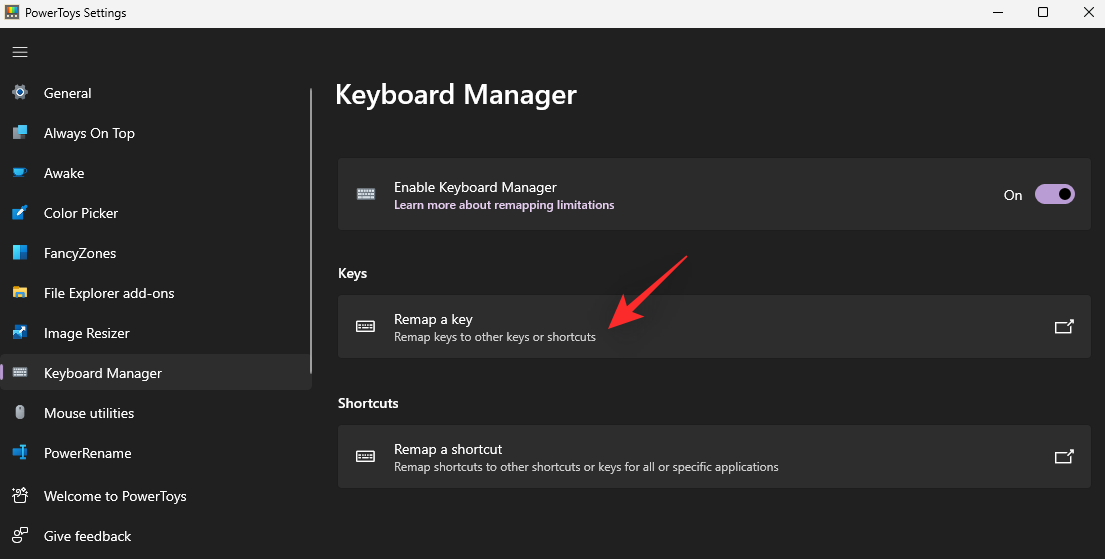
- Click Keyboard Manager.

- Click Remap a key.
- Click on the + icon.

- Click Type.

- Now press the Caps Lock on your keyboard and it should be automatically detected.

- Click OK.

- Click the drop-down menu under Mapped To.

- Select Disable.

- Click OK.

- You will now be warned that the Caps Lock has been disabled. Click Continue Anyway.

And that’s it! Caps Lock should now have been disabled on your PC.
Method 5: AutoHotKey
- Download and install AutoHotKey on your PC using the link below.
AutoHotKey | Download Link - Once installed, open a Notepad file and copy-paste the code below into your blank text file:
SetCapsLockState,AlwaysOff

- Press
Ctrl + Shift + Son your keyboard and name your new file in the following syntax:(FileName).ahk

- Choose a location for your AutoHotKey script and click the drop-down menu and select All files.

- Finally, click Save.

- Now go to the saved file and double click the same. The script will now run in the background and the same can be found in your taskbar.

As long as the script is running, Caps Lock will be disabled on your PC.
You can also set the script to Auto-Run whenever your PC turns on by using the steps below.
- Click on the script and press
Ctrl + Shift + Con your keyboard. This will copy its path to your clipboard.

- Launch the Start menu, type in Task Scheduler, and launch the same from your search results.

- Click Create Basic Task…

- Enter a name for the task. This task will auto-run the Caps Lock disable script whenever you turn on your PC.

- Click Next.

- Click and select When I log on.

- Click Next again.

- Ensure Start a program is selected and click Next.

- Press
Ctrl + Vin the text box under Program/Script.

- Click Next.

- Ensure that everything has been set up correctly and click Finish.

And that’s it! With this new task, the script will automatically launch each time your computer turns on.
More methods: Alterative apps you can try
- NumLocker | Download Link
- CapsLock Toggle | Download Link
- KeyMapper | Download Link
- KeyTweak | Download Link
FAQs
Here are some commonly asked questions about disabling the Caps Lock on Windows 11 that should help you get up to speed with the latest information.
Can I re-enable the Caps Lock?
Yes, you can always re-enable Caps Lock no matter which method you used. In case you used the pre-made registry or .bat file, please use the manual guide to delete the concerned registry value. In the case of other methods, simply revert the changes made to your PC and the Caps Lock should be re-enabled.
Will I have to re-apply changes with a Windows update?
No, these changes should carry forward with each Windows update unless reinstall Windows or reset your PC.
Is it safe to use third-party apps to disable the Caps Lock?
Yes, most third-party apps listed above are safe to use but each has its privacy policy and TOC. If you’re concerned about data collection, we recommend you check out their support websites for more information.
We hope this post helped you easily disable the Caps Lock on Windows 11. If you face any issues or have any more questions, feel free to drop them in the comments below.
RELATED