Built to run applications from a wide assortment of third-party sources on a server, Python is easily one of the most widely used open-source programming languages out there that lets you integrate systems efficiently and get work done quickly. And PIP is the best tool for the purposes of installing and managing Python packages. Python users would concur.
Although PIP comes pre-packaged with the newest versions of Python, if you’re using an older version, you will have to install PIP on Windows yourself. Here is everything you need to know about installing PIP on Windows 11.
What is PIP?
PIP (or Preferred installer program) is a tool that enables third-party package installations and is the standard package manager for Python. Through PIP, you can install and manage packages that contain some features that are not available in the standard Python library. As such, a wide variety of applications use PIP to install binary packages, which is one of the reasons for its widespread fame.
Related: Windows 11 Shortcuts: Our Complete List
How to check if PIP is already installed
As mentioned, PIP is so important for Python that it has been included with the Python installer since Python version 3.4 (for Python 3) and Python version 2.7.9 (for Python 2). That means it’s possible that you most probably have PIP already installed. To check if that is the case, first, open an elevated instance of the Command Prompt.
To do so, press Start, type cmd, then click on Run as administrator.

Then type the following command:
pip help

If the command prompt tells you that “‘pip’ is not recognized as an internal or external command, operable program or batch file”, it is either not installed or its system variable path hasn’t been set. If you’re sure that PIP has been installed, then go to the last section to know the fix.

If for some reason you don’t have pip installed or are using an older version, here are the steps to install pip on Windows 11.
Related: How to Create a Restore Point in Windows 11
How to Install PIP on Windows 11 [2 Ways]
Method #01: Install PIP while installing/upgrading Python 3
Download python from here.
Once downloaded, run the setup file. Then click on Customize installation.

Here, make sure there’s a tick next to ‘pip’ to ensure that it gets installed.

Although you wouldn’t need to do this for newer versions of Python, it is one way to be sure that it does get installed. Click on ‘Next’ and go ahead with the installation.

Method #02: Using get-pip.py file and command line
Well, here is how to fix an existing PIP installation or install a new one if you already got Pything but only want to install PIP now.
Step 1: Download the get-pip.py file
Firstly, download the get-pip.py file.
You may notice upon clicking the link that you are taken to a new page with a bunch of binary data. In that case, press ctrl+s to save the file. However, to easily download it, you will have to right-click on the link given above and select Save links as… option and then save the file on your hard disk.

Copy the file to the same directory where Python is installed. For us, it is Pythin39 but it may change for you depending on what version of Python 2 or 3 you have installed. So, the python folder for us is here: C:\Users\(username)\AppData\Local\Programs\Python\Python39.
Step 2: Install PIP via Command Prompt
Now, to install PIP, open the Command Prompt as shown before. Change the current path directory to the directory where the file is saved by typing the following command and press Enter:
cd C:\Users\shash\AppData\Local\Programs\Python\Python39

Now, type the following command and press Enter:
python get-pip.py

Wait for the installation process to complete. Once it’s done, you will see the ‘Successfully installed pip…’ message.

And that’s it! PIP is now installed on your system.
How to check PIP version and verify PIP installation
Just to be sure, you can verify whether pip has been properly installed or not by checking its version. To do so, enter the following command in the Command Prompt and hit Enter:
pip -V

The Command Prompt will show you the PIP version in the next line.

How to upgrade PIP
PIP, just like every software, gets updated from time to time and it’s important to stay updated to get the most out of the latest features and bug fixes. In fact, you can even update PIP with a simple command line. Here’s how to do so:
Open the Command Prompt as shown before. Then type the following command line and press Enter:
python -m pip install --upgrade pip

This will uninstall the previous version and get you updated to the latest PIP version.
How to downgrade PIP
On the other hand, if you are experiencing compatibility issues with the latest version of PIP, you may want to downgrade it to a previous version. Here’s how you can downgrade PIP:
Open the Command Prompt and enter the following command, followed by the specific PIP version number, and press Enter:
python -m pip install pip==(version number)

This will uninstall the previous version and install the PIP version that you’ve specified.
Fix: ‘PIP’ is not recognized as an internal or external command
There may be times when, while running the PIP command, the Command Prompt gives the “not recognized as an internal or external command” error message. There can be two causes for this – either PIP is not installed on your computer, or it’s not added to the PATH environment variable.
Since we’ve already shown how to install PIP on Windows 11, the problem most definitely lies with the Path environment variable not being updated. To fix this error message, follow the instructions given below:
Press Start and search for System Environment Variables, and click on the first option.
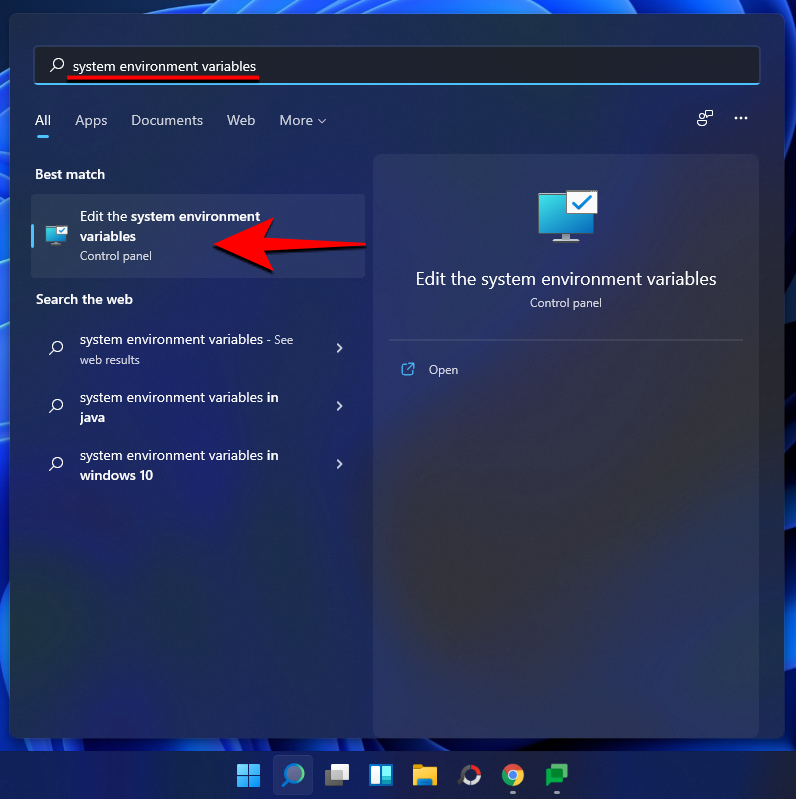
Now click on Environment Variables.

Under ‘System Variables’, double-click on Path.
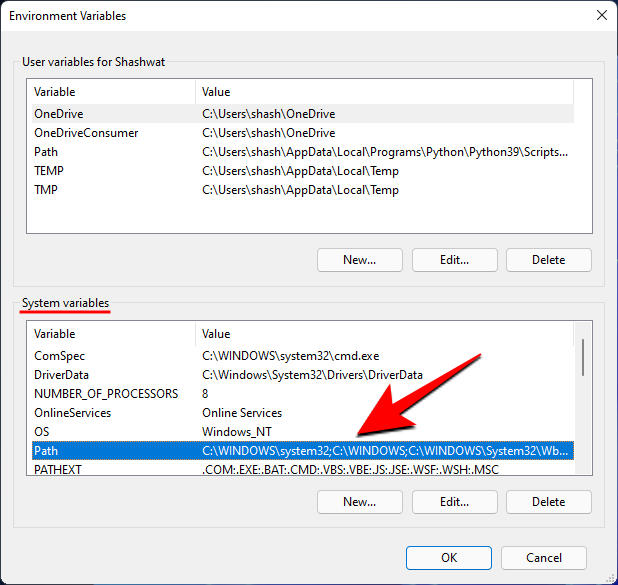
Here, click on New.

Then add the location where ‘PIP’ is installed. By default this is C:\Users\(username)\AppData\Local\Programs\Python\Python39\Scripts

Click OK on all open windows.
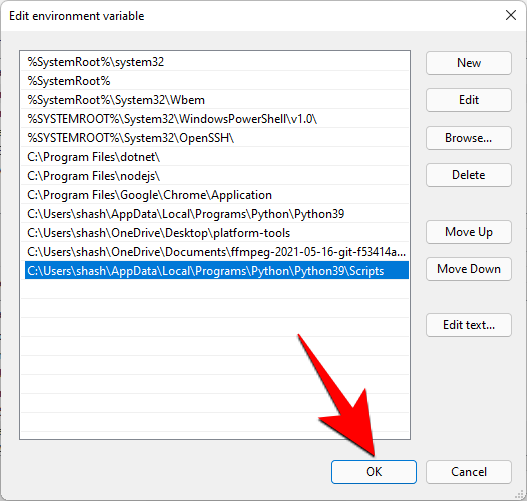
Now open a new instance of Command Prompt and try the ‘pip’ command again. Because the command prompt now knows where to look for the ‘pip’ command, it won’t throw up the error message again.
So this is how you can install PIP on Windows 11, upgrade, or downgrade it.
RELATED
- How to Change a Wallpaper on Windows 11
- How to Ungroup Icons on Windows 11 Taskbar With a Registry Hack
- What Windows 11 Services to Disable Safely and How?
- How to Show Hidden Files on Windows 11
- How to Change Brightness on Windows 11
- How to Find Product Key on Windows 11


