
What to know
- From the Action Center, to the keyboard shortcuts to the Settings app to your Graphics panel, there are several ways to change the brightness levels on Windows.
- Terminal apps like PowerShell and CMD also let you change brightness levels (check commands in the guide below).
- If you have an external monitor, you can use the monitor buttons or on-screen display to change brightness.
Screen brightness is an integral part of using modern-day computing devices, especially if you spend long hours looking at the screen. It helps you reduce eye strain, improve legibility, and view content easily and effectively.
However, depending on your setup, it can sometimes be difficult to manage your brightness, especially on Windows 11 with its new UI changes. If you’re having issues adjusting your brightness, here are all the ways to manage it on Windows 11.
How to change brightness on Windows 11 [10 Ways Explained]
Single monitor users can use the methods below to adjust their brightness on Windows 11. This includes desktop systems using a single monitor as well as laptops. Let’s get started.
Method 1: Using the Action Center
The action center is the easiest way to access and adjust the brightness on your PC.
- Press
Windows + Ato launch the action center. You can also click the taskbar icons in the bottom right corner of your screen.

- Now click the slider and adjust your screen brightness as needed.

You will now have adjusted your brightness from the action center.
Related: How to Add, Remove or Change Order of Shortcuts in Windows 11 Action Center
Method 2: Using keyboard hotkeys
If you’re using a keyboard with dedicated hotkeys then you can use the same to adjust your brightness. This mostly applies to laptops and third-party keyboards.
Look for a brightness icon on your keyboard. Most keyboards will have them located in the Function or Fn keys while third-party keyboards might have dedicated keys at the top.
Simply use these keys to adjust your brightness. If you’re a laptop user, you will most likely need to use a combination of the Fn + Brightness key to adjust your brightness. This is because the key will act as a function key unless using the dedicated Fn key as a modifier to use its alternative function.
If you wish, you can change this behavior on Windows using the Fn Lock function on most keyboards.
The Fn lock is usually activated by Fn + Caps Lock or Fn + Esc. If you have this feature, then you can quickly change the functionality of your Function keys using these combinations.
However, if your keyboard does not have an Fn lock feature then you’ll have to continue using the dedicated key combination on your keyboard to control your brightness.
Related: Windows 11 Shortcuts: Our Complete List
Method 3: Using dedicated Monitor controls
If you don’t have access to the brightness slider in your action center then it is likely because you’re using an external monitor.
Unless your external monitor comes with a dedicated driver or utility, Windows has no way of controlling the brightness using in-built utilities.
In such cases, you will have to use the OSD of your monitor to change and adjust its brightness. Most monitors will use the following terminology for brightness settings in their OSD.
- Brightness
- Backlight
- Backlight intensity
Note: If your monitor has the option for both Brightness and Backlight, then Backlight will help you adjust the actual brightness of your monitor. The Brightness option instead will adjust the Gamma for your PC display output.
Here are some common monitor OEMs and their dedicated apps that will help you control your monitor’s brightness and more. Use either of the links below depending on your monitor’s OEM.
- LG | Link
- Samsung | Link
- Asus | Link
- Acer | Link
- AOC | Link
- Gigabyte | Link
- BenQ | Link
- Alienware | Link
- MSI | Link
- ViewSonic | Link
- Dell | Link
- Lenovo | Link
For example, for our LG monitor whole model no. is 34GL750-B, here is what we will do download its software to manage the display, including brightness.
- First, we will visit LG’s support page for software, drivers and firmware here. Now, we will simply search the model no. of the monitor in the search box here.

- From the search results, we download the Windows software because our system is running Windows 11.

- Once the software is downloaded, we can simply install it and then open and use it to control the brightness.

Related: How to fix ‘OEM Unlock greyed out’ or ‘ OEM Unlock disabled’ problem
Method 4: Using the Settings app
You can also adjust your brightness in Windows 11 using the settings app. Follow the guide below to help you along with the process.
- Press
Windows + iand click Display.

- Now adjust the slider for Brightness under Brightness & color.
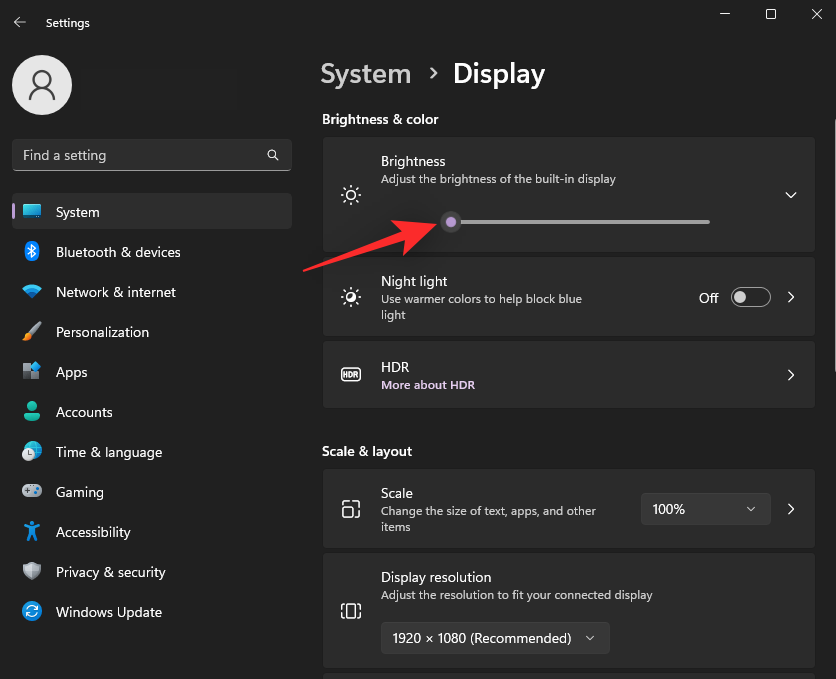
- You will now have adjusted your brightness from the Settings app.
Related: Customize Windows 11 in 20 ways: Step-by-step guide
Method 5: Using PowerShell
If you’re facing driver issues or don’t have a brightness slider accessible to you, then you can try using a PowerShell command to adjust the brightness on your PC. Let’s take a quick look at the procedure.
- Press
Windows + Rto launch Run.

- Enter the following command and press
Ctrl + Shift + Enteron your keyboard:powershell

- Now use the following command to adjust your screen brightness. Replace BrightnessValue with a number between 1 to 100. One is the lowest brightness level supported by your display while 100 is the highest.
(Get-WmiObject -Namespace root/WMI -Class WmiMonitorBrightnessMethods).WmiSetBrightness(1, BrightnessValue)
- Once executed, your screen brightness will have changed automatically on your PC. Use the following command to exit PowerShell:
exit

And that’s it! You will now have adjusted your monitor brightness using a PowerShell command.
Method 6: Using Command Prompt (CMD)
You can also adjust your screen brightness using a CMD command. This can come in handy when in recovery environments or when you’re facing issues with your PC. Use the steps below to help you along with the process.
- Press
Windows + Rto launch Run.
- Type in the following and press
Ctrl + Shift + Enteron your keyboard:cmd

Note: If you’re in a recovery environment then you can press Shift + F10 on your keyboard to launch CMD as an administrator. - Now type in the following command to adjust your screen brightness. Replace BrightnessValue with a number between 1 to 100. One being the lowest brightness value supported by your monitor while 100 being the highest:
PowerShell (Get-WmiObject -Namespace root/WMI -Class WmiMonitorBrightnessMethods).WmiSetBrightness(1, BrightnessValue)

- Once done, use the following command to close CMD:
exit

You will now have adjusted your screen brightness using Command Prompt.
Method 7: Using the Mobility Center
Mobility Center is another utility offered by Microsoft where you can control important peripherals on your PC including monitor brightness. Here’s how you can use it to adjust the brightness on Windows 11.
- Press
Windows + Xand click Mobility Center.

- Now use the slider under Display brightness to adjust the brightness on your PC.

And that’s it! You will now have changed your screen brightness using the Mobility Center on Windows 11.
Method 8: Using your Graphics Card panel
You can also use the Graphics Control Panel offered by your Graphics card OEM to control the brightness of your display. Follow one of the sections below depending on your graphics card manufacturer.
For Nvidia
Make sure you have the Nvidia Control Panel software installed on your PC. If not, get it from either here or here.
- Now, to open the Nvidia Control Panel software, press the Windows key on your keyboard to open the Start menu and then search for Nvidia.

- Now, under Display, click Adjust desktop color settings.

- Now adjust the brightness slider to adjust your display brightness.

- Once you’re happy with your settings, click Apply.

And that’s it! You will now have changed your brightness from the Nvidia Graphics Control Panel.
For AMD Catalyst Center
Make sure you have the AMD Catalyst Control Center software installed on your PC. If not, get it from here.
- Launch the AMD Catalyst Control Center from your Start menu.
- Now click Desktop Management on your left and select Desktop Color. If your monitors show up as Digital Flat Panel, then click the same and select Display Color (Digital Flat-Panel).

- You will now have a brightness slider for the current monitor on your right. Use it to adjust the brightness on your PC as needed.

- Click Apply.

You will now have adjusted the brightness using the AMD Catalyst Center.
For AMD Radeon Settings
- Right-click on an empty area on your desktop and select AMD Radeon Settings.

- Now click Display.

- You will now be shown all the output displays connected to your PC. Click Color for the concerned display.

- Now use the brightness slider to adjust your brightness as needed.

You can now close AMD Radeon Settings and continue with your work as needed.
For AMD Radeon Software
- Right-click on your desktop and launch AMD Radeon Software by selecting the same.

- Click the Gear (
) icon.

- Click Display.

- Now use the Brightness slider under Custom Color to adjust your brightness.

And that’s it! You will now have adjusted your brightness using AMD Radeon Software.
For Intel
If you’re a laptop user or don’t have a dGPU, then you can use the Intel Graphics Command Center to adjust the brightness on your PC. Follow the steps below to help you along with the process.
Note: The Intel Graphics command center lets you adjust the brightness for the overall display signal your monitor receives. This means that it can mess up your color settings if you go too far. We recommend you keep an eye on your overall colors when adjusting the brightness using the Intel Graphics command center.
- Intel Graphics Command Center | Download Link
- Download and install the Intel Graphics Command Center on your PC using the link above. You will be redirected to the Microsoft Store. Simply click Install to install the same on your PC.

- Now launch the Intel Graphics Command Center from the Start menu and click Display on your left.

- Click Color.

- Now use the slider beside All Colors under Brightness Enhancement to adjust the display brightness.

Note: This is the recommended way to adjust your display’s brightness to avoid messing up your colors. However, if your display’s color profile does not comply with this setting, you can adjust individual brightness for RGB by disabling the toggle for All Colors.
Once you’re happy with your display brightness, you can close the Intel Graphics Command Center on your PC.
Method 9: Using third-party apps
As a last resort, you can try third-party apps on your PC to adjust your brightness. We recommend the following apps that should help you adjust your brightness easily.
Keep in mind that some of these apps might affect your display colors instead of their backlight value. In such cases, you can opt for a different utility in case that does not help your display.
- Win10 Brightness slider | Download Link
- ClickMonitorDDC | Download Link
- Dimmer | Download Link
- Gammy | Download Link
- Brightness Tray | Download Link
- CareUEyes | Download Link
Method 10: Automatically let Windows adjust your brightness
You can also let Windows automatically adjust your display’s brightness based on your current ambient light. This feature is mostly applicable to laptops and All in one PCs that have a built-in light sensor.
We recommend you check your PC documentation for more information on the same. Follow the steps below to enable and use auto-brightness on Windows 11.
- Press
Windows + iand click Display.
- Now expand Brightness by clicking the arrow beside it.

- Check the box for Change brightness automatically when lighting changes.

You can also check the box for Help improve battery by optimizing the content shown and brightness. This option will allow Windows to automatically optimize the brightness on your PC depending on the content being displayed on your screen.
Close the Settings app and Windows 11 should now automatically be able to manage the brightness on your PC.
Tips to change brightness on Windows 11 with multiple monitors
If you have a multi-monitor setup then options are slim when it comes to managing the brightness on all your monitors. You can either use the OSD and dedicated keys on your monitor or opt for a third-party utility to help you with the same. Follow either of the sections below depending on your current preferences and requirements.
Tip 1: Using dedicated monitor keys
Most external monitors come with a built-in OSD display that lets you access the monitor’s features and adjusts its display output. This OSD can be accessed using the dedicated keys found on your monitor or its dedicated remote.
Launch the OSD on your monitor and look for a slider or value named one of the following.
- Brightness
- Luminance
- Backlight
Once found, adjust its value to increase or decrease the brightness on your monitor.
This is the recommended way to increase the brightness of your monitors without the hassle of dealing with bugs and unwanted artifacts.
Your monitor could also have a dedicated OEM utility that helps you manage its brightness, color space and more. Use the links below to help you check for the same.
- LG | Link
- Samsung | Link
- Asus | Link
- Acer | Link
- AOC | Link
- Gigabyte | Link
- BenQ | Link
- Alienware | Link
- MSI | Link
- ViewSonic | Link
- Dell | Link
- Lenovo | Link
If however, you own a display that does not have a built-in OSD or brightness settings, then you can use one of the third-party apps mentioned below to adjust the brightness on your monitor.
Tip 2: Using third-party apps
We recommend the following apps to adjust the brightness on your multi-monitor setups. Our top picks are Monitorian and Dimmer. Both these apps work well with multi-monitor setups with built-in support for most screens currently available on the market.
Monitorian is our first pick as the tool can hook directly to your monitor’s backlight and adjust its brightness. Dimmer on the other hand will resort to adjusting brightness and gamma values to increase or decrease the brightness if no compatible drivers are found. Use the links below to download and test the apps and find one that best fits your current setup.
- Monitorian | Download Link
- Dimmer | Download Link
- PangoBright | Download Link
- ClickMonitorDDC | Download Link
Note: ClickMonitorDDC is a long-standing app that has been used by users worldwide to adjust their monitors. However, the app hasn’t been updated in a while and a known bug seems to reduce its performance on Windows 11. If you face this bug, simply turn off re-read values for the tool to fix this bug.
- TwinkleTray | Download Link
Why is my brightness slider greyed out?
There can be a couple of reasons why the brightness slider is greyed out or missing on your PC. The most common ones have been listed below.
Third-party monitor
If you’re using an external third-party monitor then it’s likely that its brightness is adjusted using its OSD and dedicated keys. You might also have a remote for the same to easily access the OSD on your monitor.
This is a good reason why the brightness slider is not showing up in Windows. We recommend you try adjusting your brightness using the dedicated keys on your monitor.
Your OEM might also have a dedicated Windows utility that allows you to manage the OSD settings within Windows. We recommend you check your OEM’s support site for more information on the same.
GPO restrictions
Some PCs can have Group Policy restrictions in place that prevent them from adjusting the monitor brightness from within Windows. This is usually applicable to PCs issued or managed by an organization.
Some organizations tend to block brightness adjustments on older PCs as a way to prevent exploits from being used on their systems. If you have administrator access on the PC, you can use the next section to disable this restriction accordingly.
Regedit restrictions
The brightness adjustment can also be restricted using the Registry Editor. Ideally, this shouldn’t happen on your PC but if it was or is managed by an organization then this could likely be the case for you.
Additionally, if you installed third-party programs or OEM utilities that can edit your registry settings then it could also be a reason why the brightness slider is unavailable to you. You can fix the same using the dedicated section below.
How to fix greyed brightness slider on Windows 11
You can fix the greyed-out brightness slider in Windows 11 using the fixes below. Let’s get started.
Method 1: Use dedicated keys
As discussed above, if your monitor has dedicated menu keys with a built-in OSD, then we recommend you use the same to adjust your brightness. Brightness will be labeled one of the following terms in your OSD.
- Brightness
- Luminance
- Backlight
Many old monitors were restricted to the OSD when it came to adjusting the color and brightness of the image. This could be a major reason why the brightness slider isn’t available to you. Using the dedicated keys to adjust your brightness is the only option at this point.
Method 2: Check GPO settings
If you suspect that brightness adjustment has been restricted using the Group Policy Editor then you can check and enable the same using the steps below.
- Press
Windows + Ron your keyboard to launch Run.

- Now type in the following and press Enter. You can also click OK if needed:
gpedit.msc

- Navigate to the following location using the left sidebar:
User Configuration > Administrative Templates > Control Panel > Display

- Double click on Disable the Display Control Panel.

- Select Disabled.

- Now click OK.

Restart your PC for good measure. If GPO restrictions were preventing you from adjusting the brightness on your PC then the issue should now have been fixed.
Method 3: Check Registry settings
You can also check your registry settings to check if display brightness adjustment has been disabled in the same. Use the steps below to help you along with the process.
- Press
Windows + Rto launch Run.
- Type in the following and press Enter. You can also click OK if needed:
regedit

- Now navigate to the following path using the left sidebar. You can also copy-paste the same in the address bar at the top:
Computer\HKEY_LOCAL_MACHINE\SOFTWARE\Microsoft\Windows\CurrentVersion\Policies

- Double click the DWORD value named NoDispCPL on your right.

- Enter 0 as its Value data: to disable brightness restrictions.

- Click OK.

Close the registry editor and restart your PC for good measure. If restrictions in the registry values were preventing you from adjusting the brightness, then the issue should now have been fixed on your system.
Method 4: Uninstall Teamviewer
If you’re a TeamViewer user then it is a known utility that causes issues with brightness adjustment on multiple systems. Uninstalling the same will help you fix this issue and here’s how you can do the same on your PC.
- Launch the Start menu, search for Control Panel and launch the same from your search results.

- Click the drop-down menu in the top right corner and select Large icons.

- Click on Programs and Features.

- You will now be shown a list of programs and utilities installed on your PC. Click and select TeamViewer from the list.

- Click Uninstall at the top.

- Now follow the on-screen instructions to uninstall TeamViewer from your PC. Once done, restart your PC for good measure. If it was the TeamViewer bug causing issues with brightness on your PC, then it should now be fixed.
Method 5: Update monitor drivers
You can also try to update your monitor drivers. Microsoft uses generic drivers for most monitors connected to a PC. These drivers are quite comprehensive but can sometimes cause issues with high-end monitors that have dedicated features that require specialized drivers.
We first recommend you check your OEM website for dedicated drivers for your monitor. However, if there are no dedicated drivers for your monitor then you can try updating your drivers manually using the guide below.
- Press
Windows + Xand select Device Manager.

- Double click on Monitors.

- Double click on your monitor under the same.

- Click and switch to the Driver tab.

- Now click Update Driver.

- Click and select Search automatically for drivers.

- Windows will now search and install the best drivers available for your monitor. Click Close once done.

If Windows was able to update drivers for your monitor then restart your PC for good measure. However, if no drivers were found then you can move to the next step below.
Method 6: Re-install your monitor
You can also re-install your monitor to fix background conflicts and bugs with the driver used by your monitor. Follow the guide below to help you along with the process.
- Press
Windows + Xand click on Device Manager.
- Now double click on Monitors.
- Right-click your monitor under the same.

- Select Uninstall device.

- Click Uninstall to confirm your choice.

- The monitor will now be uninstalled from your PC. Fear not, you will still have a display signal. Once done, click the Scan for hardware changes icon at the top.

- And that’s it! Windows will now reinstall your monitor.

If background driver conflicts were preventing you from accessing the brightness slider on your PC, then this issue should now have been fixed.
Method 7: Restart the Display enhancement service
As a last resort at this point, you can try restarting the Display enhancement service in Windows. Windows 11 is designed with background display management services and tools in mind. The service helps watch DRM content, stream HDR videos, and automatically adjust your video settings and color profile based on the content being played on your PC.
While great features, they can sometimes conflict with monitors that come with similar features built-in. Restarting the Display enhancement service can help fix the same. Use the guide below to help you along with the process.
- Press
Windows + Rto launch Run.
- Type in the following and press Enter. You can also click OK:
services.msc

- Now find Display Enhancement Service in the list on your screen and right-click the same.

- Select Restart from the context menu.

- Once the service is restarted, then try accessing the brightness slider again. If Windows 11 background conflicts were the cause of your issue, then they should now be fixed on your system.
How to toggle display dimming when PC is low on battery
If you’re facing dim display or brightness issues when your PC is running low on battery with the battery saver turned on, then it is due to how Windows 11 is designed to manage battery life on your device. You can disable this feature for better legibility and visibility at the cost of extra power usage. Follow the guide below to help you along with the process.
- Press
Windows + iand click Power & battery.

- Click and expand Battery saver.

- Now turn off the toggle for Lower screen brightness when using the battery saver.

And that’s it! Your screen brightness will no longer be dimmed when using your device on a battery saver.
We hope this post helped you easily manage brightness on Windows 11. If you face any issues, feel free to reach out using the comments below.
Related: How to Turn On or Off Content Adaptive Brightness Control in Windows 11


