Thanks to the pandemic, video conferencing solutions have become the most-used tools over the last year. Things are slowly returning to normalcy, of course, but things are still far from ideal. Zoom, which is the front runner of the segment, has continued to offer features that keep users hooked to their software, and we don’t expect the dependency to vanish overnight.
In general, Zoom is a pretty reliable tool. However, despite the developers’ best attempts, there are occasions when the application fails to keep the user engaged, primarily due to the number of different hardware combinations it’s forced to adjust to.
Today, we’ll take a look at a persistent problem in Zoom on Windows 10, tell you how you can fix the black screen issue during a Zoom video call.
Related: How To Add Pronouns to Zoom
What is the Black Screen on Zoom issue?
Many users have found their Zoom client crashing or displaying a black screen while in a meeting. This phenomenon has been more common while opting for the screen sharing option or joining a meeting. Additionally, this issue has been prevalent on Windows 10, meaning if you have a Mac, you might not experience this issue at all.
Since Windows 10 can be installed on a bunch of different hardware combinations, an error of this sort is hardly a surprise. Incompatibility is usually the biggest culprit behind these issues but other reasons cannot be ruled out as well. Below, we’ll check each of them out and give you possible solutions.
Related: Does Zoom Notify About the Apps Installed on Your PC or Phone?
How to solve Zoom black screen issue on Windows 10
Battling the crippling Zoom black screen issue? Here is how you can get rid of it.
Method #01: Restart your PC
Let’s get this show on the road with the most basic solution — restarting your PC. Hit Windows + X to access the Start context menu. Now, take your cursor over ‘Shut down or Sign out.’ The menu will expand, allowing you to pick ‘Restart.’

After your PC boots up, relaunch Zoom and try screen sharing once again.
Method #02: Change screen resolution
Having an incompatible screen resolution can also mess up your Zoom experience. So, it’s not a bad idea to experiment with screen resolution and figure out the one that works for you. To get to resolutions, right-click anywhere on your desktop wallpaper. Now, go to ‘Display settings.’

Scroll down until you see the ‘Display Resolution’ section. Click on the dropdown menu.

Finally, select from any of the resolutions presented there.
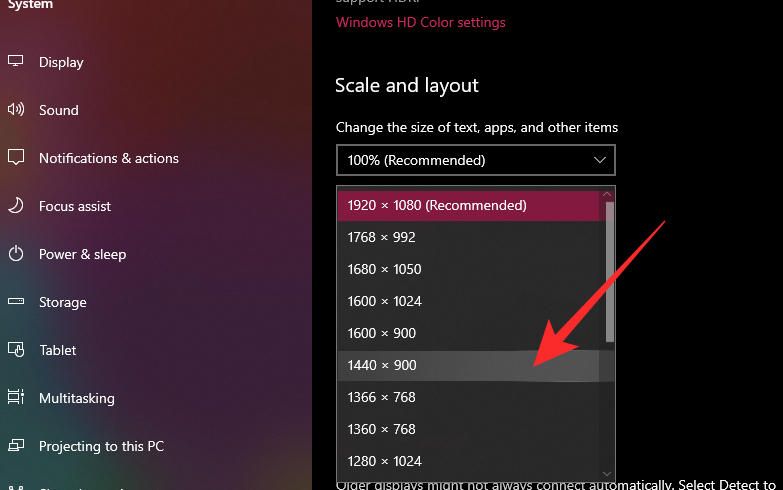
Log back into Zoom and see if the black screen issue has been fixed.
Method #03: Turn off automatic graphics switching
The issue has been prevalent on systems with dual graphics — integrated and external. Due to abrupt switching from one GPU to another, Zoom’s processes get interrupted, which ultimately manifests itself as a black screen. Nvidia systems have been notorious for black screen issues, but AMD chips also need to be tested comprehensively. In this guide, we’re looking to troubleshoot Nvidia graphics cards, since Zoom itself believes it to be the main culprit.
First, go to ‘Control Panel’ by looking it up in Windows Search.
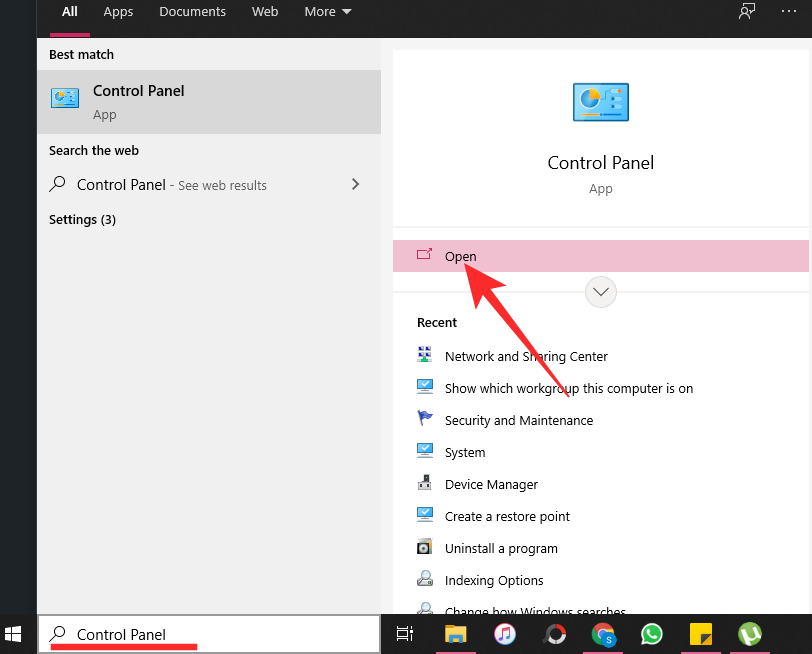
Now, go to ‘Nvidia Control Panel.’

On the left-hand side panel, click on ‘Manage 3D Settings.’ You’ll find it under the 3D Settings banner. Now, go to the ‘Program Settings’ tab. Click on ‘Add’ on the right of ‘Select program to customize.’

You’ll have to locate and add Zoom’s Cpthost application. After clicking on ‘Add,’ click on ‘Browse.’ Then, navigate to your user directory > AppData > Roaming > Zoom > Bin. Select the ‘Cpthost’ application and hit ‘Open.’ Alternatively, you can paste this path to your Windows Explorer address bar.
C:\Users\Replace_With_Your_Username\AppData\Roaming\Zoom\bin
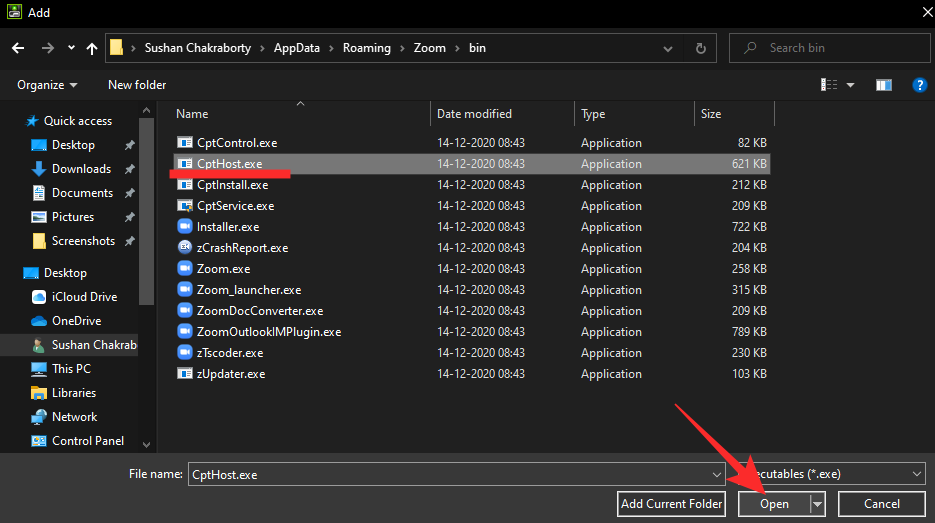
You’ll need to change the Preferred Graphics Processor and pick Integrated graphics. Apply the changes and exit the area. Restart Zoom and share your screen to see if the black screen issue is resolved.
Method #04: Don’t let Google Chrome or any other browser in the background
Google Chrome is the most widely used internet browser in the world, and no one would blame you if you use it as your default browser. However, the Google-owned internet browser has proven to be a spoilsport when it comes to Zoom calls, with many claiming that Zoom’s black screen issues only popped up when Chrome was running in the background.
So, if you find yourself on Zoom calls while browsing the internet on Google Chrome, we’d advise you to lay off it for a while.
How to stop Chrome from running in the background:
Open Chrome browser, click the 3-dot button in the top right, and then go to Settings > Advanced > System. Now, toggle off ‘Continue running background apps when Google Chrome is closed’.
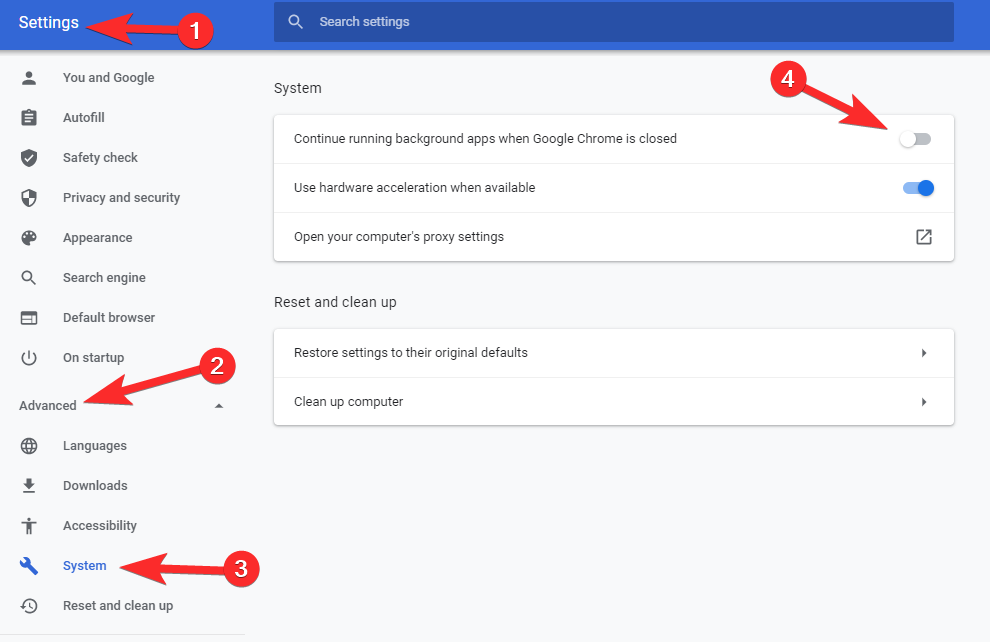
If browsing during a Zoom call is of utmost importance, you can either use Mozilla Firefox or Windows 10’s built-in Edge browser. The latter would make you feel right at home, thanks to the Chromium platform it’s based on. But again, these browsers could run into issues too.
Method #05: Update the Zoom client
The black screen issue isn’t doing Zoom’s reputation any favors, which is why it will do its best to come up with a solution as soon as possible. And it will do that with the help of software updates. So, to fix known issues in the most reliable manner, it’s important to keep the Zoom desktop client up to date at all times. To look for an update, first, launch the Zoom client and click on your profile picture thumbnail at the top-right corner of the window. Now, click on ‘Check for updates.’

You’ll get a prompt if an update is available for you. Click on ‘Update’ to kickstart the update.
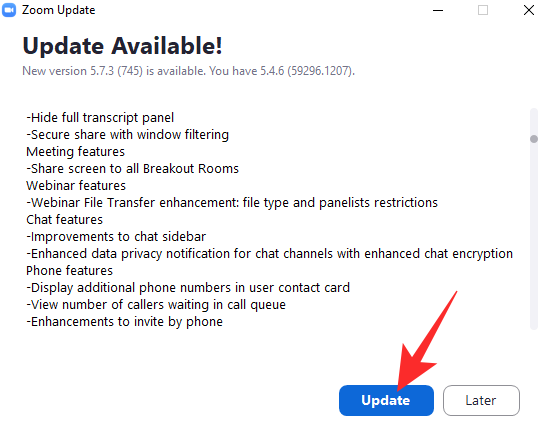
The program will relaunch after the update completes.
Method #06: Run laptop in high-performance mode
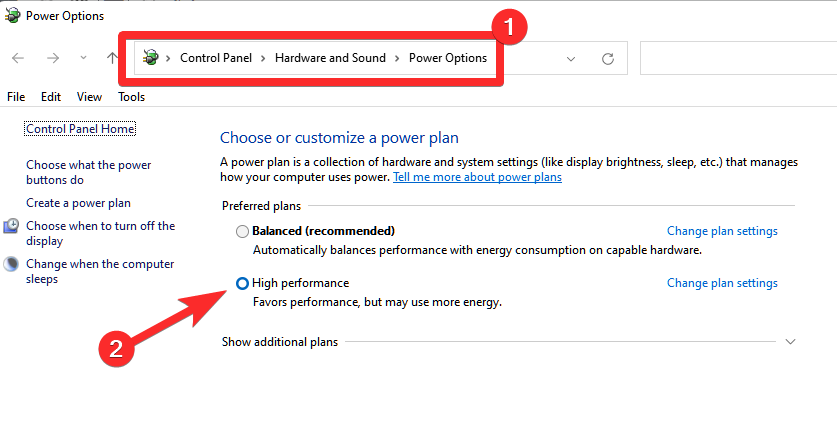
While desktops get the privilege of firing on all cylinders at all times, laptops are required to strike a balance between performance and battery life. When it’s juggling between the two, you might notice a stark dip in performance from time to time. Zoom, being a resource-hungry application, would bring out the deficiencies pretty easily. So, if your laptop comes with a dedicated graphics card, it’s best if you keep your machine in high-performance mode during Zoom calls.
After you plug in your charger, click on the battery button at the bottom-right corner of your taskbar. Now, select ‘High performance’ instead of ‘Balanced.’ Zoom should now bank only on your graphics driver for video calls and more. It is to be noted that the high-performance mode would drain your battery very fast. So, only engage the mode when you can plug in your charger.
Method #07: Update driver
If you have a dedicated graphics card, you can look for a driver update to solve the Zoom black screen issue.
Related: 6 Ways to Update Drivers on Windows 11
1. Download driver from manufacturer’s website
You can get the latest driver for your card from the manufacturer’s website. Click on this link to get the latest driver for your Nvidia graphics card. And click here for AMD chipsets.
2. Update driver through device manager
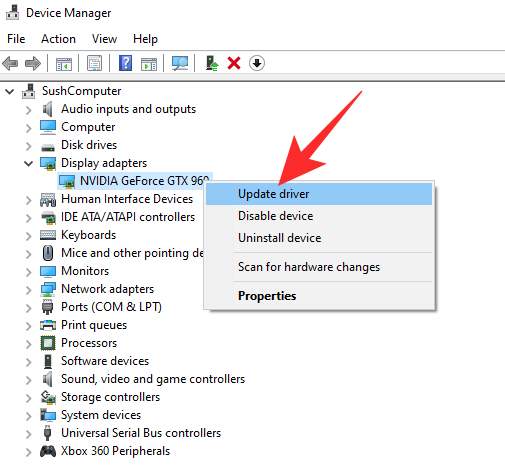
You can also update your graphics driver through the device manager. Press Windows + X to get the Start context menu. Now, click on ‘Device manager.’

Expand the ‘Display adapters’ section and right-click on your graphics card. Now, click on ‘Update driver.’
Select the ‘Browse my computer for drivers’ option.
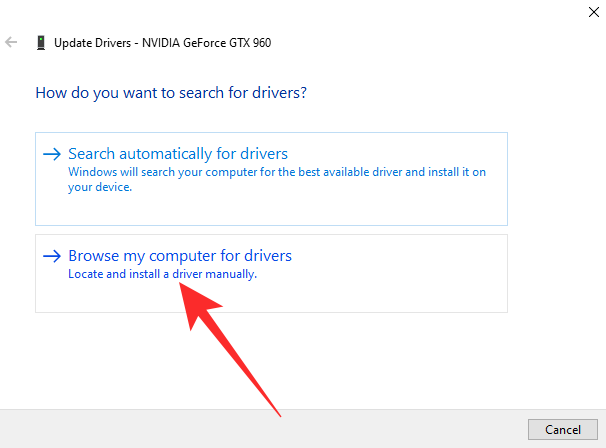
On the next screen, click on ‘Let me pick from a list of available drivers on my computers.’

Windows will list the available options. Select your graphics card and hit ‘Next.’
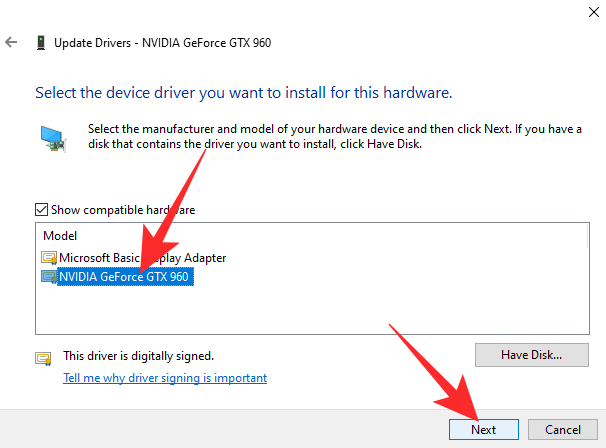
The installation would begin. Remember that your screen will go black and your computer might become unresponsive for some time.
Method #08: Update Windows
Windows updates are notorious for messing things up, but they can also lend you a helping hand from time to time. In this case, getting the latest update might actually do you some good. To get the latest update for Windows, click on the search bar at the bottom-left corner of the screen and look for “Windows update.” Click on the first option that pops up.
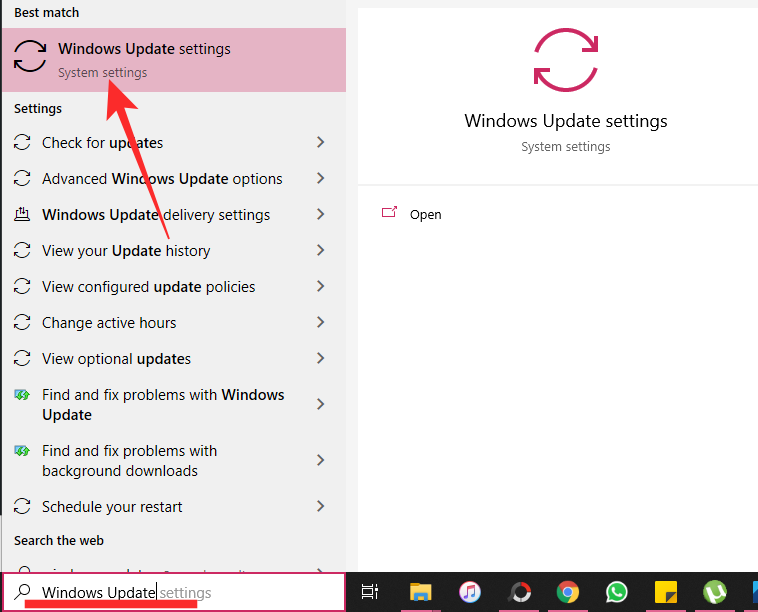
This will take you straight to the Windows Update screen. Click on ‘Download and Install’ if a version is available. If an update has already been installed, click on ‘Restart now’ to finish its installation.

RELATED
- Zoom Limit: Maximum Participants, Call Duration, And More
- How to Blur your Background on Zoom
- How To Add Zoom To Microsoft Outlook
- How to see everyone on Zoom on PC and Phone
- 12 ways to fix Zoom virtual background not working problem
- How to update your Zoom app on iPad, iPhone and Android phones and tablets?



This is quite a common issue for IT Support
Thanks for the significant information. It’s really appreciative article.