The evolution of Facebook seems to have taken a turn for the worse, in the past couple of years. The platform has been plagued with fake news, propaganda, and major privacy concerns. Having bought Instagram and WhatsApp, Facebook now pretty much has the power to creep into every detail of our lives. If you are tired of the company monetizing your personal data, then it might finally be time to quit Facebook.
If you are not sure how to go cold turkey, then you may opt to deactivate your account first. This allows you to take a sabbatical from the platform. Once you log back in, your account will get reactivated.
Related: Does Deactivating Facebook Deactivate Messenger?
But, if you are ready to move on from the predatory platform, then you can permanently delete your profile. Before you do hit the delete button, here is all you need to know about deleting your Facebook account.
What happens when you delete your Facebook account?
So, what happens to the account after you pull the plug?
- Your account gets deleted from the platform.
- You can no longer log into Facebook Messenger using your deleted account.
- You will be logged out of any apps and websites, where you have used Facebook to create an account.
- If you have an Oculus account linked to Facebook, then you will be logged out of it. You will also lose in-app purchases.
- It is not only your profile that will be de-platformed. All the posts, pictures, videos, and everything you have shared will get deleted.
- Pictures and videos of you, added by your friends, will not get removed. But you will no longer be tagged.
- Your chats with friends remain in their inboxes. But they cannot go to your profile from the chat.
- While most data is deleted from the platform, Facebook does store some data. They claim that data such as log records remain in the Facebook database after account deletion. However, the data is scrubbed of personal identifiers. So, it is no longer associated with you.
Thus, with the deletion of your Facebook account, most of the data gathered will get removed as well. Ready to hit the delete button? Here is how you do it.
Related: How To Find Drafts on Facebook App
How to delete a Facebook account
Your self-imposed de-platforming can be done either from the app or from the website.
Option #1: How to delete Facebook account from the app
Open the Facebook app on your device and tap the hamburger menu, on the top-right corner of the screen.
![]()
Scroll down in the menu. Once you find Settings & Privacy, tap on it.

Tap on Settings.

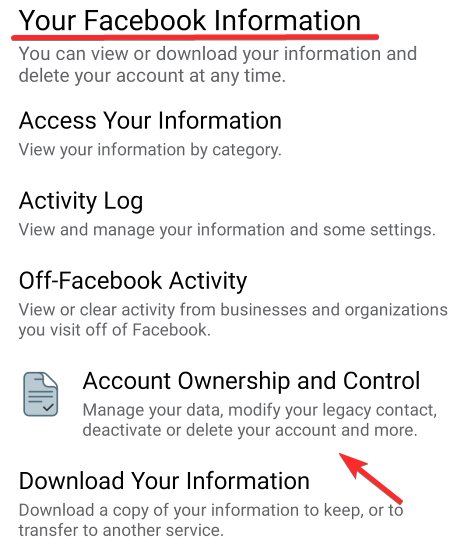
Scroll down to Your Facebook Information. Tap on Account Ownership and Control.
Tap on Deactivation and Deletion.

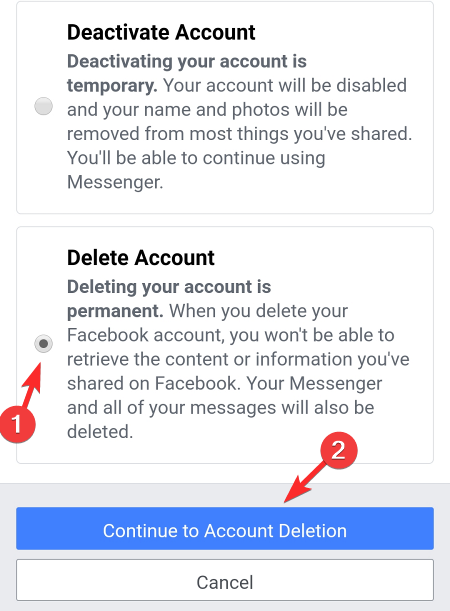
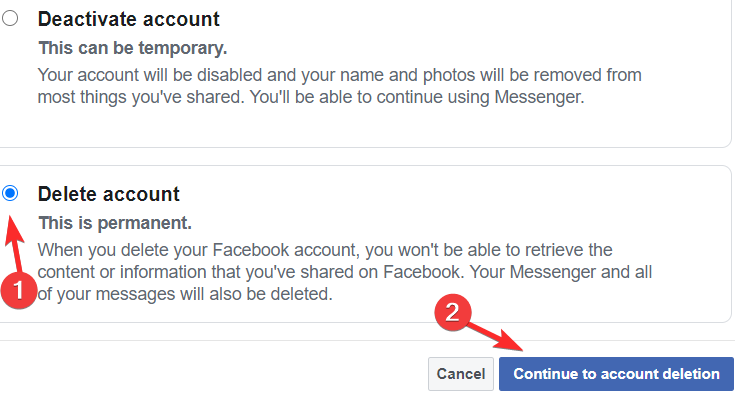
Select Delete Account. Tap on Continue to Account Deletion.
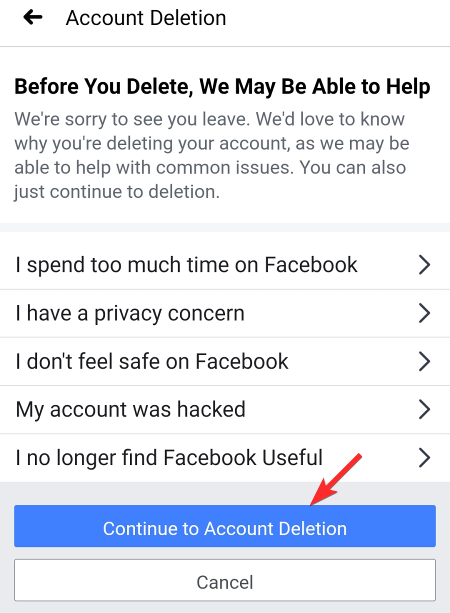
You will be asked why you want to delete your account. To proceed without choosing any options, tap the Continue to Account Deletion button again.
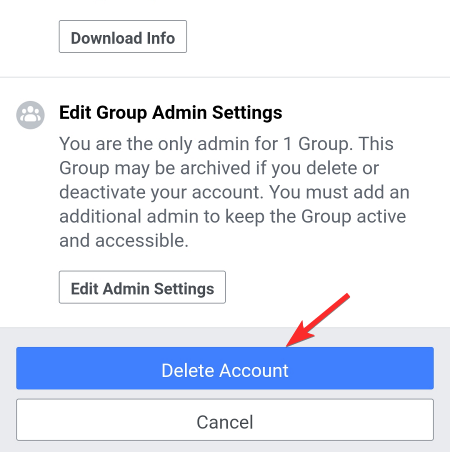
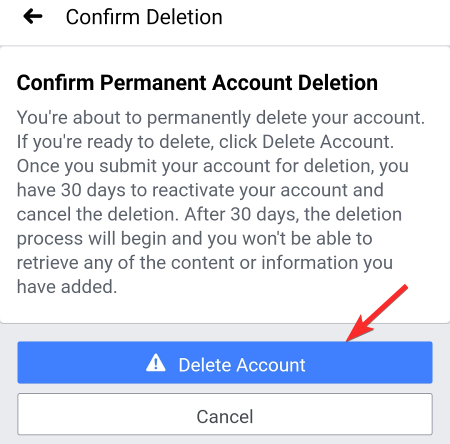
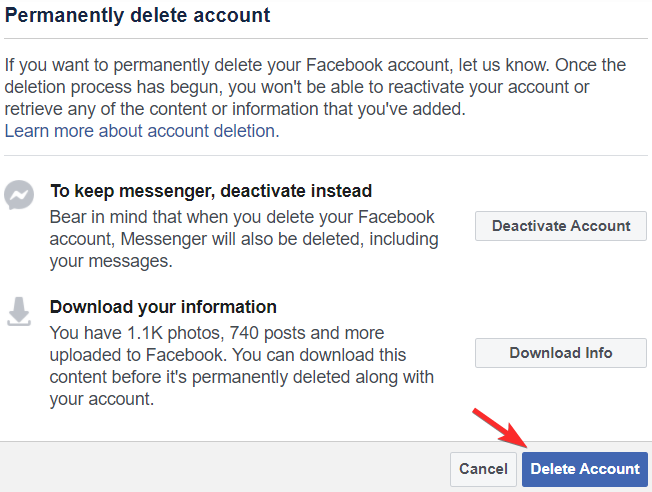
Facebook keeps promoting alternatives to deleting your account. But to proceed, scroll down and tap on the Delete Account button.
You will be asked to enter your password. Enter it and tap on Continue.
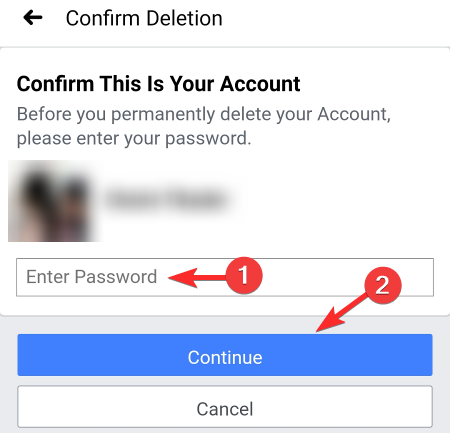
The final step is to press the Delete Account button once more.
This will start your account deletion process.
Option #2: How to delete Facebook account from the website
Open Facebook on your browser.
Click on the arrow icon on the top-right corner, next to the notification icon.
![]()
Click on Settings & Privacy, from the drop-down menu.

To open the setting page, click on Settings on the menu.

From the tab on the left side of the screen, click on Your Facebook information.

On the right side of the screen, click on Deactivation and deletion.

Select Delete Account and click on Continue to account deletion.
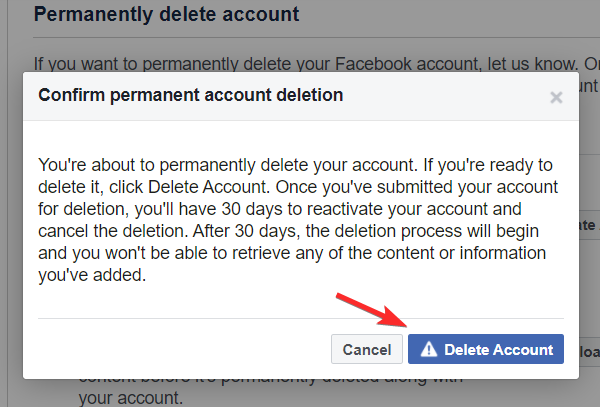
Facebook will warn you of losing your account. To continue, click on Delete Account.
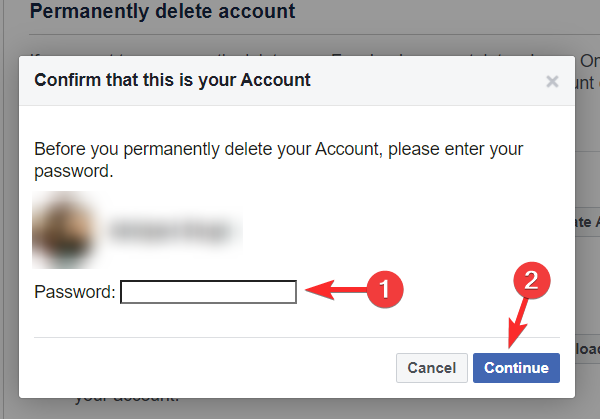
Enter your password in the dialogue box and press Continue.
On the final prompt, click on Delete account to start the account deletion process.
Related: How To Change Your Facebook Name
How to retrieve a deleted Facebook account
Facebook allows users to have a way to return to the platform even after deleting their accounts.
You have a 30 day period during which you can log back in to have your account reactivated.

Once the 30-day cool-off period is over, your account is lost forever. You can always return to the platform and create a new profile. But it will not be the same one as your deleted account. You can still upload all the pictures, videos, and other content from the deleted account. This is possible if you have saved them before deleting your account.
How to download account information before deleting a Facebook account
Facebook allows you to back-up some of your account’s data at any point in time. You can do this both from the app as well as the website.
Option #1: Download Facebook account information from the app
Open your Facebook app and tap on the Hamburger menu in the top-right corner.
![]()
Tap on Settings & Privacy, after scrolling down the menu.
Tap on Settings to open the settings options.
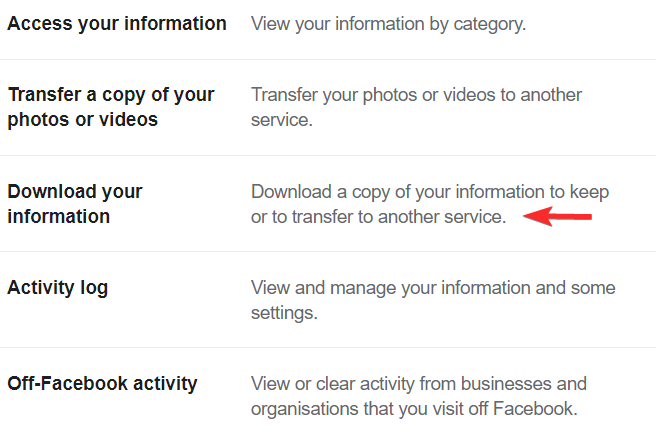
Tap on Download Your Information under Your Facebook Information.
You will see a list of information that you can download. Select all the information you want to be copied.
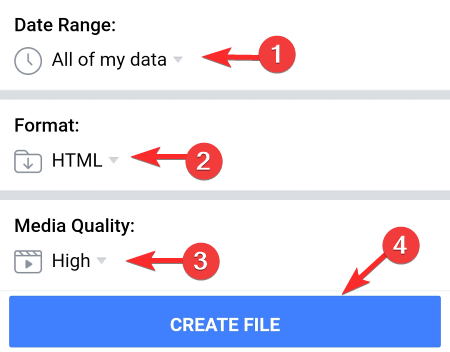
Set the date range, the format, and the media quality.
Tap on Create File.
The file creation will start. Once the file is created the app will notify you.
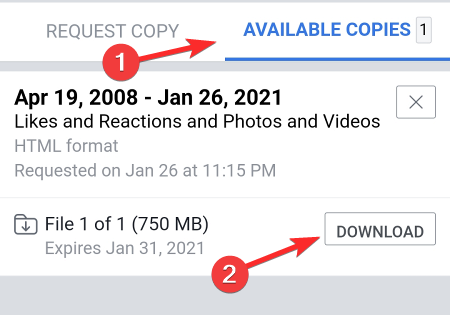
You can then download the file from the Available Copies tab.
Option #2: Download Facebook account information from the website
After opening the Facebook website on your browser, press on the menu arrow on the top-right corner of the screen.
![]()
Click on Settings & Privacy.
Click on Settings to go to the settings page.
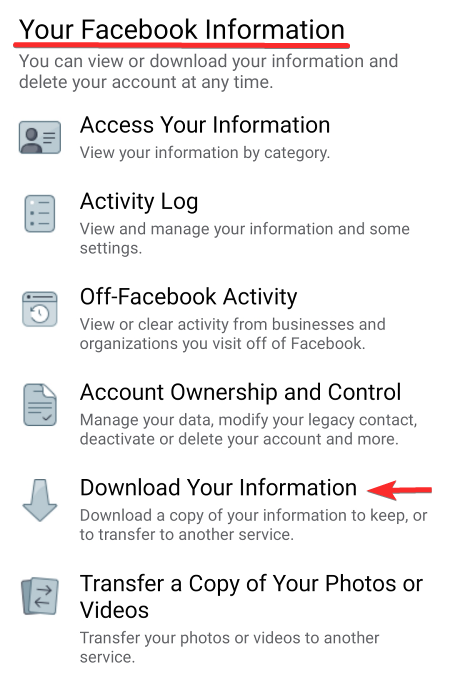
Click on Your Facebook information from the tab on the left side of the screen.
Click on Download your information, from tab on the right side.
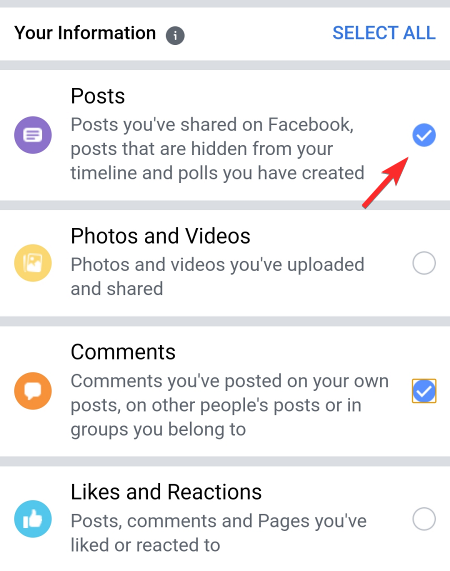
From the list of information, you can download, select the ones you want to be downloaded.

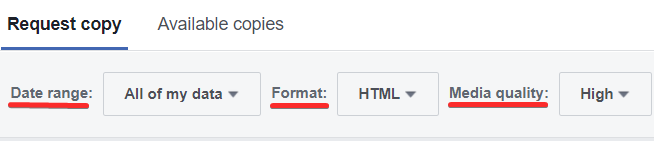
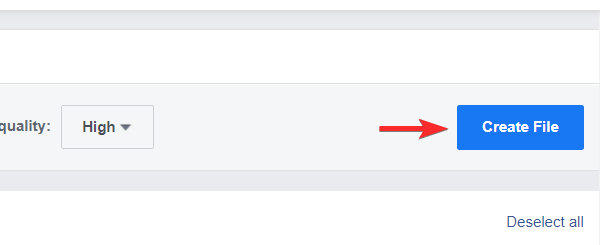
Set the Media quality, Format, and Date range.
Click on Create File.
The file will get created. From the Available copies tab, download the file by clicking the download button.

This way you can retain some data generated on the platform by your account.
How to transfer a copy of photos and videos before deleting a Facebook account
While downloading account information, you can choose to only download photos and videos. But, if you want to transfer the media without having to download it, you can do that as well. This feature allows you to copy your photos or videos or both to any other server. Here is how you do it from your device app or from the website
Option #1: Transfer copy of images and videos from the app
Open the Facebook app on your device and tap the hamburger menu on the top-right corner of the screen.
![]()
Tap on Settings & Privacy, after scrolling down the menu.
Tap on Settings.
Tap on Transfer a Copy of Your Photos or Videos, under Your Facebook Information.
![]()
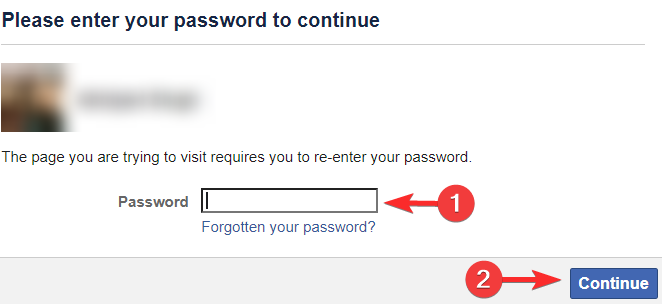
Enter your password and press the Continue button.
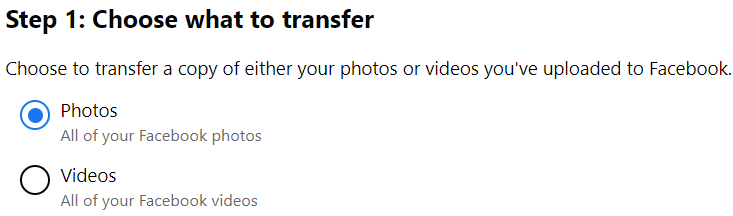
Choose if you want to transfer your photos or videos first.
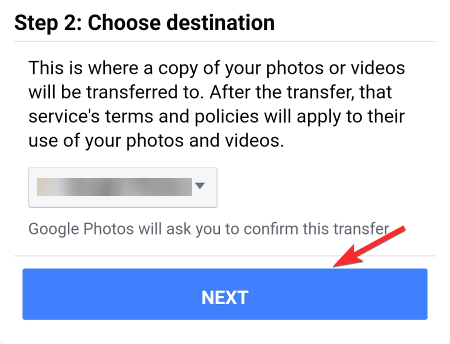
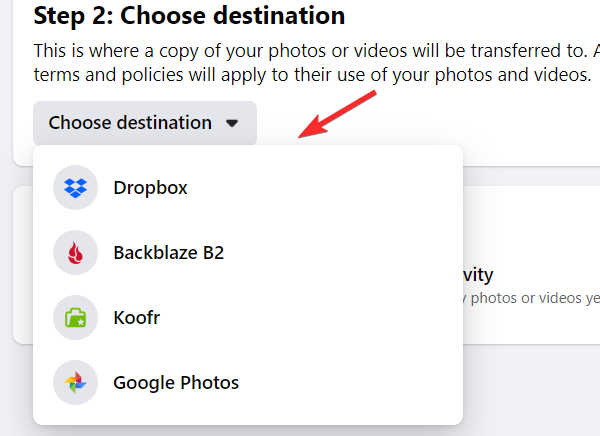
Choose the destination from the list of options.
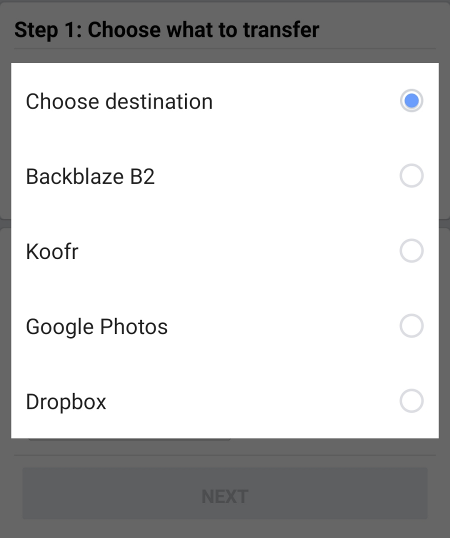
Press Next to continue transferring the media.
Option #2: Transfer copy of images and videos from the website
After opening the Facebook website on your browser, press the menu arrow on the top-right corner of the screen.
![]()
Click on Settings & Privacy, from the drop-down menu.
Click on Settings to go to the settings page.
From the tab on the left side of the screen, click on Your Facebook information.
On the right side of the screen, click on Transfer a copy of your photos and videos.
![]()
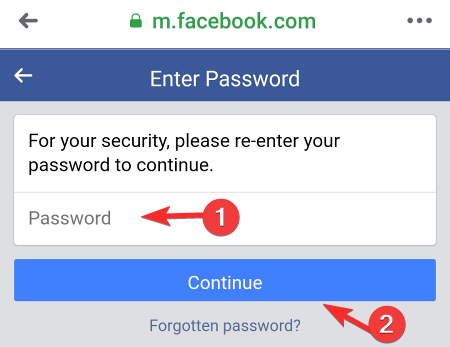
You need to enter your password and press Continue.
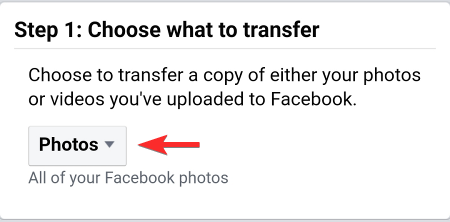
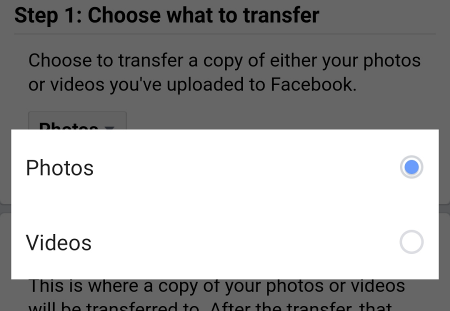
First, choose whether you want to copy your photos or videos.
Then, choose the destination from the list.
Click on Next.
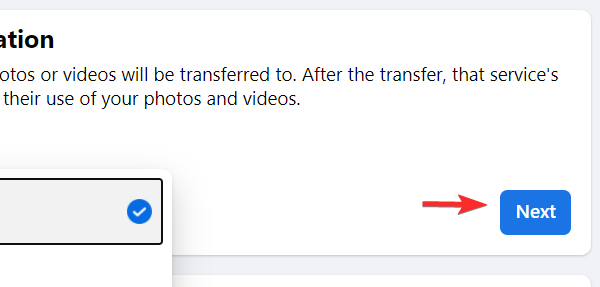
Note: Once you press next, you will be taken off of Facebook to the server where you want the copy to go. You may have to sign in to continue the process.
Now that you have your files and media copied, you can without hesitation hit the delete button. Your account will permanently get deleted from Facebook after 30-days. Just make sure that you do not log back into your account during the cool-off period.
RELATED