
iPhones, by default, capture pictures from the camera in the HEIC format. HEIC stands for High-Efficiency Image Containers and can hold more pixel data than PNG or JPG files taking significantly less space on your iPhone storage than other formats. These files work best on iPhones but aren’t widely accepted across the internet as they often result in blurry/grainy pictures when you share them with non-Apple devices.
To make HEIC pictures compatible with other devices, you may need to convert them into JPG files. In this post, we’ll explain all the ways you can convert images from HEIC to JPG on your Mac.
Related: How to Record Your Voice on a Mac
How to convert HEIC photos to JPG on a Mac [3 methods]
Method 1: Using Preview on Mac
The easiest way to convert HEIC files into JPG will be using Mac’s native image viewer – Preview app.
- Open the Finder app and locate the HEIC file you want to convert.
- Once located, right-click or Control-click on the file and go to Open With > Preview.

- The selected file will now load up inside the Preview app. To convert the file, head over to File > Export on the Menu Bar.

- A new popup window will appear on the screen. Here, select JPEG as the file format in place of “HEIC”.
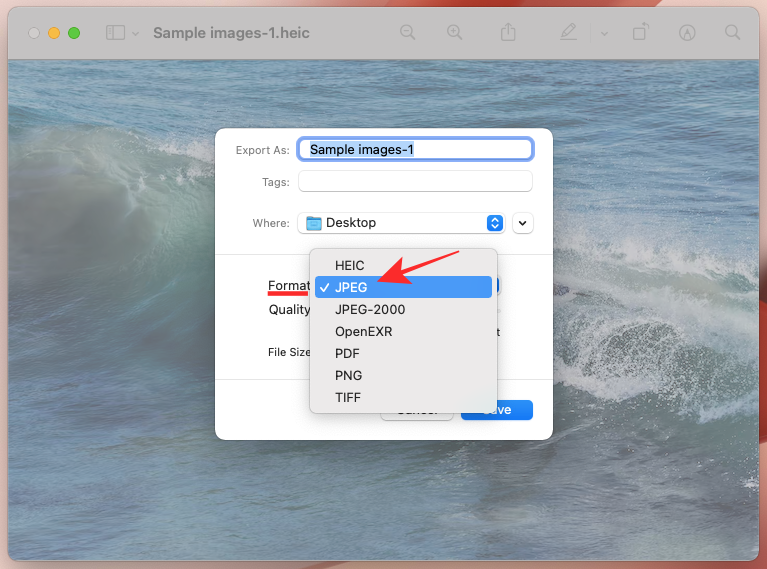
Additionally, you can change the name of the converted file, save location, and image quality within the same window. - Once you’ve confirmed all the changes, you can click on Save to save the file in JPEG format.

The newly created JPEG file will now be saved at your selected location. This method can also be used to convert images to other formats like PNG, TIFF, and PDF.
Related: Where is Mac Terminal and How to use it
Method 2: Using Automator on Mac
The method we’ve explained above works for converting individual images into JPEG files but what if you wish to convert a bulk amount of images at once? Enter Automator. It is a native macOS program that lets you automate built-in actions and make changes to multiple files in your way. You can use the program’s “Change Type of Images” function to convert multiple images into a different format at the same time.
- Open the Automator app on your Mac from the Launchpad, Spotlight, or by going to the Applications folder inside Finder.

- When the app launches, you will be prompted to open a file. In the popup that appears, click on New Document at the bottom left corner.

- On the next window, select Quick Action under “Choose a type for your document” and then click on Choose.

- To choose the image conversion function, select the Photos tab under “Library” from the leftmost sidebar, and then select Change Type of Images from the middle panel. Alternatively, you can search for “Change Type of Images” from the search bar at the top.

- You can select the function by either double-clicking on it or dragging it to the empty box on the right-hand side of the screen.

- You will be prompted with a popup asking you whether you wish to save the converted files as copies while preserving the original versions of the files. If that’s what you want to do, then click on Add. Otherwise, click on Don’t Add so that, all your converted image files will replace the original ones on your Mac.

- You should now be able to see the selected functions on the right-hand side of the Automator window.

- Inside the “Change Type of Images” box, select JPEG inside the “To Type” section. You can select other file formats like TIFF, PNG, BMP, and JPEG 2000 to convert your images.

- You can select the default locations for converted files from the “To” section under the “Copy Finder Items” box.

- Once you have chosen your preferred file format and saved location, you can proceed to save this Automator action. To do this, go to File > Save from the Menu bar.

- Enter the name for your Automator action in the popup that appears and then click on Save. We’re naming this as “Convert to JPG“.

- The new action will now be available directly inside the ‘Quick Actions’ section when you access files with a Control-click.
- To convert a file or multiple ones using the newly created action, select the file(s) and Control-click or right-click on them. In the menu that appears, go to Quick Actions > Convert to JPG.

The selected HEIC pictures will now be converted to JPG files and saved to Desktops on your Mac.
Related: How to use Split View on Mac
Method 3: Using Photos on Mac
The one app that comes preinstalled on both the iPhones and Macs is the Photos app which doesn’t just allow you to interact with HEIC files but also lets you convert them into JPG or other image formats.
- To convert HEIC images to JPG files, open the Photos app on your Mac using the Launchpad, Spotlight, or by going to the Applications folder inside Finder.
- Once Photos has been launched, import the HEIC photos that you want to convert into the Photos library, if they haven’t been imported yet. You can import new files into Photos by dragging and dropping them into the Photos window or by going to File > Import from the Menu bar at the top.

- After the files have been added to the library, select them to convert into JPEG and then go to File > Export > Export Photos from the Menu bar.

- When a popup appears, select JPEG as your default selection under “Photo Kind” to convert the selected files into JPG files.

- Additionally, you can modify other aspects of the files like filename, location info, the format of a subfolder, and the ability to include title, caption, and location.
- Once you’ve decided on all the changes that are needed to be made, click on Export.

- You will be prompted with a new window. In this new window, select the location you want to store the converted files to and then click on Export.

The newly created JPG files will now appear inside the selected location.
That’s how you can convert HEIC photos into JPG files on a Mac.
RELATED


