Having an administrator account is the best way to use your Windows PC. It gives you complete control of your system so you have full access to all your files and apps, make changes to settings, carry out elevated tasks, and so much more.
If you’re not the administrator or have had your admin privileges revoked, it can be quite a pain to set up a new account and give it administrator privileges. But fret not, we’ve got you covered here. Here are all the ways that you can change your account type to get admin rights and truly own your Windows PC.
Standard vs. Administrator account
Before we begin, let us first take a look at the core differences between a standard and an administrator account.
A standard or a local account is highly restrictive and is only meant to provide basic computer privileges. There are a bunch of things that a local account does not have access to, like installing or removing applications, making changes in the settings, and a whole lot more.
An administrator account, as mentioned above, has all the rights and privileges to view and alter files and settings, add/remove other accounts, and a variety of other things. It goes without saying, then, that if the PC is yours, that is the type of account that you would want to have.
Related: How to Change User Folder Name in Windows 10
5 ways to change a local (standard) account to an Administrator account
In order to change a user’s account type, you need to have administrator access. So, if you only have a standard account, then you need to ask the administrator to change the account type for you. This is how the administrator can do it for you:
Method 1: From Control Panel
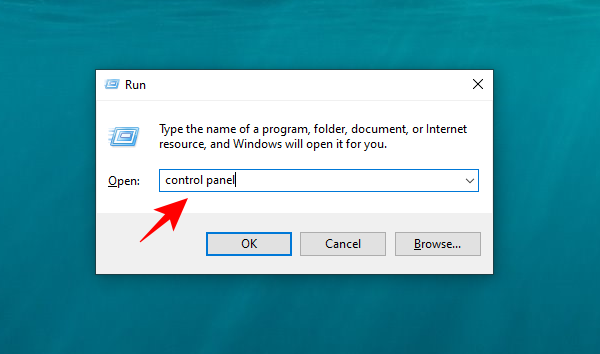
First up, let’s see how your local account can be given admin privileges through the Control Panel.
- For this, press
Win+Rto bring up the RUN box, type in “control panel” and hit Enter.
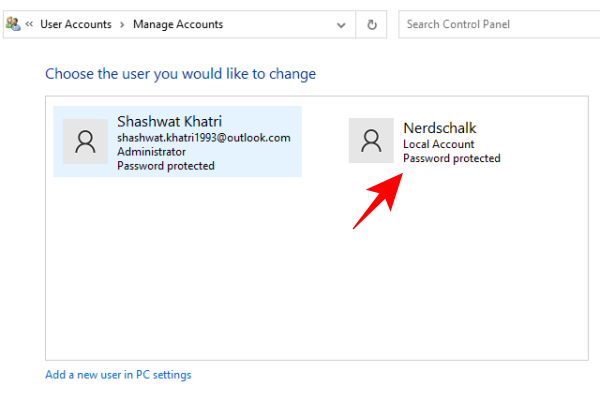
- Click on Change account type under “User Accounts”.

- Now, click on the account that you want to give admin rights to.
- Click on Change the account type.
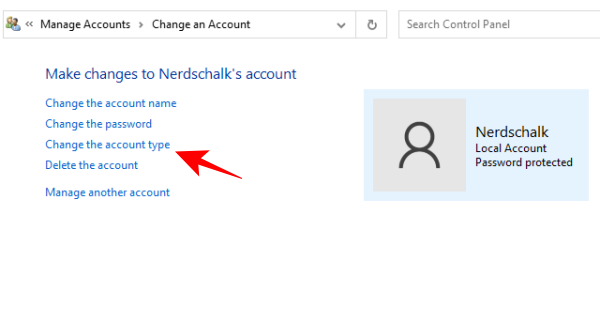
- Select Administrator and then on Change Account Type.

And that’s it. The selected account will now have administrator privileges.
Method 2: From Settings
You can also change the account type from Windows Settings. This is how to go about it:
- Press
Win+Ito open Settings, then click on Accounts. On the right, click on Other users.

- Select the account that you wish to give admin rights to.
- Then click on Change account type.

- In the “Change account type” window, click on the Account type drop-down menu.

- Selecet Administrator.

- Then click on OK.

Now, this account will have admin privileges when it is logged in the next time.
Related: How to Change Mouse Polling Rate on Windows 10
Method 3: Using User Accounts (netplwiz)
Another way to change a user to administrator is through User Accounts (or the netplwiz command).
- Press
Win+Rto open the RUN box, type netplwiz and hit Enter.

- Select the account that you want to elevate to admin, then click Properties.

- In the new window, go to the “Group Membership” tab, then select Administrator, and click on OK.

- Then click OK in the “User Accounts” window as well.

Method 4: Using PowerShell
Power users who like using PowerShell can follow the steps given below to give an account complete control of the system:
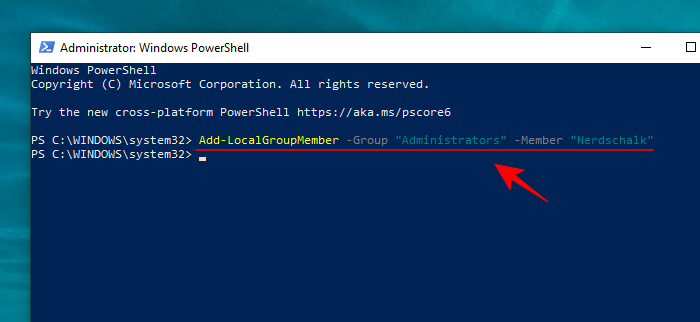
- Press Start, type “PowerShell”, then click on Run as administrator.

- In PowerShell, type in the following command and press Enter:
Add-LocalGroupMember -Group "Administrators" -Member "Account name"
Just make sure that you change Account name to the exact name of the account that you want to give admin rights to. In our example, we’re giving admin privileges to the account “Nerdschalk”. This is what it looks like:
In case you’re giving admin rights to an account that uses a Microsoft account, type in only the first five letters of the email address. This is because Windows registers only the five letters of email address as the user’s name.
Method 5: Using Command Prompt
Lastly, those who prefer using Command Prompt can change a user’s account type by the following method:
- Press Start, type “command prompt”, and click on Run as administrator.
- Now, type in the following command in Command Prompt and hit Enter:
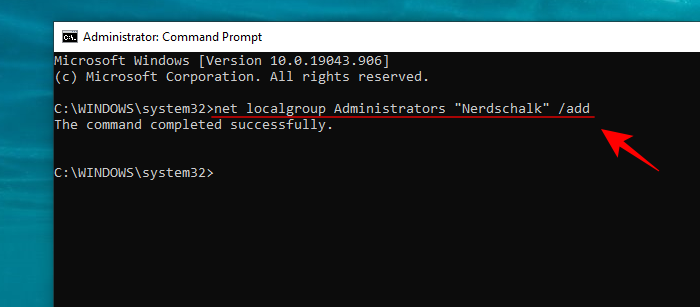
net localgroup Administrators "Account name" /add
As before, make sure to replace the Account name with the name of the account that you want to make an admin. Here is our example:
Change to Admin account with Standard account
All the methods mentioned above elevate a standard account to the administrator only if you are an administrator yourself or if you have the admin’s password. But what if you are the local user? There are a lot of restrictions and hurdles that Windows places to ensure that the standard account cannot change its own account type. However, if you have the right tools and follow the guide below closely, this can be done.
Refer to our step-by-step guide on How to Change Standard Account to Admin Account on Windows 11 to know how.
Change Administrator Windows 11 name
Once you have admin rights, you can do many things. For starters, let us look at how the administrator account name can be changed.
- Press
Win+Rto open the RUN box, type in ‘control panel’, and press Enter.

- Click on User Accounts.

- Then click on User Accounts again.

- Here, click on Change your account name.

- Enter the new name and click on Change Name.

- You will have to sign out and sign back in to see the changes reflected.
Another way to change your account name is to do it through Command Prompt. Open an elevated instance of Command Prompt (Run as administrator) from the Start menu.
- In Command Prompt, enter the following command and press Enter:
wmic useraccount where name='Administrator' call rename name='NewName'
Make sure you replace NewName with your desired account name. In our example, we have changed the account name to Nerdschalk.

Your account name will be changed.
Change Administrator Windows 11 PIN
Now, let’s see how you can change your Admin PIN on Windows 11.
- Press
Win+Ito open Settings. Then click on Accounts on the left and Sign-in options on the right.

- Click on PIN (Windows Hello).

- Click on Change PIN.

- Enter your current PIN and your new PIN twice, and click OK.

Log in on Windows 11 with a different email
If you want to log in to Windows 11 with a different email, here’s how to go about it:
- Press
Win+Ito open Settings and click on Accounts. Select Your Info on the right.

- Click on Sign in with a local account instead on the right.

- When prompted, click on Next.

- Enter details for your local account.

- Then click Sign out and finish.

- Log back in and go to the same Accounts Settings page. Now, you will see a new option – Sign in with a Microsoft account instead. Click on it.

- Enter your new email address and click Next.

- Enter your Windows password and click Next.
- When prompted, authorize this link-up, and your administrator account email address is now changed.
And that is it! These are the ways that you can get Administrator rights and full control over the system, including changing name, email, and PIN.
Being able to do so can come in quite handy, especially if have forgotten your admin password or you want to simply upgrade your standard account. This will allow you to give trusted parties (as well as your other accounts) the ability to tweak settings and access the whole system without being restricted by the dreaded “access denied” message.
RELATED