Well, since you still can’t react to a situation in person, maybe you could react virtually? Emojis are the perfect way to keep that personal touch while still miles away. Add your own face to that and you could be standing right next to the person! Ok, that’s a bit of an exaggeration, but they do add a personalized touch to your conversation. In this post, we will cover how to create your own personalized stickers to impress your friends with your reactions!
- What is personal emoji?
- How to create personalized emojis
- 1. How to create a personal emoji in Gboard
- 2. How to create a personal emoji in Bitmoji
- 3. How to create a personal emoji and save it on your phone/gallery
- 4. How to create a personal emoji in Snapchat
- 5. How to create a personal emoji for WhatsApp
- 6. How to create a personal emoji on Facebook
What is personal emoji?
We all know what emojis are. They have been around for ages. But the new rage is ‘personal emoji’. Basically, they are emojis that have your face on them. Many apps now support stickers, which are basically emojis but with more character. These stickers have grown in popularity with most of the big social media apps like Snapchat, Instagram, and WhatsApp creating custom packs of stickers.
Depending on where you make them, these stickers will be available in different apps. For example, stickers created on WhatsApp will be available to use only in WhatsApp, which stickers create in Gboard can be used in any app that supports stickers.
Related: What do Snapchat Emojis Mean?
How to create personalized emojis
In this section, we will cover how to create personalized emojis in different apps. Unfortunately, Android doesn’t have an emoji creator of its own — although, for the devices that come with Gboard pre-installed, you’re safe as you can create a personal emoji with Gboard, thus won’t need to install any additional app. You are able to use ‘your own emoji’ created with Gboard and Bitmoji on any apps you want to.
However, certain social media apps also let you create personal emoji. For example, Snapchat, Facebook, and some more. But you will be able to use these personal emojis only on the app you created it on. You won’t be able to save them on your phone for use with any other app. Let’s take a look at the various methods to create a personal emoji, and how to use them.
Related: How to get iMessage like emoji reactions bar on Android
1. How to create a personal emoji in Gboard
Google Keyboard or Gboard is a virtual keyboard used quite extensively. The keyboard already has integrated stickers and emojis to choose from. A recent update now lets you add personalized sticker packs to your arsenal. Let’s get started on how you can do that.
Download Gboard: Android | iOS
To be able to create a personal emoji on Gboard, you first need to enable it. So, open the app, and follow the instructions to enable it. (You can also change the keyboard app to Gboard under Settings > Language and Keyboard. Now, open any app to bring up the Gboard app to get started.
Now tap the emoji key on your keyboard. Select the ‘Stickers’ tab from the bottom panel, then go to the ‘Settings’ cog in the right corner. You may need to scroll right to find it.
Now tap the ‘Browse’ tab and select ‘Create’ under Your Mini. You will now be prompted to click a picture of your face. Once you do, Gboard will generate your very own customized sticker packs based on your photo.

To try them out, go back to your keyboard and tap the stickers button. You should see your new customized sticker packs in the top panel.

Note: Gboard stickers can only be used in apps that support stickers.
Related: How to change the emojis on Snapchat [May 2020]
2. How to create a personal emoji in Bitmoji
Bitmoji is the hugely popular personalized emoji app. The app lets you create a cartoonized version of yourself. You can then share this avatar in a number of supported apps. Bitmoji is especially known for the vast customization that it offers. It even has branded content from companies like Adidas, NFL, and more. To get started first download the Bitmoji app on your device.
Download Bitmoji: Android | iOS
Launch the app on your device. If you have a Snapchat account you can use your Snapchat credentials to sign in to Bitmoji. If not, you can create an account using your email address.
Now go ahead and create your avatar. You can customize every small aspect of your performance, from the shade of your eyes to the type of shoes you wear. Use the tabs at the bottom to select different aspects that you would like to customize.

Once done hit Save in the top right corner.

Now head to the ‘Stickers’ page of the app. You can use the search bar at the top to narrow your search for the perfect sticker.
Tap the sticker and select the app that you would like to send it in.

Related: 10 Best Emoji apps on Android to help you find the perfect emoji
3. How to create a personal emoji and save it on your phone/gallery
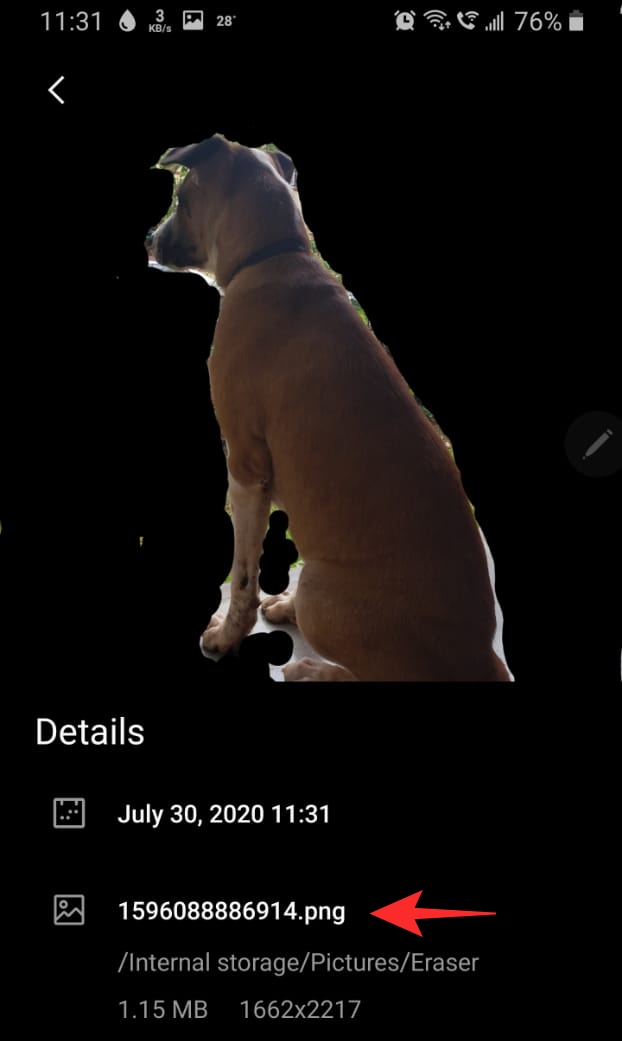
As mentioned above, Android does not let you save stickers to your gallery. But with this trick, you can create your own folder of Sticker images that you can send out to your friends.
First, you will need to download the Background Eraser app. Now launch the app, and tap ‘Load a photo’ in the middle of the screen. Select the photo that you would like to turn into a sticker.

First, you need to crop the photo as close to the object as possible. Now use your finger to erase the background of your image. Tap ‘Done’ in the top right corner, then ‘Save’.
Your custom sticker is now saved in your Gallery. You will notice it is a PNG image. This means it can be sent without a background, but only on those apps that support it. On other apps, it will automatically send with a white background.
Done!
4. How to create a personal emoji in Snapchat
Snapchat actually has an inbuilt tool to help you create your own personalized stickers! So you do not need to download any third-party app.
4.1 Create your own personalized stickers on Snapchat
While Bitmoji stickers are great, they aren’t very customizable. Snapchat also lets you create your very own customized stickers right on the app. Here is how you can go about it.
Launch Snapchat, and click a photo of what you would like to create a sticker with (you can also create a sticker from an image in your Memories by swiping up at the camera screen and choosing the image).
Now tap the ‘Cut’ button (scissor) in the right-side panel. Trace an outline of the object that you would like to turn into a sticker. Lift your finger when done. You will notice a small copy of the sticker has automatically appeared on the snap.
Now go to your conversation page and open a chat that you would like to send the sticker in. Tap the ‘Emoji’ button beside the textbox.

Now tap the ‘Scissor’ button in the bottom panel to bring up your custom created stickers. Tap on the sticker you like to send it in the chat.

4.2 Create your own Snapchat cameo
Yes, Snapchat already has its own set of personalized stickers that use your Bitmoji avatar. These stickers can be used in chats as well as added to snaps. While you can use the search function when adding a Bitmoji sticker to your snap, the stickers are generated by simply typing out a word in your chatbox.
► How to create your Snapchat cameo with Bitmoji
4.3 How to use a personal emoji in Snapchat
Here are the two ways to use a personal emoji in the Snapchat app, first, in a chat, and second, in a snap.
4.3.1 Use personal emoji in a Chat on Snapchat
Open the chat that you want to use the customized Bitmoji sticker in. Now use the textbox to search for your sticker. For example, type ‘Hello’ to view stickers with that theme.
Now tap the ‘Emoji’ button next to the textbox. You should see all related Bitmoji stickers appear at the top of the list. Tap the one that you like, to immediately send it in the shat.

4.3.2 Add personal emoji in Snaps
To add a customized Bitmoji sticker to your snaps, first go ahead and click a snap using your Snapchat camera. Now tap the ‘Stickers’ button in the right-side panel.

Use the search function at the top to search for the right sticker. Bitmoji stickers appear below ‘Giphy’.

Related: How to get Verified on Snapchat
5. How to create a personal emoji for WhatsApp
WhatsApp is probably the biggest audience for stickers. The app already contains a plethora of sticker options. But what if you wanted to take it to the next level? Create a custom sticker from an image! Here is how you can go about doing that.
Step 1: Create a Sticker pack
We will be using the Sticker Maker app for this. So the first thing you want to do is download the app on your device. This will let you create a personalized sticker pack in WhatsApp.
Download: Sticker Maker
Now launch the app, and tap ‘Create new stickerpack’. Name your sticker pack so that you can easily identify what it contains. For example, if you are creating a sticker pack for positive stickers, mention that in the name. Stickerpack author is mainly if you are going to share your sticker pack with others (yes you can actually share your customized stickers).
Now tap on your newly created pack.

Step 2: Create a Tray Icon
First off, you need to set a tray icon. This is what will represent the sticker pack on WhatsApp so that you know which one to choose. Tap the ‘tray icon’ button at the top.

You can now choose between taking a photo with your camera, using a photo from your gallery, or using a file. In this case, we will create a personalized sticker from a photo that we click.

Go ahead and click the photo that you would like to turn into a sticker. Now trace your finger along with the image that you would like to cut out. This is what will turn into your sticker. As soon as you release your finger, the image will be cropped.
Tap ‘Save Sticker’ if you are happy with the cut-out, or ‘Try again’ to take another shot at it.

Step 3: Create a sticker
Now that you have the tray icon ready, you should see it at the top of your sticker pack. It’s time to create your first sticker. This is exactly the same way as creating a tray icon.
Tap the first sticker block, then select where you would like to create your sticker from.

Once you have your image, trace the outline with your finger. Once done, tap ‘Save Sticker’. Go ahead and create as many stickers as you would like.
Step 4: Access the sticker pack from WhatsApp
Once you are done, tap the ‘Add to WhatsApp’ button at the bottom of the sticker pack. Note: You need to create at least three stickers before you can add the new sticker pack to WhatsApp.

Now go ahead and open WhatsApp on your device. Tap the Emoji button beside the chatbox.

Select ‘Stickers’ in the bottom panel. Now tap the ‘Tray Icon’ that you set to view all your customized stickers.
6. How to create a personal emoji on Facebook
Recently, Facebook introduced a new ‘avatar’ option quite similar to that found on Snapchat (Bitmoji). This lets you build a personalized avatar on the app. The best part is that you can use this avatar in Messenger too. You can also set your avatar as your own profile picture!
Step 1: Create your avatar
First, you have to create your avatar on Facebook. Avatar creating is quite fun and lets you choose from a variety of options. You can create your avatar on the Facebook mobile app or the website. Both of them offer the same customizations. In this guide, we will create an avatar using the Facebook mobile app.
To create your avatar, launch the Facebook app, then tap on the hamburger menu in the top right corner. Select ‘See more’ from the menu, then select ‘Avatars’.
Go ahead and create your avatar. You can edit quite a few aspects of your appearance, like face shape, eye color, etc. Once you are happy with your avatar, hit ‘Done’ in the top right corner. It may take a few seconds to complete.

Step 2: Use customized stickers
Facebook will automatically generate stickers for you based on your avatar. To view all stickers, tap the Stickers button in the right-side panel of the ‘Avatars’ tab.
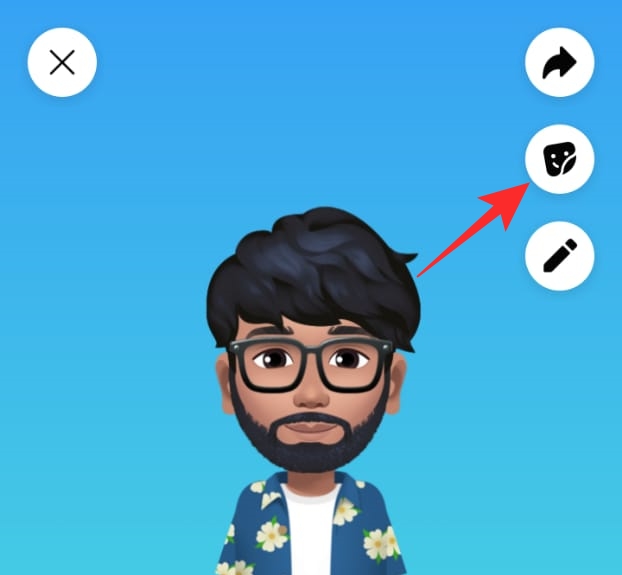
To use the customized stickers in Messenger, launch the Messenger app, and locate the conversation you would like to use the stickers in. Now tap the ’emoji’ button beside the chatbox. Under ‘Stickers’, the first tab in the bottom panel will be your customized stickers. Simply tap the sticker to send it immediately.

To use the customized stickers in comments, tap the emoji button beside the textbox in the comment section. The first tab in the panel will be your customized stickers.

Well, now you know how to create your own personalized emoji stickers. We hope this article helped! If you have any queries, feel free to reach out to us in the comments below.
Related:


