One of the most popular applications in the business, Zoom, strikes the perfect balance between utility and ease-of-use. It allows you to get in touch with your friends, family, and colleagues; lets you collaborate remotely, and continuously introduces new features that are worth celebrating.
However, the feature we are talking about today has been around for a long time. Still, we believe, we have not covered all the bases of it as extensively as we intend to. So, let us take a look at one of Zoom’s legacy features — let us tell you all you need to know about the cloud recording option in Zoom.
Related: What are Zoom Apps and How to Use Them
- What does cloud recording mean in Zoom?
- What are the requirements for cloud recording in Zoom?
- How to enable cloud recording
- How to configure cloud recording
- How to start cloud recording in Zoom
- How to stop cloud recording
- Where are the cloud recordings stored?
- How to download cloud recordings
- How to share cloud recordings
- How to delete cloud recordings
- Is cloud recording secure?
- Zoom Cloud recording for free users
What does cloud recording mean in Zoom?
When we think about recording, two variations come to mind: local recording and cloud recording. The former uses your onboard storage as a server, storing necessary data on your hard drive. The latter — cloud recording — stores data on Zoom’s servers, demanding nothing off your computer’s hard drive.
Due to storage, local recording isn’t accessible from any part of the globe. Cloud recording, on the other hand, makes your recordings available on any authorized computer, from anywhere in the world. So, strictly from the perspective of convenience, cloud recording takes the cake. However, local recording continues to be considerably easier to handle.
Related: What is Personal Meeting ID in Zoom and How to Change it
What are the requirements for cloud recording in Zoom?
The cloud recording feature has been in Zoom for a while now, and the company has refrained from making too many changes. So, the feature remains exclusive to premium users (hosts only, not participants) — Pro and above — meaning no free user can do a cloud recording on Zoom. Additionally, you’ll need a decent internet connection to upload the whole thing to Zoom’s servers.
Before you start the upload, please remember that cloud recording is dependent on the space you have at your disposal, at least for Pro and Business users. Subscribers of both the plans get 1GB of cloud storage per license, after which cloud recording will not work as expected. Only Enterprise users get the privilege of unlimited cloud storage. So, if you tend to use the feature a little too often, consider subscribing to the top-of-the-line pack to get the most of your Zoom experience.
Related: How to Fix Zoom Black Screen Issue on Windows 10
How to enable cloud recording
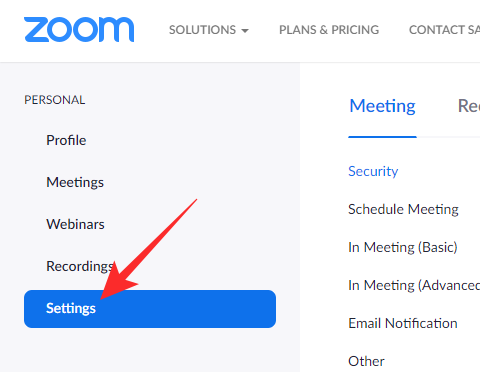
With the intro and requirements out of the way, let us take a look at enabling the cloud recording feature on Zoom. With a couple of clicks and toggles, you can enable the cloud recording option for all hosts in your account. First, go to zoom.us and log in with your company ID and password. Please login with a paid Zoom account as free accounts do not get the cloud recording option. Now, click on the ‘My Account’ hyperlink at the top-right corner of your screen.

Next, go to the ‘Settings’ tab on your left.
Then, click on the ‘Recording’ tab.
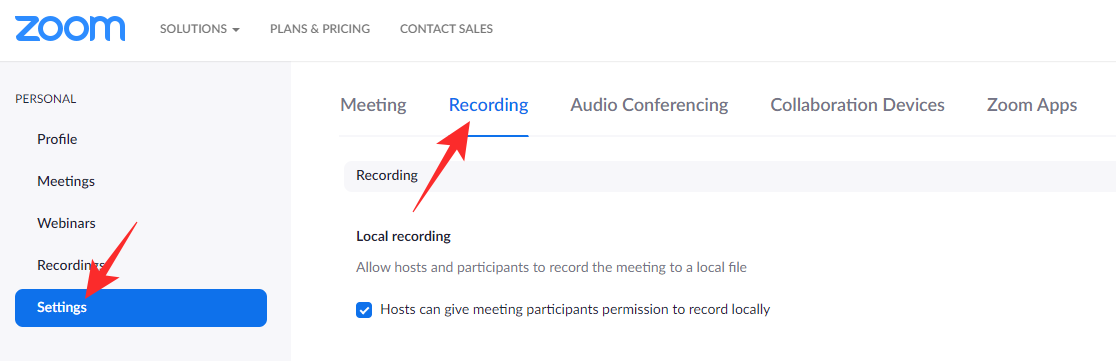
This place will show you all the recording options in your account. You can also control local recording options from this area. To make sure the cloud recording option is enabled for hosts in your account, click on the ‘Cloud Recording’ toggle.
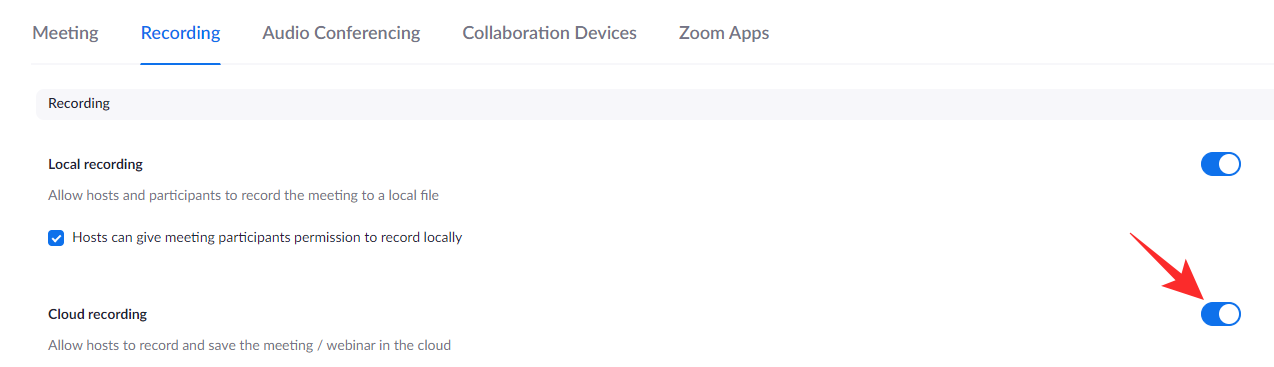
That’s it! Cloud recording would be enabled for all hosts.
How to configure cloud recording
Unlike local recording that records the whole meetings in default settings, cloud recording comes with some major configurable options. Below we’ll take a look at some of the most important ones.
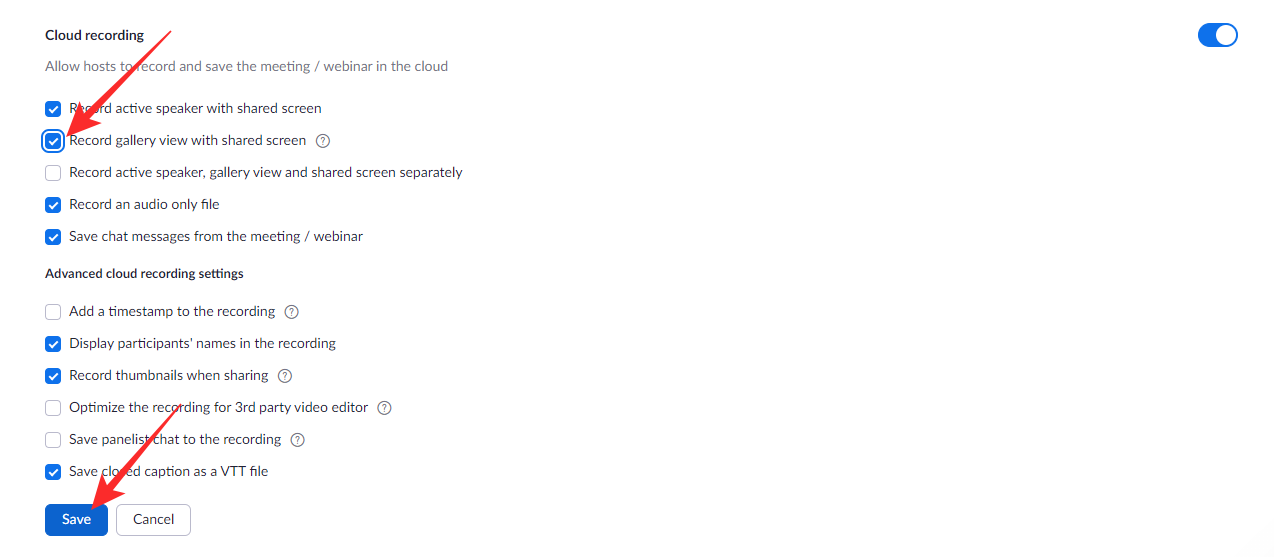
Gallery view with shared screen
If you wish to record your meetings while screen sharing is in progress. You can do so with this option. It will record the screen sharing session as well as record the gallery view of the meeting. When enabled, the active speaker would show at the top-right corner of the shared screen.
To enable the setting, first, click go to zoom.us and click on the ‘My Account’ option at the top-right of the screen.
Now, click on the ‘Settings’ tab on the left of your screen.
Then, go to the ‘Recording’ tab and make sure the ‘Cloud Recording’ option is enabled.
Under the toggle, you will find some cloud recording options. Enable the ‘Record gallery view with shared screen’ option and click on ‘Save’ at the bottom.
Add a timestamp
When you are tackling large recordings, directing and extracting data from the whole thing can become quite a hassle. By adding a timestamp, you would be able to go through the recordings easily and add notes to specific parts while reviewing. It might take a bit of screen real estate, but it’s still an excellent option to consider. To enable timestamping, first, go to zoom.us and log in with your username and password. Next, go to the ‘My Account’ option by clicking on the button at the top-right corner of your screen.
Now, click on ‘Settings’ and then go to the ‘Recording’ option.
Under the ‘Cloud Recording’ toggle, you will find an advanced section. Under the ‘Advanced cloud recording settings’ banner, select the ‘Add a timestamp to the recording’ option and click ‘Save’ at the bottom.

Optimize recording for 3rd party video editors
Performing a cloud recording is only a part of the picture, the next bit tends to be a lot more intricate. If you’re one of the many who engage in a hardcore editing session after cloud recordings, it might be a good idea to make your recordings as compatible as possible. Zoom cloud recording gives you the option to do just that and with only a couple of clicks.
To make your recordings easier to edit on 3rd party applications, first, head over to zoom.us and log in with your username and password. Now, go to ‘My Account.’
Next, click on ‘Settings’ and go to the ‘Recording’ tab.
Then, make sure ‘Cloud recording’ is turned on. Under the toggle, you’ll find an ‘Advanced cloud recording settings’ banner, under which the option to optimize recordings for third-party apps would be present. Enable the option and click on ‘Save.’
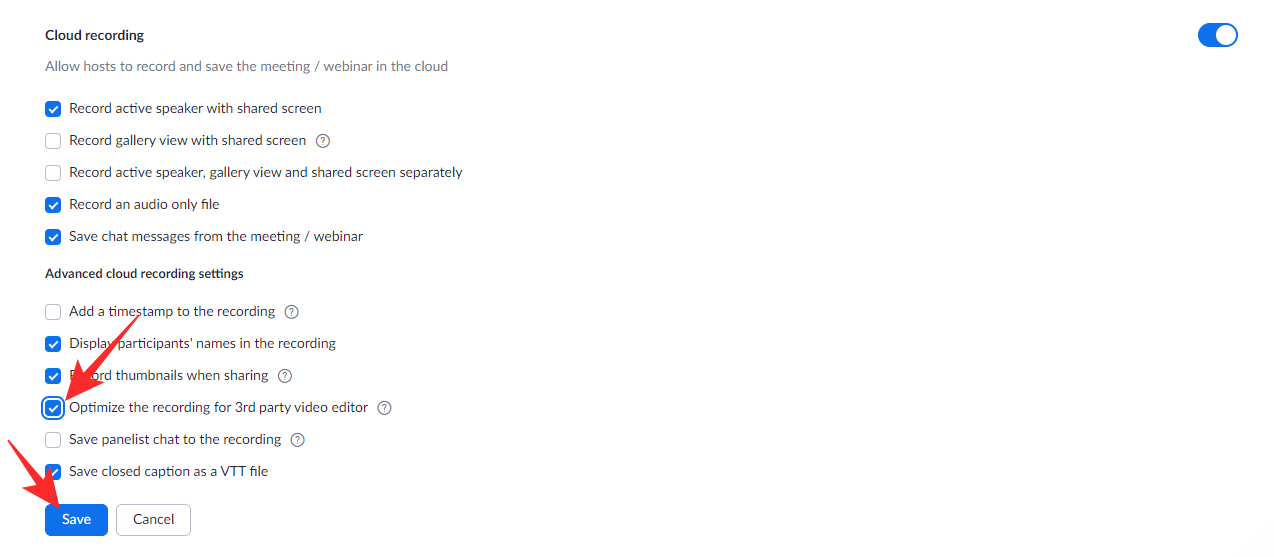
Please note that turning on this option would make the recordings larger and longer to process. So, enable this option only if you are an expert at space management.
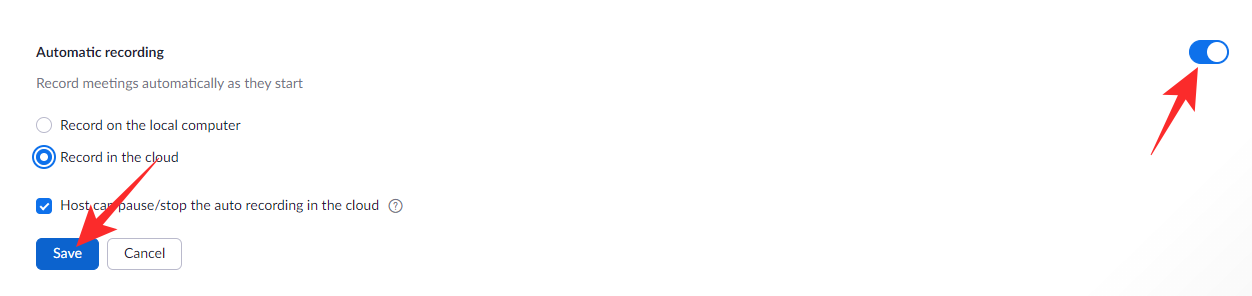
Turn on automatic recording
In general, turning on the recording option in Zoom is a pretty straightforward task. However, it is still a task — something you must diligently do before the start of each meeting. This ritual leaves some room for errors — forgetting to turn on the recording, for example. So, to ease the anxiety of millions of users, Zoom offers a little auto-recording option, which would automate the task of recording for each meeting.
Go to zoom.us, log in with your credentials, and go to the ‘My Account’ section.
Now, click on the ‘Settings’ tab on your left and go to ‘Recordings.’
Scroll past the cloud recording option and focus on the ‘Automatic recording’ option. Toggle it on and select either ‘Record on the local computer’ or ‘Record in the cloud.’ If you choose the latter, you will get the option to grant the host the ability to stop auto-recording in the cloud. Check or uncheck the option and click on ‘Save’ to make the changes.
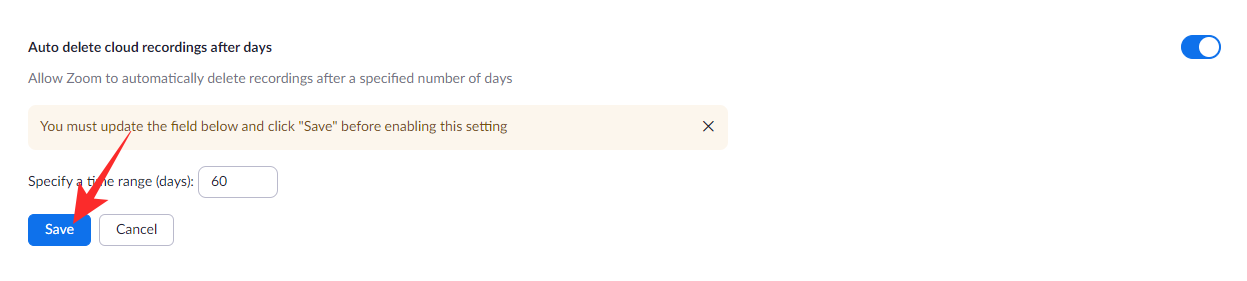
Auto-delete cloud recordings
To save your recordings in the cloud, you must have enough room. Unfortunately, space is at a premium here. So, it’s not a bad idea to automate the process of deletion. Doing so is also pretty easy. After you log in to zoom.us, click on the ‘My Account’ button at the top-right corner of your screen.
Now, click on ‘Settings’ and go to ‘Recording.’
Make sure ‘Cloud Recording’ is turned on and scroll down until you see the ‘Auto delete cloud recordings after days’ option. Toggle it on. Now, you will find the default auto-delete window set to 30 days.

To make changes, click on the field where “30” is written and pick from — ’60,’ ’90,’ or ‘120.’ After you’ve finalized the tie frame, click on the ‘Save’ button.
How to start cloud recording in Zoom
You have seen what cloud recording is, how to enable it, and how to configure its options. Now, let us take a look at starting a cloud recording while in a meeting.
Computer
First, launch the Zoom desktop client on your computer and either start or join a meeting.

Now, at the bottom of the screen, you will find the Zoom toolbar. Now, click on the ‘Recording’ button.

Next, select ‘Record to the Cloud.’
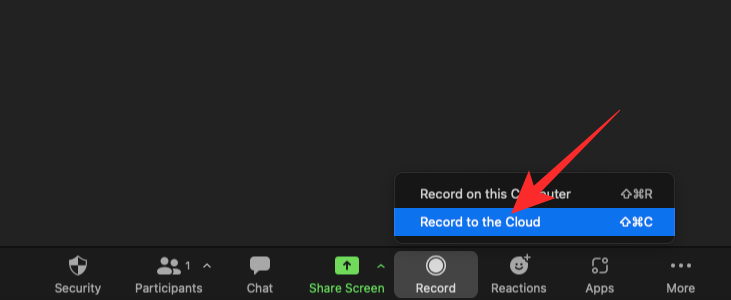
This would instruct Zoom to contact the cloud server and start the recording. If the recording commences successfully, you will find a cloud recording icon at the top-left corner of the Zoom meeting window.

Mobile
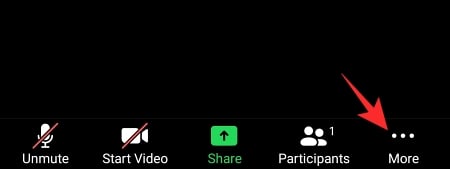
As you may already know, the Zoom mobile client doesn’t allow local recording. So, pushing the recording to the cloud is the only valid option here. To record on a mobile device, first, launch the Zoom client on your Android or iOS-powered mobile and either join or start a meeting. Now, tap on the ‘More’ button at the bottom-right corner of your screen.
When the options bar pops up, tap on ‘Record.’
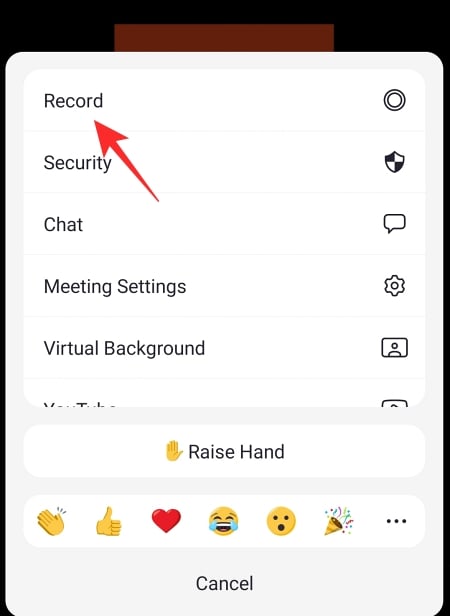
A voice would go off, telling you that your recording session has commenced. A red ‘Rec’ logo would show up at the top-left corner of your screen, indicating that a recording session is in progress.

How to stop cloud recording
Stopping the cloud recording is straightforward in both mobile and computer clients.
Computer
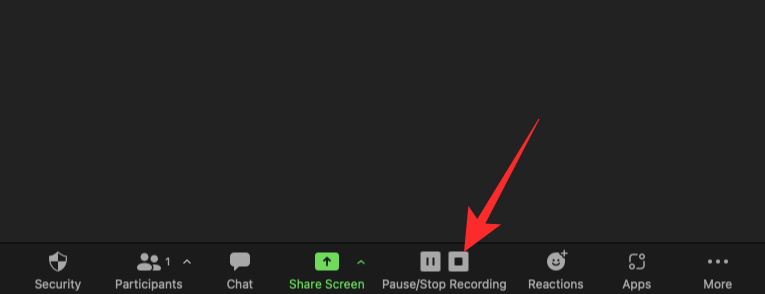
The Zoom application on your desktop would replace the ‘Recording’ button with one pause/stop button when a recording session is in progress. If you wish to pause the recording and resume it a little later, you will need to click on the ‘Pause’ button.
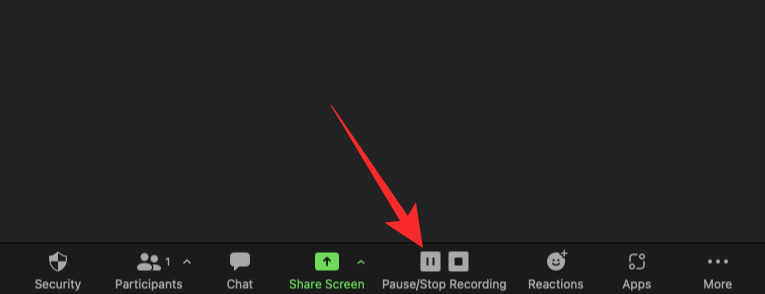
To stop the recording altogether and save it to the cloud, you will have to click on the ‘Stop’ button.
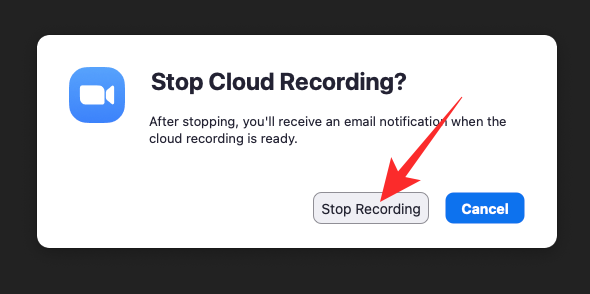
Clicking on it would pop a dialog up, asking you whether you want to stop the recording for certain. Click on ‘Stop Recording’ to stop the recording for good.
The link to the recording is sent over as an email after the processing completes. Alternatively, you could click on the Pause/Stop button at the top-left corner of the screen, next to the ‘Recording’ indicator.

Mobile
Unlike the Zoom desktop client, you won’t actually get any glaring on-screen prompts that tell you that a recording session is in progress. You only get a red ‘Rec’ logo at the top-left corner that tells you about the recording.
The pause/stop controls are hidden further down the ‘More’ menu. So, you will need to click on the ‘More’ menu to access the options.
To pause the recording and resume it later, click on the pause button. To stop it and end the session, click on the ‘Stop’ button.
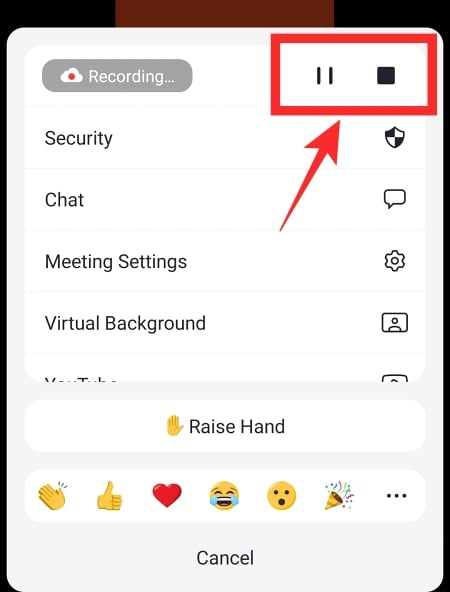
When the dialog pops up about stop recording, click on ‘Stop’ to end the session.

Where are the cloud recordings stored?
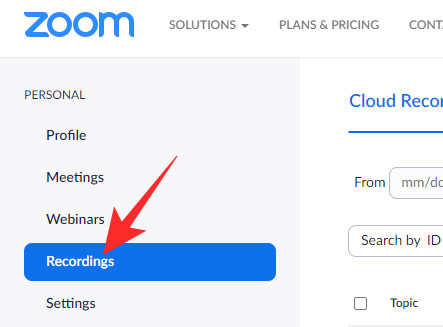
Unlike local storage, cloud recordings do not have a physical address on your disk. However, they are kept safely on Zoom’s servers, allowing you to download and share them whenever you feel like it. To access your cloud recordings, first, go to zoom.us and log in with your username and password that you used while taking part in the video calling session. Now, click on the ‘My Account’ button at the top-right corner of the screen.
Then, go to the ‘Recordings’ tab on your left.

Next, click on the ‘Cloud Recordings’ option.
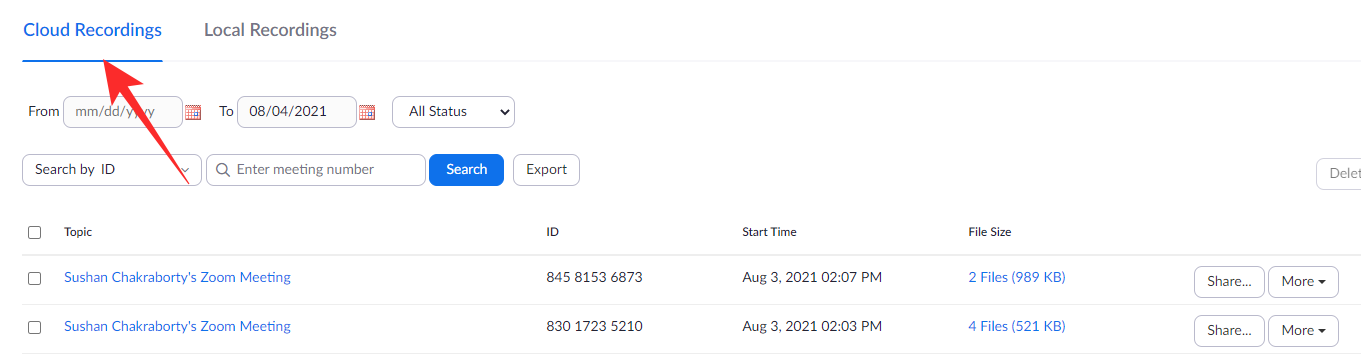
Recordings for each session would be shown on the right. You can manipulate the recordings as you see fit.
How to download cloud recordings
Cloud recordings can easily be viewed online, but they cannot be edited as robustly without offline third-party tools. So, we must find a way to download the recordings, and the best way is through a simple download. To download your cloud recordings, first, go to zoom.us and log in. Next, click on the ‘My Account’ option at the top-right corner.
Now, click on the ‘Recording’ tab on your left, under the ‘Personal’ banner.
Then, click on ‘Cloud Recordings’ and your cloud recordings would show up on the right of your screen.
Alternatively, you could get to the recordings through the Zoom desktop client. After launching the application, click on the Settings option at the top-right corner, under your profile picture thumbnail.
On the left-hand-side panel, click on ‘Recording.’ On the right of ‘Cloud Recording,’ click on the ‘Manage’ option.
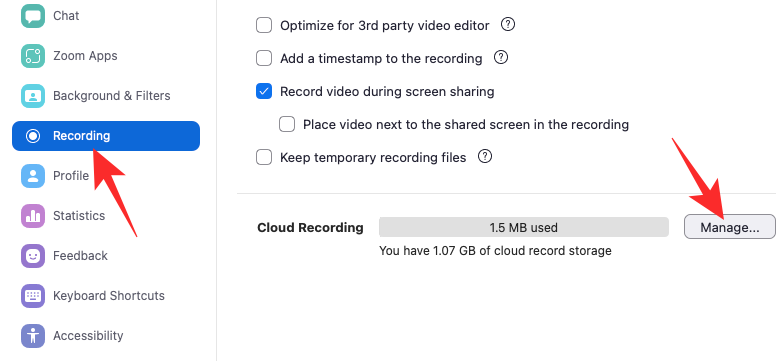
This would launch your default browser, ask you to authenticate, and take you to the ‘Recording’ page.
On the right of a recording, you’ll find a ‘More’ option.
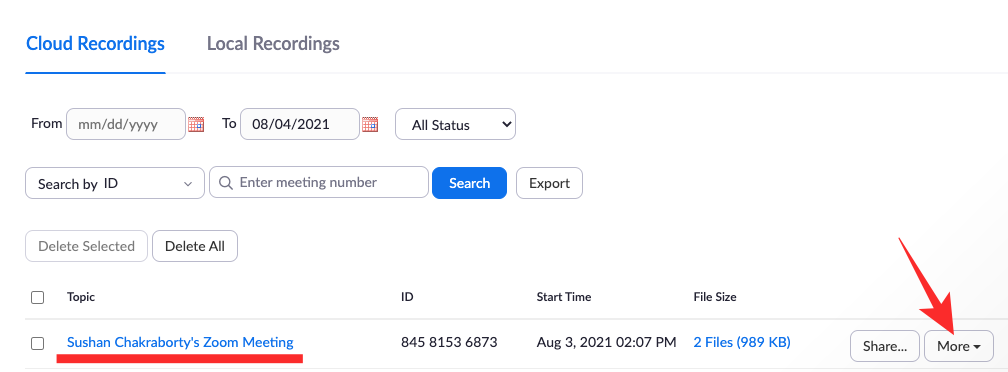
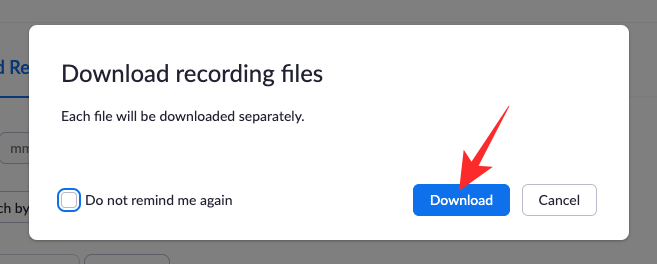
Click on it and hit ‘Download.’
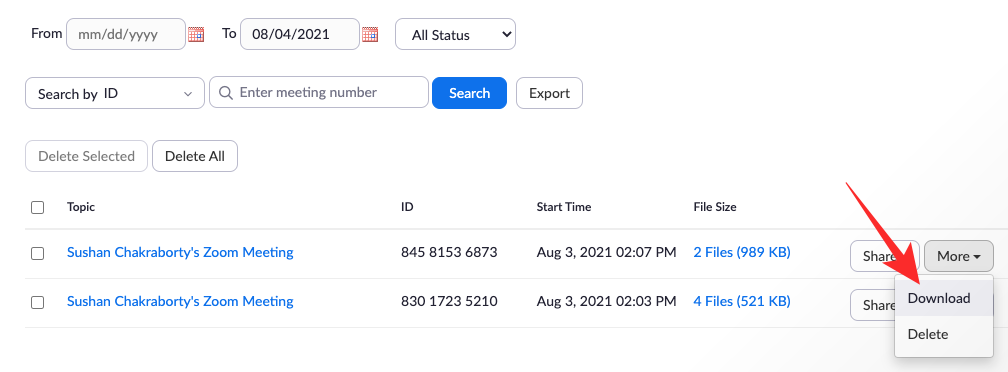
If you have multiple files under a meeting, they will be downloaded separately. Click on ‘Download’ again to start downloading to your hard drive.
Download audio-only or Shared screen with speaker view
If you wish, you could download the audio-only files from the screen recording sessions. Click on the name of the recording to explore additional options.

On the next screen, click on ‘Audio Only’ to download the entire recording without video.
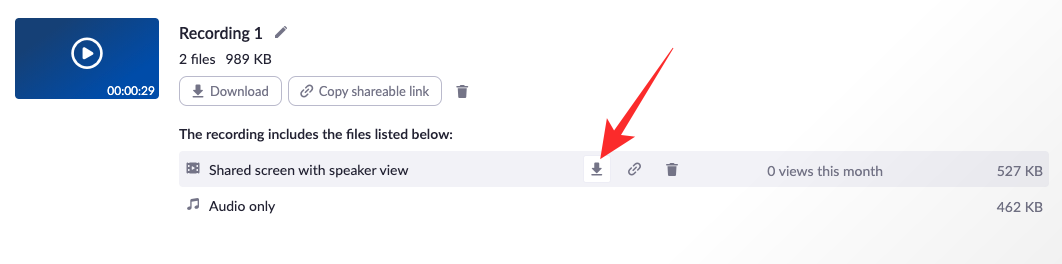
Similarly, you will have to click on ‘Shared screen with speaker view’ to get the screen share view.
Sharing is one of the biggest perks of cloud recordings. Just a couple of clicks and you would be able to share the files with people who matter. First, you will have to access the recording screen. Go to zoom.us and click on the ‘My Account’ button at the top-right corner of the screen.
Now, go to the ‘Recording’ option on the left of your screen.
As an alternative, you could use the desktop client to open the app. After launching the application, click on the Settings option at the top-right corner of the Zoom window.
On the left, click on the ‘Recording’ tab. Then click on ‘Manage’ under ‘Cloud Recording.’
When you get to the recording page, click on. the ‘Share’ button on the right of a recording.
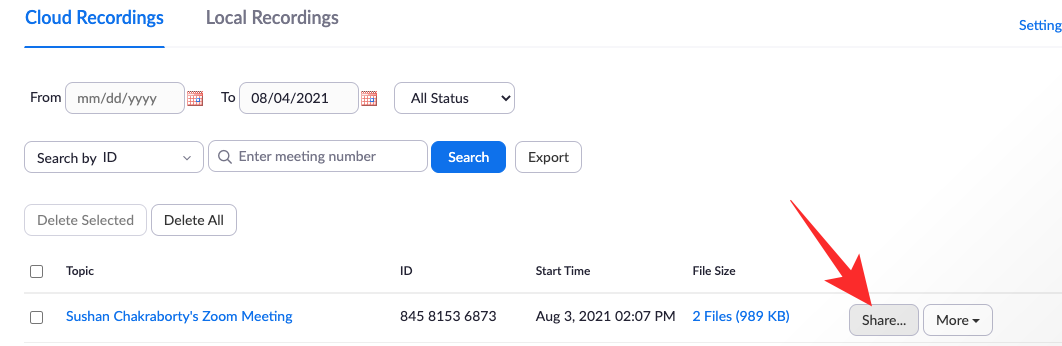
Click on it and then on ‘Copy Sharing Information’ to copy the sharing link to your clipboard.

Share with your colleagues to let them have a look.
How to delete cloud recordings
Once you have saved cloud recordings to your local storage, there is really no need to keep older recordings up on the cloud, especially if you have a limited plan. Having too many old recordings takes a significant toll on your storage, eventually preventing you from adding new recordings. So, to maintain sanity and peace of mind, be sure to click the delete button every once in a while.
First, go to zoom.us and click on ‘My Account’ at the top-right corner.
Now, go to the ‘Recordings’ tab on the left of your screen to see all the recordings.
Now, click on the ‘More’ button on the right-hand side of the recording.
When the overflow menu shows up, click on ‘Delete.’
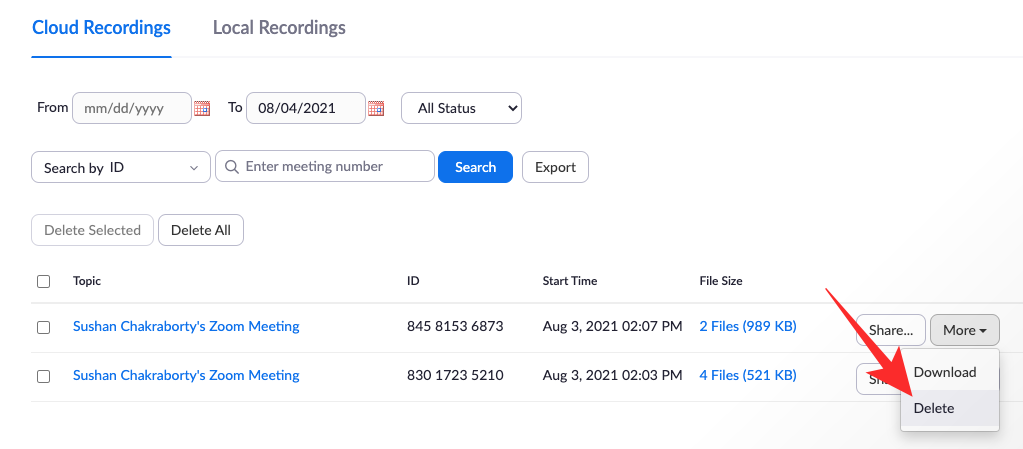
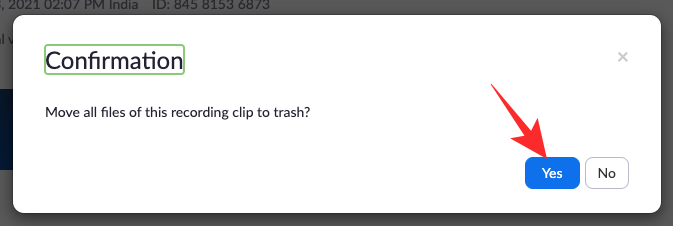
Confirm your action by clicking on ‘Yes.’

There will be instances when you have to conduct multiple recording sessions in a single meeting. When that happens, deleting all recordings at once may not be a good idea.
To avoid that, click on the name of the meeting to access all the recordings associated with it.
Now, click on the recycle bin icon on the right of the ‘Copy Shareable Link’ button to delete individual recordings.
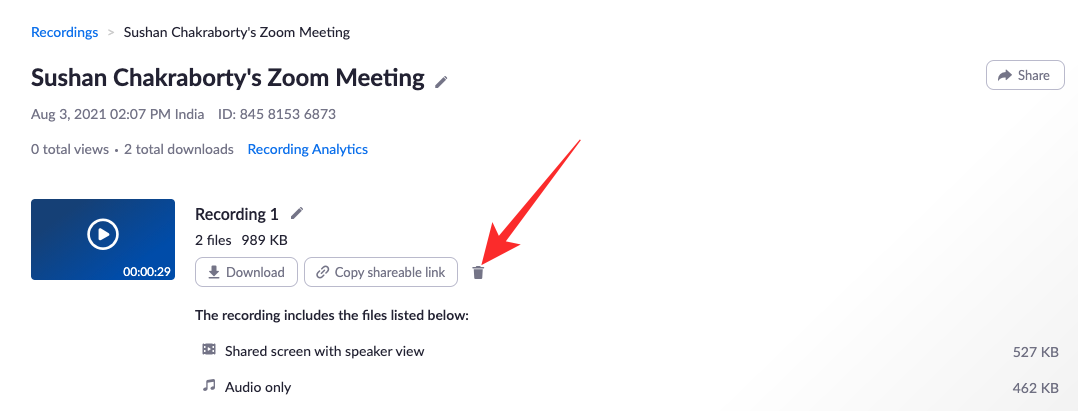
Click on ‘Yes’ to confirm.
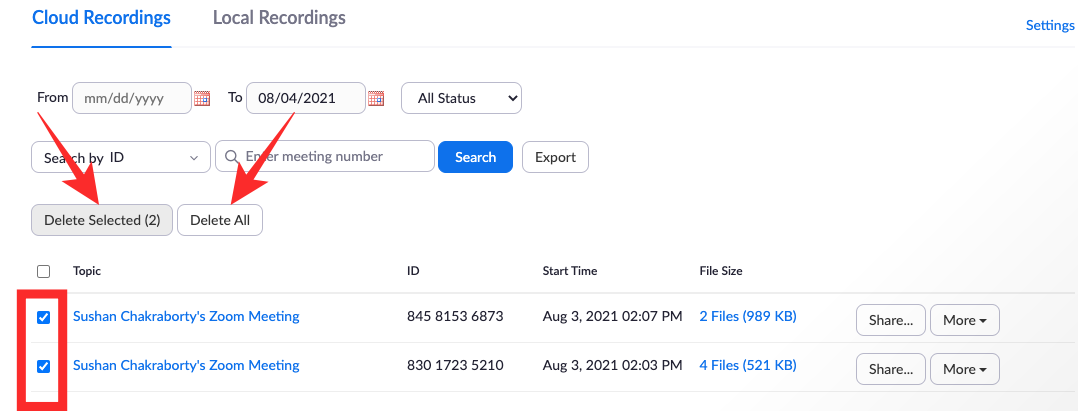
Finally, you could also select multiple recordings by selecting them and clicking either the ‘Delete Selected (number of selections)’ or the ‘Delete All’ button.
Is cloud recording secure?
Cloud recording on Zoom is as secure as any other cloud service out there. The recordings are not End-to-End Encrypted, unfortunately, but hackers will not have an easy time hacking into your recordings. As a host, you can encrypt your recordings with passwords and only allow access to people you know and are trustworthy. Without the passcode, no one would be able to access your recordings. All in all, cloud recording in Zoom is reliable and will not expose your trade secrets to the world, granted you keep your passwords secure and do not share them with sketchy individuals.
Zoom Cloud recording for free users
The host of the meeting needs to have a licensed account (pro and above) to be able to record the meeting on the cloud. Participants need not have a licensed account, meaning they will be able to view or download the recorded meetings once the host shares with them.
However, free users cannot record a meeting on the cloud.
But the free users can record a meeting locally on their Windows or macOS computer or laptop by simply pressing the Record button at the bottom in the meeting screen. However, they will need the host to allow it. The host need not have a licensed account for this either.
RELATED
- How To Add Pronouns to Zoom
- Does Zoom Notify About the Apps Installed on Your PC or Phone?
- How to Blur your Background on Zoom
- How To Add Zoom To Microsoft Outlook
- How to see everyone on Zoom on PC and Phone
- 12 ways to fix Zoom virtual background not working problem
- How to update your Zoom app on iPad, iPhone and Android phones and tablets?