
Windows 11’s recent release has brought along its fair share of controversies and debates. One of the main ones being around its inherent hardware and software requirements. This essentially means that though the OS at the base is compatible with 1GHz dual-core processors, the requirement for TPM, Secure Boot, and UEFI essentially means that you can’t use components released a few years ago.
A registry value called ‘AllowUpgradesWithUnsupportedTPMorCPU’ has come to light recently as it was endorsed by Microsoft itself, allowing user to circumvent the Windows 11 requirements. Let’s find out more about this registry value.
- What is the AllowUpgradesWithUnsupportedTPMorCPU?
- What happens when you use AllowUpgradesWithUnsupportedTPMorCPU?
- Is it safe to use AllowUpgradesWithUnsupportedTPMorCPU?
- How to use AllowUpgradesWithUnsupportedTPMorCPU?
- Alternatives to AllowUpgradesWithUnsupportedTPMorCPU (registry bypass)
- Is it safe to remove AllowUpgradesWithUnsupportedTPMorCPU after installing Windows 11?
- How to remove AllowUpgradesWithUnsupportedTPMorCPU
What is the AllowUpgradesWithUnsupportedTPMorCPU?
‘AllowUpgradesWithUnsupportedTPMorCPU’ is a new registry value created by your Windows 11 setup at the time of upgrade. If you found this value by chance then you were likely trying to update your system while booted into Windows. Editing this value manually can help you bypass compatibility checks during the upgrade process which can help you install Windows 11 on unsupported PCs.
However, you can create this entry manually in the speficied location in the registry (see below) and set its value to 1 to let system ignore the requirements for Windows 11. This way, you are able to install Windows 11 on unsupported hardware.
What happens when you use AllowUpgradesWithUnsupportedTPMorCPU?

Manually editing the ‘AllowUpgradesWithUnsupportedTPMorCPU’ value bypasses compatibility checks performed during the Windows 11 setup. Enabling the value allows the setup to upgrade your system even if you do not have TPM or Secure Boot.
This registry value is a background toggle for ‘Install Anyway’ that shows up on systems that fulfill basic compatibility but are missing either of the enhanced security features like TPM or Secure Boot.
Is it safe to use AllowUpgradesWithUnsupportedTPMorCPU?
For now, enabling, disabling, or deleting this registry value doesn’t seem to have any adverse effect on systems. After all, Microsoft themselves shared this little registry bypass so that people looking to try Windows 11 on their otherwise unsupported systems can do so.
The value seems to be created at the time of your setup and should be automatically deleted once you have upgraded to Windows 11. However, you can create it manually to force install Windows 11 on a unsupported PC.
You can manually delete the value as well after installing Windows 11. No bugs, crashes, BSODs have been reported yet when editing the ‘AllowUpgradesWithUnsupportedTPMorCPU’ registry value.
How to use AllowUpgradesWithUnsupportedTPMorCPU?
If you wish to bypass TPM and CPU checks when installing Windows 11 then you can use the ‘AllowUpgradesWithUnsupportedTPMorCPU’ using the guide below.
Option 1: Disable the TPM check-in Registry manually
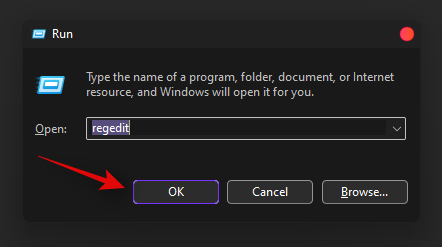
Press Windows + R on your keyboard, type regedit and then hit Enter on your keyboard to open the Registry Editor.
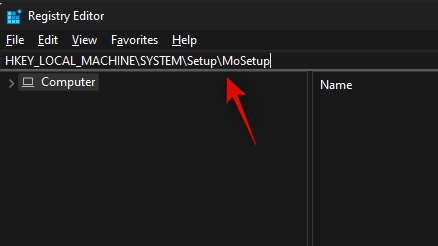
Navigate to the following path. You can also copy-paste the address below in your address bar at the top.
HKEY_LOCAL_MACHINE\SYSTEM\Setup\MoSetup
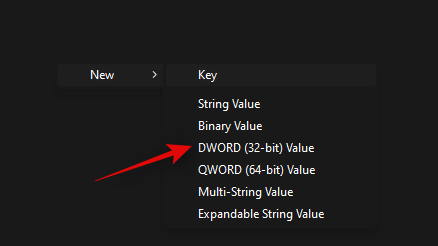
Now right-click on the empty area on your right and select ‘New’.

Select ‘DWORD (32-bit) Value’.
Enter the following name for your new value and press Enter on your keyboard to confirm the changes.
AllowUpgradesWithUnsupportedTPMOrCPU
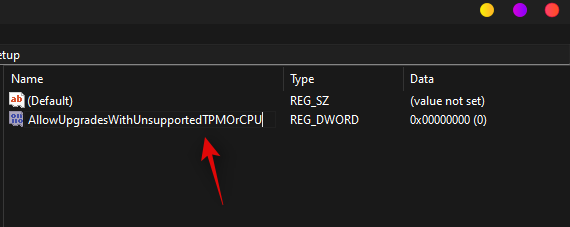
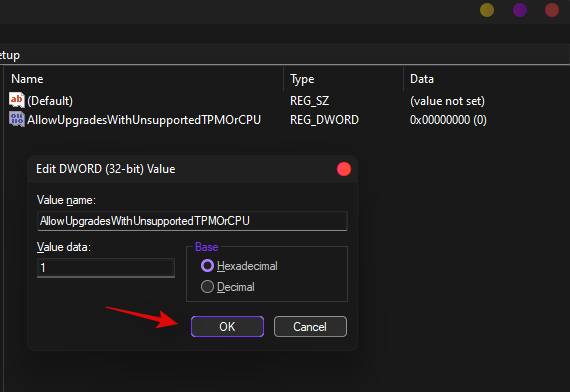
Double click on the newly created value and enter ‘1’ as your Value Data.
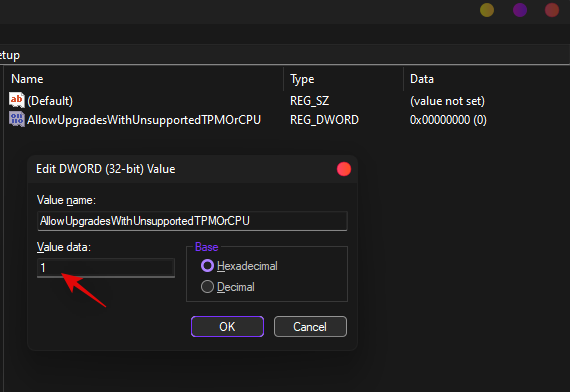
Click on ‘Ok’ to save your changes.
You can now install Windows 11 on your system and you should no longer be restricted during the setup.
Option 2: Disable the TPM check-in Registry automatically with a registry script
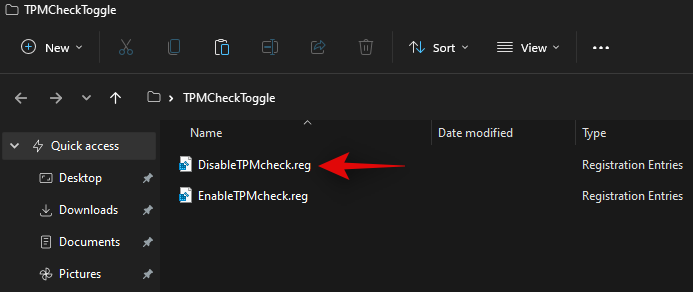
If you wish to edit your registry values automatically then you can simply use the file linked below.
- TPMCheckToggle | Download Link
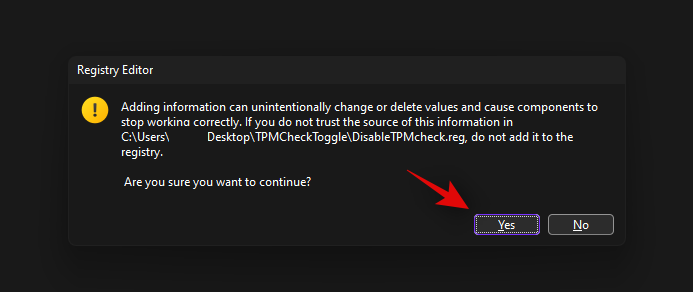
Download the file on your PC and run the ‘DisableTPMcheck’ file.
Click on ‘Yes’ to confirm your changes.
You can now install Windows 11 on your PC and you should no longer be restricted due to TPM requirements. If you ever wish to revert your changes, simply run the ‘EnableTPMcheck’ file in the .zip archive linked above.
Next step: Upgrade to Windows 11
You can now easily upgrade to Windows 11 without worrying about the TPM check. You can install Windows 11 using either of the two methods given below:
- Method #01: Install Windows 11 using Windows 11 Installation Assistant
- Method #02: Install Windows 11 using the ISO file
Alternatives to AllowUpgradesWithUnsupportedTPMorCPU (registry bypass)
Alternative 1: If you don’t like to play with registry or its entries, you can bypass the system check for TPM and Secure Boot by simply removing a file called appraiserres.dll from Windows 11’s ISO and then use it to install Windows 11 on any unsupported PC. See the guide link right below.
Read: How To Remove or Replace appraiserres.dll in Windows 11 Setup
But wait, there’s more.
Alternative 2: If removing the appraiserres.dll manually is also too much for you, then you can use Rufus (version 3.16 beta2) to create a Windows 11 bootbale USB drive that will ignore TPM and Secure boot requirements and let you install Windows 11 on unsupported hardware. Once you have the bootable drive made with this method, you can can install Windows 11 through BIOS/UEFI by using this guide. So, it’s a two-step process:
- Create bootable Windows 11 USB drive with Rufus 2.16 BETA2 that ignores system requirements (guide)
- Install Windows 11 using the bbotable USB drive you created above (guide)
Is it safe to remove AllowUpgradesWithUnsupportedTPMorCPU after installing Windows 11?
Yes, it is completely safe to remove the ‘AllowUpgradesWithUnsupportedTPMorCPU’ registry value after you have upgraded to Windows 11.
How to remove AllowUpgradesWithUnsupportedTPMorCPU
You can manually delete the file, or use the registry file linked above to delete the ‘AllowUpgradesWithUnsupportedTPMorCPU’ registry value from your system. Navigate to the path below and delete the registry value for the same on your right.
HKEY_LOCAL_MACHINE\SYSTEM\Setup\MoSetup
Alternatively, you can also use the ‘DisableTPMcheck’ registry script given above to automatically delete the value from your system.
We hope this post helped you learn more about ‘AllowUpgradesWithUnsupportedTPMorCPU’. If you face any issues or have any more questions, feel free to drop them below.
Related:


2 responses to “allowupgradeswithunsupportedtpmorcpu: What is it? How to Use & Easier Alternatives”
Hi,
I thought I would mention that it looks like the word “windo” is spelled incorrectly on your website. I’ve seen some tools to help with problems like this such as SpellAlert.com or WebsiteChecker.com. I just thought you should know!
-Amanda
It’s throws the same error after putting the key in, even after reboots and editing using admin privs. What gives?