
- What to know
- How to rename files using PowerRename
- Step 1: Install Microsoft PowerToys
- Step 2. Enter the text to search for files
- Step 3. Add replace with text
- 3. Select what part(s) to change
- 4. Choose what is included (files, folders and/or subfolders)
- 5. Apply Text formatting and enumerate items
- Step 6: Perform the rename
- FAQ
- Can I reverse the changes I made using PowerRename?
What to know
- PowerRename is one of the tools within the larger suite of PowerToys utilities, designed specifically to give you more renaming options over the basic Windows renaming function.
- With PowerRename you can search for files using different parameters, replace their text, and rename the files in bulk.
- PowerRename lets you quickly search and rename filenames and their extensions, rename files and folders within folders, add timestamps, and change text formatting.
- Find our detailed step-by-step guide to use PowerRename below.
PowerToys is one of the finest utilities to get to improve upon your basic Windows experience. Comprised of multiple tools and features, PowerToys fills in the gaps that are not addressed natively, such as key mapping, text extraction, edit registry files easily, image resizing, highlighting mouse clicks and mouse location even, and much more.
PowerRename is one such toy that lets you rename files in bulk, specify their identity by using search parameters, change capitalization, add numbers, year and date, etc.
The following guide will illustrate how you can go about using PowerRename and how each of its options can come of use in your everyday Windows use.
How to rename files using PowerRename
PowerRename is not meant to replace the basic ‘rename’ function of the File Explorer. It is meant only to add on top of it and give you additional renaming options, like sifting through a mountain of files and renaming them based on search patterns, changing text formatting, and applying changes to subfolders and files, in bulk.
Step 1: Install Microsoft PowerToys
Firstly, download and install PowerToys if you haven’t already. To know more about how to get PowerToys, refer to our guide on How to install PowerToys on a Windows PC.
Within the PowerToys utility, make sure that PowerRename is enabled and is visible in the default and extended context menu.

Thereafter, follow the steps given below to start renaming your files with PowerRename.
Step 2. Enter the text to search for files
Firstly, open File Explorer and navigate to your files. Select your files, right-click, and select PowerRename.

This will open them in the PowerRename window where we will apply all the different renaming options.
2.1 – Use simple text
To search for text in filenames, type them in the “Search for” field.
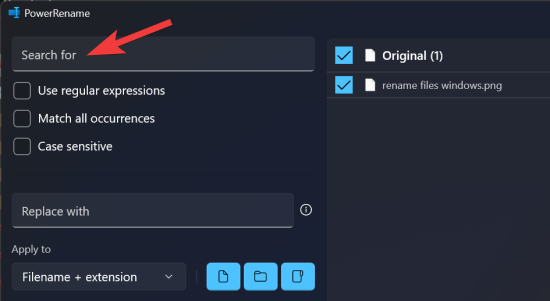
The same will be highlighted on the right.

Below the search field, there are three different search parameters that you should know about.

2.2 – Use regular expressions
If you’re a programmer, you might already be familiar with this, since the ECMAScript grammar used by PowerRename is common among coding languages. Simply put, regular expressions define the patterns that are to be used to manipulate and edit the terms of your search.
So, for instance, if you use the expression ^ and follow it with a word, that lets you find filenames with text that begins with that word.

Or if you use the expression $ at the end of a word, that lets you find files that end with it.

Similarly, you can use any regular expression to define the search pattern. There are many such regular expressions, and they can be added on top of each other to make the search definitions as precise as you want. Listing all of these is an impossible task. But we’ve added a small list of regular expressions examples that might inform your search pattern:
| Search expression | Result match |
| ^ | Start of the filename |
| $ | End of the filename |
| .* | All text in the filename |
| ^friedman | Text that begins with “friedman” |
| song$ | Text that ends with “song” |
| ^fried.*man$ | Text that starts with “fried” and ends with “man” |
Do take note of whether you’re applying your search results to filenames or their extensions. Depending on your query, you may have to adjust these. Refer to section number 3 for more.
2.3 – Use ‘Match all occurrences’ if needed
The ‘match all occurrences’ option is what lets you change and replace all matches of the search results in bulk.

Without it, any changes you make will apply only to the first occurrence. So make sure you keep this option checked if you want to make changes in bulk, especially when you’re using regular expressions for search.
2.4 – Use ‘Case Sensitive’ if needed
The ‘case sensitive’ option lets you further specify search results based on their text formatting. With it, only text that has the same letter casing (uppercase or lowercase) as your search term comes out as a match.

Step 3. Add replace with text
To replace the text in the filenames, simply type your words in the “Replace with” section and check the preview under the ‘Rename’ column on the right.

If you keep the ‘Replace field’ empty, the text that you’ve highlighted with Search will be deleted in the filename.

This is because when there is no replacement text, PowerRename considers it as replacing something with nothing. So, if you want to delete the text in filenames, simply leave this field blank.
Tip: Add creation date and time
You can also add timestamps to the filenames or use them to replace text in them. To add timestamps to your files click on the ‘i’ button next to ‘Replace with’.

And select from the list of options to add the creation date/time.

Your chosen timestamp will be added and shown in the preview on the right.

You can add timestamps by year, month, day, hours, seconds, and milliseconds, and add as many of these as you like.

3. Select what part(s) to change
Any changes made can be applied to either the filename or its extension, or both. To specify this, click on the drop-down menu under “Apply to”.

And choose between ‘Filename only’, ‘Extension only’, and ‘Filename + Extension’.

When you’re searching for files, do take note if it applies to the filename, its extension, or both. If you’re only looking for text within the filename, then select ‘Filename only’. Or if you’re changing the extensions, select ‘Extension only’. Similarly, depending on what you want to replace, you can apply the changes to your search results and replace the text accordingly.
4. Choose what is included (files, folders and/or subfolders)
By default, all changes are applied to include files, folders, and subfolders. But you can pick and choose whether you want to apply the changes to only the files, the folders, or both, and if you want to include subfolders as well.

If you like, you can click on these to turn them off and only make changes to the file or folder that you have selected.
5. Apply Text formatting and enumerate items
Changing the text formatting of the file names lets you switch between uppercase and lowercase for characters and letters.

We’ve dedicated a full guide on how to do this with PowerRename so make sure you check that out as well.
Step 6: Perform the rename
Be sure to preview the output reflecting on the right side of the PowerRename window to make sure the changes are exactly how you planned it. When you are sure about it, make the changes by using the Apply button. (Without this, no changes will be made.)

That’s all.
FAQ
Let’s take a look at a few commonly asked queries about using the PowerRename tool in the PowerToys program.
What is ‘Case sensitive’ on PowerRename?
When searching for files, the ‘case sensitive’ option lets you find the exact match, such that only the results that match the upper/lower casing of the text are displayed. This is helpful when there are files by the same name but different text formatting and you want to find exactly the ones that you search for.
Where is PowerRename in the context menu?
If you’ve enabled PowerRename to appear in the default context menu, you should see it appear when you right-click on a file. If you don’t see it there, click on ‘Show more options’ and then select PowerRename.
The PowerRename toy within the set of PowerToys utilities is a massive add-on to the basic renaming function on Windows. It is ideal in situations when you have tons of files to deal with, especially with similar titles, and speeds up renaming and classifying files and folders. We hope this guide proved useful to you in learning how to use PowerRename to rename files on Windows. Until next time.
Can I reverse the changes I made using PowerRename?
Well, PowerRename doesn’t have such an option. But you can do it manually. You can try do a reverse replace by simply replacing the text in the “Search for” field with the text in the “Replace with” field and vice versa. Adjust the other parameters if need be but for simple replace, this should do the trick.

Let us know if you need any help with replacing text in filenames and folder names on Windows using PowerRename.
RELATED
- Best New and Upcoming Features in Windows 11 [June 2023]
- 8 ways to repair Windows 11 using Command Prompt (CMD)
- How to Remove Bing From Start in Windows 11 or 10
- God Mode in Windows 11 or 10: What is it, why and how to use it
- Customize Windows 11 in 20 ways: Step-by-step guide
- Windows 11 Widgets not working? 15 ways to fix