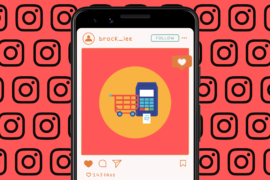
Beyond connecting to your friends and family, Instagram also hosts a shopping platform for sellers and brands looking to establish new sources of revenue. For users, shopping on Instagram gets you one step closer to your favorite brand so that you can browse through different items that you wish to buy and move on to purchase within a few taps.
Instagram is now making the ability to purchase products much easier for customers and less cumbersome for sellers by introducing its newest feature – Checkout on Instagram. In the following post, we’ll discuss Instagram Checkout in all of its entirety, from learning what it is, how it works, buying items, and selling your product as a brand. We’re also providing some helpful tips on how you can strengthen your Instagram business by utilizing this new feature and some more information.
Related: How to stop being added to groups on Instagram
What is Checkout on Instagram?

Checkout is Instagram’s own payment feature that lets users pay for products within the social media app. The feature was introduced in March 2019 but until now it was only available in closed beta for select brands and businesses. Facebook has now announced that it’s expanding the availability of Instagram Checkout to all eligible sellers in the US.
Instagram Checkout will be available for sellers who have set up shop using Facebook Commerce Manager, Shopify, or BigCommerce. The company has also revealed that it will be waiving selling fees for businesses until the end of 2020 so that businesses can reduce costs for selling online owing to the current economic crisis.
Related: How to Turn off Instagram DMs
Who is it for?
Checkout will help both buyers and sellers on Instagram. Potential buyers will no longer need to leave the Instagram app to complete a purchase when buying something within the social media app. Additionally, users will be able to save their payment credentials on Instagram doing future purchases quickly and efficiently.
Similarly, businesses and brands will have an additional platform for hosting and their products on Instagram. Sellers can leverage Checkout alongside Instagram’s ecosystem of shopping tools to build brand awareness and direct transactions without forcing users out of Instagram.
Currently, Checkout for Instagram is only available for users in the US. This means only buyers and sellers in the US can take advantage of the in-app payment system on their Instagram app.
Related: How to put multiple pictures on Instagram story
Why should you use Checkout on Instagram?
As explained above, Checkout on Instagram benefits both sellers and buyers.
If you’re a user, you can use Checkout on Instagram for:
- Buying products easily without ever leaving the Instagram app
- Shopping directly by clicking on a brand or influencer’s post
- Paying for the products securely and conveniently
- Storing your payment credentials safely for future transactions
- Avoiding being redirected to brand websites and their sign-up processes
If you’re a seller and you’re wondering how Instagram Checkout will benefit you, then you should know that the feature:
- Expands your business by one more platform
- Directs potential buyers into purchasing your product without doubt as Instagram is hosting the payment process
- Allows content creators and influencers to link your products on their posts to drive your business
- Lets you convert users from browsing to purchasing within a few taps
- Drive users to buy your products directly from your Instagram feed
Related: What Happens When You Temporarily Disable Instagram?
How to buy a product using Instagram Checkout
After you find a product you like, you can now buy it without leaving the Instagram app using the inbuilt Checkout feature.
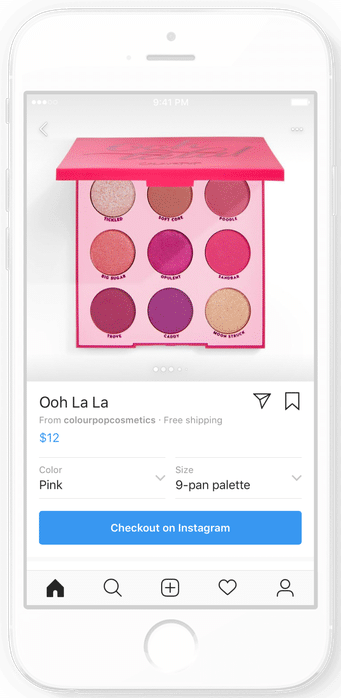
Buying a product with Instagram Checkout
To do so, tap on the post you saw the product on, and if there’s a product linked to it, you will see a ‘Shopping bag’ icon at the bottom left corner of the product picture.
Tap on the picture again to see the price tags of different products and select the price tag of the product you wish to buy. When you do, you will be taken to the product landing page where you can personalize the specifications of the item like color and size as per your requirement.
Once you have selected your preferences, tap on the ‘Checkout on Instagram’ button (colored in blue) at the bottom if you wish to pay for the product directly on Instagram. Repeat the steps for other products you wish to purchase using Instagram Checkout and after that, tap on the ‘Proceed to Checkout’ button. You will now be asked to enter your name email, and shipping address, and after that is taken care of, you can tap on the ‘Next’ button.
Inside the Checkout screen, you will be able to see the total amount that you’d need to pay for the product. Here, you can select the type of shipping you prefer and enter your billing information for the payment to take place. Once these details have been entered, you can finalize the purchase by tapping on the ‘Place Order’ button and completing the payment process.
If you’re purchasing for the first time, Instagram will now save your information securely for the next time you shop. Details regarding the shipment and delivery of your order will be available directly inside the Instagram app. You will be sent timely notifications on the shipment so you can keep track of it anytime you wish to.
Related: How to cancel an upload and stop an Instagram post from sending?
Adding a new payment method for Instagram Checkout
You can add more than one payment method for purchasing products through Checkout on Instagram. To do this, go to your profile, tap on the 3-lines button (hamburger button) at the top right corner of the screen and select ‘Settings’.
In the next screen, tap on the ‘Payments’ button, select Payment Methods, then tap on either ‘Credit or Debit Card’ or ‘PayPal’ and add your new payment info.
Related: Is There Any Way To See How Many Times Someone Views Your Instagram Story?
Creating a PIN for Instagram Checkout
To prevent unauthorized transactions from your account, Instagram lets you add a PIN for easy and secure checkout which you can do to make future transactions on its platform.
You can set a PIN to shop using Instagram Checkout by going to your profile > Hamburger button > Settings > Payments. In the Payments screen, tap on the ‘Security PIN’ option and follow the on-screen instructions to create and set a PIN for Instagram Checkout.
You will be asked to enter this PIN whenever you’re purchasing a product through Instagram Checkout next and you can also change or turn off your existing PIN anytime you want to.
Related: ‘No Posts Yet’ on Instagram: What does it mean and why is it appearing for you?
Changing your delivery address for Checkout
You can add multiple delivery addresses when buying products using Instagram Checkout. For adding a new delivery address to Checkout, go to your Profile > Hamburger button > Settings > Delivery Info. Inside Delivery Info screen, tap on the ‘Add Delivery Info’ option to add a new address other than your current list of addresses and then tap on the ‘Done’ button.
You can also edit your existing addresses using the same technique and also set one of the addresses as the default option for future orders.
How to sell using Instagram Checkout as a seller
If you’re a seller and want to take advantage of Instagram Checkout to sell products, then you need to consider going through the following steps.
Check if you’re eligible for Instagram Checkout
Before you can set up Instagram Checkout, you need to make sure that you meet the following requirements:
- You’re located in a region that supports both Instagram Shopping (check eligibility here) and Checkout (only available in the US)
- You comply with Instagram’s Terms of Use and Community Guidelines
- You make sure that your professional account represents your store and that you have verified your Domain
- You have maintained a sufficient follower base and demonstrated trustworthiness
- You have clearly displayed product information and its refund and return policies
Related: How To Remove Or Hide Reels On Instagram. Can You Get Rid Of Reels Completely?
Sign up for Facebook Catalog Manager and Instagram Shopping
After you have confirmed your eligibility for Instagram Checkout, you need to sign up for Facebook Catalog Manager by clicking here. Once that’s done, you can sign up for Instagram Shopping by opening your Instagram app and going to Settings > Business > Shopping on Instagram.
You need to have a Business account on Instagram to do this which you can enable by going to Settings > Account > Switch to Professional Account and then selecting ‘Business’ in the next screen.
Add products to your Instagram shop
Before creating posts with shoppable tags, you will have to first add products to your catalog. To add products and collections to your shop, head over to your Business profile on Instagram, and tap on the 
Create a Shopping post for tagging products from your catalog
Once you have signed up for hosting Instagram Shopping, you can now start creating shopping posts or add product tags and stickers to your already posted Stories and Posts. To tag a post with a product from your catalog, tap ‘Tag Products’ and select the highlighted product.
You can add up to five products per picture and a total of up to 20 tags in a multiple-picture post. Product tags can be added to both new and old posts. Instagram Stories, on the other hand, only allows one product sticker per story.
Apply for Instagram Checkout
Now that you have created shopping posts, you can apply for Instagram Checkout to start processing payment within Instagram. The platform has partnered with PayPal to enable payment services inside Instagram Checkout. To apply for Instagram Checkout, click here, sign in with your Instagram Business account and fill out the application form provided on the page.
Once you have enabled Instagram Checkout, all the products in your catalog will be routed to payment via Instagram’s own payment service when a user is buying an item.
Related: How to get famous on Instagram Reels
Tips to make the most out of Instagram Checkout
While Checkout on Instagram will surely help you boost the sale of your products, you can consider the following tips to make sure you benefit from the service.
Add as many product tags as you can
The more posts you upload with shoppable tags, the more it will look pleasing for viewers when they’re going through your profile. Users will also be able to find your products better and buy them within a few taps on your profile. Once your products get enough visibility, your shop will be seen as a reliable source for purchasing items.
Related: Best Instagram Stories Viewer And Saver Apps And Websites
Create Instagram Stories with shoppable stickers
If you own a shop on Instagram, posts, and product catalog aren’t the only means to share content. You can also upload Instagram Stories to your profile and use shoppable product stickers to your story so that users can go to the Purchase screen directly from it.
Product stickers on Stories are what Shoppable tags are to posts on Instagram as they will act a direct means to buy your products. Since Stories are what your followers first interact with upon opening the Instagram app, creating constant stories with product stickers can be a decent way to drive sales.
Check this Instagram support page to learn to add product stickers to your Instagram stories.
Run an Instagram shopping ad with Checkout
Besides tagging products via posts, Instagram lets you share shopping posts as ads for users to discover and engage with products. Sellers can then enable Checkout on Instagram for these adverts so that potential buyers can proceed to purchase from directly within the app.
To run an Instagram Shopping Ad with Checkout enabled, open the Ads Manager and tap on ‘Create’ and select an objective for your ad placement. This could be anything between post engagement, conversions, brand awareness, reach, and link clicks. Once you have selected the objective, choose your audience, and placement.
You will be asked to select a post to run as an ad. Select the preferred Shopping post and check the ‘Checkout’ box to make sure that your ad is enabled with Instagram Checkout. Complete the ad creation by following the on-screen instructions.
Welcome content creators and influencers to promote your products
Instagram’s main pull is its slew of content creators and influencers. Ever since Instagram started allowing these artists the ability to use shopping tags just like brands, sellers have started driving their sales through influencer marketing on the picture/video sharing platform.
If you wish to take full advantage of Instagram Checkout, you must partner with influencers, celebrities, and content artists and push them to add product tags from your catalog on their posts. Since Instagram now allows users to purchase anything within a few clicks, buyers can easily order your product with ease, thus getting you more exposure.
Host exclusive product launches on just Instagram
Instagram is also allowing sellers who have signed up to Checkout on Instagram to set up exclusive launches for their products. By setting up exclusive product launches, you can gain more visibility and you’ll be able to give your audience a better shopping experience. Brands and sellers will also send regular reminders to their followers and reward those who stay up to date on your product release.
When you set up your new and upcoming product for an exclusive launch on Instagram, people can know more about your product through Stories, Feed, your product catalog, push reminders, and from creators, you’ve partnered with. You can learn more about how to create a Product Launch on Instagram from this support page.
Add links to your own shop for better visibility
While Instagram Checkout should be one more way of getting people to buy your product, you should consider it an additional source of the sale. To drive your product sales, you must also provide details about your products through other means, most importantly through your own online store.
You can try hosting your new and popular products with Instagram Checkout and provide a link to your shop in your profile bio will do a lot more good toward bringing visibility to your brand.
Checkout on Instagram: FAQ

If you still have some doubts reserved about using Checkout on Instagram, the following section should help resolve your queries but don’t think twice before shooting one to us. We’ll help you sort out your doubts as well.
Can everyone use Checkout on Instagram?
Instagram Checkout is available for both sellers and buyers signed in to Instagram, provided both of them are in the US. This means you can only sell products as a brand or a seller if you’re in the US and the same applies to you if you wish to buy something using Checkout on Instagram.
Apart from that, any user will be able to buy items using Checkout if they have provided the right payment information for processing their transaction.
Do sellers need to give Instagram a fee for using Checkout?
Yes. Instagram does charge sellers for using Checkout through Commerce Manager. You will be charged 5% per shipment or a flat $0.40 for shipments of $8.00 or less and this applies to all checkout transactions across any product categories.
However, Facebook has waived off the selling fee for all orders shipped until December 31st, 2020. To know more about the selling fee for using Instagram Checkout, look at this page.
Can my followers see what I purchased on Checkout?
No. The products you buy using Instagram Checkout will only be visible on your Instagram account and no one else’s. What you buy on the platform won’t get posted on your followers’ feeds or inside your profile.
How is Checkout different from Instagram Shopping
Checkout on Instagram works in such a way that you can only buy the products that show both 
Similarly, you can only track the shipment and delivery information of items purchased through Instagram Shopping on the seller’s own website, unlike the case when using Checkout. If you’re paying for order through Checkout, you will also be able to track its shipment progress within the Instagram app.
Additionally, it’s important to note that only purchases made through Instagram checkout are covered under the Purchase Protection Policy which handles refunds, returns, and other claims through Instagram.